Don’t pour wine in your MacBook Pro, Picasa tutorials from Debbie T at splashofstyle.com, Mailplane application for your Gmail at mailplaneapp.com. HDA Bob brings me a vintage vibration tachometer, RapidWeaver for easy web design at realmacsoftware.com, Bart on Tinkertool at bartbusschots.ie. Don’t buy a USB wireless dongle, but the Buffalo wireless ethernet converter: Circuit City.
Subscribe: 
Listen to the Podcast Once (42 min 06 sec)
A technology geek podcast with an ever so slight Macintosh bias. Today is Sunday, August 26th, 2007 and this is show #109.
I’m having a BAD week guys – on Friday night after watching a movie I still had half a glass of wine left, and as I got up to go to bed, I knocked it off the side table and into my laptop! I know, you’re wondering why I had wine left over, but try to focus, would you? I quickly flipped i upside down, and Ron rushed over with a wad of kleenexes, and we cleaned it off upside down as best we could. I left it hanging upside down on a towel (open) over night, and when I got up in the morning, the keys were cross-mapped in a lot of cases. Kind of a fun adventure, because you never knew what you were going to get when you poked a key. My favorite was hitting command-tab, which is supposed to switch to the next application, instead it would launch Front Row. Space bar is fun too, it enters “=/” instead. Return enters delete, and delete triggers Exposé. As much fun as all that was, I didn’t think it would be all that functional in regular working environments.
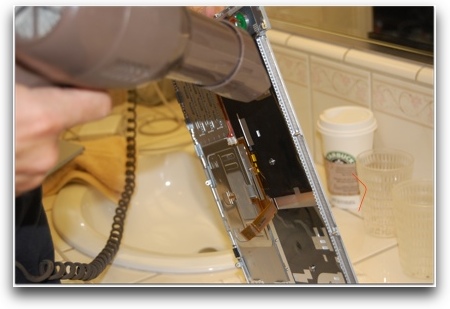
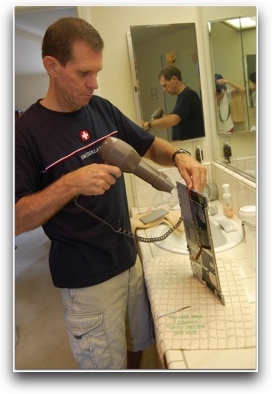 So Steve and I took the keyboard out and ran a hair dryer over the inside, but you really can’t get to the back of the keys. They have a black plastic sticker over the metal back behind the keys. We found some vents into there, so we toasted it all over in there. Tried it again, no change. Toasted it outside in the sun on top of the hot barbecue for a while, no change. Finally started calling around for help. The really good place I’ve been to before had a good price ($125) but they’re an hour and a half away, and i’d have to go there twice! argh. Went to a close place, but they’re not an authorized Apple repair place, and they’re price was way higher. they said they charge a minimum of one hour labor ($85) even though it takes a little under five minutes to remove the 21 screws to get the keyboard out!
It’s under AppleCare, and even if I confessed about the wine, I bet they’d do it for free, but I’d be out of the machine for about 3-5 days! So then my friend Pat suggested looking for a keyboard online – and I found one on eBay for $50, supposedly brand new, from a very reputable seller. I bought it! Will probably get here mid week. And then I woke up Sunday morning and the keyboard is almost 100% fine! The only key that’s not functioning is the up arrow, which I use more often than you would think. So, the lesson learned here is to buy a new one very quickly when something looks broken and then your original item will magically heal out of fear of being replaced. I thought about telling the guy that I wanted to back out on the deal, but I decided to let it ride. I may go ahead with the new one if the arrow key doesn’t heal itself soon.
Picasa tutorials from Debbie T
I have a tip for the Windows folks out there this week. My friend Debbie has a father who’s getting into using his computer for some fun stuff, and he requires some assistance. Debbie thought it would be cool to create tutorials for him online, and she decided to share them with all of us. She’s been teaching him to use Picasa, which is a fabulous photo organizing tool for Windows. He wanted a way to get photos out of his camera and into Craig’s List, so that’s part of the point of her tutorials. She’s got four of them up already, first it’s “Importing Photos from Camera Using Picasa”, then “Resizing Photos With Picasa 2”, “Include a Photo with Craig’s List Ad”, and finally “Sharing Photos Online – Choosing an Online Photo Management Service”. Soon she’s going to explain how to upload to picasaweb and flickr and link to your photos from other locations, like blogs or discussion forums.
If you or someone you know is looking for a good photo management tool on Windows, or decided on Picasa and want some really well written tutorials on what you can do with it, I think you’ll find Debbie’s tutorials very helpful. Check them out at splashofstyle.com.
Debbie also has tutorials on how to configure a Linksys router, CSS and Web Design (I should read that one!) digital photography, and assorted Mac tips.
Mailplane
Listener Ryan (who also made my GORGEOUS logos for the show) sent me an invitation to an interesting piece of shareware called Mailplane. Mailplane’s objective is to allow you to have all of the benefits of Gmail but in a local client. I watched the video, and I don’t completely understand the objective. It seems to me that I can access my Gmail using Apple Mail, so what could Mailplane do for me that Apple Mail doesn’t? I set out to find the answer to that question.
Mailplane is in beta right now, but when released it will be shareware. When Mailplane is first launched, it asks you to set 3 preferences – if you accept what they suggest, these are the three things that will change. Mailplane will become your default mail application, you’ll install an iPhoto plugin so if you hit the iPhoto Mail button it will launch iPhoto, and finally it will check for updates automatically. I wasn’t ready to commit to Mailplane just yet, so I didn’t choose the first two options, but I did let it do its updates.
Next, Mailplane asks for your Gmail address and password, and in just SECONDS, the Mailplane window lookS exactly like real Gmail! A warning came up though, saying that the Google account setting “Keyboard shortcuts” is off. Not really sure what that is, but I was assured that things would be hinky if I didn’t fix it, so I said I’d go along with it. It automatically opened my Gmail settings (still in Mailplane) where I can turn those pesky keyboard shortcuts back on. It’s pretty spooky how much this thing works like Gmail – I clicked the link to learn more about the keyboard shortcuts, and it opened the Gmail help center, all still within Mailplane.
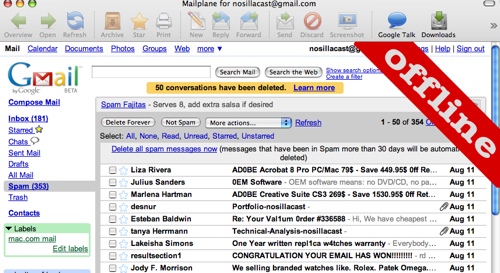
I started dinking around in my Gmail on Mailplane, and then to figure out what’s really going on here, I turned off my wireless connection. Instantly Mailplane put a big red diagonal banner across the upper right side of the window saying “OFFLINE”. You couldn’t possibly miss it! The ability to read and create emails while offline would be great! that is, if Mailplane could do that. As soon as it went offline, all buttons, links, emails were dead. Nothing was clickable at all on the page, it was almost like it became a graphic image. As soon as I reconnected to the network, everything became live.
Ok, still looking for how this is different from “real” Gmail. I found one cool feature – Google Talk isn’t available for the Mac yet, but you can access it through a web browser. I have my home page set to google.com/ig, which is a tailorable page, and I added Google Talk to it. But with Mailplane, there’s a Google Talk button and it launches what sure looks like a real chat client to me. I was very excited about this until I figured out that if you have Google Talk in your google/ig, you can click a button and it becomes a standalone window…just like the one in MailPlane.
I added a friend of mine to the buddy list, and it worked fine. I noticed that if you click on the field to enter an email address to search for Google Talk, it has already prepopulated with all of your email addresses from your Apple Address Book. Pretty cool! I thought I’d see how well integrated the Apple Address Book was in the Mail part of Mailplane, only to find out that it isn’t in there at all. Since i haven’t created a lot of emails from within the web-based Gmail, I only had 25 contacts. Why would they let Google Talk see your Address Book and yet not make it available for Mailplane?
In Gmail, to add an attachment you have to use the little paper clip and then navigate to the file using the browse button. An advantage of Mailplane is that you can use drag and drop to add an attachment. Nice. But then again, if I was getting my Gmail in my Apple Mail, I could do that in there too.
Mailplane does support Growl, and if you’ll remember my long series on Growl-enabled applications, you know I love Growl! Whatever happened to that series anyway? I don’t think I ever finished that, did I?
Mailplane lets you resize images like you can in Apple Mail, but you do it at a global level instead of mail by mail, which I don’t think is quite as good – if I know I’m sending to someone on dialup I might go for the smallest option, but for a friend on broadband I might go much bigger.
As I struggled to figure out what advantage Mailplane offers, I think I finally figured it out. You can access Gmail from Apple Mail and get all the advantages of Apple Mail, or you can work in a web browser and get the advantages of the Gmail interface. What I think Mailplane offers is the best of both worlds. You get most everything Apple Mail gives you but combines it with the clever interface and design of Gmail in a browser. not all the functions were working for me – there are buttons to archive or store emails, and also to create a new email, but all three did nothing when I clicked them (even if I did have emails selected), but it IS a beta product so that’s not such a big deal.
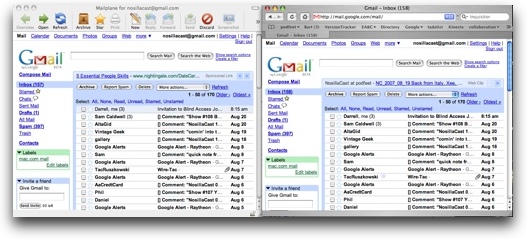
Mailplane is an interesting application and I’m pretty sure there might still be something I’m missing about this application. I included in the shownotes a picture of Mailplane and Gmail side by side so you can see how identically they’ve replicated the software. If you’d like to check it out during the beta, head on over to mailplaneapp.com.
As I mentioned, I got the tip to Mailplane from artist Ryan Sakamoto, and you can check out more of his marvelous artwork at graphicforce.net.
HDA Bob
Time for a word from our sponsor. You know I write my own ads for Honda Bob – I do that because it’s actually easier than reading a repeating script. Ever week I’m thinking, man, how am I going to come up with something new to say about my mechanic? If you haven’t been playing along with our home game, you will want to know that Honda Bob has been my mechanic for the last 29 years. He actually DRIVES to my house to fix my car, and not just because I’m a long standing customer. He does that for EVERYONE. Well, everyone who drives a Honda or an Acura and is smart enough to call him for service in the Los Angeles Area. Bob is trustworthy, intelligent, and hard working, what more can you ask for in a mechanic. I should watch what I’m saying, he listens to the show and he’s probably getting a swol’ head with all this praise. This week he stopped by the house just to say hi, so we punished him by making him watch our home movie of the trip to Italy. Two hours worth and he was so polite as to pretend he enjoyed it!
Bob also brought me a really cool antique – the kind only a girl like me would appreciate. It’s a vintage vibration tachometer from Stewart-Warner. Basically it’s a thin metal rod that slides out of a sheath, and as it slides it moves a red indicator along a scale. Here’s how it works and what it does. You’ve got an engine where you want to know how many rotations per minute it’s running. You place the edge of the tachometer up against something in the engine that’s vibrating with the engine. Then you slowly slide the rod out of it’s sheath, and when the rod gets to the length where it now has a resonant frequency identical to the engine, it will begin to vibrate wildly at the tip. Now you’ve found the right frequency, and you can just read it off the indicator scale. Bob and I played with it on his engine where he cranked up the RPMs and let me slide it in and out – longer for lower frequencies and shorter for higher frequencies trying to match it perfectly.
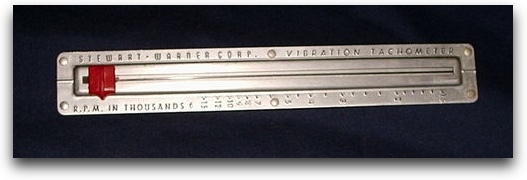
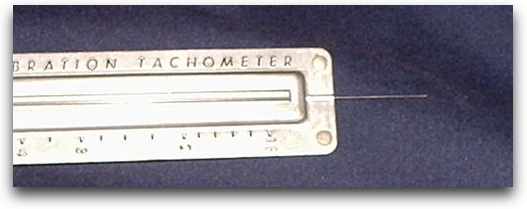
My dad would have loved one of these, in fact I’d be willing to be he had one at one time. I put a couple of pictures of it in the show notes so you can see what it looks like. Anyway, if you’d like to be entertained by Honda Bob AND get your car serviced or repaired, give him a call at (562)531-2321. You can also check out his website at hdabob.com. HDA Bob’s Mobile Service is not affiliated with Honda, Acura or Honda Worldwide.
RapidWeaver
If you’ve been wanting to create a website, but you don’t know any html, and you don’t want to use one of the content management systesms out there like WordPress, you might like to check out RapidWeaver from realmacsoftware.com. According to the RealMacSoftware site, “He’s a revolutionary, but friendly piece of web design software made exclusively for the Mac. He’ll help you create and publish beautiful, modern sites, compliant with today’s web standards.” Evidently RapidWeaver is a boy, but we won’t hold that against him! I like the web standards compliant part – I’ve learned from Bart and Mario and Matt to turn my nose up at applications that create non-standard output!
I launched RapidWeaver without reading any documentation (as always, and I was treated to a nice big screen with three big buttons on the front – Add a Page, Insert Content, and Publish. There was a big plus sign for Add a Page, so I clicked it, and nothing happened. hmmm…tried the other buttons and nothing happened there either. Turns out these are not actually buttons, just a graphic showing you that you can create a web page with three easy steps.
I wasn’t really sure what I should be able to do with this app, so I headed over tot he Real Mac Software site to see what kind of information they had. To my delight, I discovered a series of videos to get you introduced to the interface. After watching a series of these, I was ready to start. They also have a manual available in the help menu, but of course I didn’t even look at that!
When you start out you have these three lovely, non-functional buttons filling the right hand pane, with Edit and Preview tabs at the top. You also have a tall, narrow pane on the left, that is completely empty. The only functional button here is the Plus button at the top of the left pane. The plus button brings up the 9 different types of pages you can create – blog, contact form, file sharing, HTML code, iFrame, movie album, offsite page, photo album and QuickTime. Since the videos showed me how to do a blog page and a photo album, I decided to start there. Eventually I figured out that many of the functions can be triggered in different ways, in addition to using the plus button, you can go to the menus and choose File–>New Page.
Let’s walk through these two kinds of pages. Starting with blog page, now the whole right pane becomes much more interesting. the top half is a list of your blog entries (which is of course empty when you start, and the bottom half is where you create the blog entries. You can fill in a title, categories, tags, and then the main entry of the text. You can view what the summary will look like from the open text field, so it does create that for you automatically. Before I get too far in, I want to mention that RapidWeaver allows you to be very simple in your work, or to dig into the more complex advantages of creating a website. For example, I could just throw up a couple of blog entries here and move on, or I could create permalinks, add a podcast entry. I’ll mention these simple/complex differences as I go through the rest of the review.
There’s a button at the bottom that pops a scrolling window showing all the built in themes that are available for your website, and switching between them is as easy as clicking a new one. I threw up a few blog entries and then decided to add a photo album page. Here’s the one place I got stuck for a long long time. According to the video tutorial (and the manual that I reluctantly opened), You’re supposed to see your iPhoto library in the pane when you ask to create a photo album. Unfortunately, all I got was an empty column. I found a + button that allowed me to navigate to folders with pictures of them, UNLESS they were in my iPhoto Library. The only thing I can think of is perhaps RapidWeaver won’t recognize my library because I updated to the new iPhoto ’08. I submitted a request to the developers, but I only gave them about 4 hours to respond, so for now I’m going to assume it’s just the iLife ’08 issue.
No worries though, because I keep most of my photos outside of iPhoto, so I was able to navigate to them and select a batch to make into a photo album. As I mentioned earlier, there’s more than one way to do things in RapidWeaver – you can navigate and shift select your photos, or you can go out to the finder, select the photos you want, and simply drag and drop them into the window. For each photo you import, you can add a caption, which will show up on the web page instead of the file name. I think I’d like to have the option to have both, but I didn’t stumble across that as an option in my cursory examination. I suspect it might be in there somewhere.
Once you have a series of photos imported, there’s a setup button. In here you set the behavior of your page for the photo album. You can define the size of the thumbnails, the size and quality of the full size images, even tell it to play a flash slideshow when the page is launched. If you choose the slideshow, you have a whole host of options – how long to pause, visual effects like cross dissolve between photos, Ken Burns effect – it goes on and on. You can set the photos to show their EXIF data (that’s information about the photo like aperture, shutter speed, photo format, metering mode, and a whole host of other things purists in photography care deeply about.
Now that we have a couple of pages to show off, let’s see how easy it is to publish in RapidWeaver. I let it default to using my .mac account. When you hit the publish button, it gives you a menu with a pulldown for .mac or FTP. Using .mac, you simply define your username and password, and then tell it what to name the folder in which your pages will reside. It’s smart enough to know that it should put that folder inside your sites folder, which already knows how to serve up web pages. this was trivially easy! Here’s one of the best features of RapidWeaver. I wanted to change the theme, so I selected a new one in the theme browser, and hit publish again, and it took only a few seconds because all it was doing was changing a few files, not re-uploading everything I’d already sent up there! You can preview your changes locally with a tab at the top of the window too.
This design really the best of both worlds, you always have a backup of your website – the database slop is hidden from you, but it’s all local on your machine, and you can mess it all up if you like locally but if you get it right, then you can send it to your website. One of the things that really delighted me about RapidWeaver was that I was able to have two projects open, and while one was working on publishing to my site, I was able to mess around in the other one. How many times have you wished an application could do two things at once?
In the intro I mentioned that the folks at realmacsoftware.com claim that RapidWeaver creates standards compliant code. The reason you care about this is that it means you can use any standards-compliant browser and you’ll be able to see the site as the developer intended. It also means that if you require assistive devices like a screen reader, you have a better chance of getting the richest experience possible out of the site. I decided to test them on this, so I went over to the W3C validator website at validator.w3.org, where you can plug in the url of any site and it will tell you if there are any non-compliant sections and even tell you exactly where to find the errors in the html. I threw in my newly created RapidWeaver site, and guess what? It passed with flying colors!
Bottom line is that RapidWeaver is a marvelous program that has a lot of flexibilty for the medium to advanced user, but is easy enough for the beginner who is just getting their feet wet. RapidWeaver is $49 and is available in a family pack for use on 5 Macs for $99. Check it out at realmacsoftware.com.
If you are interested in learning more about how to use RapidWeaver, you might want to check out Don McCallister’s ScreenCasts Online site for his video tutorials. I put a link in the shownotes to the RapidWeaver tutorial at screencastsonline.com. A trailer at low resolution is available for free, but if you become a member you get the full resolution, long playing version.
Bart on TinkerTool and Tweak Freak
You may have heard of this next tool before, it’s called TinkerTool. Bart sent in an audio review of TinkerTool, let’s hear what it’s all about:
=============INSERT BART’S TINKERTOOL REVIEW===================
Thanks Bart – I’ve always wondered what those darn DS_Store files are for, AND I love the idea of being able to make them stop getting plopped all over the Windows servers I access! As requested, the link to Bart’s blog for the links to TinkerTool and Tweak Free is at bartbusschots.ie.
How to make a G5 wireless
So here’s the problem statement. Steve and I share a desk in our bedroom, with his G5 at the desk. i say share because sometimes I get to sit there, it’s really mostly his desk. Since I’m on a laptop, I’m much more mobile, but sometimes I really need a desk, like when I’m recording the podcast. I’ve been hiding out in my daughter’s room to record, but sometimes she’s home, and it also gets really really hot in there when I have to close up all the windows. Sometimes I just want a place to write checks or something too!
We have a recently vacated room in our house, our beloved babysitter, Carmen, of 17 years is gone now – as much as we loved her we just couldn’t justify keeping her here when Kyle is 16 years old and Lindsay is off at college! So my plan was to turn that into a study for me, putting in a nice desk and moving in there. then Steve mentioned that he can’t work on his videos on his G5 when I’m sleeping on weekend mornings, so he’d rather that he actually move into the spare room.
That would mean we’d put the nice new desk in our bedroom, which would be cool, because the desk we have in there is the desk Steve got when he was in college. that was 31 years ago. and it wasn’t a beautiful inlaid rosewood desk or anything, just one of those formica coated fake wood press desks!
Ok, so the problem statement is really coming up here, I promise. The cable modem and router are in the bedroom with the G5. Evidently the spare room is not wired up properly to move the cable modem and router into there, which means the G5 will have to go wireless. No worries, I’ll just order an Airport Extreme card for the G5 and pop it in there and we’re good to go. Well, not exactly. turns out it’s not considered a do it yourself part, and it’s a specific TYPE of card, and I can’t figure out where to buy the card.
the article at docs.info.apple.com saysPower Mac G5 (Late 2005) computers are designed to work with a combination AirPort Extreme with Bluetooth 2.0+EDR card, which combines AirPort and Bluetooth wireless technologies on one card. Please note that other versions of AirPort cards cannot be used with Power Mac G5 (Late 2005) computers. Although the connector on the computer’s logic board will fit an AirPort Extreme card, it is meant for the AirPort Extreme with Bluetooth 2.0+EDR card only. Power Mac G5 (Late 2005) computers will not recognize an AirPort Extreme card if you attempt to install one.
The AirPort Extreme with Bluetooth 2.0+EDR card is available either as a factory-installed option at the time you purchase your Power Mac G5 (Late 2005), or you can add wireless capability post purchase1 by having an Apple Authorized Service Provider or a retail Apple Store install the AirPort Extreme with Bluetooth 2.0+EDR card for you. The AirPort Extreme with Bluetooth 2.0+EDR card is not a DIY (do-it-yourself) part.
Sigh. I’m back to the drawing board. then I got the brilliant idea to use one of those wireless USB dongles. I happened to have a D-Link DWL-122 wireless B device that I got for my Tivo years ago, but I couldn’t find any Mac drivers for it. so I went online to Best Buy and researched. I found the Belkin F5D8051 USB 2.0 wireless G dongle, and it said right there on the website that it supported the Mac, unlike virtually every other dongle I could find that said Windows only. So I headed over to Best Buy, and looked at the actual box. Luckily it showed the Mac symbol right on the packaging. I wanted to be certain here, so I took it over to the Mac guy (we have one of those Apple stores inside our Best Buy) and started talking to him about the G5 problem. He said that I definitely could not put an airport in it, but that I should buy the Belkin model I happened to have in my hand. He hadn’t used it himself, but he’d heard it worked great. That’s three sources that assured me it works with the Mac, right?
You can hear the punchline already, can’t you? C’mon, just GUESS what happened next? Of COURSE there are no Mac instructions or drivers in the box! Nothing! Seriously, not one darn stinkin’ mention of the Mac in that stupid box. I could have spit! I went online and after a LOT of searching on their site, I was able to find the Mac drivers, and of course they didn’t work. It installed an application – I DON’T WANT AN APPLICATION! this app recognized our router, but wouldn’t connect to the darn thing. then i went searching message boards, and found a guy who’d found a link that was corrected in another post…to an alternative Mac app for the Belkin. sheesh! so install that one, and it looks very similar, but it doesn’t find my router. I fool around with these two apps, installing one, uninstalling the other, back and forth until suddenly one of them actually works. i think it might have been the Belkin one.
Now think about this, you KNOW the first time I have to move the G5, or unplug that stupid dongle, I’m going to have to sacrifice another dead chicken during a full moon to get this stupid Belking piece of garbage to work, aren’t I?
Luckily I’m on a message board with some really smart people, and I wrote of my woes with the USB adapters, and Bruce Brown gave me a great recommendation. He suggested the Buffalo wireless ethernet converter. As he explains, it “provides some LAN Ethernet jacks for network devices in a remote area. Those jacks are just like the LAN Ethernet jacks on your Linksys router. Except–the Linksys connects to the WAN with a wired Ethernet connection, but the Buffalo connects to the WAN with a wireless Wi-Fi connection. That means it gets its Internet connection via your existing Linksys router. In turn, the Linksys gets ITS Internet connection directly from your broadband modem (cable or DSL), and gets it via a wire.
I was a bit confused, but I went ahead and bought it anyway – hey, Bruce had never lied to me before! Once I had it in my hot little hands I really got the idea. I move the G5 to the spare room, and I use an ethernet cable to plug it into one of the four ports on the Buffalo wireless ethernet converter. The Buffalo plugs into power in the wall, and receives the ethernet signal from the normal wireless access point, in this case, my wireless Linksys router. The advantage of the Buffalo unit is that it doesn’t require drivers of any sort, any more than your router does.
I plugged it into my router first hard wiring the two together, ethernet port to ethernet port. They explain that the Buffalo starts with an IP address of 1.1.1.1, so to configure it you have to set your computer to be on the same subnet, so they suggest 1.1.1.2. Then I launched a web browser, and set the url to 1.1.1.1, and a configuration window popped up. I entered the username to the Buffalo, which happens to be root with no password. Then a window comes up inviting you to scan for access points. I selected my own, and it returned with a connection of 42% – but it turned out that it meant I was 42% done configuring it. Next I entered the WPA encryption password, and I was 100% done. I turned off the airport on my laptop, plugged an ethernet cable into it and the Buffalo, and bam, I was instantly on the network.
I should mention pricing, the Belkin USB device that didn’t work was $60, and I paid $70 for the Buffalo. You can get it cheaper than that, but I went for the full price because it was from Circuit City and I knew I could take it back in a heart beat if it didn’t work as promised. Luckily it was just as easy to configure as Bruce suggested, so I’m not going to have to worry about this ever again.
This is a great unit for a small home office that can’t be near the original wireless router, but does not actually extend the range of your wireless network. In fact, my son Kyle put it perfectly when he said it was sort of like the exact opposite of a range expander. Now I’ll be able to move Steve into the spare room and set up my very own desk for the first time in my 25 years of marriage! I can’t wait to have my own desk! Thanks Bruce for making this all possible.
That’s going to wind it up for this week’s episode of the NosillaCast, I hope you enjoyed the show. Keep all the great feedback coming to [email protected], or send audio feedback and reviews to [email protected]. Thanks for listening, and stay subscribed.
Enjoyed the podcast and blog … the pic of your hubby drying the keyboard in the bath will be a classic. I also enjoyed Bart … love his accent and since of humor I was laughing through much of his review.
Is my face red or what? Let me correct .. ” love Bart’s SENSE of humor”. Cheers
A fantastic plug-in for Rapidweaver (Blocks) is on sale at Maczot today:
http://marieboyer.smugmug.com/gallery/3390714/1/189523224
[…] Rocks Way back last August on Show #109 I told you about my trials and tribulations trying to move Steve’s G5 to our spare room where […]