New decals for the new MacBook Pro from Ryan Sakamoto of RyanSakamoto.com with his only bill being a request to donate to the “Japan Earthquake and Tsunami Relief” fund via iTunes. In Dumb Question Corner, Gaby asks how to make time zones operate properly in the calendar on his iPhone. Ron Burch demonstrates the Azden ECZ-990 Super Cardioid Zoom Camcorder Microphone and the iPhone adapter from KV Connections for doing recording in crowded rooms. I do a full review of Acorn 3 for graphics editing from flyingmeat.com. WillP throws in his two cents about the FIRST Robotics competitions too. In Chit Chat Across the Pond Steve Stanger from The Mac Attack Podcast joins us to talk photography and iPhone photography app obsessions.
[twitter-button][fb-like-button]

Hi this is Allison Sheridan of the NosillaCast Mac Podcast, hosted at Podfeet.com, a technology geek podcast with an EVER so slight Macintosh bias. Today is Sunday April 24th, 2011 and this is show number 309.
New Sticker for MacBook Pro
Now that I have my MacBook Pro smoking along at full speed, it’s time to put an appropriate decal on it. On my old MacBook Pro I put a decal of an old fashioned microphone. I liked the statement it made – told you what I was about when you looked at it, made it stand out in a crowd, and yet didn’t damage the device in any way so resale value was retained. I started noodling on a different option and I thought maybe it would be fun to have the mic AND a decal of the famous podfeet themselves.
I immediately enlisted the help of the artist who created the entire look at feel of the podfeet.com website, Ryan Sakamoto of RyanSakamoto.com. I thought of him not only for his artistic talent but because he also sent Steve and I some modified Apple stickers a few years ago. Steve and I NEVER put anything on our cars – not even when our kids won student of the month did we put the stickers on our cars – but we are both sporting Ryan’s skull and crossbones versions of the Apple logo. So I wrote to Ryan asking him whether he could make me a podfeet decal.
He wrote to tell me that he had sold his decal making machine, but as luck would have it, he happened to have made a black podfeet decal before he’d sold it! He agreed to mail me the decals. Now the only problem with Ryan is that he never charges me for anything. I told him he had to charge me this time, but instead he said this:
Hey Allison,
You know I can’t take your money, but here’s the deal in iTunes there is a button called “Japan Earthquake and Tsunami Relief Donate here” donate $10 & I’ll mail the decals up to you. Deal or no Deal?
 Well what could I do? Of course I followed his instructions and donated some more money to the Japan fund. I can’t leave it at that though, I have to tell you to go over to RyanSakamoto.com and take a look at the artwork he does have for sale – he’s a phenomenal photographer, sells his prints, and if you’re on Oahu Hawaii you can hire him to photograph events. I love to go over to his site and spend time looking at the gorgeous family photographs and weddings he’s taken. Truly amazing.
Anyway – then Steve, Ryan and I started an email string back and forth as I used an image editor to try out different options on how to arrange the decals. In the end I’m really happy with what we ended up with – you can see a picture of it in the shownotes.
Dumb Question Corner – Time Zones in iPhone Calendar with Gaby
This week Gaby Weissman sent in a dumb question. For some reason he felt the need to apologize for sending in too many of them! This is his third dumb quesiton, but evidently he hasn’t figured out that I LOVE dumb questions! I especially love them when they’re easy to answer. The only Dumb Questions I don’t like are the ones that are too hard to answer!
Let’s get into Gaby’s Dump Question:
I found this out the hard way. I booked a flight and entered the details into tripit.com. i then exported the flight details into ical. so far so good. i then flew from EST to MST. i then proceeded to miss my 1:30 pm flight MST by arriving at the airport late because ical told me the flight was at 3:30 (only correct if you consider that 1:30 MST is 3:30 MST). looking at this i notice that ical does this for all my flights. this is not what i want.
seems to me the correct display would show the local time as that is the time i am looking at when i am in said location. so if i have a 8am meeting in LA i don’t want to have to enter 11 pm when i make the appointment while in in NYC.
what is the correct solution to this? i am reading about turning on “time zone support” but to be frank i don’t get what it does yet, and i don’t want to mess up my ical calander.
as an aside. i never switch time zones on my macbook. but my iphone obviously knows where i am and that is my primary device for calendaring/meetings. this mistake cost many hours and dollars and i would like to try to not repeat it and not do the math in my head (GMT-X)
thanks so much. as always love the show and all your hard work. thanks for letting us know we can watch the live show not live. who knew? can never really make sundays but the on-demand model usually works for us podcast types (i guess one reason we listen to podcasts in the first place. time shifting. like ical)
Thank you for the kind words Gaby! My first impression was that this must be a bug. My final impression is that Apple are idiots. Let me explain the “feature” that’s helping you here. You almost got it yourself, but let me walk through it so no one else ever falls into this trap.
To restate the problem very simply, when you change time zones, your iPhone knows the new time, but the calendar doesn’t adjust the times of events. Again, sure sounds like a bug. I checked into Time Zone Support on the iPhone and I understand what they did, even though it’s idiotic. the default setting on an iPhone is to have Time Zone Support on. One might incorrectly assume that with it on, you’d have a phone that understands if you’ve changed time zones. But you’d be wrong, it means the exact opposite.
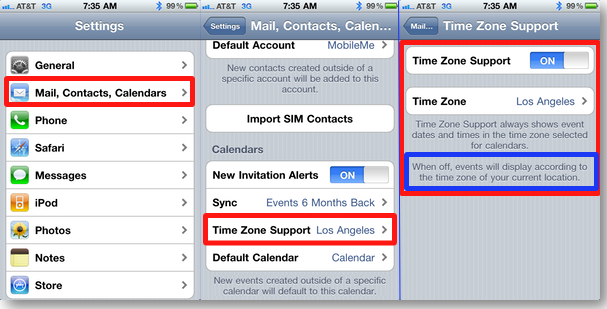 I went into Settings on the iPhone, clicked on Mail, Contacts, Calendars, and then selected Time Zone Support. Time Zone Support was defaulted to “on”, and my Time Zone was et to Los Angeles. In the print under that it says ” Time Zone Support always shows event dates and times in the time zone selected for calendars”. Below that it says “When off, events will display according to the time zone of your current location”.
So the brainiacs at Apple decided that it was a good idea to make it where your iPhone would know where it was, but would refuse to tell your calendars. Could someone please tell me a single scenario where I would want that? I can’t imagine. So Gaby you have two choices here, you can manually change the Time Zone to the city you’re in when traveling and then your calendars will make sense, or just shut the stupid Time Zone Support off so you never have to worry about it again.
I’m really sorry this happened to you, but I’m really glad you wrote to us about it so we all learned from your experience. I’m shutting Time Zone Support off right now!
ScreenSteps
This weekend Steve and I went to visit Steve’s parents, and his mom had a nice long list of computer questions for me. Now I know you’re all groaning in sympathy at that but it’s not annoying at all. Her questions are great – she wants to know how to scan in photos, or what to do with some aliases on her desktop or what the heck is RSS anyway? She and I sat down for about an hour and had a blast. When I showed her that she could subscribe in Apple Mail to the RSS feed for her grandaughter-in-laws blog, she thought she’d died and gone to heaven. The steps weren’t exactly intuitive for her though so she started to scribble out some notes on a pad of paper. I told her not to bother, popped open ScreenSteps on my Mac, took some screenshots, annotated them with arrows and boxes, and then added some text for each image to give it some context to remind her why she was doing each step. I exported it to a PDF, dropped it into the mail to her and she had her permanent instructions on how to subscribe to blogs. So in maybe 10 minutes I was able to create fabulous, professional looking documentation that made her happy.
I thought maybe you have friends or family (or maybe even yourself) who’d like to know how to subscribe to RSS feeds in Apple Mail, so I clicked on the Export to Blog button, uploaded it to podfeet.com and added it to my tutorials section (https://www.podfeet.com/wordpress/tutorials/rss-feeds-how-to-subscribe-in-mail/. Easy Peasy!
You can look this smart too for only $40 for the standard version of ScreenSteps or $80 for the Pro version. Give their free trial a spin to make sure you love it as much as I do by going to ScreenSteps.com.
Ron’s AZDEN ECZ-990 Super Cardioid Zoom Camcorder Microphone
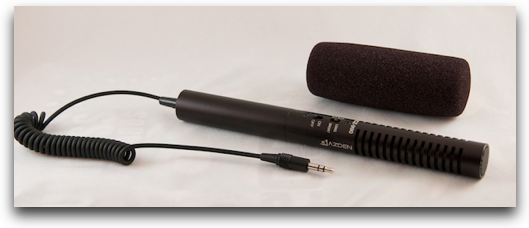 My buddy Ron was over Friday night and he brought with him a really cool new toy. It’s a very very small portable boom mic for his iPhone. I put an Amazon link in the shownotes to the Azden ECZ-990 Super Cardioid Zoom Camcorder Microphone, but the photo they had of it was about the worst I’d ever seen so I took my own shot using my light box. you know any excuse to play with it, right? anyway he started telling me about it and I figured the best way to let you know how it sounds was to actually do a quick interview WITH the Azden mic. At the end Steve decides to start getting “entertaining” – it’s not my fault, take it up with him, ok?
I warned you about Steve goofing around with the pizza guy at the end, right? Anyway, I found this a very intriguing device. As you know I’ve been using the iPhone for on the road interviews and it’s been working really well, but you also remember the crazy bird noises from the interview with Shai last week and the raging seagulls from the interview with Tom Merritt? Maybe with a mic like the Azden I could get more isolated sound but still not have to carry a lot of heavy equipment around. This Azden mic is about as big around as your thumb and weighs practically nothing.
Ron mentioned the adapter he bought that allowed him to use it with the iPhone because the iPhone uses a mutant four-ring connector. He sent me the link to kvconnections.com where he bought the iPhone adapter. Don’t forget to buy this too if you buy the Azden to work with your iPhone. I should mention that the prices are higher than Ron’s recollection – the adapter is $25, while the mic itself through Amazon is $55, but you’re still out the door well under $100.
and finally I put a direct link to Ron’s Flickr account in the shownotes.
Smile
Let’s say you’re writing a review of the Azden ECZ-990 Super Cardioid Zoom Camcorder Microphone. You know you’re going to want to write Azden ECZ-990 Super Cardioid Zoom Camcorder Microphone a whole bunch of times, but dang that’s a lot to type. Did you know that if you had TextExpander, if you’d typed it out once, you could simply select that giant glob of text, and hold down option-t and TextExpander would open up and offer to let you assign an abbreviation for it? I did just that, put in a z ; and from then on I could type Azden ECZ-990 Super Cardioid Zoom Camcorder Microphone with 3 characters instead of 54 characters? That kind of savings really adds up, makes you much more efficient, makes your writing clearer because you don’t get lazy and skip things, and I’m no doctor but it’s got to help with repetitive stress on your hands and wrists, doesn’t it? Head on over to smilesoftware.com and buy yourself a copy of TextExpander for $35. They even have a money back guarantee so they’re sure you’re going to find it worth every penny.
Acorn 3
Sometimes you find a piece of software that captures your imagination, and every year or two when they bring out a new version you just can resist it. There aren’t many in this category, just the jewels that get this honor. One of these rare applications is Acorn from flyingmeat.com. I first reviewed Acorn in 2007 thanks to Gus from Flying Meat, and again in 2009 when they came out with version 2, and now in 2011 Gus has graciously let me review Acorn 3.
Wait! what am I doing here? I forgot to tell you what problem needs to be solved! How about you’re a normal person who doesn’t have to do all kinds of fancy pants stuff that Photoshop has built into it and you don’t want to drop $650 on it, or even $90 on Photoshop Elements. But a great number of us want to do a little bit of image creation, a little bit of image editing. I’m not talking about the kind of stuff you can do in iPhoto or Aperture, red eye reduction and levels and all that, but maybe adding a drop shadow or creating some original artwork from scratch, or doing some more advanced editing of an image to plop into a blog.
I’ve been using Pixelmator for the last six months, so my opinion on Acorn 3 will be more from that perspective than comparing Acorn 3 to Acorn 2.
A few weeks ago I was working on some images for a website I’m designing for my dear friends Ileana and Mike. They’re creating a line of products called SeaSons, and one of the products is greeting cards made from artwork created by Ileana’s father. They’re beautiful cards created by a real artist. Now I know I don’t have a right brain at all, so I couldn’t have created the card artwork myself, but looking at them they looked very flat when plopped on a white background. I thought a nice drop shadow set them off the page and make them look more like real physical cards.
I opened Pixelmator and for the life of my I could not figure out an automatic way to make a drop shadow. I fought with it for a long time, I searched their practically useless help files too. Their help files tell you what you CAN do, but they never tell you HOW to do it. No step by step instructions of what buttons to push. In contrast, Acorn 3 has great help files that tell you what to do, and better yet I didn’t find that I needed the help as often because the options are much more obvious.
One of the big new features of Acorn 3 is Layer Styles. With layer styles, you can add bevels, glows, comic patterns, gaussian blurs, and about 20 other styles, PLUS my beloved drop shadow. The cool part about Layer Styles in Acorn 3 is that this is a non-destructive process. you can add a bevel, then add a blur, then add a drop shadow, and later on decide you don’t want that original bevel any more. Simply uncheck the box in the layer styles menu and it’s gone. Very very cool – lets you feel free to do more experimenting than you normally would.
So here I’ve got this flat greeting card, I want to add a drop shadow. The image opens in Acorn with white all around the image within the same layer as the card. To get a drop shadow on the card, I need to erase the white. Enter Instant Alpha. I’d never heard of this concept before watching the great Don McAllister demonstrating a feature in Keynote of all places. The idea is that with the instant alpha brush you can slowly increase how much of a color is selected from a scene. By color here I guess i mean range of hue, like lets say you have a blue sky, it’s not all the exact same color of blue. As you drag the instant alpha brush it selects more and more of the range of available blue. Does that make sense?
Anyway, both Pixelmator and Acorn have an instant alpha brush, but the one on Pixelmator ALWAYS grabbed more of the color than I wanted, not taking just sky but immediately grabbing the blue in someone’s shirt as well. Acorn was much more delicate and accurate in my experiments. So let’s jump back to my card example, using the Instant Alpha brush, by moving carefully I was easily able to get Acorn to select the background white but none of the white of the card. I clicked delete and my background was gone.
Next I right clicked on the layer, chose layer styles, and from the menu chose drop shadow. From there I could define the x/y offset, the opacity and even add some nice blur to the shadow, along with setting the color for the shadow. In just 2 seconds I had the exact shadow I’d searched so valiantly for in Pixelmator and never achieved! There are so many layer styles available in Acorn 3 I won’t even try to explain them here but I’m sure you’ll be able to find what you need.
I did find one hinky behavior in Acorn 3, every once in a while the selected tool would switch up on me. For example when I was doing the instant alpha tool, it switched to the move tool. When I was working with the clone tool, it switched to the rotate canvas tool. I think this is a bug, so they can probably sort it out.
 I mentioned that I like the help files much better on Acorn than on Pixelmator (they’re actually useful) but they also have some tutorials up there. One fun one is how to change the color of something. I took a picture of Tim Robertson of mymac.com when he was on stage at Macworld and decided to see how he’d look with green eyes instead of blue. In a few quick steps I had my masterpiece. I put a link to that tutorial in the shownotes.
 Another one of my favorite things to do with photos is to take out wrinkles and whiten teeth. To take out wrinkles, copy someone’s face to a new layer, blur the snot out of that layer with a nice big gaussian blur, then change the opacity of the layer until the wrinkles are believable and the face doesn’t look too weird. Then you use a small eraser to erase the blurred layer over the teeth, eyes, eyelashes and any edges you want to show clearly. You’ll be amazed at how great someone can look! I also like to take someone’s teeth, copy them to a new layer, remove the color, brighten that layer unrealistically white, then set the opacity of that layer until it looks believable. I took a a picture of Jeff Gamet of The Mac Observer also from Macworld and whitened our teeth and got rid of my wrinkles (Jeff didn’t have any) and we look fantastic! I know I’m not telling you exactly how I did this in Acorn, but the point of all this is that it was easy to do in Acorn and I didn’t have to go study a bunch of documentation to figure out how to do it.
The only thing I didn’t like about Acorn was that when I was messing with the saturation on the teeth I was whitening, Acorn brought that up in a separate editor window, and I couldn’t zoom in to see it very well. If they must have it in the separate window they really should give you some sliders for zoom, or else just let you mess with a live preview of the edits while in the main image window.
I’ve been teasing you for a long time here – I told you this is for people who don’t want to spend $650 for Photoshop or $90 for Photoshop Elements – Acorn 3 is only $30 and is available in the Mac App Store, which means you can put it on all of your machines (maybe it’s up to 5) for that same price. If you already own an earlier version of Acorn, you can grab the upgrade for only $20 from their website at flyingmeat. I should mention that Acorn is for OS 10.6 Snow Leopard. Still not convinced? then give their free trial a shot before you buy. I am delighted with Acorn 3 and I’m replacing Pixelmator with it as my standard image editor.
One last thing – I found out after I recorded the review of Acorn that the $30 price is only until the end of April, after that it goes up to $50 so jump on it now if you’re interested. I think it’s worth $50 so if you’re listening after the deal is over don’t be disappointed. oh wait, one more last thing – I got an email back from Gus where he said I might be invoking a gesture when I was getting those accidental rotations. He said that in the Acorn preferences you can turn off gestures if you find that problem happens to you.
FIRST Robotics from WillP
Hey, Allison and the Nosillacastaways, it’s me! Will! You remember me, right? Well, I’ll forgive you if you don’t, because I haven’t sent anything in in a while. I have a good reason, though: I’m in a FIRST robotics team, the same organization as Kirschen talked about two CCATPs ago. As far as I remember, everything Kirschen said was right, but it didn’t include what we do.
Hang on, back up. The problem statement, right? Well, FIRST is more of an opportunity than a problem to be solved. For middle- and high-school students, it’s an opportunity to build amazingly interesting robots with a group of your peers, while learning about working in a team and about engineering. For professional engineers, it can be an opportunity to work with many future engineers and help them learn.
Before I talk more about that, I’ll explain the FIRST Robotics Competition, the highest-level competition. Each team gets six weeks to design, build, test, and program a robot to play a game that FIRST devises. Sometimes these games are based on sports, like soccer, but they always consist of a simple task the robot has to perform, usually with obstacles in the way. Some of these obstacles are other robots—every round, two alliances of three teams each play against each other. The games always give more points to harder tasks, like making a soccer goal from farther away, or hanging an inner tube on a higher peg. The main game has two sections: a short autonomous period, where drivers have no control and the robot must perform the task on its own, or not at all, and a longer teleoperated period, where drivers take control and continue trying to score points. The last ten to fifteen seconds are the end game, where the robot can perform a completely separate task for a large amount of points. In the past, robots have had to hang themselves off a bar, or send a small mini-robot up a pole, racing the other alliance’s minibots.
The game is played over two days, and in between matches teams fix up their robots in case they need fine-tuning or repairs. Because of the alliance system, teams who were on opposing alliances may soon be playing together. This creates an atmosphere where teams help out others, lending tools, materials, and knowledge.
There is, however, one imbalance in the system, and that’s the big reason I’m telling you about FIRST. While teams are theoretically equal in resources (there’s a limit to the amount of money you can spend), those with many professional mentors perform consistently better than those with few or none. As a member of a team without any regular professional mentors, I’d like to put out a call to the engineering community, and encourage you to seek out a Robotics team in your area and offer your services. You don’t need to commit much—obviously you can be more helpful if you can attend more meetings, but teams like ours would much prefer you come once a week or even only a couple times a month than not at all.
So, please, if you are able, consider joining a team. I promise, it’s a lot of fun even just building, let alone the competition itself. Thank you, and thanks, Allison, for this opportunity to get the word out, and as always, have a great episode.
thanks Will, nice to hear from you again, and it’s great to hear about FIRST from your perspective in addition to Kirschen’s.
Honda Bob
I remember back in 1978 when I got my first car. My dad’s office mate was selling a 1976 yellow Honda Civic. I was so excited – $2800 for my first car and she was a beauty. Ok, actually it was ugly as sin but she was MINE, all mine. I wish I could remember who told us about Honda Bob, but I remember this funny guy driving to my apartment to do scheduled maintenance on my car. Steve was driving a ’53 Chevy at the time and when he finally bought a new car, you know he picked a Honda. That was all over 30 years ago, and to this day we wouldn’t trust anyone with our cars but Honda Bob, plus you can’t beat the convenience of having him come to us. If you live in the LA or Orange County areas, and you drive a Honda or an Acura, give Honda Bob a call at (562)531-2321 or send him an email at [email protected]. HDA Bob’s Mobile Service is not affiliated with Honda, Acura or Honda Worldwide.
Security Light
Security activity this week was pretty boring, unless you consider updates for iTunes and Adobe products interesting. When I was helping my mother-in-law this weekend she showed me proudly how she’d followed my instructions on getting rid of Adobe entirely even though every site with a PDF on it insisted that she needs Adobe Reader. She did have some trouble opening PDFs with Preview so I walked her through how to Open With and choose Preview. There was one interesting security point though.
Last week I talked about the new iPhone update 4.3.2, but Gary Beltz called me on the carpet for what i said. Here’s what he wrote:
Just got done listening to your latest Podcast and you talked about a bunch of security updates for the iOS devices and the Mac in general. You only mentioned the iPad, iPod Touch, and AT&T (GSM) versions of the iPhone. Apple has also released update 4.2.7 for the Verizon CDMA iPhone. I know it may not have crossed your mind but with the popularity of this device among Verizon customers like myself you should try to keep up with these updates as well. Thanks for the great shows. Take care, Gary
thanks for sending this along, Gary; I actually had no idea the update for Verizon phones was different. For some reason I got the idea in my head that they were finally in sync. I’d heard that Verizon phones got the update too, assumed it was the same. I didn’t forget you guys – I was just being un-thorough in my research. this really isn’t my topic area, it’s Bart’s. Have we said enough times yet how much we miss Bart?
Chit Chat Across the Pond
This week it’s Steve Stanger from The Mac Attack Podcast talking Photography.
how do you take such awesome photos?
Took photography back in high school and college as elective classes and part of my Fine Arts Minor. I was always into visual and graphic arts. Much better at photography then drawing or painting. My Mom actually got me into taking photos when I was young. When I got back into photography a few years ago I searched the web like a starving man for info — podcasts, youtube vids, ebooks, books, online training…Know your camera. Learn how exposure works (ISO, shutter speed, aperture). You’re able then to concentrate on the composition of the photo –you’ll find you can be more creative when you’re not so worried about all of those knobs, switches and camera settings. What’s nice with the iPhone you don’t have to worry about the ‘technical’ stuff so much…
how big is the lens you used to get those wicked cool photos from the Bronx zoo?
It was a Nikon 70-200mm, not really an expensive lens ($200-$250). Here’s a big hint when wanting to photograph at a zoo — go before the season starts and on a day that’s a little on the cold side. The Bronx Zoo was practically empty and we were able to get very close to the enclosures, use tripods and take our time in the exhibits. The down side is the zoo is still preparing for the season so not all the exhibits were open.
how do you like using the iPhone for photgraphy?
I originally didn’t think I would be using the iPhone for photography. I figured I would use it take photos of what was going on ‘now’ to share via twitter/facebook or use it as a way to remember locations I wanted to shoot later with my DSLR (location scouting). Now I pretty much treat my iPhone camera as if it’s another camera lens — it has it’s own properties, limitations, behaviors, etc. It’s a lot less obtrusive then a DLSR too. I find myself shooting with both my Nikon DSLR and iPhone when I’m out shooting now.
how MANY apps have you acquired (bought + free)?
(oofa! This is going to hurt)
Around 25-ish? Both free and purchased. I have two folders for photography on my iphone and ipad — Photography and Photo utilities.
Note: My usual iPhone photo workflow – Shoot with Camera+, process in PictureShow, share with Instagram.If I feel like playing around I’ll use one or more apps. Recently it’s been picfx and 100CamerasIn1. I’ll even move photos from my iPhone to my iPad to work on them on the bigger screen.
These are the photo apps on my iPhone/iPad right now:
Photography
- Instagram (free) – iPhone/iPad –http://instagr.am/–share your life with friends through a series of pictures. The twitter of iphone photography.
- Camera+ (.99) – iPhone/iPad –http://campl.us/– I use this all the time. Allows you to set exposure separately from focus.
- PictureShow (1.99) – iPhone/iPad –http://itunes.apple.com/us/app/pictureshow/id324243655?mt=8– Usually my second goto app for processing. Slider controls.
- Plastic Bullet (1.99) – iPhone/iPad –http://www.redgiantsoftware.com/products/all/plastic-bullet/– emulatesplastic toy camera. totally random photos.
- Hipstamatic (1.99 + in app purchases) – iPhone – http://hipstamaticapp.com/-swap lenses, film and flash
- 100CamerasIn1 (.99/2.99) – iPhone/iPad –http://itunes.apple.com/us/app/100-cameras-in-1/id408481287?mt=8–100 different effects that use mixes of hardlight, overlay, and textures.
- picfx (1.99) – iPhone/iPad – http://picfx.co/–apply 27 textures and frames + 13 styles to create unique looking pictures.
- Increibooth (.99) – iPhone –http://incredibooth.com/– A photo booth in your pocket
- TiltShiftGen (.99)– iPhone –http://itunes.apple.com/us/app/tiltshift-generator-fake-miniature/id327716311?mt=8– Fake miniature photography (tilt-shift)
- Tiltshift Video (1.99) – iPhone/iPad –http://itunes.apple.com/us/app/tiltshift-video/id395953517?mt=8–generate Tilt-Shift Videos
- TinyPlanets (free) – iPhone/iPad –http://www.infoding.com/tiny-planet-photos/–transforms your photos to look like tiny planets
- Diptic (1.99) – iPhone/iPad –http://www.dipticapp.com/– combine multiple photos to create a new image
- PhotoPad (free)- iPad –http://itunes.apple.com/gb/app/photopad-by-zagg/id364758617?mt=8&affId=1158466–easy to use, photo editing app
- TouchUp (4.99) – iPad – http://itunes.apple.com/us/app/touchup-for-ipad/id365465261?mt=8#–creative photo editing to iPad
- PS Express (free) – iPad –http://itunes.apple.com/us/app/adobe-photoshop-express/id331975235?mt=8–Adobe software lets you use simple gestures to quickly edit and share photos
- PSD Viewer (.99) – iPad – http://itunes.apple.com/us/app/photoshop-psd-viewer/id408723437?mt=8–Open Adobe Photoshop PSD documents on iDevices
photo utilities
- FlickrStackr (1.99) – iPhone/iPad – http://itunes.apple.com/us/app/flickstackr/id364895358?mt=8–Flickr photo sharing to the iPad
- Flickr (free) – iPad –http://itunes.apple.com/us/app/flickr/id328407587?mt=8– Official Flickr app
- Transfer (2.99) – iPhone/iPad –http://www.phototransferapp.com/– Great for transferring photos between iDevice to iDevice and to Mac. Computer transfer a little clunky.
- PhotoToMac (1.99) – iPhone/iPad –http://www.galarina.eu/PhotoToMac/Home.html–Transfers iPhone, iPod touch and iPad photosand videos to your Mac over Wi-Fi
- Flickpad Pro (.99) – iPad –http://www.flickpadapp.com/-Facebook and Flickr photos delivered fresh daily
- LightLoupe (4.99) – iPad – Review photos via camera connection kit. Pan and zoom your images on an external display
- SoftBox Pro (2.99) – iPad – http://itunes.apple.com/us/app/softbox-pro-for-ipad/id415056105?mt=8–soft box lighting system
- Postalpix (free app/pay for prints) – iPhone/iPad –http://postalpix.com/–easily select and order your iPhone photos.
is there a support group for people like you with your addiction?
I don’t know? Is it an addiction? 🙂 (Spent about $50 on apps and in app purchases, not as bad as I thought it was going to be.)
Photography resources
podcasts:
- Within the Frame podcast –http://www.peachpit.com/podcasts/channel.aspx?c=159BDD23-69E4-48CA-9083-DE02E56232F9(only 20 eps but a must watch)
- Typical Shutter Bug podcast –http://typicalshutterbug.com/wordpress/
- The Art of Photograph –http://aop.thepublicbroadcast.com/
- D-Town TV –http://kelbytv.com/dtowntv/
- Photoshop User TV –http://kelbytv.com/photoshopusertv/
ebooks:
- Craft and Vision –http://craftandvision.com/#list(The best $5 (per book or iPAd app) you will ever spend)
books:
- Within the Frame by David duChemin-http://www.amazon.com/Within-Frame-Journey-Photographic-Vision/dp/0321605020
- The Moment It Clicks by Joe McNally –http://www.amazon.com/Moment-Clicks-Photography-secrets-shooters/dp/0321544080/ref=sr_1_1?ie=UTF8&s=books&qid=1302882152&sr=1-1
- The Digital Photography Book by Scott Kelby (3 volumes)
online training:
- Kelby Training –http://www.kelbytraining.com/
- Lynda Training –http://www.lynda.com/
- Search YouTube for photography. Lots of junk but really good stuff too. For example Rick Sammon – http://www.youtube.com/user/pixelmagicand herehttp://www.youtube.com/user/ricksammon
Find Steve’s photography at flickr.com/photos/tma_steve and links to everything Steve does at about.me/sstanger.
Steve and I did that recording two weeks ago, but I saved him till this weekend to play for you so I could cheat and take most of the weekend off to visit family. I love talking to Steve. He’s got such an easy, unassuming air about him, doesn’t put anyone else down because they’re not great at photography yet. That makes him easy to learn from. I can’t wait to get into watching some of the video resources he recommended (they’re all in the shownotes of course), something fun to look forward to.
That’s going to wind this up for this week, many thanks to our sponsors for helping to pay the bills: ScreenSteps, Smile, and of course Honda Bob. Don’t forget to send in your Dumb Questions, comments and suggestions by emailing me at [email protected], follow me on twitter at twitter.com/podfeet. If you want to join in the fun of the live show, head on over to podfeet.com/live on Sunday nights at 5pm Pacific Time. Thanks for listening, and stay subscribed.
Just a reminder, repeat on verbal for the iPad-toting listeners …
When scrolling in boxes / containers fails, try it again with two fingers within that box.
For example, point your iPad to the home page of PdFeet.com
On the right-side, find the Twitter boxes.
Notice how the text is cut-off at the bottom of each Twitter box?
Use two-fingers to scroll-up the rest of that text!
🙂
Same bidness in this here darn comment box!