In Errata I am successfully corrected by EVERYONE that CrashPlan definitely does let you back up external drives. Then I walk you through why I think you should consider moving your data manually to a new machine instead of using Migration Assistant. I cover how to move missing fonts, how not to move your bookmarks, how to reconnect your CrashPlan backups to your new machine and why you should make sure to find everything in your ~/Library/Application Support folder, and don’t forget to email yourself a copy of your email certificate to keep your signed/encrypted email. In Chit Chat Across the Pond Bart takes us through Taming the Terminal Part 10 of N – mastering the Manual Pages.
![]()
mp3 download
Hi this is Allison Sheridan of the NosillaCast Mac Podcast, hosted at Podfeet.com, a technology geek podcast with an EVER so slight Macintosh bias. Today is Sunday November 3, 2013 and this is show number 443.
Errata
Let’s start off with the evidently now weekly feature I like to call Errata – or how Allison said something dumb and the NosillaCastaways sent me corrections. This week was a doozy and I’m not actually sure if I said it once or twice. I think I may have said it on both the Mac Roundtable and the NosillaCast. I don’t think I caught everyone who corrected me, but for sure Michael Price, Donald Burr, Joshua Owens, Jans Roeber, Ricky Rodrigquez, Barry Porter and Mark Pouley helped out here. What I said was that I couldn’t put my Aperture library on an external drive because then CrashPlan wouldn’t back it up to the cloud because they don’t back up anything outside of your computer. Well, that’s just plain not true.
I know how I got mixed up and thought this though. Carbonite, a competing backup solution, does not let you back up external drives unless you upgrade from their Home to Home Plus service. I heard a gazillion times in the ads Leo Laporte runs for Carbonite, and just channeled it right into my memory banks for CrashPlan instead. Unlike Carbonite, you absolutely can back up external drives with CrashPlan. I did some comparisons – the cheapest plan for Carbonite, their Home service, is $60/year for unlimited data backed up, but like I said does not include external drive backup. CrashPlan has a free service where you can back up (including external drives) to a friend or family member’s house, and they also have CrashPlan+ which lets you back up and unlimited amount of data to their servers (including external drives) for $60/year. They have cheaper plans if you pay more than a year in advance and also they have family plans so if you’re in charge of your household’s backups you can do that pretty inexpensively too.
This isn’t an ad for CrashPlan by the way but I really wanted to correct my erroneous statement from last week. I’ve been using CrashPlan since January of this year after Macworld and it’s awesome. I get a tweet every once in a while assuring me that things are working well, and every week or so I get an email giving me status on both Steve and my computers. It took nearly a month for my giant data set to get up to their servers but it was inside the time for the free trial so I could be sure it was going to work before shelling out the money. I have piece of mind about my data like I’ve never had before. I still do my on site backups but only once a week, and I do a quick dropbox backup of my Feeder file to Dropbox constantly since the writing of my show notes is one of the most difficult to reproduce things I do during the week.
Like I said, not an ad, but if you’re not doing offsite backups I can highly recommend giving CrashPlan a try. And sorry about the mistake and thank you to EVERYONE who sent in their polite ways of saying, “hey dummy…”
Migrating to a New Mac
This week I got a new MacBook Pro – the new 15″ retina model with a solid state drive. I wanted to walk through the things to think about when you’re migrating in hopes that I can keep you from some pitfalls that I encountered. You may not follow my advice here, but you might get a nugget or two to hold in your brain till next time you get a new Mac.
 The first thing I did was try and run the Migration Assistant. I do have a ton of data (around 500GB) so some of my issues might be different for you but bear with me. In the old days we had this lovely thing called Target Disk mode, where you’d boot the old Mac by holding down the T key, and you’d put a firewire cable between the two machines and the data would fly over at 400 or even 800mbps if you had FireWire 800. Then they got rid of FireWire, so now you have to use an Ethernet cable. in theory this should go pretty fast, since both the old and new machine have gigabit Ethernet (aka 1000Mbps). It doesn’t seem to work that way in reality. Using what we learned last week, 1000Mbps divided by 8MB/Mb is 125MB/sec. We have 500GB of data to move, which is 500,000MB. So 500,000MB divided by 125MB/sec is 4000 seconds, or 67 minutes, a little over an hour. Well, Migration Assistant took 16 hours to move that data over. I KNOW it’s doing other stuff while it moves the data but I would love an explanation of why it works at 1/16th of the speed it’s rated.
When I started the transfer, it said, “connect a thunderbolt cable to go faster”. Well that sounded grand, so I plugged one into both Macs, and the message didn’t change. Hmmm. I unplugged the Ethernet cable and the thunderbolt cable, and the message changed to “connect a thunderbolt or Ethernet cable to go faster”. So it’s definitely noticing on the fly what’s connecting them (in this case having reverted to wifi transfer). By the time I’d started fiddling with this, it had been going a couple of hours so I didn’t want to interrupt it, but I went online and found in a knowledge base article by Apple that Target Disk Mode still exists, and that I could have started my old Mac up with it and used Thunderbolt to transfer the data. So there’s a nugget for you – and a bit of info they COULD have included on screen before I started, right?
After the data finished transferring, I started playing with my new Mac…and I wasn’t impressed with the speed. It was better, but nothing to write home about. I should mention that my upgrade to the new Mac was only moving from a 2.2GHz i7 processor to a 2.3GHz processor (after 2.5 years the top of the line only changed by that much. My expected speed improvements were going to be from going all SSD and having 16GB of RAM now. The processor clock rate wasn’t going to do it but I was looking forward to the promised 8 hours of battery life now that it’s the Haswell chip.
ANYWAY, like I said, the speed wasn’t blowing my dress up. That’s when I realized that I really should do a clean install of JUST my data, not bring every little piece of cruft over that I’d loaded on my old machine. So after all that waiting for my data to move…I erased that account. I had created a vanilla Admin account earlier, but I realized I’d mucked about in that one already so it didn’t count as clean any more either, so I created a clean Admin account and threw out both of the other accounts.
Then I had way more fun. I hooked up my most recent backup (done right before the new machine arrived) and even though I had to connect it via USB since my new machine doesn’t have FireWire, I was able to pick and choose what to bring over. For example, right before going to the gym for example, I grabbed that 250GB Aperture library and started that migration while I was gone. Only took a couple hours so when I got back it was all ready for me. I was also able to play on BOTH machines while I was transferring dat so it was far less painful. On top of all that I was very selective on what I really needed to move. You know how when you clean out your closet, if you take out what you don’t wear you maybe give away 10 pieces of clothing, but if you take out everything and put back what you DO wear you give away a lot more stuff? Moving data between drives is exactly the same thing.
I have to tell you, NOW my machine is snappier than ever. I’m actually able to feel the speed of the SSD, especially with Aperture. If you’ve been playing along with our home game, you know I’m a big fan of putting an SSD in place of the optical drive and keeping your spinning drive for data as a way to upgrade an older computer and gain a lot of speed. That’s still true, but one of the cost tradeoffs I’d made on my previous Mac was to put a giant spinning drive in (750GB) but to go for the 5400RPM drive. So that giant Aperture library was on pretty much the slowest media you could have hoped for. Now on the SSD in the new Mac it’s blindingly fast, and that makes me really happy I shelled out the extra moola for a giant SSD, instead of putting my photos on an external drive (even if CrashPlan would have backed it up for me!)
More Migration Thoughts
I’ve explained the advantages of moving your data only instead of using Migration Assistant but there are disadvantages of course. You have to pretty much configure everything on your own, but it’s not near as bad as you would think.
Of course the best thing to make your life easy is the Mac App Store. Pop that open, hit the Purchases tab and start tapping on the download buttons. I don’t know about you but I download a lot of stuff that don’t necessarily stay with me for the long haul, so I find that I only download only about 60% of what I had on my old computer. That’s the good thing of starting over though, right?
Once you’ve downloaded the apps you bought through the app store, now it’s time to tackle those pre-app store applications. One of the most wonderful things I’ve added to my arsenal in the last 5 years is LastPass – which is designed mostly to store passwords but is fabulous for storing application keys. I kept LastPass open for a couple of days straight so I could download applications, install them, slap in the key and keep moving. If you don’t use LastPass yet for passwords, you might want to try it first for keys.
Missing Fonts
Here’s a weird omission in Mavericks – the font Century Gothic was missing for me. I’m not one of those crazy font people who talk about serifs and such, but I just love that one font. On Windows, on Mac, in email, wherever I type I want to see Century Gothic. I’m not sure why it was missing for me, or even if it was missing for anyone else, but I was very sad. Luckily with a bunch of Macs lying around, it was easy to recover. I couldn’t remember where fonts were stored, but luckily someone on Twitter (and I wish I could remember who), reminded me that fonts are stored in an application called Font Book. I went over to my previous Mac, opened up Font Book and just as a guess right clicked on Century Gothic, and just like in iTunes there was a “reveal in Finder” option. Now to move it from old Mac to new Mac – what’s the best way to do that?
 Many of you already know the easiest way to move files between Macs and between iOS devices now, but just in case someone doesn’t know about it, let’s briefly talk about AirDrop, but I didn’t “get” AirDrop at first. There’s an icon in your left sidebar, and if you click on it, you see an explanation of how you can share files wirelessly. What’s the big deal though? I can do that anyway with file sharing, right? Well the big deal is that AirDrop actually lets you transfer between machines without using the local network. When Steve and I were on MacMania last year, we didn’t have good Internet, but we were able to pass files back and forth between our computers without an Internet connection at all. It’s sort of like it creates a temporary ad hoc network just for the computers nearby. I used it again recently when my buddy Niraj was teaching a class, and we all needed this 400MB download and the Internets were dodgy – I did the slow download once and then very quickly AirDropped it to everyone else in class. Steve and I love AirDrop now and use it constantly to move field within our network. So of course I used AirDrop to move Century Gothic back to my new Mac.
Moving Bookmarks
Next up I wanted to start taking advantage of the new iCloud Keychain in Mavericks and iOS 7. As you recall, I’m a huge fan of LastPass, but iCloud Keychain could make life even simpler. The only problem is that, like many of you, I’m a Chrome user. I decided to give Safari another try and the only good way to do a real trial is to move bookmarks and all to Safari and make it the default browser. It has also been on my nerves that bookmarks don’t sync between Safari and Chrome so I figured I’d make a clean start. By the way, don’t write this down because my process was a disaster!
I have my bookmarks and most importantly my bookmarks bar set up perfectly the way I like it in Chrome, so rather than export and import into Safari where I already have a pile of outdated bookmarks I’d have to sort through for duplicates, I got the genius idea to erase all of my bookmarks in Safari first, then I’d export from Chrome and import them into Safari. That SOUNDS like a good idea, right? Well I have no idea why this happened, but after I deleted my Safari bookmarks and went back to Chrome – they were ALL GONE FROM CHROME. I couldn’t believe it – somehow THAT was the precise moment that bookmark syncing decided to take place??? I opened my iPhone and of course syncing was working perfectly so I didn’t even have my old lame bookmarks in there.
I think I showed a sign of brilliance when I opened my old MacBook Pro and as fast as I possibly could I shut off wifi, and was quick enough that I could open Chrome there, export my bookmarks, turn on wifi and AirDrop them back to the new computer. If anyone can explain to me how killing bookmarks in Safari killed them off in Chrome, I’d sure like to know!
Restarting Backups
 At some point in the process you’re going to want to start to back up the new computer. As I mentioned at the top of the show I’m a huge fan of CrashPlan for offsite backups. Since I’m a big old data hog, and it took 3 weeks for my data to get up there in the first place, the last thing I wanted to do was start over with the exact same data, right? Turns out CrashPlan has a process for this – it’s called Adopt a Computer. Personally I don’t think that’s an intuitive name and it did take me a long time to figure out that it was what I was looking for. All you have to do is click that button in CrashPlan and it will point your new backup to the old data and won’t rewrite any of it. Pretty cool, isn’t it? It does have to do some work since I’m not copying over nearly as much glop as I had before but it’s working pretty darn well so far, and I feel good knowing I’m still protected on my new machine. Another reason to love CrashPlan!
Don’t Forget Your Application Support Folder
There’s a folder you may not realize is super important until you forget to check it just that one time, and it’s called Application Support and it lives in your user Library folder. I’m not sure how many applications use it but if you don’t use Migration Assistant, you wouldn’t naturally go digging around in your Library folder. In fact, that’s where all those crusty plists and such live so most of the glop you’re trying to avoid moving is thrown into the Library.
I’m sure very few of you use Feeder, but it’s the application in which I write all of my 5000 word show notes and create the feed that gets the podcast to you. Well Feeder keeps it’s files inside the Application Support folder! So yeah, it’s kind of important to me to keep that one.
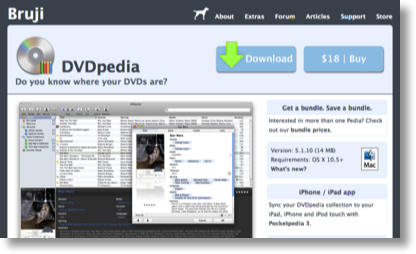 The second application is called DVDpedia, which is an awesome application from bruji.com that keeps track of your DVD library for you. Maybe Steve and I are old school but we still like having the physical media because it allows us to create the digital media to play anywhere we want it, and when we’re at home we get the full Blu-ray visuals and Dolby 5.1 audio. DVDpedia is awesome – you simply hold a DVD up to your iSight camera and it reads the barcode and adds an entry to your DVD database. We use it all the time when we’re trying to find a DVD and then start wondering if we actually do own it or not. You can also use DVDpedia to keep track of videos you’ve loaned out. It taps into your Contacts and can even give you a reminder to bug your future son-in-law that he’s had Planet Earth for nearly two years now. It’s only $18 on the Mac and I just noticed they’ve got an iOS app so you can carry your DVD database with you, called PocketPedia. I totally have to go get that! I’m tracking 266 DVDs right now so that would be super fun. ANYWAY, why did I bring up DVDpedia? Because it keeps the database in my ~/Library/Application Support folder. As fun as it is to scan in the movies I really don’t want to do it again 266 times!
After I finished writing up these show notes, I did what I do every week – I open up the wiki where Bart and I keep the Chit Chat Across the Pond notes, I switch to html mode, copy the text, and then open TextSoap and run a custom filter I created to clean out all the glop that our wiki markup language throws in that really messes me up. I opened Text Soap on the new machine…and guess what was missing? My custom filter. And by now you can guess where I found it – over in my Library/Application Support folder on the new machine!
These are three examples of mine that maybe you don’t have – but based on my experience, I HIGHLY recommend going through your Application Support folder as part of your manual migration process, who knows what you might find in there. By the way, I also discovered that my SuperDuper backup was NOT backing up my Library folder all this time, I guess because it’s normally hidden? I changed it so it’s definitely backing it up now, and of course CrashPlan was getting it for me so I was still protected.
Signed Encrypted Email
Here’s another thing to remember in your manual migration process – remember all that work we did to get our email signed so we could have encrypted email between each other? With my manual method, my Keychain Access file didn’t come over. I still have to go through it to see what else I need, but I didn’t realize what I was missing until BarryP sent me an email and it was empty but had a little .smime attachment. That’s when I realized my certificate for signed email hadn’t come over.
You don’t need to recreate anything, simply go to the old machine, open Keychain Access, click on Certificates in the left sidebar, and find your certificate. You can recognize the email cert by the fact that it starts with your address in the name, in my case [email protected]. Right click on it, select copy, open up email (still on the old machine) and email it to yourself, and then open on the new machine. It will jump right into Keychain Access where it belongs. This is exactly how we moved it to our iOS devices, remember?
After I opened my cert I went back to Mail and there was Barry’s email politely telling me that CrashPlan could back up network drives! Sheesh. Anyway, Barry and I chatted about what I had to do to read his email and he pointed out that if anyone got a new iPhone or iPad recently they should email their cert on over again to make sure the new device can still do encrypted and/or signed email.
The Little Things
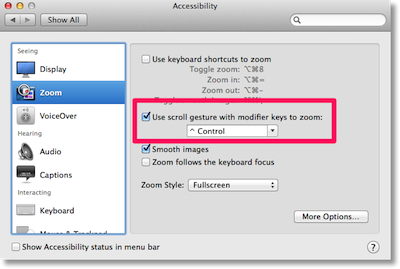 Lastly there’s the little things you take for granted that you have to redo. I freaked out for a second when I tried to use Control-scroll to zoom on some text I couldn’t quite see and it didn’t work! I thought maybe they disabled that feature in Mavericks and I would have been really sad about that, but then I remembered it’s something you can enable in System Preferences. If you’re over 40 or you hook your Mac up to your giant TV and the menus get REALLY teeny, you might want to turn this on. In System Prefs go to Accessibility, then click on Zoom and check the box that says “Use scroll gesture with modifier keys to zoom:” It defaults to Control, but you can select something different if you like. Now instead of getting to a web page where the webmaster hates people and hitting command-+ a zillion times to embiggen the fonts, just hold down control and scroll on your mouse or trackpad to embiggen the whole darn screen. Found what you want? control scroll back down and everything is back to normal. I use this ALL the time and used it for ages even before I got old!
Conclusion
The bottom line is that if you’ve recently done a clean install on your Mac, there’s no way any of this shenanigans is worth the effort, but if it’s been a year or two, I really think investing a few hours getting to know your system all over again and how you make it tick is actually very worthwhile. My new Mac is now performing at lightning speed – and I’m pretty sure all my old settings and garbage would have slowed it down. I do highly recommend keeping a full copy of all of your settings for at least 3 months because you just never know when you’ll go to open a file and realize there was that one settings file in the Library…
Clarify
I talked a lot about the modifications I had to do to migrate to my new Mac (and I’m not finished yet!) and there was one tool that was crucial to my success, and that was Clarify. For example, I have a ton of little fiddly settings in Feeder to create the show – rather than figure all that out again, I simply flipped through every setting on my old Mac, using command-shift-2 to trigger screenshots in Clarify, and then went through and named each shot for the command so it was easier to search later. I tapped the Evernote button, it threw my tutorial up into Evernote, synced it in the cloud and I opened up Evernote on my new Mac and it was easy peasy to flip through the shots and get everything just the way I like it. I did forget one screenshot, and that’s when the real power of the Evernote Clarify syncing is awesome. I opened Evernote on the old Mac, found the tutorial, and at the bottom, the Clarify document was attached. Opened it from within Evernote, added in the missing screenshot, tapped Evernote again and boom, it’s synced across to my new Mac with the changes reflected in Evernote.
Remember, when you go to buy Clarify, be sure to buy the version over at clarify-it.com so when Clarify 2 comes out you’ll get the update! I wouldn’t recommend the app store version for now because Apple won’t let you upgrade from there, you’ll have to buy the upgrade.
Chit Chat Across the Pond
Security Light
Important Security Updates
- FireFox updated to version 25 – this is a security update, so be sure to re-start FireFox when it asks you to – http://nakedsecurity.sophos.com/2013/10/30/firefox-moves-up-to-version-25/ (did you know, FireFox’s official cycle is to release a new version every 42 days!)
- OS X 10.9 Mavericks IS a security update, and the bugs it fixes are NOT patched in older versions of OS X, at least not yet (the price of free perhaps) – http://www.intego.com/mac-security-blog/os-x-mavericks-10-9-gets-security-update/ (related, good advice on what to do if you Mac is too old to run Mavericks – http://www.intego.com/mac-security-blog/what-to-do-if-your-mac-cant-run-os-x-mavericks/)
- Apple patches Safari for older versions of OS X (10.7 & 10.8) – http://www.us-cert.gov/ncas/current-activity/2013/10/23/Apple-Releases-Security-Update-Safari-OS-X
Important Security News
- D-Link responds to the recently revealed backdoor in some of their products and begins to release new firmwares for the affected routers – http://www.dlink.com/be/fr/support/security
- PSA – there is a big spike in randsomeware at the moment – this is malware that encrypts your files and then extorts you for money to get your data back. This is not a new idea, but in the past it has often been done badly, the big problem with the latest iteration, CryptoLocker, is that the encryption is well implemented, so actually un-breakable within the age of a human (and possibly even within the age of the universe). The best defence is good backups THAT ARE NOT CONNECTED TO YOUR COMPUTER AT ALL TIMES – this malware enumerates drive letters, so it will get files on connected backup drives, AND NETWORK DRIVES – Brian Krebs has some good advice for protecting yourself from this threat: http://krebsonsecurity.com/2013/11/how-to-avoid-cryptolocker-ransomware/
- There is a lot of hubbub at the moment about a fantastical sounding virus that can apparently magically send radio traffic without actual radio hardware and much more. The only thing we know for sure is that we don’t know enough to know anything – this is a wait-and-see story. The best critique I’ve come across so far is from Naked Security – http://nakedsecurity.sophos.com/2013/11/01/the-badbios-virus-that-jumps-airgaps-and-takes-over-your-firmware-whats-the-story/ Phys.org discussion: http://phys.org/news/2013-11-badbios-malware-microphone-speakers.html
- Ars wrote a dramatic-sounding story which stated the blindingly obvious – badly written apps that don’t use SSL to communicate with servers can be easily attacked. The headline also implied that this fundamental truth about all internet communications is somehow an iOS problem, it’s not, it’s a problem for every single app on every single platform that communicates across the internet in any way. Despite the link-baity headline, the article raises an important point – there are lots of badly written apps in the App Store – http://arstechnica.com/security/2013/10/ios-apps-can-be-hijacked-to-show-fraudulent-content-and-intercept-data/
- SecureMac have issued an advisory warning people about CNET’s Download.com injecting adware into downloads of some Mac apps – I reiterate my advice to avoid all download sites and always get your software directly from the developer of the Mac/Windows App Stores – http://securemac.com/cnet-installer.php?utm_campaign=Feed&utm_medium=referral&utm_source=loopinsight.com
- It turns out Adobe rather under-estimated the size of their recent breack – it was about 13 times worse than they said – 38 MILLION users affected, and they also lost more source code than they first though, including Photoshop – http://krebsonsecurity.com/2013/10/adobe-breach-impacted-at-least-38-million-users/
- Beware fake BBM apps in the Google Play store – http://nakedsecurity.sophos.com/2013/10/21/fake-blackberry-bbm-apps-still-in-google-play-store-one-month-after-failed-official-release/
Suggested Reading
- Lavabit and Silent Circle come together to form the Dark Mail Alliance – an attempt to create a whole new open-souce email standard that is inherently secure – http://nakedsecurity.sophos.com/2013/11/01/lavabit-and-silent-circle-form-dark-mail-alliance-to-thwart-email-surveillance/
- More security concerns over NFC contactless payment systems – can be interacted with silently from up to 90 cm away with a cheap and relatively easy to build kit that fits in a backpack – http://nakedsecurity.sophos.com/2013/10/31/contactless-payments-researcher-intercepts-card-data-from-a-metre-away/
- Mavericks introduces a dictation mode that does not send your data to the cloud (if you opt into it) – http://nakedsecurity.sophos.com/2013/10/29/apple-introduces-cloudless-dictation-no-longer-demands-your-contact-list-to-understand-you/
- WordPress 3.7 is out, and it introduces an interesting new feature – automatic security updates – http://nakedsecurity.sophos.com/2013/10/26/wordpress-3-7-is-out-now-and-promises-to-update-while-you-sleep/
A Quick Pallet-cleanser – Comet ISON is coming!
You may or may not know, but there is a comet making it’s way into the inner solar system that could well put on a spectacular show in our Christmas skies. The comet is called C/2012 S1 ISON, or Just ISON for short (named after the International Scientific Optical Network, a network of telescopes, one of which discovered the comment in 2012).
Comets are notoriously volatile, so treat any estimates of it’s future brightness as educated guesses. You can watch the comet’s progress live at http://www.cometison2013.co.uk/perihelion-and-distance/
While brightness estimates are a black art, our understanding of orbital dynamics is very solid (and has been since Johannes Kepler published his laws of planetary motion in 1609), so we do know exactly where it will be in the sky. You can use desktop astronomy apps like RedShift (https://itunes.apple.com/ie/app/redshift-astronomy/id515282894?mt=12) to plot the comet in the sky for you (RedShift has a button to download comet data from the internet, if you do that, it will fetch the ISON data for you).
Main Topic – Taming the Terminal Part 10 of n – The Manual
http://www.bartbusschots.ie/blog/?p=2650
That’s going to wind this up for this week, many thanks to our sponsor for helping to pay the bills, Blue Mango Learning at bluemangolearning.com makers of ScreenSteps and Clarify. Don’t forget to send in your Dumb Questions, comments and suggestions by emailing me at [email protected], follow me on twitter and app.net @podfeet. Check out the NosillaCast Google Plus Community too – lots of fun over there! If you want to join in the fun of the live show, head on over to podfeet.com/live on Sunday nights at 5pm Pacific Time and join the friendly and enthusiastic NosillaCastaways. Thanks for listening, and stay subscribed.
My first “modern” Mac was the first White G3 iBook running OS X 10.0
Migration Assistant may have been hauling Kruft around dating back that far.
I decided to clean install my new 2013 Air, and I don’t have any Apps from the Mac App Store I wanted to keep. (Other than the free core, like iPhoto.). in fact, the Apps I did buy from the App Store are Kruft, and even though I uninstalled them, I couldn’t stop Notification Center from annoying me with Notifications to update Apps I trashed.
Solution: new ID not connected to the one I used to buy the Kruft.
Next, how to move Applications and Settings I do want, without Migration Assistant dragging Kruft, or install problems related to plist files, etc, not coming along with drag and drop of Applications. (Don’t ya’ miss the good old days ? )
SOLUTION: Reggie Ashworth’s App Delete which doesn’t just delete programs and am related files but offers the option to archive programs and related files. Then to install the archive on the same, or a different (NEW!) computer.
And, no, I bought AppDelete direct from Reggie. He did the work, he supports his programs, give him the money, not Auntie Apple who certainly doesn’t need it. And when you do, Reggie won’t annoy you through the “Notification Center” on your Mac
I heard, and can’t verify, that the nagging about updated apps that you don’t have installed happens if you have a Time Machine backup connected that has the apps on it, could that be why you get the nagging?
Definitely buying AppDelete from Reggie directly (http://reggieashworth.com) is a great idea. The main reason is because they only let him sell AppDelete Light which only tells you where the files you want to delete are, but won’t actually delete them.
FIRST – if you want to try moving Applications using App Delete’s Archive feature, go to Allison’s Nosillacast Google+ Page where I shared some hints with Allister Jenks.
**********************
Second:
Nope, Allison, no Time Machine.
How is Apple’s Store to know I deleted a program.
Ok, they know everything, and share it with the NSA. I get that.
But is the App Store getting a signal when I delete an App? If it gets the signal, is anything (useful, not marketing related) done with the information? How to handle the multiple computers / users who can share an App?
Nag, nag, nag, and no way (I could find) to turn it off. Until I simply decided to walk away from my App Store ID and geta new one, which is annoying. And you probably notice, a process intended to give Apple lots of detailed information about its customers, for Apple marketing, to tie to Apple iAds, and surely to resell to third parties.
Give a company your real legal name (necessary to activate the credit card), address, phone number, and access to your computer, and you’re their pawn.
Google, Facebook, MSFT, Apple. Not much difference in how aggressive they are in trying to suck out your soul to sell into the “free market.”
Allison – I’m not really sure why you found the “adopt a computer” thing so hard to find. When my girlfriend got her new MacBook Air and I installed CrashPlan on it, it mentioned that feature right there on the “backup” screen (the first screen that the Crashplan app opens to) once you log in to your CrashPlan account from within the app. I don’t remember the exact wording but it said something like “Upgrading to a new computer? Use the “adopt” feature to transfer your CrashPlan+ membership to this new computer and continue backing it up” and it had a button you could click to do just that.
Donald – because I didn’t open up CP and try to back up. Like a crazy fool I went straight to the CP site to read the documentation. “Adopt” was prominently shown but that word didn’t jump out to me as meaning “transfer”. Once I figured out that’s what adopt meant, I opened CP only then did I see the obvious description!
Strictly speaking, man pages have been considered as deprecated by the open source community (at least the GNU faction of same) for quite some time now. A lot of commands still come with man pages, but many more do not. The “new black” in terms of documentation for Unix commands is the GNU “info” system. It works kind of similarly to man, in that typing “info (command)” will (usually) give you information on that command. But if you type “info” with no arguments, it will print out a directory of all available documentation, and you can use the arrow keys and return to scroll through it and drill down and read it. (And, yes, the “info” command has a man page. And the “man” command has an entry in the info system. How’s that for meta?)
Re files vs directories – In unix-speak, everything is a file. Directories are just specially formatted files. You even access devices (hard drives, terminals, printers, USB drives, etc.) by way of “device special *files*” which are entries in /dev (e.g. /dev/disk0.
Another useful man command trick is the -k option, which does a keyword search across all available man pages. So for example if you know you need to use a command relating to printing, but you’re not sure what command you need,you can do “man -k printing” and it will list out all printing-related commands. It will list out all man pages of commands having anything to do with printing.
Man pages have “sections” When you view a man page, say for “ls”, you will see it listed as “LS(1)” The (1) is the section where that particular man page comes from. Here are the various sections available: 1 – General commands; 2 – System calls (programmer stuff); 3 – Library functions (programmer stuff); 4 – Special files (usually devices, those found in /dev) and drivers; 5 – File formats and conventions; 6 – Games and screensavers; 7 – Miscellanea; 8 – System administration commands and daemons.
This is important because some man pages are listed under multiple sections. For example, “passwd” is both the command used to change your password, but it is also the file format of the slash etc slash passwd file that stores user account information. So when you want to read the man page for “passwd” how do you tell it which one you want? By using the section number of course! So “man 1 passwd” gives you the “passwd” man page from section 1 (commands, aka the “passwd” command used to change your password), whereas “man 5 passwd” gives you the “passwd” man page from section 5 (file formats, aka the format of the slash etc slash passwd file).
Finally, there is a great FREE app in the Mac App Store called “Dash” that lets you graphically read and search man pages (as well as a bunch of other kinds of documentation). Very useful for developers/programmer types such as myself, but can also be useful for web developers (has tons of documentation on Web technologies like HTML, CSS, JavaScript, jQuery, etc.) Plus there is a handy Alfred workflow that makes it dead simple to search Dash for anything, so now you can easily search man pages right from within your Alfred.
Sorry about having to split up my comment into multiple comments, for some reason WordPress would NOT let me post that all as one long comment (maybe it thought I was a spammer or something 😛 )
(BTW apparently the problem was that WordPress thought that me mentioning the slash etc slash passwd file was an attempt to try and hack WordPresss, so I had to spell out the slashes 😛 )
To add to Donald’s detailed discussion of man / info… “help cd” provides useful output. The reason is that bash (the default shell for most *nix OSes) is providing the “cd” command for performance reasons, rather than it being a separate executable. “help” is the built-in bash command for, well, help running its commands. So try “help” if “man” fails.
Thank you i praise you!!! You rock! You are awesome!!! For 2 freaken days my migration assistant (yes I would like to shorten that to ass.) has not been able to see the files from the source machine for other macbook pro and only 1 year older. nothing nothing nothing worked! arg! It wouldn’t see my files no matter if I shared them with all of the people in my building….arg! So I tried the magic T and turn on and well darn if it didn’t work. It kicked the migration ass. into gear and wow I could see all of my GB of files…not just 147kb. Thank you so much!!! It is the little things that turn into big things isn’t it?
So glad this helped you Deb. And thanks for letting me know!
Sorry, I know old episode, but regarding the manual migration of data, was this still using Migration Assistant to pick and choose the data to move from the TimeMachine backup? And if not, did you copy top level folders or individual files, etc.? I’m confused on whether I can just paste on top of folders and replace everything in the new installation or if I need to copy contents and paste them within the corresponding folder on the new installation.
Thank you!
Omr- it’s a great idea to use Migration Assistant to move your data because it will keep permissions properly set. You can absolutely plop the files where you want them by dragging them over but MA is an excellent method. I avoid MA for all the apps and settings though. Cleaner faster machine that way. Good luck!