Katie Floyd (Twitter) sits in this week for the still vacationing Allison Sheridan. We discuss upcoming events at Macworld/iWorld, Katie offers a review of SaneBox, a web service that has helped her bring order to email, Allison chimes in to talk about creating custom calendars using iPhoto and Bart contributes a review of the MOS Organizer. Finally, Chuck Joiner of MacVoices joins Katie for Chit-Chat Across the Pond to discuss Macworld/iWorld and how he produces hours of video coverage from the show.
Hi, this is Katie Floyd sitting in for the still vacationing Allison Sheridan of the NosillaCast Mac Podcast, hosted at Podfeet.com, a technology geek podcast with an EVER so slight Macintosh bias. Today is Sunday March 9, 2014 and this is show number 461
Macworld/iWorld
Macworld/iWorld is only a few short weeks away and I hope I’ll have an opportunity to see some of you there. I will be involved in a number of activities this year. I have two presentations as part of the conference schedule. the first will be held on Thursday, March 27, 2014 at 3:00 p.m. with my podcasting partner in crime, David Sparks and is appropriately named “Power Users Workflows.” David and I will take the audience through some of our favorite workflows from our personal experiences as well as 5+ years of Mac Power Users. This will be a 45-minute session jam-packed with explanations and demonstrations of our favorite workflows to save time and enhance productivity on the Mac and iOS.
My second session will be held on Saturday, March 29, 2014 at 11:00 a.m. and is called “The Apple Media Center”. The title is a misnomer because what the session is really about is piecing together a user-friendly entertainment that incorporates all the current technology and entertainment service offerings including subscription to a traditional cable service, OTA, Netflix, Hulu, Amazon, etc. We’ll also look at hardware products including the Apple TV, Roku, TiVo and the “create your own media center” approach using a Mac mini and how to make all these services interconnect for an Apple-centric audience.
I’ll also be part of a session with the Mac Roundtable that will be held at 11:30 on Friday, March 28th on the Second Stage which is located on the exhibit hall floor. Chuck Joiner will be hosting and I’ll be joined by Allison, Don McAllister, Dave Hamilton, Jeff Gamet, John F. Braun and other members of the Mac Roundtable.
Of course I would be remiss if I didn’t remind you about Allison’s session at Macworld/iWorld. That will be held on Thursday, March 27th and it’s called Avoiding Digital Disaster. I’ve seen a sneak peak of this presentation and it’s sure to impress. Allison wants to get you thinking about what would happen to your digital life if something happened to you. Would your family know where your passwords are? How would they know whether all of your tech stuff is worth is worth anything?
To attend the sessions you must have a conference pass (not just an floor pass) which includes access to over 60 hours of training, entertainment, and product discovery with full access to all Tech Talks, Main Stage activities and the Macworld/iWorld Expo Hall. As a speaker I’ve been given a limited number of $100 discounts on a first come first serve basis using this link. The discount is valid on new registrations only until March 14, 2014 or until all the discounts have been used, whichever occurs first.
Allison also asked me to remind you that if you’re going to go to Macworld, she hopes you’ll come to the NosillaCastaways party at Jillians on Friday night 28 March from 6–8pm. Be sure to sign up for the party so the scary bouncers will let you in. Go to podfeet.com and click on NosillaCastaways Party 2014 in the tab in the menu bar, or go to the link in the shownotes.
The double secret password to get in is ClarifyRules! (with the exclamation point!)
For everyone who can’t attend, Kevin and Steve are valiantly working out how to have a Google Hangout on Air so that people from far away can talk to people at the party.
SaneBox
 I receive quite a bit of email, easily over 100 messages a day between the day job, my personal email and the podcast. I try to subscribe to the “inbox zero” philosophy to keep my inbox manageable and for years have tried to tweak various email rules to keep things under control. But it just got to the point where things were becoming unmanageable. After reading my friend David Sparks’s book on Email, I decided to give SaneBox a try. (full disclosure, SaneBox has since become a sponsor of my podcast, Mac Power Users).
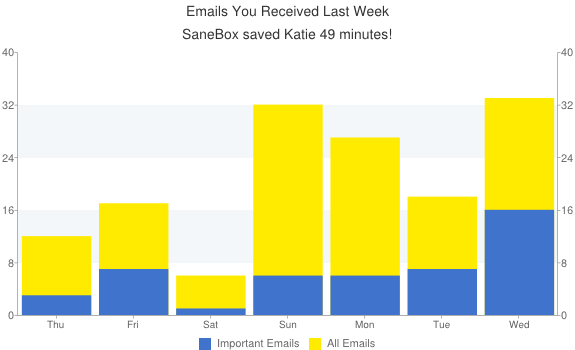 SaneBox connects to your various email accounts and filters your messages for you. When you first sign up, SaneBox scans your email, and optionally connects to your social network accounts to learn about your habits and connections. It then creates a “SaneLater” folder and from that point forward will automatically filter unimportant messages to this folder that you can check at your convenience while your most important messages stay in your inbox. SaneBox learns your patterns and habits and will get smarter about its filtering the more you use it and train it.
After you’ve mastered the concept of the SaneLater folder, you can active additional folders and features. One of my favorites is the “SaneBlackHole”. Drag an email to this folder and you’ll never hear from that sender again. Great for pesky PR companies who don’t provide you with a legitimate way to unsubscribe from their mailing lists. You an also create custom folders for Newsletters, Bulkmail or any other category you like.
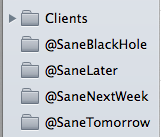 One of my most frequently used features are “snooze” folders. With these you can remove a message from your inbox, but that message will automatically reappear in the inbox on the day you specify. For example, I have a “next week” and “tomorrow” snooze folders setup for my work email account. If someone emails me with a non-urgent issue after hours or on the weekend I will put the email in the appropriate folder and it will pop back in my inbox the following morning (or Monday morning in the case of the “next week” folder) so I can take action. All the while, the emails are safely stored in my snooze folder and totally accessible should I decide to access the message sooner rather than later.
If you need to follow-up on a message, SaneBox can remind you through a feature called SaneReminders. SaneReminders notifies you when an email you sent wasn’t responded to by a certain time. To activate, just CC or BCC timeframe@sanebox .com (for example: [email protected] or [email protected]) and you’ll receive a reminder. You can also use this feature to defer individual email messages to a future date or time by forwarding the email to [email protected].
SaneBox comes with a two week free trial with plans starting at around $5 a month. If you had asked me a few months ago, I would have never thought I needed a service like Sanebox, after all I’m a geek and I know how to manage my email by setting up rules, clipping messages into OmniFocus for future action and other “power user” techniques. But I was wrong. Three days in to my trial I went all in and bought a two-year membership, it was that good.
If you want to check out SaneBox, use the link in the shownotes and in addition to the two week free trial, we’ll both get a $5 SaneBox credit.
Before she left our fearless leader said she left a present for me, let’s take a listen…
iPhoto Calendars
Hi Katie and the NosillaCastaways! You didn’t think I’d let Katie get away with an entire show without me poking my head in, did you? Well I can’t ask everyone else to submit recordings for the guest hosts and not help out myself could I? I’d like to talk to you about how to make iPhoto Calendars.
Whether you’re an experienced photographer who has mastered the art of photographing butterflies or you’re the family member who makes sure to capture the important moments in your lives, a great way to have fun with your photos is to create calendars for yourself, friends and family. Luckily Apple makes this fairly easy but I’d like to give you some tips to help make this fun. I’ve done it the hard way and I’ve done it the easy way so let’s learn from my mistakes!
But Allison, It’s March – Isn’t it Too Late to Make a Calendar? Nope! you can have a calendar in iPhoto start on any month, and extend for as many months as you like. I used to try to get my calendars done in time for Christmas but it really made me crazy on top of all the other stresses of the holidays. One year I simply declared that the calendar year was now February to January. My stress level cut in half when I did that. Heck, you could make it July to June or even go longer than 12 months!
First you need to choose your photos. There’s a lot of ways to do it but let me give you some tips. I use Aperture to manage my photo library but it doesn’t let you create photo calendars; only iPhoto has the calendar creation feature. Luckily, in the latest versions, you can open your Aperture library in iPhoto (and vice versa). This means I can use Aperture but still create my calendars in iPhoto without copying photos from one library to the other. This is a great improvement in how they work together. I used to end up with duplicates in iPhoto and I was always afraid to delete them for fear I’d not actually put them in Aperture.
You might be thinking that you have to be super organized to do a good job of keeping track all year long of what photos might be good for the calendar at the end of the year. I pretend I’m going to do this every year, but to be honest, even I’m not that organized. Let’s assume it’s March and you’ve done nothing to keep track of the good ones throughout the year. There’s three ways to go through your photos to mark them as potentials.
1. You can add a naming convention to the information in each photo
2. You can rate your photos with stars (5 stars = calendar)
3. You can use Keywords.
I used to use the first option because I actually name every photo but that isn’t for everyone. Giving stars is easy, you see a photo and hit a number, but then when you’re ready to organize you have to put in extra filters by year. As much as it pains me to admit it (Allister Jenks and Bart Busschots have finally convinced me), Keywords are the easiest way to go, at least for this kind of project.
Both Aperture and iPhoto have super easy ways to assign Keywords. In Aperture you bring up the Keyword HUD (Heads Up Display) and simply drag your Keyword onto one or more photos as you flip through them. In iPhoto they have a Quick List option that allows you to select one or more photos and simply click on the Keyword to apply. Both methods are easy and painless. I chose to use the Keyword “calendar_2014” and even though I had at least a thousand photos to flip through, I was able to decide what photos might be worthy of inclusion in our calendar in an hour or two. Remember all you’re doing is selecting potentials so you can be liberal applying the Keyword which helps it go much faster than you’d think.
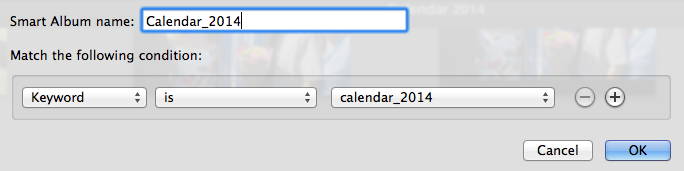 Both Aperture and iPhoto support the concept of Smart Albums, which will make it really easy to collect the photos that we’ve just finished keywording. These are just like smart folders on your Mac. Go to File and select New Smart Album, name the album and then choose what goes into the album. In our example we simply type in or select the Keyword for the search criteria and instantly we have an album with all of our candidate photos.
In my case I planned to send this calendar to some family members and I wanted to make sure I didn’t use a picture they hated, so I then selected all of the photos in my Smart Album and made a shared Photo Stream of them. I let my family members even contribute to the album so we got the best of the best as candidates.
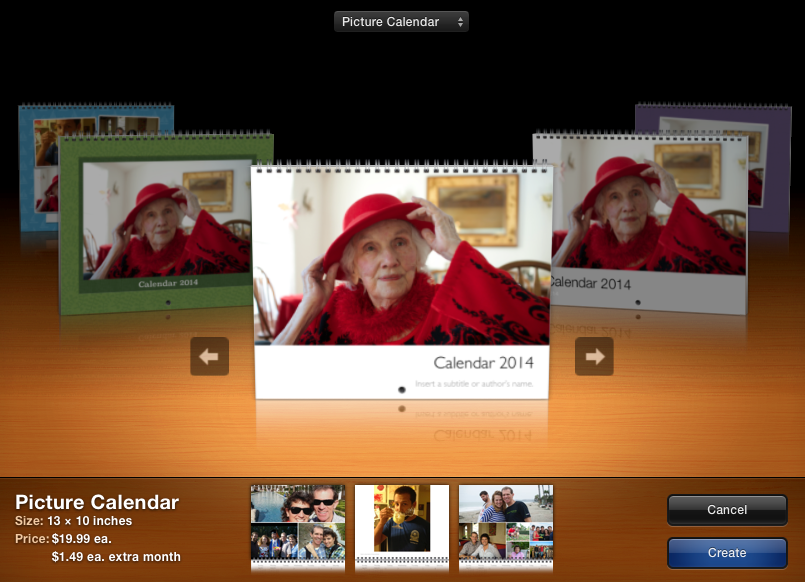
Now We Can Finally Start the Calendar. In iPhoto, select the Smart Album first (so iPhoto more easily knows which photos to use) and click on File, Select New Calendar. You’ll be faced with a carousel of options on how you want your calendar to look. There are whimsical and colorful backgrounds, options that have the photos tossed on the pages like real photos, and the classic calendars that have photos that fill the page.
iPhoto will auto layout your photos for you which is kind of nice; sometimes it’s easier to change things than to start with a blank slate. Double click on a month and from there you can drag and drop photos from the gallery on the right hand side to replace and move photos around. Can’t see the gallery on the right? Click the icon in the bottom right that says Photos and your Smart Album will be revealed.
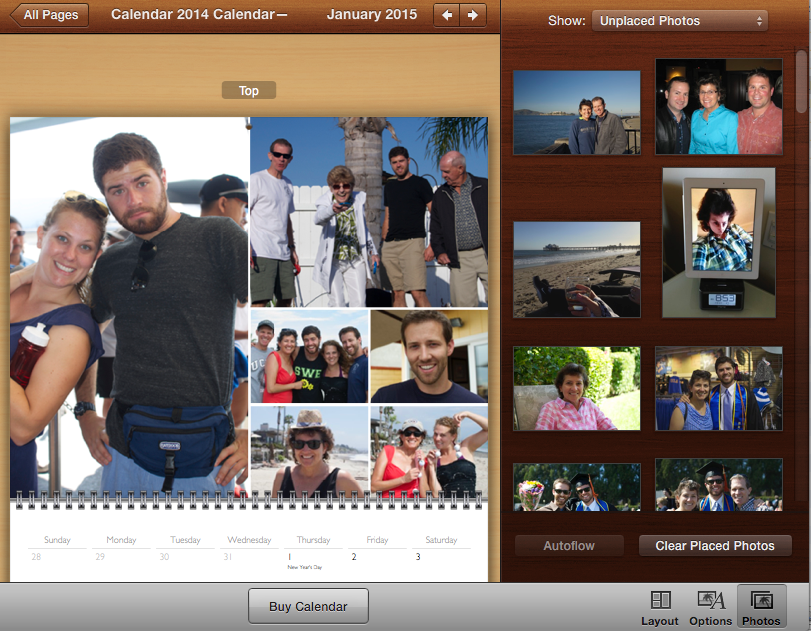
Keeping track of which photos you’ve used can be tricky so in the upper right corner of the window you’ll see a pulldown to filter your gallery by photos you’ve already placed, unused photos, or show all. This comes in really handy. Remember I mentioned the blank slate approach; in the bottom right of the gallery you’ll see an option to [email protected]. Do not click this unless you want to clear ALL placed photos. I thought it would only clear the photos on the one month I was viewing and there’s no undo for this one so I lost a lot of work. Remember we’re supposed to be learning from my mistakes
iPhoto even lets you modify the photos including filters, enhancement tools, zooming and cropping. I tend to get my photos in good shape before creating the calendar but sometimes it’s handy to have those tools right there when you’re creating your masterpiece.
I spent a lot of time this year fighting with iPhoto because it kept changing the layout of my photos. If I dropped in a new vertical photo for example, it would rearrange all of the other photos to accommodate the newcomer. I remembered in the old versions of iPhoto I had lots of layout options and I could control which layout I was using. I had to actually hunt down an Apple support article to find that there is a way to disable this auto-layout feature in iPhoto. In the bottom right click on Options, then on Calendar Settings and turn that darn auto-layout off! Once I did that I had a plethora of options for my layouts and I could control things myself.
iPhoto Calendars are printed beautifully and worth every penny of the $20 plus $6 shipping they charge. I’ve tried other options and none have been as nice as the ones from Apple. But $26 is still a lot of money, especially if you’re making more than one, so I highly recommend you proof your Calendar before pushing that “Buy” button. A great way to do that is to use the standard Print to PDF command. Somehow viewing it in Preview makes it easier for me to see duplicate photos and find artistic changes I’d like to make.
I also like to run it by someone else to make sure I get family approval. The only problem is the PDF you just created from iPhoto is super high resolution so the file is huge. Not just huge, GIGANTIC! When I printed mine to PDF, it was 198MB – that’s nearly a quarter of a gigabyte!
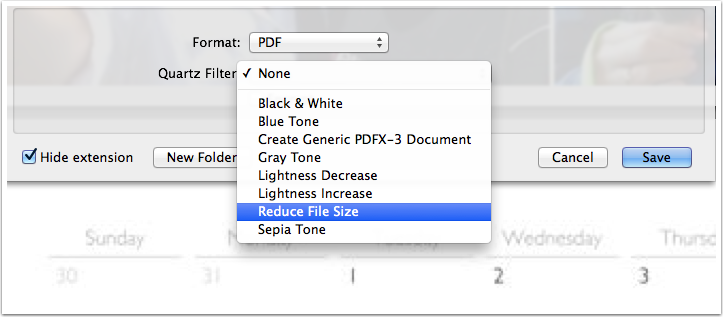 There’s a quick trick to make the file size very manageable and mailable. Open the PDF in Preview. Hold down the option key and then click on File and you’ll find the old favorite, Save As. When you select Save As, make sure the format is still set to PDF, and then click on the pulldown next to Quartz Filter, which you would think would have something to do with color, and choose Reduce File Size. Click save and miraculously that same file will shrink down to a mere single megabyte. Seriously – from nearly 200MB to 1.
I spend a fortune on calendars sending them to my family but I always get such a great response from them it’s worth every penny. I hope you take the opportunity to make you or someone you love happy with a personalized photo calendar.
Ok, Katie – you can have the show back…for now.
MOS – Magnetic Organization System:
Next up we have Bart with a review of the MOS Magnetic Organization system
http://mosorganizer.com – list price $23.95, available on Amazon for as little as $15
The problem to be solved:
You have a whole bunch of chargers plugged in, and the cables are always in your way, or worse still, they fall to the floor and you damage them by standing on them or running over the with the wheels of an office chair. (I’ve lost quite a few iPhone/iPad cables that way)
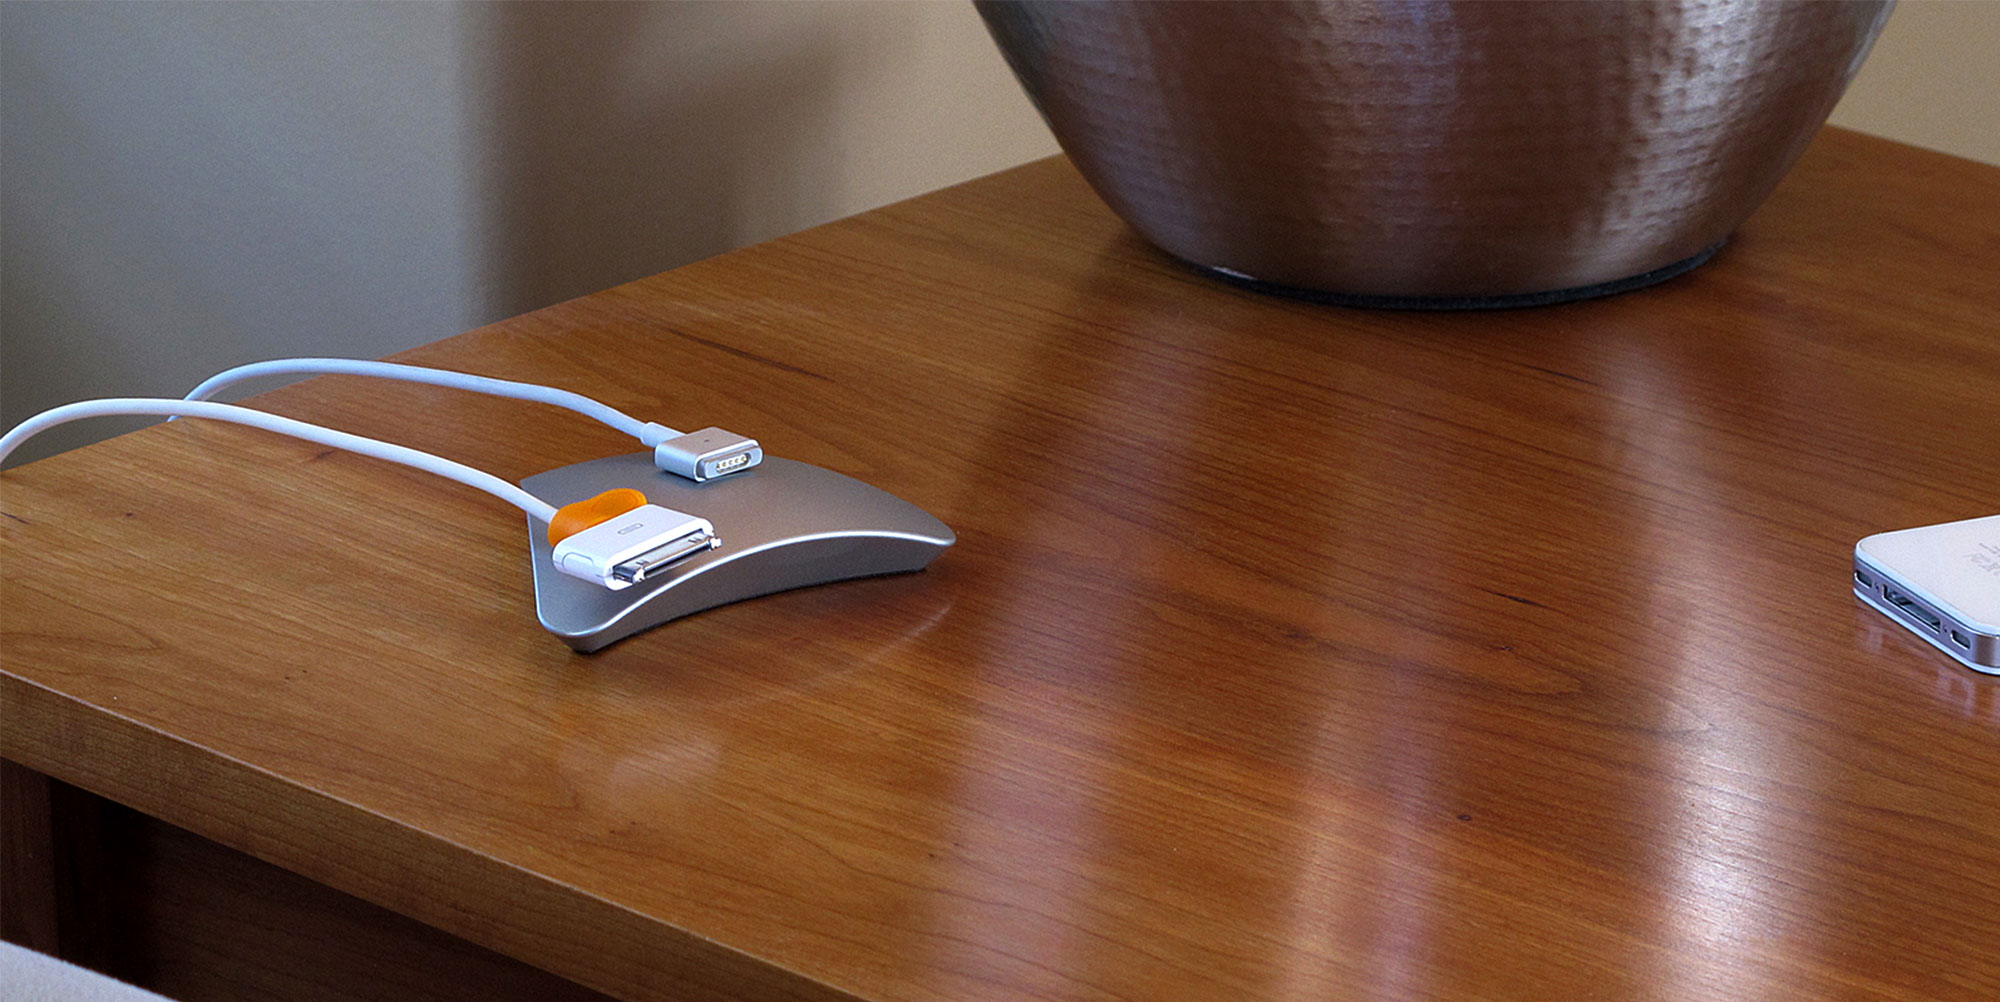
- A deceptively simple device – it’s just an elegantly designed magnet to help keep our cables organized.
- Many cables will just stick to it, but for any that don’t, it comes with little removable magnetic ‘cable ties’ (their word) that you put around cables to make them stick to the MOS.
- There is something really elegant about the rounded triangular shape – I can’t explain it, but it looks anything but cheap or tacky.
- The base is not sticky, but it really doesn’t slip – the site claims the base has a ‘micro suction cup surface’ – I’m not sure what that means, but I know it works!
- I have mine on my night stand and it’s made my life just that little bit nicer 🙂
Thanks Bart. I too picked up a MOS organizer a month or so ago and I posted a review of it on my site over at KatieFloyd.me you can find a link to my review in the shownotes. I really liked the MOS and keep mine on my desk at home and find I don’t have to use the cable clips that come with it because most cables have enough metal that they’ll stick to the MOS. I’m thinking about picking up a second one for my bedside. Allison chimed in on this discussion too via email (isn’t she supposed to be vacationing) and wanted me to remind you that the MOS does have magnets inside so you may want to be careful about positioning it too close to anything with a hard drive.
CCATP: Chuck Joiner and Macworld/iWorld
Links of Interest:
* Chuck on Twitter
* Chuck’s Podcast MacVoices
* MacVoices on YouTube
* Macworld 2014 Coverage on MacVoices
* MacVoices #14050: Road to Macworld – Allison Sheridan on Avoiding Digital Disaster
* MacVoices #14036: Road to Macworld – Katie Floyd On Media Center Options and Choices
It is strongly true that video is one of the most powerful tools on the internet and it allows people to not only see and hear you, but it lets them feel our enthusiasm and excitement for whatever it is that we are talking about. Personally I believe that philosophy. These video clips are really effective to promote this job.
Mulia