It’s time to take a break from all the photography talk and get back to my Top 5 lists as requested by Tammy. When last we left our hero, I had given you my top 5 iPad and top 5 iPhone apps. Now it’s time for my Top 5 Mac Apps. Again my criteria will be not necessarily the ones I use the most (e.g., Mail) and hopefully to avoid the super niche applications like Feeder from reinventedsoftware.com (the most awesome application ever that I use to create the podcast feed), but to provide more mainstream and perhaps unusual applications. As I looked at my applications on OSX, I realized I still had too many favorites. How about if I skip over applications I mention all the time, like the awesome AppDelete from reggieashworth.com and the first application I load on every Mac, TextExpander from smilesoftware.com. I’ll eliminate tools I have talked about recently too, like the VPN software Cloak from getcloak.com. I have to say, eliminating applications from the list felt like I was abandoning puppies. I have so many great applications but I did say I would bring it down to 5. I also said I would separate out my 5 favorite menubar apps so that I didn’t have to drown so many puppies. Ok, enough excuses, here’s my top 5 Mac Applications.
Adium
 You may have picked up on the fact that I’m a bit of a social animal. I love talking to people in real life and in text. I encourage all of the listeners to write to me and ask for help. If you ask me to be your friend on Facebook, I’ll probably say yes. I can’t promise to read all of your posts though! I am not a huge fan of Facebook itself, but it gives me access to so many more people to talk to, I suffer through the indignities. By friending up so many people, Facebook chat is a place I can yak with people.
I love Google Plus as I’ve mentioned about a zillion times, and Google Hangouts comes along for the ride so I can chat to people in there too. I’m about 150 years old, so I still have an AIM account from the old days, and a bunch of friends who keep their AIM accounts live at all times too. Now picture what my desktop would look like if I had a web browser open to a Google page so I could get my Google Hangount conversations, an AIM client to get those chats, and a Facebook page so I could talk to my Facebook buddies. It would be a mess, and I know for a fact that I have a bad (or is it good?) habit of closing tabs in my browser, forgetting that I’m chatting with someone!
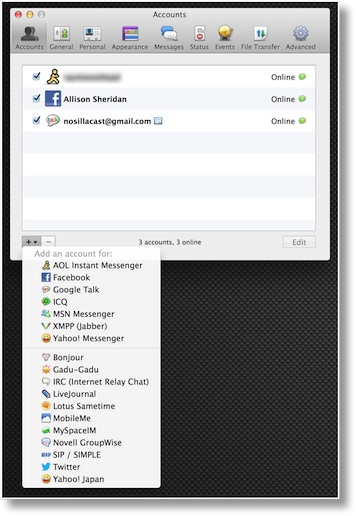
Enter Adium from adium.im. This is a chat client for OSX that’s been around forever and allows you to integrate just about every single chat protocol out there. For me, it allows me to use Facebook, Google Hangouts, and AIM all in one pretty little integrated window. If you use Windows Live Messenger, Yahoo Messenger, or a whole host of other protocols it’s worth checking out Adium to see if it supports it. Heck, it even supports Lotus Sametime! You can even use Adium as your IRC client – IRC stands for Internet Relay Chat, the protocol that we use for the live chat room. I haven’t had great success with it for IRC, but a lot of people swear by it.
In Adium if you go to the Preferences pane, you can tap on the Accounts tab and then the plus button at the bottom. It will offer you a plethora of account types to add as I described, and walk you through how to enter your credentials. I imagine if you’re a first time user it would offer you the same screen straight away, but it’s been so long since I started with Adium I don’t remember!
I want to give a couple of caveats.
- Adium seems to forget accounts from time to time. I don’t know if it’s Facebook changing the rules (which they do so very often) but I know I have to re-enter my Facebook credentials at least every 6 months.
- Adium doesn’t work as well as the native clients. For example, in a Google Hangout from within a web browser window, I can attach an image, but I can’t do that in Adium. It tries, but it gets hung up every time, sometimes sending an image to Steve who’s also on Adium has crashed the application on his end.
For a free client that accesses so many networks, Adium easily made one of my top 5 favorite Mac apps!
Image Capture
 The next application on my top 5 hit list is an unsung hero. It’s actually a standard Mac application that comes with the OS, but most people don’t know about it, or they forget about it even if they did know it once! Let’s start with one problem it solves right off the bat. We love our iPhones and take scads of photos with them (the iPhone 4-5s take the top 4 spots in Flickr’s most popular cameras graphs) and the video from the iPhone is quite astonishing too. The result is that we fill our phones up quite easily. You may think you can depend on iCloud to store your photos, but the automatic feature only keeps the last 1000 photos. I have a weenie little 16GB iPhone, so I run out of space all the time.
If you plug in your iPhone and launch Image Capture (it’s hiding in in plain sight inside Applications), you’ll see your device on one side and all of your photos in the center. You get lovely column titles for name, date, file size, width, height, and kind, along with several options that don’t apply to the iPhone like color space, DPI, Focal Length and Shutter Speed. For the first time while I was writing this up I inserted my memory card from my real camera and for those photos the fancy pants data showed up too. But let’s get back to the iPhone.
The real usefulness of Image Capture is that you can import your images from the iPhone to a folder on your computer, or you can import them into iPhoto or Aperture to play with later. Now come’s the exciting part, you can import them one by one, or select the ones to be imported, or select them ALL to be imported. If you choose them all, you can then select them all and delete them all from your device. Suddenly you have 5GB free on your iPhone! I should mention, unless it was obvious, that Image Capture also sees your movies, so you can move them to a separate location from your photos. Easiest way to do that is to tap on the “Kind” column title and you’ll see your .MOVs separate from the .JPGs for your camera photos. I take a LOT of screenshots of my iPhone, and those are all separated out nicely with sorting by Kind because they’re .PNG files.
If you do want to be more selective and triage your photos as you import them from your iPhone, you can get a good view of the images by toggling the column view over to image view in the bottom left and using the size slider in the bottom right to make them pretty big. I’d still like to be able to make them bigger, but since I’ve currently got 920 items on my phone right now I guess this is a better way to make me do it quickly! I know that when I make a screenshot of my phone, it’s usually to do something like send Rod Simmons a screenshot of Fitbit showing him how I just got 3 steps ahead of him, so I send those out right away and don’t need them later. While writing this up I selected 93 .PNG screenshots and hit that little delete button. Such joy!
I wish Image Capture had a few more features. I’d love it if it had Quick Look. That’s the feature in OSX where you can simply hit the space bar on an image or video in the Finder and it shows it to you in full resolution. I have some movies on my iPhone that I can’t remember, so I want to know whether I want to keep them or not. I tried just double clicking on one of them and it moved it to my desktop so that wasn’t ideal. Right click on reveals an option to import as well. If anyone knows a way to see these without importing I’d sure like to know about it!
Now that I’ve described the problem it solves that I really care about, I wanted to tell you other things it can do. I heard about this one from Don McAllister – you can scan from your network scanner with Image Capture. You don’t get any fancy bells and whistles with this option but maybe sometimes you just want it easy without all that rigamarole! In the left sidebar in Image Capture I mentioned that you’ll see Devices (that’s where the iPhone shows up) and below that you should see Shared if you have a network shared scanner. I can see my HP D110 multi-function printer/scanner in there. If I tap on it, I get a big giant window that says “Waiting for Scanner”. In the bottom left you get a pulldown for the location to save your scan on your computer, and another pulldown that allows you to choose from Detect Enclosing Box, Detect Separate Items, and your paper size. I suspect that these options might be specific to your scanner, so your mileage may vary.
If you WANT the bells and whistles, in the bottom right you’ll see a button to show details, and then you can choose whether to have it be in color, how many colors, the resolution, set resolution, rotation angle, format of the saved file and even get into things like image corruption, descreen, adaptive lighting and sharpen! So basically a full featured scanner application built right into Image Capture. I’m not sure I’ll use my scanner-specific software any more!
Drop Shadow
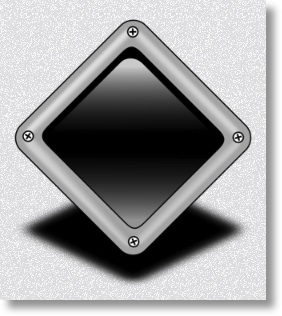 Next up is an application which in the words of the great Tim Verpoorten, does one thing and does it well. I’ve mentioned it before on the show, it’s called Drop Shadow from delsolsoftware.com. I like to put images up in my blog posts, and I find that normal images look kind of flat. I like to set them off a bit by putting a nice little grey drop shadow down and to the right. I spent a LOT of time messing around in image editing applications learning how to add a drop shadow. I can do it now that way, but it’s a real pain.
In Drop Shadow you can define the x and y offset (to make it bottom right for example, the color of the shadow (don’t go crazy here, the answer is grey) and then how blurry you want to make it. I use offset of 8,8 and a blur of 8. If you want to go crazy you can add borders too, so I guess Drop Shadow violates the First Law of Tim Verpoorten. Simple borders have some options too, border width, color and whether you want rounded corners which can add a nice finished look to an image. Since I have no need for this tomfoolery, I didn’t spend a lot of time on borders, but if you like that sort of thing there are expanded borders as well.
You can save your masterpiece out as a png or a jpg when you’re done. This sounds all complicated the way I’ve described it, but once you set all the sliders the way you like them, you don’t have to mess with them again if you don’t want to. My workflow is to right click on a screenshot, open with Drop Shadow, and then use the cute little Drag Me to drag it right back to my desktop. Boom, pretty drop shadow, no drama. Since Drop Shadow does do more than one thing, if I were to add something to it, I’d have a resize the image option as well. I take these giant screenshots sometimes, and I have to open them first in Preview, resize, then open with Drop Shadow. It’s not like Preview is some amazing tool for this, so having it built into Drop Shadow would be cool. Drop Shadow will set you back a grand total of $4 in the Mac App Store.
Skitch Was in the Top 5
 Next up I have a confession to make, I don’t always grab my screenshots using Clarify. I know you’re appalled at this revelation but it’s true. If I just want a quick snap of a screen and I’m not going to make a tutorial out of it, I use the free Skitch app from Evernote. Skitch has the advantage of being an app you can keep running in the background at all times and doesn’t hog up system resources, so it’s ready at the snap of a couple of keys. I keep mine set to command-shift-5, and with that key combination I get a nice set of crosshairs that makes it trivial to grab just the shot you want. I should mention that if I’m simply copying and pasting somewhere, I use the built-in Apple keystroke: command-control-shift-4. With Skitch I get the screenshot but I can do a couple of things with it. It has some (very crude) annotation tools that get the job done if you just want to say, “CLICK HERE, DUMMY!”, and it’s also easy for me to save to my drive, and then do my Drop Shadow dance and send it up to my web server.
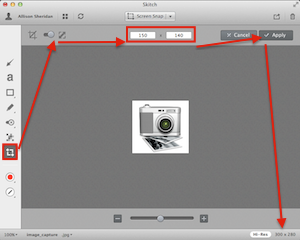
Remember when I was talking about how I have to open them in Preview first to resize and only then do the Drop Shadow dance? Any of you out there who are familiar with Skitch are yelling into your portable devices that Skitch can do that! Well yes, it can. There’s a crop tool you can tap on and then flip a little switch at the top to change from crop to resize. You can type in the precise dimensions and hit apply. The image will then shrink on screen…and when you drag it to your desktop, the image goes back to the original size. I’m hoping that writing about this, someone will write to me and say “Hey dummy, you forgot to…” because this would be a lovely feature if it actually worked! I did notice that in the bottom right it says Hi-Res followed by the larger, original dimensions but it’s not something I can affect.
Now wait, wasn’t Skitch supposed to be on my top 5 favorite apps list? I do really like it, and use it probably several times a day but I can still complain about what it doesn’t do right, can’t I? As I’m writing this, the more I think I’m wasting some steps with Skitch. Sure it saves my snapshots up into Evernote, syncing at all times, but I never use that workflow, I save the images to my desktop and then move them up to my web server, or if they’re the quick and dirty, I just drag them into wherever they belong. I created a screenshot of the sizing problem in Skitch by using command-shift-4 and opening it in preview and annotating there … and that’s when I realized I could actually bypass Skitch altogether. Here’s my new plan:
- Use command-control-shift-4 to take a screenshot with Apple’s built in tool
- Open Preview
- Hit command-N which will open a new file with the clipboard contents
- Use Preview’s annotation tools which are no better or worse than Skitch
- Resize from within Preview
- Save it out and then use Drop Shadow before uploading
So I take it back. Skitch is no longer on my top 5 favorite apps list, Preview and the built in screen capture tool of OSX are on the list!
Audio Hijack Pro for Audio Recording
 I tried not to go with any niche products but I really do love Audio Hijack Pro from Rogue Amoeba. This is a really versatile application for recording audio from your Mac. Now I know you guys for the most part aren’t podcasters, but this app might be for you too. I remember one time I bought Steve a CD, and it came with a free digital download of an extra song. I went to get it, and it would ONLY play on Windows! Well I fixed their little red DRM wagon. I launched one of my virtual machines (I had a copy of Windows something back then) and opened the file. Then on the Mac side I launched Audio Hijack Pro and told it to hijack the audio coming out of the Mac. This doesn’t take audio that comes out of the speakers that then comes back into the built in microphone. Audio Hijack Pro actually hijacks the digital audio signal and gets a perfect digital reproduction of the audio.
Let’s say there’s an online video from Vimeo or YouTube from which you’d like to capture the audio. Launch Audio Hijack Pro and tell it to hijack your web browser and then hit play. How about you like a streaming radio talk show from The Netherlands that plays at 2 in the morning your time? Don’t think that’s silly, that’s exactly what listener Margaret wanted to do. Audio Hijack Pro allows you to set up a scheduled recording with a start and stop time.
Audio Hijack Pro will record in MP3, AAC, AIFF, WAV, or even Apple Lossless, and you can control the sample rate and bit rate and whether it’s mono or stereo. Maybe you don’t want to know how to do all that nonsense, they have presets built in for your intended use, like spoken word, streaming music, audio from DVDs and how you want to play it back, and it does all the fancy pants settings for you.
I use Audio Hijack Pro to record my Skype conversations and ever since I switched to it, it’s worked flawlessly for me. I also use it in the production of the live show. Audio Hijack Pro allows me to hijack the audio from my mic and from GarageBand and to pipe them together using Soundflower into a single stream that can go to Justin.tv, Icecast for the mobile listeners, and Shoutcast for the Alpha Geek Radio listeners.
Audio Hijack Pro is such a versatile tool. It’s great to keep in your toolbox for when you need it. Rogue Amoeba is a great company and they keep enhancing their tools to make them even more awesome. There’s a free download of Audio Hijack Pro available at rogueamoeba.com that will allow you to test it out. After 10 minutes of recording it adds noise on the trial version so it’s a great way to do a full test drive of its functions without spending the money first. Audio Hijack Pro is currently $32 at Rogue Amoeba’s website. One caution – Rogue Amoeba is in Alpha testing of a new, very different version of Audio Hijack Pro. If you plan on using the advanced features of how to route audio around like I do for the live show, you might want to hold off because that interface is getting some cool improvements. If you want the simpler functions like timed recordings or hijacking your audio from a web browser, Audio Hijack Pro is a great buy right now.
Audio Hijack Pro is one of my absolute favorite apps. You can run all sorts of effects as you record – noise gate, compressor, etc., but my absolute favorite is the Remove Silence option. I typically set it to remove silences longer then 2 seconds automatically. This is similar to Audacity’s Truncate Silence feature, but even more flexible, and it saves an enormous amount of time in editing podcasts.
[…] Top 5 Favorite Mac Apps […]
I love this list, thanks for sharing! I was doing a Google search because I too use Adium and would love it if I could include images that don’t crash other peoples systems. I know, I’m picky like that too. Anyway, you opened my eyes to Image Capture which I have obviously been neglecting until now. So thanks for the info!
Glad you liked it Brett! With 146 different chat apps around you’d think ONE of them would meet all of our needs.