Leon Sargent explains how Tim Verpoorten changed his life and introduced him to a lot of great podcasters, then George from Tulsa tells us about how the Oyen Mini Pro SSD gives new life to an older Mac. Neil Worton brings us his first review about iFlares from the Mac App Store to alert you when Iridium Flares will occur near you. Then Steve Davidson teaches us how to use Terminal aliases instead of TextExpander to type in complicated terminal commands. Steve Sheridan pits his beloved GoPro HERO2 up against the Sony HDR-AS15 Wifi Action Video Camera. Check out his comparison video at youtube.com/watch?v=xiWWRyEw3o4 In Chit Chat Across the Pond Bart takes us through Taming the Terminal – Part 7 of n where we get to manipulate files and folders.
![]()
mp3 download
Hi this is Allison Sheridan of the NosillaCast Mac Podcast, hosted at Podfeet.com, a technology geek podcast with an EVER so slight Macintosh bias. Today is Sunday July 28, 2013 and this is show number 429. Steve and I had a terrific vacation with his family this week and it was made possible by so many of you sending in terrific contributions to the show. In fact, I got so many recordings that I think I’ll be able to save some for next week so I can just be lazy. This was probably the most relaxing vacation I’ve ever had. We drove about an hour south of LA to Capistrano Beach which is actually in Dana Point. We rented 3 houses, and we sat on the beach pretty much all day every day. We alternated between sitting on the beach, playing frisbee and football, short jaunts into the ocean (which was FREEZING) and back to sitting on the beach again. It was pretty much awesome. Enough about our vacation, let’s get back to some tech.
Next week’s show for August 4th will come out a bit early because we’re going to see Lindsay for her birthday, so that means the live show will be early as well. I plan to record the live show at 11am Pacific time on Sunday August 4th. Of course if you subscribe to the NosillaCast News you’ll get a notification or if you follow me on twitter @podfeet you’ll also get multiple warnings. I know that Peter Benz from Germany will be happy because for once it will be at a much more reasonable time. Hope he can come! Btw if this showtime will allow you to come for the first time, it’s a really good idea to go to https://podfeet.com/live and read the instructions way before showtime because it’s a tad tricky if you want to really participate. for example there are third party clients that make it way more fun.
Leon and How Tim Verpoorten Changed his Life
This I received a lovely audio recording from Leon Sargent that I’d like to play for you first.
For the people who read only, in Leon’s recording he explained how much Tim Verpoorten meant to him. He was the first podcast Leon listened to, from there he found the NosillaCast, from the NosillaCast he found Bart, and then the Mac Observer and now his entire podcast feed list is filled with podcasts he found through Tim’s show.
I’m really touched Leon, and so happy that Tim was as important to you as to many of us, and that you found me and Bart through his work. If you have a podcaster who has made a difference to you – do take the time to write/record something to them. We do this work for the fun of helping others, and a very small percentage of the people ever give us feedback, so each one is precious to us. thank you again Leon.
George from Tulsa on Tim Verpoorten and
I promise there was no collusion here, but George from Tulsa also sent over a recording about Tim Verpoorten amongst other things:
I miss Tim Verpoorten. I learned a lot from his Podcast and especially valued his emphasis on freeware and shareware. I can’t look at the Menu Bar on my Mac without thinking of Tim, because there’s a collection of valuable Apps up there I learned of from him. Maybe you heard Allison talking recently how Tim’s computer gear ended up shipped to her, and how she’s selling it to send money back to Tim’s wife.
I’m overloaded with computer gear and not in the market for more. But I’m sending a check to Allison to include with the money she raises from the sale. Buy or donate, let’s help Allison help Tim’s wife. Tim’s death sparked a Mac Roundtable discussion on how to prepare for disaster. Be it death, disease, tornado or earthquake. Worth a listen: http://www.macroundtable.com/?p=726.
No connection with Tim or the Roundtable, but the Fickle Finger of Fate reached out and thwaped me in May. If you listen regularly, you’ve heard Allison mention the banners and posters I’ve sent her. They’ve all been made on a Windows computer necessary because the high-end printers we bought years ago have no Mac drivers. But the Win computer was so often shut down by malware, I bought a duplicate to switch out while making repairs. A good idea, but not when the Fickle Finger of Fate Flicks me out of town long enough for both to go down.
 Back at work in June, I’d had enough. We could either get out of the sign business, or junk Windows and buy new Mac compatible printers. It was a painful decision because while Windows is broken, the printers aren’t. You’ll find a pic of the new printers in Allison’s shownotes. What you won’t see is the 16GB Quad Core i7 Mini with 256 GB SSD I transferred to our graphic artist because I expect new, and better, Apple computers soon, and didn’t want to buy something that would be “old news” in a few weeks.
While waiting for Apple to sprinkle the Intel Haswell chips through its line, I’m using a 2009 Mini that had been in the closet serving as a NAS. It’s a decent computer, but with an old fashioned, slow, spinning hard drive. Turns out that’s no problem, because before passing my Mini along, I used Carbon Copy Cloner to duplicate the i7 to a 240 GB Oyen Mini Pro SSD which I set to be the old Mini’s default boot drive via Firewire 800.
The Oyen Mini Pro comes in several models, mine has USB 3.0 and FW 800. It is fast, silent, bus powered, and reasonably priced. It’s in an aluminum enclosure, and seems robustly safe to carry around. Sure, the i7 benchmarks much faster, but in my real world of mostly Excel, Firefox, Gmail, and ScanSnap to Preview, I’m not noticing the difference.
If you have an old spinning disk Mini or MacBook Pro with a FW 800 Port, setting it to boot from an SSD like this Oyen, will give it a new lease on life. And when your new computer arrives with USB 3.0, you’ll have a superb backup drive ready to go.You’ll find several models of Oyen, with differing ports, on Amazon. Consider using Allison’s Associate Link to help support her podcasting habit.
Thanks so much George, for helping out Alice Verpoorten and also a cool solution to the Waiting for Haswell problem. It took me a while to figure out that buying thunderbolt or USB3 external drives was really a waste unless the drive inside was actually an SSD. I wish my backup needs fit in 250GB, sadly I’m more of a 750GB sort of person. One of these days I need to take all my audio recording files off of here…
Neil Worton on iFlares
Hi Allison, Going back to episode number 422 Bart was talking about Iridium flares. Well I found a great App for the iPhone/iPad for finding them. It’s called iFlares (or course) and cost £1.99 in the UK app store.
It will get your location from your GPS, and downloads the Iridium flare information. It then lists all the available Iridium flares that are coming up in your area and the apparent magnitude.
You can set it to remind you for each flare, which it does 10 minutes before with a little bell. The it starting counting down from 3 minutes – 1 minute with speech, then again at 30 seconds, 20 seconds and then from 10 to 0 it counts down every second.
The clever part to this app, is that if you touch on the flare info line it then goes into a virtual camera mode which by holding you idevice in front of you directs you via arrows and a compass on the screen to where in the sky the flare will appear. While it has these graphics on the screen the background is live video from your camera, so gives you a heads up display effect while scanning the sky for the correct area.
As well as all that it also keeps a database of which ones you have seen, so once you have viewed the flare you can hit the seen it button and it makes a note of it, and even puts it into game centre, so all your friends also flare hunting can see how your doing.
Information about each flare is very detailed, including the centre of the flare, which if you touch on the info shows you the centre on a graphical map (nice). It is a universal app, so although waving an iPad around in the air to locate the flare isn’t the best idea, all the details about the flare including the map of where the centre point is is all included on the single page. For the price and fun value, whether you are taking a photo or just viewing the flare I give this 10/10…. Bart will love it.
Hey Neil, iFlares sounds really excellent, will definitely be putting it on Steve and my iPhones. I love your voice by the way and hope you do more reviews in the future!
Steve Davidson on Terminal Aliases
Terminal Aliases (or how you don’t need TextExpander in the Unix world)
I must be a Terminal purist, because I found myself shouting at my iPod, “That’s not the way to do that in the Terminal,” for the second straight segment of “Taming the Terminal” in a row. You see, Allison and Bart were discussing complicated Terminal commands, and Allison said that she would make it easy for herself by setting up a TextExpander shortcut (or whatever it’s called) so she wouldn’t have to remember a long command string. You may not already know this, but Allison is kind of nutty about TextExpander – oh, you knew that already. Since the segment was called “Taming the Terminal,” I think a Terminal-based solution is far more appropriate: it’s called an alias. An alias is simply a shortcut string that can be used to represent a longer string.
So, let’s rewind the virtual tape, and review what I was getting all hot around the collar about. Most Unix commands have qualifiers that go between the command and the target (the latter is usually a file or directory). The qualifiers, called command switches, are usually denoted by a dash or “minus” sign, followed by one or more letters or numbers.
You might remember our friend the listing command, ls. If you simply type “ls” (followed by a return key), it gives you a simple listing of the present working directory. But if you want more detail, you use a command switch. For example, if you want to see the hidden files and folders, you would use the “a” switch (“a” for “all”) like this:
ls -a
A more useful example might be a situation where you want to list the files, see the permissions, include hidden files, have file size be “human” (in kB, for example), sorted chronologically, and with the most recent at the bottom. You’d use this command:
ls -lhatr directoryName [the directoryName can be omitted for the PWD]
But that “-lhatr” is a lot to remember, and you’d rather simply want to remember something short, like “ll” (which I just made up for “long list”). Enter the alias. To create our desired alias, in the Bourne Again Shell (BASH, the default shell in Mac OS X):
alias ll=”ls -lhatr”
and from then on, any time you type the command “ll” it will be as if you typed “ls -lhatr”
One word of caution: Most Unix commands are short, so to be sure you aren’t redefining a command that is already part of Unix, you can type this command (using the example “ll”):
which ll
And if you aren’t shown a path to a command (either it responds with nothing or with a “Command not found”) you are safe to use it. So, as long as you type the string
alias ll=”ls -lhatr”
at the beginning of every Terminal session, you’re all set. But what a pain in the backside that would be! Not to mention that it would violate the whole “don’t need to remember all that” thing.
Fortunately, there is automatic method of issuing the alias command for each new session. Unix has a facility for that, it’s called a resource file. It is a hidden text file that lives in your home directory and is invoked every time you start a new shell session. In the case of BASH, it is called “.bashrc”
There are many ways of creating that file, but the simplest (and easiest to maintain) is to create a text file using any editor (e.g., TextEdit) and enter into the editor window the desired contents of the resource file. The text you want to enter looks like this:
#!/bin/bash

alias ll=”ls -lhatr”
plus any other aliases (or other commands) you want to create to start off your Terminal session. But since you can’t save a hidden file with TextEdit (or most Mac editors), you can create the .bashrc file using, you guessed it, Terminal commands. First enter the command
cd
which will ensure you are in your home directory. Then type the command
cat > .bashrc
Now, any text you type into the Terminal window after that will be copied from the screen into the .bashrc file. You close it out with a command-d key combination. That ends the entry and closes the file. I recommend you save the TextEdit file for later use (such as adding aliases). If you are using other shells (like my favorite, tcsh) the syntax of the alias command is different (tcsh uses a space for the delimiters instead of the equals sign, and doesn’t need the quotes).
That’s it. You now have an excellent way of creating shortcuts using a Terminal-pure method – without the need for TextExpander. I hope this helps, this is Steve Davidson.
This is cool Steve! I like that you wrote this up AND recorded it, because now I have it as a great reference file. I think you made one audio typo – you said 1hatr instead of lhatr early on but looking at the shownotes people won’t be confused. I absolutely did not know you could do any of this, OR that you could simply type cd to get to your home directory, that’s a time saver right there. This terminal thing is really getting to be fun, thanks for helping out! But I still love TextExpander…
GoPro HERO2 vs. Sony HDR-AS15 Wifi Action Video Camera
Hi Allison, this is husband Steve back for a product review. You know how much I like video so I’d like to review the GoPro Hero2 and the Sony HDR-AS15 mini action cams. The GoPro is the established brand in the mini action cam-market and THE name everyone knows while Sony is a relative newcomer with the AS15 which was released in mid 2012. I know there are newer GoPros available, the White, Silver and Black models of the Hero3. But I don’t have a Hero 3 … yet, so we’ll review Hero2, and maybe someday I’ll be able to review the newer model. For brevity, I’m going to refer to the GoPro Hero2 as the GoPro and the Sony Action Cam as the Sony from here on.
I’ve included a table comparing the key specifications of both cameras in Allison’s show notes. I won’t go over all of the specs here but in most cases the cameras are comparable. A notable exception is that the GoPro offers several additional still camera capture modes and has a much higher pixel count than the Sony (11 MPixels vs 2 MPixels). However, from my perspective, the primary use for both cameras is video rather than still photos and they’re comparable in their video capture options. Both cameras weigh in at just over 3 oz for the camera body alone with battery and around 6 oz when enclosed in their waterproof case.
Ok, initial impressions out of the box: The GoPro feels more rugged and solidly built in the hand. The two covers on the Sony camera don’t close as solidly as the GoPro covers and they feel a somewhat flimsy when they’re open. Both GoPro and Sony’s waterproof housings however feel solidly constructed. The GoPro camera body is bit more blockish in shape whereas the Sony body is a narrower and longer in its construction. The Sony’s display is about twice the size of the GoPro’s display and is easier to read.
Control through the waterproof case for the GoPro is through 2 buttons while Sony is through just one. This leads to a very different user interface. Starting a recording on the Sony is simpler – with the camera off, just push the prominent red button and the camera begins recording in the mode you left it in. The GoPro requires pressing the On button, then another button to begin recording. You can’t change the Sony’s recording mode through the case with buttons. However this isn’t too much of a limitation since you can control the camera through Sony’s WiFi interface on your iPhone (more on that later). GoPro allows you to change video & camera settings through the waterproof case. This is probably due to the fact that the Hero2 does not come equipped with WiFi – you have to buy the WiFi Bacpac as an additional accessory, so GoPro had to provide control through the case w/o WiFi capability.
To be fair, you need to add the WiFi Bacpac accessory to the GoPro Hero2 to make an apples-to-apples comparison with the Sony Action Cam HDR-AS15 since the Sony comes with WiFi capability built into the camera. The later Hero3 model comes with WiFi built in, so that might be a better comparison, but as I said, I don’t have a Hero3 so we’ll stay with the comparison to the Hero2.
Both GoPro and Sony provide a free iOS app to support real time remote control of the camera and display of the image. The level of camera control through the WiFi interface is rather limited with the Sony while the GoPro provides full control over all parameters through WiFi. Sony named their app “PlayMemories Mobile”. I think they need to choose another name since it implies playback only (not control) and the name is just clumsy.
When viewing the camera displays remotely through the iPhone apps, there is a significant difference between the GoPro and the Sony in the delay from the actual recorded image to the displayed image on the iPhone. The delay on the GoPro is about 4 sec while the Sony delay is less than a second. The 4 second delay on the GoPro can become rather annoying and does not allow for any quick reaction in response to changes in the video.
You can record about 2.5 hours of continuous video with the GoPro while you only get about half that (1h 20 min) with the Sony on a single battery charge.
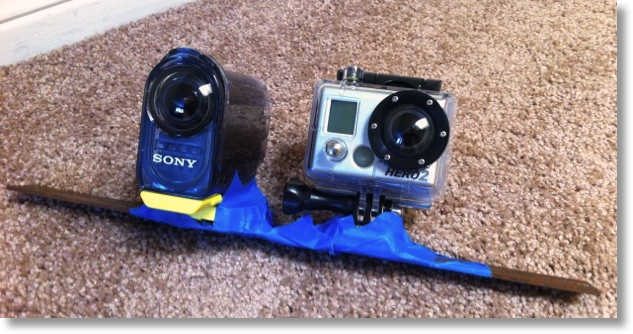 Ok, let’s compare the video quality of the two cameras. I recorded some sample scenes side-by-side so you could compare the video quality of the two cameras yourself. The link to the video is in Allison’s show notes. I’ve also included a photo of the rig I McGyvered for shooting the side-by-side videos. I set both cameras to their widest 170 deg FOV and their highest resolution of 1920×1080 at 30 fps. I also turned off the image stabilization feature on the Sony camera since the GoPro does not have this feature. I shot video in full daylight at the beach, in low light conditions with the blinds drawn in dark room, and in medium light.
I was a bit surprised at the outcome here. The Sony appears to have better image quality than the GoPro in several respects. First, the Sony records more vibrant colors under normal lighting conditions – for example the sky was much more blue in the beach setting. Sony advertises a “back-illuminated Exmor R CMOS sensor” in the Action Cam that is supposed to perform well in low light conditions. True to their claim, the Sony camera’s low light video quality is significantly better than the GoPro video which was quite grainy and dark. Also, the dynamic range of the Sony sensor (that is its ability to register both very bright and very dim imagery in the same scene) is noticeably better than the GoPro. And the Sony sensor responds more quickly to rapid changes in lighting conditions.
The GoPro Hero2 is being sold for $229 U.S. on Amazon plus another $18 for the WiFi Bacpac (total of $247) while the Sony Action Cam lists for $269, a little bit more . Although I didn’t review it, the Hero3 Silver Edition with built-in WiFi is sold for $300 on Amazon.
Bottom line is that both cameras are quite capable and will do the job for most action scenes shot in daylight. If you want more still photo capture modes and longer battery life on a single charge, the GoPro will serve you better. However if you’re going to shoot video in low light or if you have a wide lighting variation in your scene, the Sony HDR-AS15 is the camera for you.
That’s it for now, Steve signing off, and be sure to Stay Subscribed!

Using a Screenreader? Click here to view the table.
This is great Steve – I sure enjoyed being the source of your entertainment while you made the video on the beach and while I was cleaning the car. I’m also surprised that the Sony did so well in your comparison since you do love the GoPro. Now lest Kevin start a chant about how you need a GoPro HERO3, let’s not forget that I have bought you not one but two HERO2’s, because you drowned your first one. And we just bought you the wifi bacpac. One question I’ll have to ask you when we get done with the show is why if the Sony was better in pretty much every test, did you choose to use the GoPro when we were on vacation? Thanks for a great review!
Clarify
In the past few weeks, Bart, Don and I have been working on moving the audio feed for the live show from it’s current server to one Bart built and to have Don’s as a backup server. Bart and I worked on how to make this as seamless as possible for everyone, and he had a brilliant idea. In the root folder for my web server there’s a file called .htaccess, and it’s inside that file where we have my RewriteRules – those are the rules that tell the Internets if you type podfeet.com/amazon, to go to my Amazon affiliate link before you buy stuff. It’s also how podfeet.com/googleplus runs you right over to the NosillaCast community on Google Plus. The brilliant idea Bart had was to create yet another RewriteRule inside my .htaccess file that points podfeet.com/icecast to whichever Icecast server I’m using at the time. Most of the time it will redirect to Bart’s server like I said, but with one keystroke I can comment out Bart’s server and uncomment out Don’s and you won’t experience any problems.
You do see the flaw in all of this, don’t you? That once in a blue moon problem will happen MONTHS or even YEARS from now and what are the chances Allison will remember a) how to fix this, b) which .htaccess file since there’s two of them on my server, and c) which server is which when I get there? Well the obvious solution was for me to create a Clarify document for myself so that when this does happen I can actually figure out how to fix it! I love knowing that I can empty my brain of such details. As soon as I was done with the Clarify document and I’d saved it to Evernote with the click of a button, my brain was free to start thinking of important stuff like whether Tad would ever come back to All My Children and Jesse would stop keeping secrets from Angie because you know Doctor David Hayword would love to swoop in and take her away from him.
But I digress. Head on over to BlueMangoLearning.com to check out the free 14 day trial and you know the words to this song – tell them Allison made you buy it!
Chit Chat Across the Pond
Security Light
Important Security Updates:
Important Security News:
- Randsomeware prank hits Safari users – this is not true malware because nothing gets installed, it’s “just” a website using JavaScript to be REALLY annoying – the solution is to force-quite Safari, and then re-launch it while holding down the shift key – http://www.intego.com/mac-security-blog/fbi-ransomware-prank-plagues-mac-safari-users/
- A new Mac trojan surfaces which uses OS X’s multi-language support to hide it’s true file extension. Some languages are read right to left rather than left to right, so OS X allows files to specify that they should be rendered in that direction. The Finder obeys this setting, and will render the file name in reverse – this allows apps to hide their identity – e.g. imagine a file named fdp.app, when you reverse the text direction that becomes ppa.pdf, which is a lot more innocent looking. Thankfully even the quarantine dialogue box obeys the direction flag, so, you know this trick is being played on you when the message asking if you’d like to proceed with running this downloaded file is backwards! – http://www.intego.com/mac-security-blog/new-mac-malware-janicab-uses-old-trick-to-hide/
- Users of Tumblr’s iOS app need to re-set their passwords because the app was not using HTTPS when logging users in – this is a truly sophomoric blunder IMO – shame on Tumblr! – http://www.intego.com/mac-security-blog/tumblr-tells-users-change-passwords-now/
- Another week, another bug in the Android App Loader than can bypass digital signature validation – this bug is based on Google treating a particular value as signed in some cases, and un-signed in others, an absolutely elementary mistake – again, Google have rushed out a patch, but again, many Android users may never get this patch – http://nakedsecurity.sophos.com/2013/07/17/anatomy-of-another-android-hole-chinese-researchers-claim-new-code-verification-bypass/
Suggested Reading:
- Some good tips from Intego for staying digitally safe when heading off on holiday – http://www.intego.com/mac-security-blog/summer-travel-tips-to-avoid-identity-theft/
- The German Chancellor calls for stricter data protection rules in the EU, and more transparency from large internet companies – http://nakedsecurity.sophos.com/2013/07/15/angela-merkel-calls-for-stricter-eu-wide-data-protection-rules/
- Sophos Labs names the 12 spammiest countries in the world – http://nakedsecurity.sophos.com/2013/07/16/the-dirty-dozen-spamming-countries-introducing-the-sophoslabs-spammiership-league-tables/
Main Topic – Taming the Terminal – Part 7 of n
http://www.bartbusschots.ie/blog/?p=2530
Many thanks to Leon, George, Neil and Steve for this week’s contributions so I didn’t have to work on the show at all this week. Like I said we’ve got even more contributions for next week too! That’s going to wind this up for this week, many thanks to our sponsor for helping to pay the bills, Blue Mango Learning at bluemangolearning.com makers of ScreenSteps and Clarify. Don’t forget to send in your Dumb Questions, comments and suggestions by emailing me at [email protected], follow me on twitter and app.net @podfeet. Check out the NosillaCast Google Plus Community too – lots of fun over there! If you want to join in the fun of the live show, head on over to podfeet.com/live on Sunday nights at 5pm Pacific Time and join the friendly and enthusiastic NosillaCastaways. Thanks for listening, and stay subscribed.
It’s always gratifying when things come together. During this week’s Taming the Terminal, recorded a few weeks ago, Bart talked about the danger of the rm command, and recommended invoking the -i switch (to take the command to interactive mode). He also mentioned that on some favors of Linux, there is an overarching aliasing of “rm” to “rm -i” to protect someone from making a big mistake. As it turns out, the very first time I aliased a command, back in 1992 on SunOS, it was exactly that: protecting myself from making the mistake that Bart warned us about. That alias (along with “noclobber” and a few other aliases) has been part of my standard .cshrc ever since.
Digression: Another way of protecting yourself from a damaging rm command is to “dry run” it with an “ls” command. If the listing of files is exactly the files you want to delete, then you can use a handy Unix trick to repeat the last argument of the last command: “!$” … like this:
ls videoFile*.mpg
rm !$
If the listing you get from the first command looks right, the second will remove the files listed. Of combining the two will give you maximum protection.
So, back to main point: completely by accident, my small contribution to the show dovetailed well with Chit Chat. It just came together that way.
Awesome show as always.
A long time ago in a galaxy far far away, I was asked to prepare a “intro to Linux” booklet for some new employees at the place where I worked at. As luck would have it, I just happened to find said file the other day while I was cleaning up my Documents folder. I cover alot of the basic file management commands, as well as permissions, etc. that Bart has been talking about these past few weeks. I’ve put it up for download in case someone who is listening finds it useful/interesting.
https://dl.dropboxusercontent.com/u/169813/IntroToLinux.pdf
Awesome Donald! You should post this in our G+ community and tag Knightwise too because he’d love it.
In the interest of accuracy and completeness, I would like to make a couple updates to my review of the GoPro Hero2 vs. the Sony HDR-AS15 Action Cam.
First, I mentioned the maximum recording time of continuous video for the GoPro about 2.5 hours while the Sony was about half that (1 hr 20 min). However, I neglected to say that these are the recording times as limited by a single battery charge, not the SD card.
Secondly, after my review, Allison questioned why I used the GoPro on our recent vacation in Capistrano when my review appeared to favor the Sony. The reason is that I have several spare battery packs for the GoPro and no spares for the Sony. Higher quality video does me no good if I can’t power up the camera. I will have to rectify that soon and get a couple spare battery packs for the Sony.
Although this is too late to help George avoid the costly decision to buy new printers (“Windows computer necessary because the high-end printers we bought years ago have no Mac drivers. … the Fickle Finger of Fate Flicks me out of town long enough for both to go down…”)…
Would it have been possible to set up Windows on one or more Macs as a virtual machine, and use that VM _*only*_ for the purpose of printing final copy (removing the browser, E-mail client, etc)? This would maintain that Windows “last mile” and avoid also exposure to the evil Internet?
Thanks for another great episode. I just can’t get over how Bart can convey high level knowlege in such a way that the lay person can grasp it. Just wonderful! I would, however, like to add a caution to those who are following along with the Taming the Terminal. Bart mentioned that the rm command is the dangerous one. I would like to add that, if not used with caution, the mv and cp can be just as distructive.
***Disclaimer – I am not a Mac user and I don’t know for certain if this applies to OSX.
Okay, so, if you have two files (file1 and file2) and file2 has important thins on it that you would not like to lose, and you cp file1 file2 …. guess what? file2 is now an exact copy of file1. Where did file2 (the original version) go? Gone. Deleted. The exact thing will happen if you mv file1 file2 except that file1 will be gone and file2 will be what file1 used to be.
I wanted to add this so that listeners would not go willy-nilly into the Terminal feeling safe that they are not using the dreaded rm and therefore cannot harm their systems.
Thnks for all of the hard work you do and congradulations on your retirement. (You thought you were busy before?) They tell me the real work starts after you retire. 🙂
Bert
Thank you for the kind words, Bert! That’s a really good warning on cp, I did not know that. Luckily my skills are rudimentary enough that I’m not likely to try to do two actions at once, but some of the NosillaCastaways are much more daring than me!