 One of the great things about teaching classes at conferences and user groups is how much YOU learn. Last week at Macstock, I did a demo of the new Audio Hijack and I’ve learned SO much more about the tool because of it. Before I explain what I learned, let me back up and explain why you might care about Audio Hijack. This application is designed to capture audio on a Mac from external physical microphones, software applications and even system audio. Once hijacked, you can record the audio, boost the volume, enhance the audio and more. Even though I actually read the manual cover to cover in preparation, it turns out I hadn’t scratched the surface of what it could do.
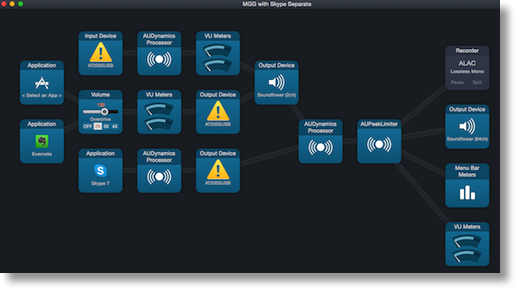
Audio Hijack has a new and unique interface that allows you to drag bricks down onto the audio grid, where bricks represent microphones, speakers, recorders and more. When you drag them onto the audio grid you create essentially an audio flow chart, which is called a session. Sessions are automatically saved so I have one for the live show and a completely different one for Chit Chat Across the Pond. By the way, you’ll hear me talk about how visual Audio Hijack is – but it’s also completely accessible to the blind! I wrote to Rogue Amoeba (the makers of Audio Hijack) suggesting that it would be really cool if there were a way to share these sessions, and they explained that if you drag the session off of the session view to your desktop you can then give them to other people. So easy it never occurred to me.
I have to admit I was a bit nervous about doing a talk on Audio Hijack at Macstock because Dave Hamilton of the Mac Geek Gab was going to be in the audience. Dave is a musician and is highly knowledgeable about audio, and I was just a little worried I’d say something dumb and he’d call me out. He promised me beforehand he wouldn’t heckle so that was nice. Imagine my surprise when after the talk he told me that I had designed some sessions in a way that wouldn’t have occurred to him so he actually learned something from me!
Audio Hijack comes with Built-in Effects that are written by Rogue Amoeba, but they also give you access to the Apple Audio Unit Effects. When I gave the talk, I simply said that these Audio Unit Effects were things people like Dave Hamilton understands so not to ask me about them! After the talk, Steve and I gave Dave a ride back to Barry’s Midwest Mac BBQ, and we got talking about Audio Hijack. Here’s where things get really cool. He explained that he uses Audio Hijack when he’s on the road to record his show with John when he’s away from his fancy pants mixer. He does some processing of the audio within the tool, using those Audio Unit Effects I know nothing about.
 I had my 12″ MacBook with me and a Mifi for connectivity so in the car as Steve drove, Dave started teaching me some cool stuff. He sent me the session he uses and I brought it up on my Macbook. I’m telling you, I’m doing so many more things with my Mac now that it weighs only 2 pounds! We could hand it back and forth between seats with no trouble at all.
The main thing Dave taught me about was the Audio Unit Effect called AUDynamics Processor. This is a brick you can drop into the audio workflow to do several things at once. Used properly it can provide a compressor which enhances the audio by compressing the variation of volume to a smaller range, and it does this by lowering the volume of the higher peaks. Imagine you’re doing a recording and you get SUPER excited about something and holler into the mic. Without a compressor, all of the rest of the recording will be much quieter to leave enough head room to accommodate the loudest part. If you add a compressor, even if you get super loud, the compressor doesn’t allow the loud sections to get much louder.
The overall effect of using a compressor is to make the recording much more listenable with less variation in the volume. This is particularly important if you’re trying to listen to a recording in an environment with a lot of background noise, for example in a car. If the recording is compressed, you can turn up the volume to hear it over the background noise without blowing out your ears, since the louder portions have been limited in volume. The cool part of doing this with Audio Hijack is that you can actually see and hear the effect while you’re doing the recording and even compensate for changes real time.
At the other end you can use the AUDynamics Processor to provide a noise gate. For example, I often record my interviews with the windows open, and that’s why you often hear birds chirping outside. I don’t notice it much myself, but I think it gives Chit Chat Across the Pond in particular a more casual feel. But what if I’m recording for Don’s ScreenCasts Online, or being on Tom Merrit’s Daily Tech News Show? Maybe they wouldn’t think the birds are so adorable. By adding a noise gate, I can make the lower volume noises in the room disappear completely or be at a dramatically lower volume. You choose a volume threshold and then change how quickly the lower volume sounds will be reduced or eliminated.
Learning in the car from Dave was great, and I got the basic gist of how it worked but I knew I’d need to really play with it to grok it. This week when we had some time to breathe I roped Steve into helping me experiment with this whole thing. His graduate study work was in digital signal processing which is exactly what we’re doing here so I knew he’d understand it and be great at teaching me how to actually use it.
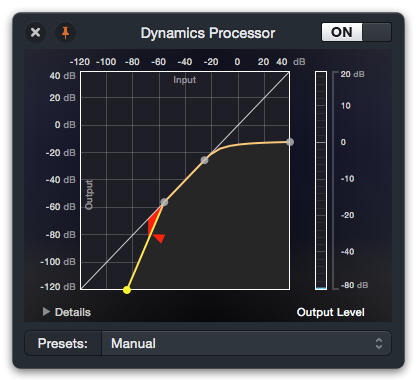
I dropped an image of the Dynamics Processor graph I’ll be describing in case you want to refer to it later. You’ll see a graph where the horizontal axis is the input volume and the vertical axis is the output volume after the processor does its thing with the input. If every level of audio was treated the same, you’d have a graph that was a diagonal line from the bottom left to the upper right. In other words, the output would match the input.
On the high volume end, we want to have the audio gracefully roll off so that when someone gets super excited it doesn’t actually get as high in volume. On the graph there’s a dot (called the upper threshold) along the diagonal line to change the level at which the input and output volumes will stop being the same and the processor will start compressing the louder audio. You also have control of a peak-limiting dot which defines how gently you want the volume to be limited above the threshold. I know this sounds complicated, but I really got the sense of how it works by experimenting with Steve while we were both on Skype and listening to the effect of moving these dots. When I dragged the peak-limiting dot down I could holler my little brains out and he never heard me getting much louder. The compressor also keeps the high volume sounds from distorting which is really slick.
On the low end you’re sort of doing the opposite. You want the lower volume sounds to disappear but not abruptly. Let’s take my bird chirping example. I slid the lower threshold dot up and down the line until Steve couldn’t hear the birds, but then I could drag the bottom of the line to an angle (called the input/output ratio) so that it wasn’t an abrupt change from sound to no sound. If you drag the dot so that the output goes to zero in a cliff below a threshold, you can get an unnatural cutoff of the sound.
Here’s part of the real magic of Audio Hijack. You can experiment with it while seeing it visually and hearing the effects of your changes. Once you start a session, you can see the audio flow as a gold line that gets thicker as the sound gets louder. Steve and I sat quietly and you could see the birds chirping. As I slid the input/output dot up the line, I could see the gold line getting thinner until it was completely gone. It was a little bit harder to tell how abrupt I was cutting off the audio. It wasn’t until I brought one of the recordings into an audio editor that I could hear when I was too heavy handed with the noise gate. The way you can tell you’re doing it wrong is that when you start talking, it’s sort of clipped off at the beginning like you came out of nowhere. This is also controlled by the attack and release on the processor, but those are even more advanced features.
Don McAllister was also at Macstock and after my talk he mentioned that he had started using Audio Hijack to improve his and my audio in his video screencasts. He volunteered to send me his Audio Hijack session so I could see what he’s doing with my voice. He’s been processing my audio by running it through the same Dynamics Processor about which Dave and Steve have been teaching me, and he also added a 10 Band Equalizer, which is a built-in effect from Rogue Amoeba. I have seen equalizers in the past and I understand that dragging those little sliders up and down cause different frequencies to be enhanced, but for the life of me I didn’t know how you decide which way to go with them.
Emboldened by my success with the Audio Processor, I started playing with the 10 Band Equalizer in Audio Hijack. The best way for me to start to understand it was to start flipping through the presets. For example, Rogue Amoeba has included presets for bass boost, treble boost, classical, hip-hop, jazz, etc. I did a recording where I tried each one, and since I could monitor the audio I could tell what I liked and hated. Dave suggested when playing around with these effects, it’s good to listen with good headphones, with earbuds, and even in the car to make sure you get the most pleasing effect across all the ways people might listen.
Don also used the Mono Enhancer Effect from Rogue Amoeba. There are no controls on it so I had no clue what this was supposed to do. I went searching the Internets and found a blog post on Rogue Amoeba’s website from 2003, where Alex Lagutin was talking about tweaking audio he was pulling using his 33.6K modem! He had one short line in the post about where he explained that “Mono Enhancer creates a pseudo-stereo sound image of mono signal.” I’m not sure I buy that part of the story but the equalizer plus Audio Processor changes should really take the NosillaCast audio up a notch.
Steve and I had a ball playing around with this and hopefully what you’re hearing right now is better than before. If it sounds worse, I blame Dave and Don! You can get Audio Hijack from Rogue Amoeba at rogueamoeba.com/audiohijack/
Audio Hijack truly is an amazing bit of kit, isn’t it? And it’s only gotten better since Day One. Paul is to be lionized! 🙂