Astrophotography by Stealth, from looking up at the night sky, to hanging a picture on the wall which takes your breath away.
Intro
In the first episode, I left you with a picture. I called it “What the heck is it?” Well, it was a picture of Andromeda which I took learning how to use the zoom on my then-new 100-500mm lens.
What I did was to open the shutter and then slowly adjust the zoom from 500 to 100mm over 30 seconds. The last 10 seconds or so was captured at 100mm. To me, it looked like a jump to hyperspace. However, in reality, the light would have been blue-shifted, but hey, it looks cool! I hope you liked it.
Part Two
Hello and welcome back. I’m Brian Hoffman and this is part two of my adventures into astrophotography. If you recall, I had the bug, but I was a n00b who wasn’t afraid to give it a try. I was getting ready for the eclipse which was going to pass right over our farm. I was a little nervous. Springtime in Texas means storms.
I had my tracker setup confirmed and the camera was ready, I had multiple batteries, just in case, and I was comfortable using my solar filter. The day I had been waiting for seven years was fast approaching.
Even though I bought the L series 100-500mm lens for the event, the sun would only fill the center 25% of my camera’s sensor. It would have to do. At right around $2000, it was a big investment, but my brother-in-law assured me it was money well spent. He was right. That lens is one of my go-to lenses if I’m outside.
For the eclipse, we invited friends and family out for the event. The cabin was full, there were several tents set up in the yard and my son and his friends camped by the big pond.
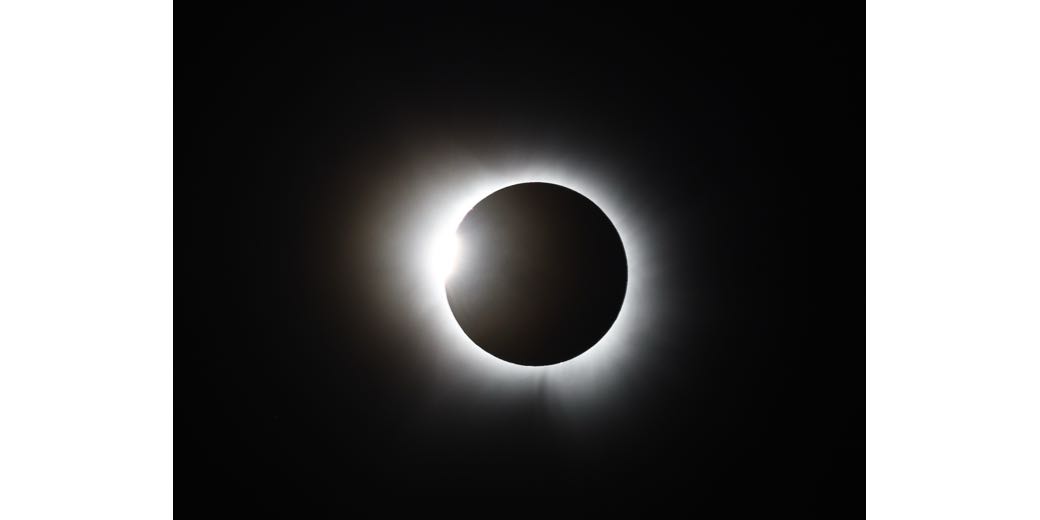
On the big day, the weather was 50-50. It was an emotional roller coaster. As an aviator, I know clouds dissipate with the loss of solar heating. I was now betting as the sun’s light fades with the moon’s encroachment, the low clouds would part and we would be treated with totality.
I was right, it was a moving experience, one enhanced by a conversation with Allison who reminded me to enjoy the event as much as I could while trying for that one wall-hanging-worthy picture. She was right. And I got several great shots.

The interesting thing to me was as soon as the sunlight returned, to most guests, the event was over. I continued to take pictures as the moon’s transit continued right up until the moon no longer blocked any sunlight. One or two of my best shots came from those pictures.

Fast forward a few months and we went on vacation at Bryce Canyon NP during the new moon of June to take Milky Way pictures. The night was so dark that you couldn’t see your hand in front of your face until your eyes night adapted.
There, I was able to sign up for and take an entry-level Astrophotography class where I learned how to improve my astrophotography pictures. I leveled up.

I also learned I needed a few more items to get the shots I wanted. A fellow photographer pointed me towards two devices, one which made setting up my tracker easier and another to allow me to put my camera in any position I wanted while it was on the tracker.
After I got back, I ordered both of them for around $50. I installed them and my Milky Way pictures got even better. I leveled up once again.
Back at our farm, I used my camera to take picture after picture in the hopes of stacking them for a better picture in the future. I got really good at finding great settings for each night. I leveled up again. Andromeda, the Milky Way edge-on, and Orion were my go-to target that time of the year.
One other cool thing happened, a friend used one of my Milky Way shots for the cover of his magazine. I have to admit, seeing one of my pictures on the cover was pretty cool, But I could do better. It was time to level up once again.

I had reached the limit of my uncooled camera mounted on an entry-level RA tracker. It was time to upgrade to a real telescope designed for taking astrophotography pictures. Time to head off to the web and do more research. This time, I needed to level up my equipment.
Teaser: Well ’24 was a busy year. I had leveled up several times and I was starting to understand the basics. But, had I really reached the end of my camera’s capabilities?

Could I do more? Would I be able to find the right telescope? Stay tuned, I think you are going to like the next addition of my Astrophotography Adventures. What new capabilities do I learn by stealth?