I’m a big fan of Markdown, the markup language invented by John Gruber. If you’re not familiar with it, the idea of Markdown is that you can write in plain text, but still produce a nicely formatted document. Instead of using clumsy menu pics to format your text, you use this little markup language. It’s super readable, easy to write, and makes your documents portable.
The first reported sighting of Markdown on the NosillaCast was in 2015, when Bart told us about this magical language during Chit Chat Across the Pond. My shownotes are brief, but they outline Bart’s points about the advantages of Markdown, and are followed by a section entitled, “Allison’s rebuttal”. I whine about the syntax being too hard to remember. I’m nothing if not open-minded.
Bart is never one to say, “I told you so”, but over the years, as he has heard me rave about something Markdown can do or about how lovely I find it, or how I found yet another great app that’s Markdown-friendly, he gets that quiet smile of satisfaction.
Today, I write almost exclusively in Markdown. The draft shownotes are written in Markdown in the Bear app, which is a lovely and inexpensive text editor that works on Mac, iPad, and iPhone. I start in Bear because it’s cross-platform, which means I can sip my morning coffee in bed while writing articles on my iPad, and later in the day, seamlessly switch to the Mac to keep writing. Bear lets me write in Markdown but renders the formatting automatically. For example, if I put an underscore (or asterisk) before or after a word, it renders as an italicized word.
When I get the article pretty much finished, on the Mac, I choose Copy to Markdown, and then paste it into MarsEdit to be published as a blog post. MarsEdit also lets me write in Markdown and see a live preview of the rendered article, and I can drag in images and MarsEdit formats them into the pretty figures you’ve come to know and love. I would start my articles in MarsEdit, but it only runs on the Mac.
Markdown for ScreenCastsONLINE
I’m so enamored with Markdown that I decided to teach it to the ScreenCastsONLINE audience. I just finished the tutorial, but it won’t air until late October. I’ve spoken often about how the best way to learn something is to teach it, and Markdown was no exception.
I started by teaching some simple syntax, including double asterisk (or underscore) for bold, double tildes (~) for strikethrough, an asterisk with a space for a bullet, and checkboxes that add double square brackets to the bullet. I ventured through building tables by hand, which is easy and fun … the first few times … and then how to use a web-based table generator to save time.
I taught some fancier stuff, too, and while doing all this, I kept switching apps so the learners could see how many different ways you can use Markdown. I showed, for example, how you can use some simple Markdown in messaging apps like Facebook Messenger, WhatsApp, and Telegram, but notably not Apple Messages.
Formatting in Notes
The reason I’m telling you all of this is because Apple made one big advancement in the Markdown world with the advent of the OSes 26. You still can’t write in Markdown in Apple Notes, but you can export notes to Markdown.
The real joy for me of Markdown is writing in plain text, not using menus to flip back and forth between bold and not bold, but this is a step in the right direction. With Markdown export, your notes are no longer captive in the app. And perhaps more importantly, images in Notes are no longer captive.
Other than releasing your notes from captivity, having them in plain text Markdown means that you can open them with any text editor, like TextEdit, BBEdit, or CotEditor. You can even open them with Markdown-friendly apps like my beloved Bear (which will make them captive again in a database), or my favorite standalone Markdown text editor, Typora.
A Worked Example
Let’s do a worked example of what happens when you export Apple Notes to Markdown. Creating our example note will require many menu picks (where typing in Markdown would be easier), but bear with me as I go through it. We can do this on iPad, Mac, or iPhone, but I’ll do it on iPad since I’ll be able to show a few more cool tricks that arrived with iPad OS 26.
We’re going to use Notes to create a heading at the top, a couple of bullets, a numbered list, words in italics, bold, and strike through, then a table, a quote, and a couple of checkboxes. If we’re feeling frisky, we’ll even embed an image. When we’re done, we’ll export the note and image to the Files app, and then see how it looks in a couple of different apps.
Creating a Heading
To create a heading we have to go up to the toolbar at the top of Notes and tap on the Aa button. If your window is too narrow (using windowed apps on iPadOS 26), you won’t see the Aa button which is swell. You’ll have to widen the window to see it.
Across the top of the pop-down menu, you’ll see Title, Heading, Subheading, followed by Body and Monostyled. We want a big heading, so tap on Heading. Because I have an amazing imagination, I’m going to call my Heading “Heading 1”.

When you hit the return key, the text formatting window will keep Heading and Bold highlighted. But if you hit one more return, it will switch you to body style.
Bullets & Lists
In a life-changing enhancement to Notes, the text formatting window stays open now as long as you don’t tap into the note. I’m not kidding, this is huge. It was one of the biggest pain points I have with Apple Notes. Since the formatting menu stays open, we can click on bullets without having to open the tool again. Type something in as your first bullet, hit return, and it will automatically create a second bullet.
Throw in another couple of line feeds (because, as Brett Terpstra likes to say, “Markdown needs the space”), and then use the number button in the still-open formatting tool to make a numbered list with two items.
I’ve made a big deal of how you can’t write in Markdown in Notes, but you don’t actually have to use the formatting tool in Notes for bullets and numbers. Type asterisk, space, and then your bullet name, and Notes will automatically change it into a pretty bullet. Same thing with the numbered list – type 1 dot, and a space, and Notes will start a numbered list. (Remember that space though!)
Formatted Text
To create formatted text in Notes, we can do some of it with keystrokes. Command-I for italics, and Command-B for bold. But if we want strikethrough, we have to trot back up to the text formatting tool again.
In that same menu, you can also choose Underline, or use Command-U, but if your goal is to create good Markdown, do that with caution. Interestingly, Markdown doesn’t support underlining. Markdown was invented as a new way to write for the web, and underlined text signifies a link, not emphasis. Let’s put in one underlined word just to see what happens when we export to Markdown. I underlined the word “Underline” so I’ll be able to find it.
Tables
Tables are next on our agenda, and I have to say this isn’t the worst part of Notes. In the toolbar, there’s a dedicated table button. When selected, it drops a two-row, two-column table into the note. It’s easy to type in the cells, and you can even tab across and then down to fill it in.
If you select a cell, you’ll see 3 dots at the top of the column and 3 more dots on the left side of the row. If you press and hold on one of the sets of 3 dots, it selects the entire row or column, and you can drag it up/down or left/right.
If you tap on the 3 dots, you get options to delete or add a column or row, change the formatting, and cut/copy/paste.

It works, but it’s a bit twitchy when trying to create and modify a big table. Lindsay, the Daughter, and I have a GIANT table in an Apple Note where we mark down what episode of Grey’s Anatomy we’ve watched. After 21 seasons, this table is getting big! When I created the table, I decided to put the latest episode at the top. But Notes insists on putting the added row below the selected row. That means I always have to add a row and then move it to the top. It’s twitchy like I said. I suffer, I really do.
Quotes
Our next order of business is to create a block quote. To do that, we definitely need a trip to the toolbar and our Aa formatting button friend. In the bottom right of the dropdown, you’ll see a button with a vertical line and a solid square to the right. That’s the block quote button. I’ll put in my favorite quote,
> What problem are we trying to solve?
Checkboxes
Checkboxes are easy in Notes because, like tables, they have a dedicated button. As soon as you tap that button, you’ll get a hollow circle where you can type the action you plan to take. We’ll make two of these and check just one of the boxes so we can see the difference in Markdown of an unchecked vs. a checked box.
Finally, drag an image into notes. If it dominates your note because it’s huge, press and hold on it and choose View as Small.
If you’re good at following directions, you’ll get something like the image I put in the shownotes.

Export to Markdown
We’re finally ready to see the magic under the hood with the new Export to Markdown capability in Notes. I have to confess that I had to ask Mastodon where the option was on iPad, because I looked at all the buttons in the toolbar and couldn’t find it.
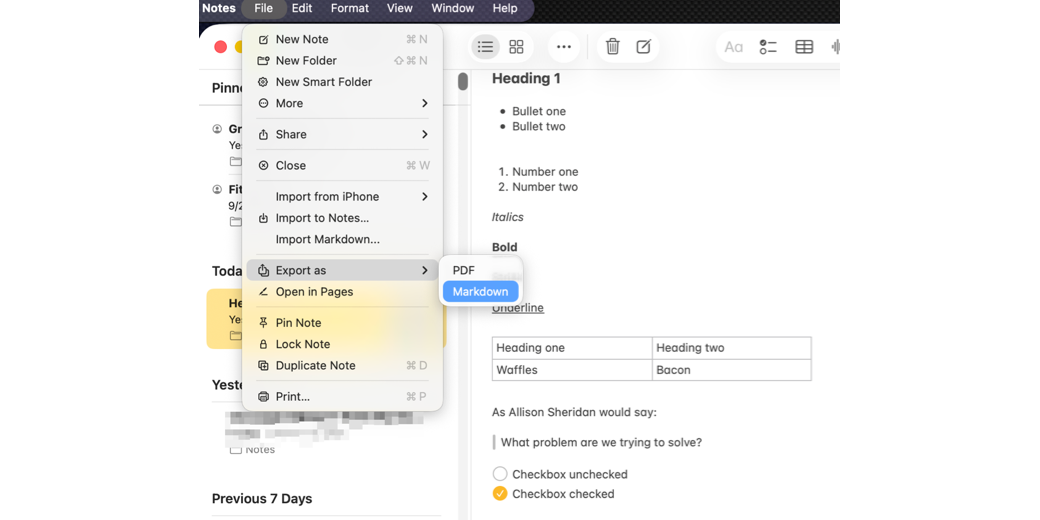
Dan Moren (@[email protected]) chimed in to remind me that with iPadOS 26, we now have a proper menu bar. In my defense, you do have to either pull down very gently from the top of the screen to reveal the menu bar, or if you’re using a trackpad, slide the cursor up to the top of the screen. So it wasn’t that obvious. The command is under File → Export as Markdown.

You’ll get a window that offers to let you share the new Markdown document or Save to Files. When the Save dialog box comes up, you get to choose the save location. For this demonstration, I chose the 1Writer folder in iCloud because that’s one of the apps I’ll use to show you how this looks after export.) At the bottom of the little save window, you can see you’ll be saving a folder, not just a document. You can change the name of that folder before you save.
Files App — Open With
Another huge enhancement to iPadOS is that you can now choose what application to use when opening documents in the Files app.
If I open the Files app to the 1Writer folder, I see the folder created by Notes. Inside is the plain text file, and a subfolder called Attachments, and inside that folder is the image that was embedded in my Note.

This is a good time to pause and explain how images work with Markdown. Since they’re just plain text files, the images can’t really be embedded; they can only be referenced with a link. Knowing that the image is in the Attachments folder beside the text file is critical. If we reference it in the plain text file pointing to that location and later move the image, it will disappear when rendering the Markdown.
If you long-press on the plain text file, the pop-up menu will include the option to Open With, and you’ll see a list of apps that can open plain text files.

1Writer (or whatever plain text editor you choose) will show you the plain text of your exported Markdown from Notes.

Let’s go through what the plain text version of our Apple Note shows us. The first line of our document was a heading, and headings in Markdown format are created with one or more hash marks. One hash is a heading level 1 (the largest), and as you add more hashes, the headings get smaller. The first thing of interest is that even though we chose “Heading”, not “Subheading” in Notes, the exported Markdown isn’t a heading level 1, it’s a heading level 2. Not quite sure why they chose that in the translator, but it’s something to keep in mind.
Next, you should see our two bullets, which, as I mentioned, are created with asterisks followed by a space. We then have a line feed. And then “1. “ and “2. “ for our numbered list. Remember, we’re still looking at the plain text.
Below that, we see very simple Markdown format for italics (asterisk on either side), bold (two asterisks on either side), and strikethrough (two tildes on either side).
Remember, I told you that Markdown doesn’t have syntax for underlining? Well, Notes just made up some annotation out of whole cloth, as Bart would say. It put two plus signs on either side. There are many variants of Markdown, but from my research, this double plus annotation is not a thing. Remember this annotation when we look at the file in another app.
The table in the text file is the standard table syntax for Markdown, which uses pipes to separate the columns, and hyphens to make a header separator row.
The block quote is standard, too — a simple greater-than symbol followed by a space. So readable! Checkboxes are shown with a hyphen, space, and then a left and right square bracket with either a space or an “x” between them, depending on whether the task has been completed. Notes has exported this section perfectly with all standard notation.
Finally, we see a proper Markdown link to the image, which is an exclamation point followed by two square brackets holding the alt text for screen readers, followed immediately by two round brackets, which hold the image file name and the path. Everything in our exported plain document looks in order, other than the phantom underline Markdown.
1Writer has a Preview button to let you toggle back and forth between viewing the rendered Markdown and editing the plain text.

1Writer shows everything beautifully rendered, except for the imaginary formatting for underline created by Notes. It simply renders the double-plus signs, treating them like any other typed characters. There’s a wee bug in 1Writer, which I just submitted to the developer, and it’s that a bulleted list followed by a numbered list (even with appropriate line feeds between them) turns the numbered list into a bulleted list.
I’m sure the dev will get this sorted quickly, as 1Writer is in very active development. I’m equally sure they’ve been super busy all summer working to make 1Writer work properly with the new OSes with rounded corners and menus, and liquid glass!
Just in case this was some sort of bug introduced by Apple Notes’ export to Markdown, I also opened the plain text file in another Markdown editor/viewer for iPad called MWeb, and the numbered list renders properly.

In both 1Writer and MWeb, the link to my image that’s in the Attachments directory at the same level as the plain text document renders perfectly.
Bottom Line
Shockingly, I got much deeper into the topic of Markdown export from Notes than I thought I would. You can tell that I’m having a lot of fun with Markdown, so I couldn’t help myself. I’m evidently amped up on the topic!
I still wish Apple would let us write in Markdown, but the latest version of Apple Notes is a lot easier to use to format text, and having Markdown export means the files are no longer captive.
I almost forgot to explain something I mentioned briefly at the very beginning of this article. It’s always been very difficult to get your images out of Apple Notes, but with Markdown export of a note, all of the images in that note are nicely exported into the Attachments folder. This works not just with one Apple note. You can select multiple notes, export as Markdown, and you’ll get the separate text files, and all of the embedded images will be filed in the one Attachments folder. I’m not sure it solves a problem anyone has, but it’s still pretty cool.
I hope this walkthrough Markdown export from Notes tickled you to experiment a bit with Markdown.