Hello. This is Eddie Tonkoi, with an article about a rather neat microphone, the Shure MV7+, which you are listening to right now. You may remember an article about the Mackie EM-98MS shotgun microphone back in December of 2024. Well, that was me, but under a different pseudonym. This is the first of what I hope to be many articles here as Eddie Tonkoi, but curiously enough, this is the second episode I have appeared in. I leave that as a puzzle for the host to work out. Anyway, enough of that. I have a thing for nice pieces of kit, and the Shure MV7+ is my latest.

Since I like Allison’s preferred structure, let’s start with the problem to be solved.
The Problem
I have used an iRig condenser microphone in the past to record good audio, including my YouTube videos that I also did articles about, and then used software to clean up the inevitable background noise from a fairly cheap condenser microphone in a suboptimal environment. I relatively recently upgraded to a Mackie EM-98MS Shotgun microphone, which is superb for what it is, that being a microphone you can get out of video-shot and still sound great.
However, I am about to embark on a new project, which is going to entail recording hundreds of hours of audiobook audio for my wife Jern Tonkoi’s fiction over the coming years, and the Mackie is not optimised for that. It is good, but it picks up background noise that leaks in through the bedroom windows and isn’t very consistent. Actually, that’s unfair, as I’m sure it is me that is not consistent, but the result is the same: variable sound-tone.
So, I wanted to move to a microphone setup that would give a consistent, warm tone, eliminate background noise as much as possible, and ideally handle my distracting mouth noise that I still create.
My Solution
Chat-GPT and Llama—more on that another time, pointed me towards condenser microphones, consistently pointed me towards Shure, and once I’d loosened the purse strings a little, pointed me towards the Shure MV7 line.
Oddly enough, the MV7 line is not a condenser line, but more on that later. There are a few variations of the MV7, which are probably worth going over, but I looked at the expected quality, the promised specs, and the trustworthy name, and decided that if I’m going to spend a hundred hours recording, I’d spend the money on quality. I also sprang for a decent metal-rimmed nylon pop filter to go with it. This all gets mounted on my tripod, a decent, heavy-duty Manfrotto job that lets the central column turn ninety degrees, effectively making it a boom arm, and I’m all set.
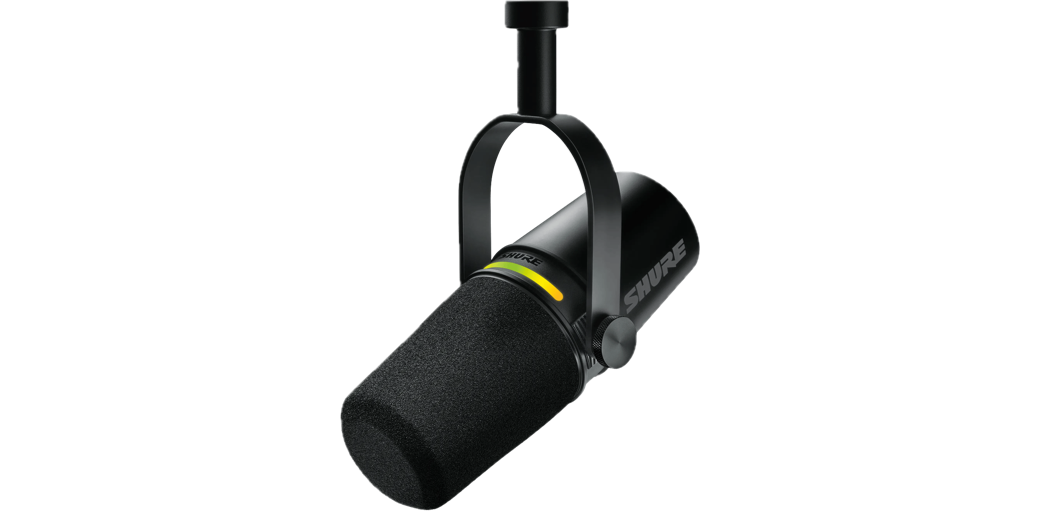
The Shure MV7 Range
The Shure MV7 range is designed for podcasters, streamers, and the like. This is clear from the marketing, which includes a Studio Kit and a Creator Pack that essentially provide mounting options.
The microphone itself comes in a few variants, starting with the original MV7. Its headline features were also clearly aimed at podcasters, streamers, and the like. It has a dynamic capsule, which means that the electronics that capture sound do so without picking up so much background noise.
It has USB connectivity for simple connection to a computer; it has built-in digital signal processing, or DSP, to reduce the need for processing on a computer. It has real-time headphone monitoring (aka you can plug headphones into it), and it even has an optional XLR output, which allows a potential upgrade path to better equipment. It really is designed to be plug-and-play, with the goal of bringing high-end audio capture to people who don’t have access to a sound engineer.
The MV7+ is an update that beefs up the DSP with things like a digital pop-filter to reduce unwanted plosive noise and switches to USB-C. Yay.
The MV7i appears to be aimed more at people who want to connect to a phone or tablet. It has an XLR connector, but this time it acts as input, so you can plug another microphone or guitar into it and then connect via USB-C to the phone, tablet, or computer. Clever, and very handy if you want that option.
I opted for the MV7+ because I think its input/output model fits me better, and it was a bit cheaper. Acoustically, they are identical, apparently.
The MV7+ Dynamic Microphone
I thought I was getting a condenser microphone because they purportedly provide the clearest sound and best frequency response. But that’s not what I bought, so what happened? Apart from me getting confused.
Simply put, the Shure MV7 and MV7+ have been designed to provide an extended frequency response, which means bright highs along with the strong lows, and also provide smooth and polished sound due to their internal digital signal processing.
Think of how photos these days are the product of capturing light in the lens and sensor, and then computational photography kicks in, and you get an amazing photo on the screen. Well, I imagine the Shure MV7+ is like that, but you capture sound in the capsule and preamp, and then computational voice recording kicks in, and you get an amazing audio file on your speaker.
Shure marketing this at a focused user group helps, because they have been able to fine-tune the output to provide what streamers and audiobook narrators want, which is clarity, presence, tamed mouth clicks, and low noise.
It sounded so perfect for me in theory, and I can honestly say I was blown away by its output in practice.
Built-in Processing
Part of what makes this dynamic microphone so wonderful is the processing that goes on inside the microphone, the digital signal processing. At first, I was wary of this, taking the traditional view that I want to get as much of the raw, pure audio as possible onto my computer and then perform magic on it there. This is how I used to view photography, too, when I demanded RAW capture and processing in Lightroom or PhotoLab.
These days, I have relaxed that stance due to a couple of changes. One is a change in me, where I have shifted my outlook from seeking the absolute ideal in technical quality to a focus on capturing the essence, the art in the subject. Don’t get me wrong, I’ll always have a pull towards technical perfection, but I’ve realised that without limitless resources, and without having the freedom to separate out these roles, I think that having something interesting to say must come first.
So, I now embrace the processing in my OMD camera and in my iPhone camera, and I feel ready to embrace the processing in my microphone. So, what does it actually do?
From the website:
- Voice Isolation Technology separates your voice from unwanted background sounds, so you can make perfect recordings every time.
- The improved Auto Level Mode adjusts your mic’s gain based on distance, volume and spatial detection for optimized audio levels.
- The real-time Denoiser uses cutting-edge DSP technology to eliminate ambient noise in your room.
- A new Digital Popper Stopper™ removes harsh plosive sounds so you can avoid acoustic distractions on your audio tracks and a physical pop filter on camera when you’re filming.
- Take advantage of three types of reverb (Plate, Hall, Studio) for enhanced depth and richness in music recordings.
The first, Voice Isolation Technology, aided by the fact it was designed by Shure for this Shure microphone, which is targeted squarely at voice-artists, is able to analyse the incoming sound for things that are created by a human voice near the microphone, and reject all the noise that is not that. And it seems to really work wonders. Not in a heavy-handed, clipping kind of way, but in a manner that gently cleans the sound and provides you with a wonderful signal-to-noise ratio.
Could I have done this in post using RX11 on my computer? Possibly, but not so well. Not me. I’m not a sound engineer. But this is where that beauty of in-house design can reap benefits, just like how Apple controls the hardware and software. Rather than relying on amazing software like RX11 that can repair the audio from any source, it is being repaired by software that is fine-tuned to this microphone, and only this microphone.
Is it perfect? I doubt it. Will some people notice the artifacts and turn off the feature in disgust? I expect so. Do I love it and welcome it into my life with a warm embrace? Oh, yes. Most certainly, yes.
We then have auto-level mode, which I turned off at first, thinking I’d want to have personal control over the loudness being captured. In one chapter, the voices might be normal, and in the next, there might be some shouty bits. My current thinking is that I want to make sure all chapters are recorded at the same level, so that dynamic range can be held over many hours of recording the audiobook, not just within a chapter. It’s early days with that, though.
Next is the Denoiser, which again seems able to work wonders in removing background noise that wasn’t already dealt with by the voice isolation technology. There is some noise still, which shows me, again, that it is not taking a heavy-handed approach.
The Digital Popper Stopper is also present. I probably could test how effective it is, but having left it on from the start and loving the quality of the audio, I have no incentive to disable this feature. Either it works, or seems invisible enough that I don’t care.
Lastly is the reverb, which I don’t fancy at all. I record in a bedroom, and I’m already concerned about any reverb that might happen there.
MOTIV Mix Software
This amount of complexity would be troublesome to handle on a small device, so instead, Shure have baked the settings into their MOTIV Mix software. I haven’t played around with the mixing at all. I already have my flow for recording. Again, more on this another time, but I happily record audio using Audacity and Audio Hijack for backup. However, I did install MOTIV Mix and used it for two tasks: updating the firmware and adjusting the microphone’s settings.
Once I received the box, I took it out of the packaging and plugged the microphone into my Mac using the generously long USB-C cable. It was detected, and I was prompted through a firmware update, which was reasonably quick. I had previously looked into the best settings to use, so I put those into the settings window for the microphone, and I was then able to fully quit the MOTIV Mix app, and the mic was ready for use.

Ease-of-Use
To record, I simply need to plug in my mic using the USB-C cable, start Audacity (or whichever app I’m using), and choose the Shure MV7+ from the list of input options.
Click record.
That’s it.
All the DSP on the device is all baked in and running. No need for manual controls, no need for MOTIV Mix. If I am happy with the output, it is now just a normal microphone in use, so that couldn’t be easier.
Now, there is a feature that lets you tap the mic to mute/unmute, which sounds kinda useful, except touching the mic also seems like a bad idea. The original MV7 had a touch-strip that also let you adjust gain and headphone volume, but that’s gone now. All adjustments need to be made in MOTIV Mix, and then the microphone becomes plug-and-play.
Post-processing
One of the fantastic results of having a high-quality, highly-suited microphone and recording in a quiet room, is that I need to do a surprisingly small amount of adjustments in post. I own iZotope RX11 Standard, so I use it with a light chain of actions. Not nothing, but each of the modules I use, such as Mouth De-click and Breath Control, all use a very light touch, which means that the quality of the audio changes imperceptibly, which could never, ever be said of my previous microphones.
When I have had a few more hours of experience, I’ll say more about this. Suffice it to say, though, that it is abundantly clear from the recorded audio that this microphone is head-and-shoulders above my previous kit for the task at hand.
Mounting
The microphone tube itself comes permanently mounted to a little stirrup that lets it rotate with just the right amount of friction, so it stays still. That stirrup has a screw-thread to let it be mounted on a tripod or boom arm, and they considerately include an adapter so it fits a standard camera tripod perfectly.
It does matter where your mouth is, and the microphone and internal DSP expect you to be pretty close, I think, with the mic pointing at or near your mouth. I have it about 15 cm from my mouth, with a pop filter in between. This close proximity means that the microphone does not have to apply too much gain to the signal, which is good because more gain can introduce more artifacts, including noise.
Standard advice is to try to have the microphone mounted so it is not on the table, since any nudging of the table could transfer to the microphone and get picked up as noise. Other than that, the tricky part is getting close whilst remaining comfortable and being able to see your script or other information, if needed.
I have so far settled with:
- My perfectly comfortable IKEA Poang chair (reclined a little, but works well);
- The microphone on a boom arm coming in to my left side. It is slightly to the left of my mouth, and it points slightly to the right of my mouth. I’m assured this will reduce the mouth-noise effect I suffer from in my recordings;
- My MacBook Air on a music stand, placed quite far in front of me. I put the text in large letters so I can easily read it from that distance, and control the computer using a wireless trackpad and keyboard on my lap. This may change as I experiment with teleprompter apps.
- The boom also has a pop filter clamped to it, which places a large nylon mesh between my mouth and the microphone to further help reduce plosives and mouth noise. I bought a nice one, the Austrian Audio OCP 8, hoping I’ll never have to think about it again. It is this that blocks my view the most, though.
There is more to say about the computer side of things, but this article is about the wonderful Shure MV7+ microphone, and so I will return to that another time.
Closing Words
I was getting good audio already, having bought the iRig aeons ago and the Mackie more recently. However, sitting down to read Jern’s audiobooks for release online is a long-term project, and I didn’t want to discover I could have done better 100 hours in.
Having taken the plunge, I have absolutely no regrets.
I’ve spent so much time working on sound isolation, room layout, technique, post-production, and more. But the change to this microphone beats all of those put together, or so it feels right now in the honeymoon period.
My very first recording, albeit with settings already fine-tuned, was stellar. The voice was clear, it was crisp but human, it was gentle, and it was me. Undeniably, the real me. And then I put on my nice headphones (Sony WH-100XM4 since you asked) and the sound stayed clear, it stayed human, and the background noise was… simply not there. I was blown away and excited, even more than before, to be embarking on reading Jern’s books.
As you may have gathered, this product is highly recommended.
If you want to know more about my experience with the microphone, or just fancy a chat with the lovely NosillaCastaways, then please pop over to podfeet.com/slack, where you can find me, Eddie Tonkoi, and a friendly welcome. If you want to know more about Jern’s books, then you can head over to jerntonkoi.com, where you can find all her ebooks, paperbacks, and also Lanta, my first audiobook, although that was recorded with the Mackie.