Last year, right around Christmas, our beloved niece passed away. As you can imagine, it’s been a rough year, especially for her parents. They’re healing, but it’s a pain that will never truly go away.
When we were visiting over the holidays, her mom showed me that they have her iPhone and can’t bring themselves to turn it off and discontinue the phone service. They pick it up from time to time and scroll through photos and texts in hopes of feeling closer to her and maybe understanding what happened in her life. You may have thoughts and opinions on whether this is an invasion of her privacy, but I suggest that we not be judgmental if we haven’t lived through the most awful loss possible.
I thought maybe I could be of some help because I had an idea of how to pull the data off of her phone, so that at least they could stop paying for the service.
iMazing Introduction
I decided to see if the long-time, and well-trusted Mac/Windows app iMazing could do the job. iMazing is from Swiss independent software developer DigiDNA Sàrl, and is available at imazing.com. iMazing was originally called DiskAid back in 2008, and in 2014, it was rebranded as iMazing, so it really has been around for a very long time.
iMazing is a very powerful app, but I’m going to focus mostly on how it solved this one problem. Before I start on the solution, though, let’s talk briefly about its overall capabilities and the company’s license model. With iMazing, you can:
- Schedule local backups with snapshots
- Back up to custom locations such as external drives
- Export messages with metadata
- Copy music and videos from and to your iOS devices
- Manage files on your iOS device just as though it’s an external drive
- Manage configuration profiles
- Store no-longer-supported iOS apps and reinstall them on a new device
- And a whole lot more
All of the transfers of data and backups are local on your machine, never sending any of the data to someone else’s cloud service.

Their license model is interesting. It’s a subscription for $60/year that allows you to install on any number of Macs and Windows machines, but you’re limited to accessing just five iOS devices. They are very clear when you sign up that you’ll be renewed in one year, and I interpreted that as, “don’t forget to cancel.” Since I only needed the application for this one task, I paid the $60 and immediately cancelled the subscription. I still get to use it for a year, and if I end up liking some of the other features, I can always renew when it comes close to its expiration date, but at least it won’t auto-renew. I looked at it as a one-time payment of $60 to extract information from her phone.
There are some features that are available without paying for the subscription, but I was unable to find a comparison list between free and paid. For example, I believe you can run backups locally without paying, but don’t hold me to that.
Working with My Niece’s Phone
Now let’s get into the specific problem to be solved with my niece’s phone. One of iMazing’s superpowers is that it can extract everything from an iOS device, either as a backup or in a more human-readable format.
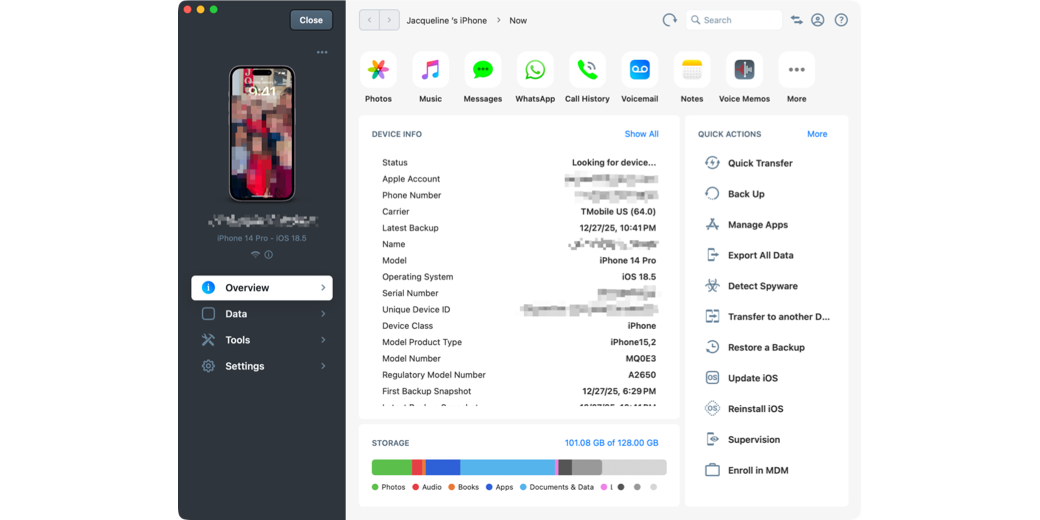
I plugged in her phone and got a very pretty interface in iMazing. On the Overview tab, I could see lots of information about her device, down to the serial number, and an explanation of her storage use by category (photos, audio, books, etc.) Across the top was a row of buttons for photos, music, messages, and more. From these buttons, you can directly access the apps on the phone and either export data from the phone or import data to the phone. For example, if you choose Photos, you can see the entire Photos library, including all albums and media types, and export or import photos and videos.

Down the right side was a list of Quick Actions, such as Quick Transfer, Back Up, and Manage Apps. My first instinct was to run a backup. While that seemed like a good idea, after it completed the backups, I realized it wasn’t a format that allowed us to access the contents. Not the worst thing in the world to have, but not the final solution.
The next option I tried was Export All Data, and that was where things got really interesting. I got a list of categories I could choose to export. I disabled the options for impersonal things like books and music, and let it run the export on the rest of the categories.
When complete, I had folders for:
- Calendars
- Contacts
- Messages
- Notes
- Photos
- Voicemail
I’d like to talk through the value of each of these folders and how they’re structured.
Calendars
The Calendars folder contained several sub-folders: iCloud, Other, Reminders, and Subscribed Calendars. Inside each of those folders were more subfolders. For example, inside iCloud, I found Calendar, Home, and Work. I imagine every named folder would be a separate subfolder in here.
Drilling down into any of these named calendar subfolders reveals three different file types that are an export of that calendar. You get a comma-separated values format (.csv), an Excel file (.xlsx), and a .ics file, which you could import into another calendar application.
I’m not sure the calendar events in a list will provide her parents with any comfort, but it will allow them to walk through her life over the decade or so she had her phone.
Contacts
Contacts worked pretty similarly to Calendars. There were subfolders for All contacts, iCloud, and Unknown, and subfolders within them. Drilling down all the way revealed .csv and .xlsx files with all of her contacts’ information, which could be useful to her parents. It also included a .vcf file, which can be imported into another contacts application. I hadn’t ever heard of it before, but .vcf is to contacts what .ics is to calendars.
Messages
Messages are definitely an area where they may get insights into her life, but it’s also so massive that it might not be super useful. Messages also have subfolders, and each subfolder is a conversation with a different person or group of people. The folders’ names start with the date, which is nice for sorting, followed by a time stamp, and then some word or words to identify the conversation. I can’t quite figure out how the name is created, but it does help to identify the conversation.
I couldn’t resist the temptation to peek inside the conversation folder entitled, “F.A.R.T”. To my great chagrin, it was a work conversation that had zero information on flatulence; it was a work thread!
Inside each message thread folder, you get several interesting ways to understand the message. Probably the most useful is a PDF that has the entire conversation, formatted just like a Message thread with little text bubbles and embedded thumbnails of any images. You also get a plain text file that has just the messages, with time stamps and who the message was from, along with their phone number. There are even Excel and CSV versions of the same information.
But perhaps of most interest to her parents is that every single image, video, and GIF that was in the message thread is also in this same folder, in full size.
I’ll get back to this in a bit, but think about drilling down into each of these folders one by one to see if any of the photos are interesting and ones you’d like to keep. She had 1082 separate Message conversations saved on her phone, so 1082 separate folders to drill down into one-by-one to see the images. I needed to find a solution to make this easier for them.
Notes
The Notes folder is probably the simplest. It simply contains plain text files for each note, and if there were any embedded images, they’re in a folder with the same title, sorted next to the text file.
Photos
The Photos folder contains separate folders of photos and videos for every day there was a media file captured. If you thought Messages would be annoying to go through, the export from her phone had 5,823 folders containing images and videos. Again, this is untenable as a way to view photos, so this one needs a solution too.
Voicemail
My niece kept a lot of voicemails. At first, her parents were pleased they’d be able to hear these, but then they realized it wouldn’t be hearing her voice; it would be the voice of others leaving voicemails for her. They’re not buried in folders; they’re simply in order by date and time, with the name of who left the messages. The recordings are .amr files, which is a compressed audio format called Adaptive Multi-Rate and easily playable with QuickTime.
Finally, she has a WhatsApp folder. I imagine you’d have one for whatever messaging apps you use. Like Apple Messages, her WhatsApp folder had subfolders containing a PDF, and the three text formats: .csv, .txt, and .xlsx.
As it turned out, she wasn’t a big WhatsApp user, so there weren’t any photos in that folder.
This Calls for a Script
Now that we understand the folder structure, let’s talk about how to reorganize both the Photos and Messages folders to make it easier for them to comb through the image and video files. Remember, there are literally thousands of folders with buried images and videos.
As much as I love this family, I wasn’t willing to do any of it by hand, but instead decided to write a script to reorganize the data.
But first, I had to do some reorganization on my own laptop, because I’d made one strategic error. I’d downloaded not just the backup, but also the folder structure export to my Desktop … and I sync Documents and Desktop through iCloud! I didn’t check the backup size before tossing it, but the export alone was around 30GB. Have you noticed It’s actually hard nowadays to find a place on your Mac that isn’t synced through some service? I settled on my Downloads folder, which isn’t synced.
Goal of the Script
The goal of my script was to move all of the photos and videos into just two folders: one for the Photos app and one for her Messages app. I wanted them copied to those two folders without any of the subfolder structure, and I wanted the original capture dates of the images to be maintained so they would sort properly.
I used that goal as a prompt in Perplexity to help me write a shell script that would work on macOS 26. The resulting script was only 29 lines long. In my original prompt, I forgot to tell it to preserve the original capture dates, but it added that step without me asking. It also added file extensions to look for, well beyond what I would have thought of if I’d been specific. For example, it included tiff, avi, and mkv. It also put in a step to check if a file of the same name already existed, and if so, it would add a counter to the file name.
#!/bin/zsh

src="/path/to/source-root"
dest="/path/to/flat-media"

mkdir -p "$dest"

# Adjust extensions to taste
extensions=(
  jpg jpeg png gif heic tiff tif
  mp4 mov m4v avi mkv hevc
)

for ext in $extensions; do
  find "$src" -type f -iname "*.$ext" -print0 |
  while IFS= read -r -d '' file; do
    base=$(basename "$file")
    # If a file with same name already exists, prefix with a counter
    if [[ -e "$dest/$base" ]]; then
      i=1
      while [[ -e "$dest/${i}_$base" ]]; do
        ((i++))
      done
      cp -p "$file" "$dest/${i}_$base"
    else
      cp -p "$file" "$dest/$base"
    fi
  done
done
I put the teeny script into the shownotes if you’re interested in reading it. While I understood the basic gist of what the script was going to do, I’ll confess that I didn’t break down every command to understand every element. Since I’m not an idiot, I created a couple of test directories with sample data from her phone and ran the script on that data first to see if it worked properly. After I ran the script on the test data, I checked to ensure that all of the images copied over to the destination directory as individual files without folders, and I double-checked that the file creation dates had been preserved.
Once satisfied that it was working properly and not destroying the original source data, I ran it on the Photos folder export from iMazing, and it copied 35,000 photos and videos in short order.
It was easy to modify the script to run again on the Messages folder because Perplexity wrote the script with a variable at the beginning for the source and destination directories, and it would create the destination directory for me. I only had to switch the source to Messages, name a new destination, and it moved over another 12,000 photos and videos to the second directory.
When I was done, I had two flat directories filled with images they could easily flip through, delete the ones they didn’t want, and save the precious memories that would give them comfort. I have to say I was rather chuffed after this success.
Interlude — Upgrading Macs to macOS Tahoe
Now it was time to move the files to her mother’s Mac. Like most of you, when Steve and I go to see family, we expect to do a lot of tech support. Steve’s parents are diligent about applying security updates to their devices, but we like to be the ones to do major OS upgrades just in case something goes wonky, or they have trouble understanding a new interface. We planned to install Tahoe on both of their Macs over the holiday.
In the past, we’ve both downloaded the installer from System Settings while at his parents’ home, which meant we were competing for bandwidth on the same network. This year, I decided to make a couple of bootable installers before we left home to speed things up when we arrived at their home.
I formatted two SSDs as Mac OS Extended (Journaled), and followed Apple’s instructions on how to How to download and install macOS – Apple Support. They really want you to use the Mac App Store to download, but that only works if you’re not downloading the current version of macOS. If you need the current version, you’ll be using the Terminal to do the download.
Luckily, I’ve taken the Taming the Terminal course, so I wasn’t afraid. The command Apple provides fetches the full installer and moves it to your Applications directory, just as if you’d downloaded it from System Settings. You provide the full installer version number for the download, so I was able to specify macOS 26.2.
softwareupdate --fetch-full-installer --full-installer-version <number>
Once downloaded, you follow another Apple Support article to Create a bootable installer for macOS – Apple Support, which also uses the Terminal. This command creates the installer on your removable media.
sudo /Applications/Install\ macOS\ Tahoe.app/Contents/Resources/createinstallmedia --volume /Volumes/MyVolume
I only needed to download macOS 26.2 one time, and then easily make bootable installers on the two drives we’d take with us to upgrade the two Macs we’d be upgrading.
You might be wondering why I’m throwing in all this stuff about bootable installers when the story was about moving our niece’s data off of her iPhone. The bootable installer only needs a 32GB thumb drive, but we didn’t have any thumb drives that big. Instead, I used two spare 1TB SSDs we had on hand. This was good news for the rest of the story.
We updated Steve’s parents’ Macs, and shockingly, neither of them was bothered at all by Liquid Glass. I had been dreading imposing it on them, but they didn’t bat an eyelash at it.
While we were working on the OS update, we discovered that his dad’s Mac hadn’t been backed up in a year and a half! While his mom uses Time Machine, his dad had always run his own backups using a thumb drive, since he didn’t have a lot of data. We all know how it works out when we think we’ll do manual backups, right?
After doing the macOS Tahoe install on his Mac, we decided to sacrifice one of the 1GB SSDs to the cause. We reformatted the drive again, this time to APFS, and turned it into a Time Machine drive for him. I’m sure the drive will be very happy living with him.
Now we move back to our hero at Steve’s sister’s house. She asked me to update her to macOS Tahoe, too. No problem, we’ve got the second SSD still with the installer, and I quickly updated her computer.
Moving the Files to Her Mother’s Mac
Finally, we’re back to where I needed to move the data from my Mac over to hers from her daughter’s phone. Time to reformat the installer drive to APFS.
At this point, I’ve got the two nice flat folders of photos and videos, but I wanted to give her the entire export just in case there was more she needed. I put the two folders and the entire export onto the SSD and moved it over to her Mac.
You would think I would have learned after putting all of this data in a location synced over iCloud, but I did it again, this time to her iMac. She only has a 256GB internal drive in her iMac, and all of this data was whooshing over the Internets to her MacBook Air. Luckily, she had 200GB of iCloud, so nothing broke, but I was close to hitting her limit. The only reason it worked was that her iCloud settings on her iMac were just optimized files. I wanted her to have the originals locally, so I changed her preferences in iCloud to originals for Documents and Desktop syncing on her iMac.
And then I realized she only had 30GB left on her Mac.
I certainly wasn’t going to go through the tens of thousands of images and videos to delete duplicates after all this work, but I did decide to delete some of them, and I thought my solution was rather clever.
In her Messages folder in the full export (the one with photos, videos, and text files for Messages buried in folders), I sorted by folder size. You can do that by going to View → Show View Options, or pressing ⌘+J, and then checking the box to Calculate all sizes, and then sorting by size.

Now I could see the top folders by size, navigate down into them, and delete any photos and videos in just those folders. Remember, she’s got all of these photos in the flat folder, and 47,000 media files to comb through, so I don’t think she’ll miss these few duplicates. Doing this purge through the top 7 Message folders increased her available storage from 30GB to 65GB!
When next we visit, I’ll help her clear out the duplicates, but at that point, I wanted to get back to playing shuffleboard and card games and hearing all of the family stories.
Bottom Line
This story is hard to do a bottom line on because nothing I could do would take away any of their pain. But in my own nerdy way, I was able to help them to preserve these memories of their daughter and save them the cost of paying for a stupid cell phone plan indefinitely.
I learned a lot, and I’m glad iMazing was there to help me with this work.
Thanks for doing this. We understand the pain of losing a child and what you did will help keep the memories of her alive. The pain is still there, but being able to look at those photos and videos when the mood strikes is helpful.
By the way, this is also a way to archive media from Messages rather than letting the messages file get larger and larger because you don’t want to get rid of any messages.