I was pretty excited to hear that Apple came out with two new versions of their 5K Studio Display, but I, like most of the Internet, was disappointed in what they announced. The reason I’m talking about it right now is that I’ve been testing the ViewSonic VP2788-5K 27″ display that might be a good alternative to Apple’s exorbitant pricing. Let’s first take a look at the specs for the displays Apple announced, and then we’ll compare to the Viewsonic offering.
Apple Studio Display and Studio Display XDR
Apple announced two displays: the 2026 update to the Studio Display they first introduced in 2022, and the new Studio Display XDR. They also retired the 32″ Pro Display XDR at the same time.
The 2026 Studio Display maintained the price of the older version at $1600 (for standard glass and a tilt-adjustable stand), but instead of 1 Thunderbolt 3 port and 3 USB-C ports, the new one has 2 Thunderbolt 5 ports and 2 USB-C 10 Gbps ports. Literally nothing else is new. You can still pay $400 more to have the stand able to tilt and be height-adjustable (really, Apple?), or $300 more for nano-texture glass, or if you’re made of money, go for the $2300 version with nano-texture glass and a tilt/height-adjustable stand.
They also came out with the Studio Display XDR for those who invested in the stock market right after the Great Depression. That new model starts at $3300 and goes up to $3600 for nano-texture glass, but at least they don’t charge you extra for the height-adjustable stand.
The 2026 Studio Display XDR is brighter at 1000 nits for standard dynamic range (SDR) and 2000 nits for high dynamic range (HDR) vs. the 600 nits of the regular Studio display. I’m not downplaying HDR, but it is good to keep in mind that those brightness values are in localized areas. You don’t get the entire screen nearly twice as bright. It would probably burn your retinas if they did that anyway! The Studio Display XDR also has a refresh rate of 120 Hz vs. the 60 Hz of the regular Studio Display. It’s also a mini-LED LCD display. I’m 100% certain it’s stunning.
I know I’ve set a lot of numbers here, so let me simplify it. You can pay anywhere from $1,600 to $3,300 for the Studio Display from Apple. One of my requirements is a height-adjustable display, so we’ll put the bottom of the line at $2,000 for the regular Studio Display with the height-adjustable stand. All of the displays I’ve talked about are 5120 x 2880 with a pixel density of 218 pixels/inch.
| Left Column | 2022 Studio Display | 2026 Studio Display | Studio Display XDR |
|---|---|---|---|
| Brightness | 600 nits | 600 nits | 1000 nits (SDR) 2000 nits (HDR) |
| Color gamut | P3 | P3 | P3 & Adobe RGB |
| Contrast ratio | 1200:1 | 1200:1 | 1,000,000:1 |
| Resolution | 5120 by 2880 | 5120 by 2880 | 5120 by 2880 |
| Refresh Rate | 60 Hz | 60 Hz | 120 Hz |
| Connections | 1 Thunderbolt 3 3 USB-C |
2 Thunderbolt 5 2 USB-C 10 Gb/s |
Thunderbolt 5 2 Thunderbolt 5 2 USB-C 10 Gb/s |
| Price | $1600 std glass, tilt-adjustable stand — $2000 std glass, tilt/height adjustable stand |
$1600 std glass, tilt-adjustable stand — $2000 std glass, tilt/height adjustable stand |
$3300 std glass, tilt/height adjustable stand |
ViewSonic VP2788-5K vs. 2026 Studio Display
None of this is breaking news, but I wanted to start with the models from Apple as a baseline to talk about the 5K display offering from ViewSonic. After Steve and I interviewed ViewSonic at CES about their foldable 4K and 5K monitors, I asked them for a review unit of their VP2788-5K display. I’ve been using it as my primary display when I’m downstairs convalescing, and it’s been great.
Before we get into the specs and the user experience, let’s set the stage that the ViewSonic VP2788-5K display is only $929 with a tilt and height-adjustable stand. It even swivels left/right and pivots so you can turn the display to portrait orientation. At $929, that’s more than $1,000 cheaper than the regular Studio Display Apple just announced. Now that I’ve got your attention, let’s talk about the specs, comparing the ViewSonic vs. the non-XDR Studio Display.
The ViewSonic display matches the Studio Display resolution of 5120 by 2880 and has the same pixel density of 218 pixels per inch. Where the standard Studio Display has 600 nits of brightness, the ViewSonic has 500, but the ViewSonic has a contrast ratio of 2000:1, whereas the Studio Display is 1200:1. The ViewSonic has a top refresh rate of 75 Hz vs. 60 Hz for the Studio Display. That’s a difference I’m pretty sure I wouldn’t notice, and I’m also sure I wouldn’t notice 120 Hz if it stared right at me.
| Left Column | 2026 Studio Display | ViewSonic VP2788-5K |
|---|---|---|
| Brightness | 600 nits | 500 nits |
| Color gamut | P3 | P3 |
| Contrast ratio | 1200:1 | 2000:1 |
| Resolution | 5120 by 2880 | 5120 by 2880 |
| Refresh Rate | 60 Hz | 75 Hz |
| Connections | 2 Thunderbolt 5 2 USB-C 3.2 10 Gb/s |
2 Thunderbolt 4 1 USB-C 3.2 10Gb/s 2 USB-A 3.2 1 HDMI 2.1 1 Display Port |
| Price | $1600 std glass, tilt-adjustable stand — $2000 std glass, tilt/height adjustable stand |
$930 Anti-glare glass tilt/height/swivel/pivot stand |
Ports!
Where you’ll find some more interesting differences is in the connections. Both displays have 2 Thunderbolt ports, but the Studio Display is on Thunderbolt 5 while the ViewSonic is still sporting Thunderbolt 4. I have to say that the speed of Thunderbolt has zero effect on my work. If you care deeply about it, then maybe it’s worth the extra $1,000 to you to get Thunderbolt 5. Thunderbolt on the studio display provides 96 W of charging for your laptop, while the ViewSonic’s Thunderbolt supports 100 W of charging, so not a significant difference.
They both have USB-C 3.2 at 10 Gbps, but the studio display has two of them, while the ViewSonic only has one. ViewSonic has always done more to support backwards compatibility, so it has some older ports you may or may not appreciate.
The ViewSonic has an HDMI port, as well as two USB Type A ports, and even a full-sized Display Port. This display is really targeted towards Mac users, so I’m not sure why these particular ports are included.
This doesn’t really count as being listed under Ports, but where Apple promises high-quality force-cancelling speakers in their displays, please don’t ever play any audio out of the ViewSonic speakers because you will be disappointed
Enough About Specs, How Does it Perform?
The review unit from ViewSonic couldn’t have come at a better time. Recovery from my broken hip is going really well, but I still need Steve’s help to get up and down the stairs. Not only does he have to transport me, acting as the second handrail, but he also has to carry my walker upstairs and downstairs, and anything else I need. We’ve settled on a strategy where I mostly spend the mornings upstairs, and then before lunch, I move downstairs till bedtime.
This means that if I wanted to do any serious computing on my big display, I had to be upstairs. When the ViewSonic display arrived, we set it up on our dining room table, and now I have a nice big, beautiful 27-inch 5K display. I use the single 1m (included) Thunderbolt 4 cable hooked to my MacBook Air to send video, audio, and data to the display while keeping my laptop charged.
I’m quite short-waisted, so being able to adjust the height down pretty low on the table has been fantastic, but my back also gets very tired of sitting for a long time. I’m able to raise it up pretty high while tilting it up, and do a little bit of standing computing until I get bored with that and sit back down. These adjustments are also valuable if you need to show someone something on your display while they’re standing.
I mentioned that the ViewSonic display will also swivel 90 degrees. Even if you never need it to be in portrait orientation, being able to swivel it makes it much easier to plug in cables. You see, ViewSonic puts all of the ports along the bottom edge of the display. Fussing around trying to plug a USB cable in blind like that is very difficult, but if you tilt the display slightly, raise it up, and then rotate it 90 degrees, you can see exactly what you’re doing. Having the cables come out the bottom means any attached cables are visible, so that is a bit of a downside to this display.
It’s pretty easy to change the height, tilt, and swivel with this display, and yet it’s not at all wobbly, so once I set it in an orientation, it stays there.
When I first plugged my MacBook Air into the ViewSonic display, it was kind of dim-looking and low-contrast, so I was super disappointed. All of ViewSonic’s displays have a small joystick on the bottom that allows you to get into some menus to change features of their displays. I touched that little joystick, and I started to fiddle with it, but before I had changed any settings, the display suddenly looked fantastic. I’m not sure what was going on because it hasn’t done it since. Over the last couple of weeks, every time I plug in my MacBook Air, it looks bright and beautiful. I would call it a fluke, but it also happened when we first plugged Steve’s MacBook Pro in using HDMI.
One thing people talk about is how pretty Apple’s displays are. I’m not saying they aren’t pretty, but I don’t think that’s something I notice on a day-to-day basis. The ViewSonic has an extremely thin physical black bezel, maybe an eighth of an inch. Across the bottom, there’s a one-inch physical bezel with the word ViewSonic printed on it, but it’s printed in black on black, so it’s very subtle. Then there’s a black border on the display of 3/8″ on a side. I never noticed it till I went to measure because I like a really dark background. In reality, 90% of the time you’re only looking at the display, not the hardware holding it up.
I took a look at the available display resolutions for the ViewSonic, and the default with the Studio Display is 2560 x 1440. I have upped the resolution to 3008 x1692, which gives me a little more space on the screen but might be too tiny for your vision. It stays super crisp at that higher resolution.

Side-By-Side Comparison with LG 5K & OG Studio Display
Luckily for you, we have two other 27″ 5K displays to which I can compare the ViewSonic offering.
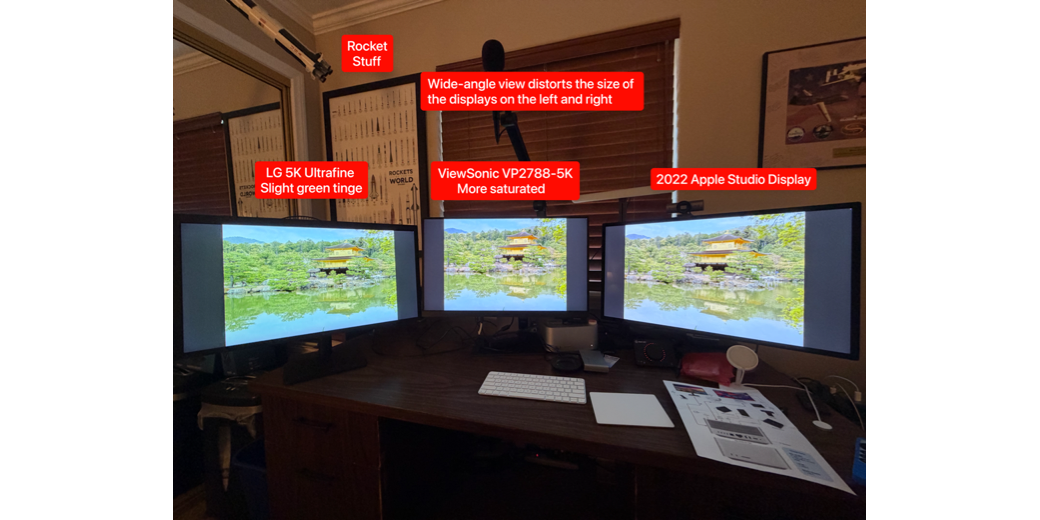
Steve has the LG Ultrafine 5K, first introduced in 2016, and the original Studio Display. He “volunteered” to put the ViewSonic on his desk so we could do a side-by-side-by-side comparison. With a bit of messing around, we were able to put the LG on the left, ViewSonic in the middle, and Studio Display on the right.
The LG Ultrafine 5K is no longer available, but it originally sold for $1300. It has one Thunderbolt 3 port, along with 3 USB Type-C ports. It also came with a built-in camera, which really wasn’t all that bad. It supports DCI-P3 like the other two displays and matches the OG Studio Display with 500 nits of brightness. For that $1300, you get a tilt and height-adjustable stand, but no pivot.
Overall the specs of the LG are comparable to the Viewsonic, if a bit dated.
Glare
I mentioned earlier that the ViewSonic has anti-glare glass. I had Steve sit at his desk, and I used my iPhone’s flashlight to point it at each of the three screens. On both the LG and the Studio Display, the light gave a clear and distinct reflection, but on the ViewSonic, the screen just had a bit of glow added to it. I’d say that’s a win for folks who have trouble with glare (I’m looking at you, George from Tulsa). It might not be nano-texture glass, but it’s definitely not reflective.
With my post-cataract surgery bionic eyes, if I look closely, I can see small specular highlights from the anti-glare surface, but I don’t think it would bother most people. Steve didn’t notice it.
Text
When we first set up the three displays, it took a bit of faffing about to get them to mirror properly. We finally beat System Settings into submission and got the two 3rd-party displays to mirror the Studio Display.
We brought up a web page on podfeet.com to compare the crispness of the text on the three displays. Both the Studio Display and the ViewSonic were flawless, but the LG Ultrafine had much lower-quality text rendering. I took photos with my phone of the three screens, which you would think wouldn’t work to see the comparison, but you can definitely see how much worse the LG looks. Vertical lines, like in the letter “r” and a capital “M” are half solid black and half grey giving them a fuzzy look. The ViewSonic and the Studio Display were super crisp in comparison.s


Color
Our next test was to look at some images on the three displays. We chose the Kinkaku-ji temple in Kyoto, Japan as our first full-screen photo to compare the displays. This is a bright gold building set against a lush green background with a reflective pond in front. If you’re in our Slack, Allister Jenks recently posted a spectacular photo of the same temple.
Steve and I both thought that the ViewSonic looked the best with rich, saturated colors and crisp edges to things. The LG looked dull and a bit green, and the Studio Display looked muted compared to the saturated ViewSonic.

But then Steve had a good idea. He suggested that since red is one of the hardest colors to capture and display, perhaps one of my many close-up photos of red flowers would be a good test. This turned out to be a very important test.
Steve did most of the pixel peeping here, and he pointed out that while in the LG and the Studio Display you could see very subtle creases in the red rose, those features were completely gone on the ViewSonic. That saturation that we liked so much for the picture of the temple in Japan really was overdone.
I mentioned earlier that there is a small joystick under the ViewSonic display that allows you to control features of the display. I messed around in the color controls, changing from P3 to sRGB to see if that would help, but nothing I did made the red flower photo any better.

Later, though, Steve noticed in System Settings → Displays, the ViewSonic was set to Color Profile “VP2788-5K”. He changed it to “Display P3” which is how the other two displays were set.
Instantly, the red rose looked great on all three displays. We’ll give up the over-saturation on the temple photo to get better color overall.
Brightness Control
In our testing, Steve and I found something disappointing about the ViewSonic display: you can’t use the brightness keys on your keyboard to control the display. You have to use the joystick to open the Brightness menu and push it up or down to change it. It’s not all that hard, but it’s a lot nicer to be able to use the keyboard controls you’re used to.
This seemed very strange, so I asked Perplexity if there was a way to get the ViewSonic to obey the brightness keys. It explained that there was a tool you could download from ViewSonic to add this capability. That seemed like a very Windowsy kind of thing to ask us to do but I decided to try the download.
At this point in my review, if the ViewSonic VP2788-5K sounds like a terrific monitor for you at a good price, please, for the sake of all things good in this world, stop here. Do not pay any attention to the rest of this article. If you keep going, remember, you were warned.
Let’s walk through the process ViewSonic wants us to follow, shall we? We start by going to the ColorPro Software Download link on ViewSonic’s website. You might think you can download the tool to adjust brightness with the keyboard, but you’d be wrong. You first have to download the ViewSonic Display Portal. It says right on it that this is a “one-stop platform to all ViewSonic monitor software.” They cheerfully tell you that with the ViewSonic Display Portal, you get automatic detection of compatible software, and you get to stay updated with the latest news and innovations from ViewSonic. Literally no one wants this, Viewsonic.

Once you download the ViewSonic display portal, you discover that it’s an old-fashioned package installer, and it requires background access. You have to realize that I truly must love you that I kept going. But it gets worse.

Once I installed Display Portal, it showed me a recommended tab with five apps it suggested I install. Two were about color calibration, which didn’t interest me, and one was an app called vSplit that I might play with just for grins and giggles. Then there was a Firmware Update Tool, which seemed like a reasonable thing to run, and finally ColorPro Display Manager, which, in theory, would give me brightness control with the keyboard.

ColorPro Display Manager required yet another package manager installation. But get this — the app is 278 MB! That’s banana pants! Again, what I do for you.

ColorPro Display Manager is a software interface to the same functionality you get with the little joystick. This is actually a good thing because until you get used to it, the joystick control is pretty twitchy. I still think more than a quarter of a gigabyte for a utility app is ridiculous, but the app itself isn’t terrible.

After all this faffing about, the brightness slider (and contrast slider) were both greyed out! The entire reason I installed this tool wasn’t working properly. I spotted a reset button in ColorPro Display Manager, and I thought, “What the heck? Let’s click it!” The screen went black, and when it came back, I was able to use the keyboard keys to change the brightness. Yay. Said without much enthusiasm because this was way too hard.
The only good thing I can say about having to install three apps from ViewSonic is that they have very striking icons.
On macOS, there’s a trick to quickly bring up Display and Sound Settings. For Display Settings, hold down the option key and tap one of the brightness keys. For Sound Settings, again hold down the option key and tap one of the volume keys on your keyboard. Super handy trick which I use all the time.
Sadly, while all of my effort and loss of disk space did allow me to change the brightness of the ViewSonic display with the keyboard controls, the ColorDisplayManager software breaks the option trick for Displays and Sound Settings. The only good news is that when I unplug the display, those tricks work again on my Mac.
Bottom Line
Let’s bottom line the ViewSonic VP2788-5K display. The screen is gorgeous, like a 5K display is supposed to be; it’s got a great stand that gives you height, tilt, and pivot control, it has the ports you need and probably a few you don’t. And all this is at less than half the price of the Apple Studio Display. If you can live with changing the display brightness with the joystick, I think the ViewSonic is a solid choice. If you’ve got the money and don’t mind spending that much, the Apple Studio Display will feel a bit more Mac-like for twice the money.
As my daughter trained as a graphic artist and worked at a high end ad agency that once rejected 30,000 glossy corporate annual reports because the Pantone ink the printer used on the corporate logo was slighty off, I understand perfection in color rendition and extreme detail may be very important to some users.
For the rest of us this Asus 31.5″ 4K should suffice. I have one at work and another at home. The anti glare surface is excellent. No issues with resolution, brightness. Works well with Mac because it is the same size as the just discontinued $6,000 Pro Display XDR
$199 at Amazon
ASUS 31.5” 4K HDR Eye Care Monitor (VP327Q) – UHD (3840 x 2160), 99% sRGB, HDR-10, Adaptive-Sync, Speakers, DisplayPort, HDMI, Flicker Free, Blue Light Filter, VESA Mountable,Black