I mentioned recently that one of the reasons I like to play with my devices and new software is so that when I’m faced with a technical challenge, I have the Lego™️ bricks necessary to piece together a solution. This week, I got to exercise those skills in an interesting way.
The Problem to be Solved
Let’s start with the problem to be solved. You may remember when Chris Cooke from Unmute Presents came on the NosillaCast to talk about how, as a blind person, she uses the Aira service to navigate the physical world. If you don’t remember or missed that episode, let me just say that she is delightful, intelligent, and funny.
The great news, is that Chris has been selected to be one of the speakers at Macstock this year. She’ll be explaining how she uses the Remote Incident Manager, from Pneuma Solutions. This product allows blind people to provide remote technical support to both blind and sighted people. Chris is an instructor and uses the Remote Incident Manager regularly to help her students.
We’ve been putting our heads together to come up with a way for her to demonstrate how it works to the Macstock audience. Since the Remote Incident Manager relies on the Internet, it would be folly for her to try to do a live demo on stage. Conference WiFi is notoriously unreliable, and to demonstrate this tool effectively, there’s some interesting audio routing required. We’ve been working on a way for me to make a video and audio recording of her controlling Mac, and then we’ll play the canned video at Macstock. It is turning out to be an exercise that requires every bit of my expertise.
How the Remote Incident Manager Works
The Remote Incident Manager was only ported from Windows to macOS two years ago, and from my understanding, it’s the only tool out there that will allow a blind person to provide remote tech support. I remember when NosillaCastaway Dan Eckmeier told me the good news that it was now available for the Mac.
Both the remote technician (Chris) and the person requiring help (me) have to install the Remote Incident Manager on their computers. On my side, the installer walked me through the plethora of permissions Apple require for our security. It wasn’t fundamentally different from any other app that requires screen recording permissions, but the UI of the Remote Incident Manager will appear non-standard to Mac users. The screens are white with black text and boxes around some things representing buttons. The screens explaining permissions are solid red with black text.
In addition to the security permissions, the Remote Incident Manager installer also installs the Karabiner Virtual Human Interface Device Manager driver extension. I had heard of Karabiner before, but had to look it up to find out exactly what it’s for. Karabiner Elements is a keyboard customizer for macOS that allows the user to remap keys. Karabiner-Elements employs a virtual keyboard and mouse driver to modify input events. The .Karabiner-VirtualHIDDevice-Manager.app is responsible for activating and managing these virtual devices. Ok, then. Not sure why this needs to be installed for the Remote Incident Manager, but I’ll play along.

The instructor and the student see the same interface when launching the Remote Incident Manager. It’s a very simple white window with black text, with plain rectangular boxes around anything that is a button. It kind of looks like an engineer designed a user interface instead of a designer with actual talent. The title of this window says “Receive Remote Help”, but Chris will push the button that says, “Provide help instead”. Her paid account allows her to define a keyword, which she tells to the person she’s helping.
On my screen, I simply enter the keyword Chris provides me into the little box in the window, and in a second or two, Chris is able to start controlling my computer.

If you’re sighted and controlling someone else’s computer, you see everything on their screen, and you can move your cursor around, click on things, and see them change. With the Remote Incident Manager, it’s exactly like that, except Chris is navigating my computer using VoiceOver. She can issue commands, open applications, and modify settings, all while listening to VoiceOver and using VoiceOver commands to navigate the system. For her, it’s just like navigating her own computer.
When she first connects to my computer, I see the little grey box in the bottom left that displays what VoiceOver is saying. Because of a recent change in macOS Sequoia, if I want to hear VoiceOver, I have to toggle it off and back on again. This behavior has been reported to Apple by Pneuma Solutions, but they’ve yet to catch anyone’s attention about it.
Chris, when initiating the connection, can choose to simply control my screen, or she can choose to have our voices transmitted within this same screen control session.
At this point, we’re ready for Chris to perform some task on my computer that would be interesting for the users of Macstock to watch. But now comes the tricky part. We have to figure out how to record everything for the video.
What She Wants to Demo
Our goal is to create a recording that includes:
- Chris’s voice
- Allison’s voice
- VoiceOver from my Mac (which is what she hears when running Remote Incident Manager)
- Video of my desktop
- Not only what she’s controlling, but the visual element of VoiceOver
That sounds simple, but it has turned out to be much more complicated than we thought it would be. With some fancy dancing with tools like Loopback and Audio Hijack from Rogue Amoeba, I can capture the audio of me, Chris, and VoiceOver on my Mac and have those three sources be included in a ScreenFlow recording of my screen while we’re doing the session.
Unfortunately, in three separate sessions over the course of many days and many hours of experimentation, we have discovered a big problem. If any software is running on my Mac that can capture the audio, Chris hears her voice reflected back to her with a 3-5 second delay. You can imagine how it would be impossible for her to conduct the demo under these conditions.
I tried recording our voices with Audio Hijack, ScreenFlow, and even QuickTime, and the result was the same: double audio with a delay. We abandoned the voice call option in the Remote Incident Manager and tried using Zoom for our voices, but the same double delay was experienced on Chris’s end. We did a screenshare with Zoom where I was able to check her sound input and output settings in System Settings, and I was able to check her Loopback settings, but I was unable to account for the problem.
Chris told me that she normally just calls her students on the phone and uses the Remote Incident Manager on the Mac for the screenshare, so we decided to give that a try. The lag was gone, and Chris was able to easily navigate around on my machine using VoiceOver and hear it speaking near real-time. But now we have a phone call, instead of a VOIP call. How do I capture her audio to put it into the video?
One iPhone, Three Microphones, Three Sets of Headphones, and Three Macs
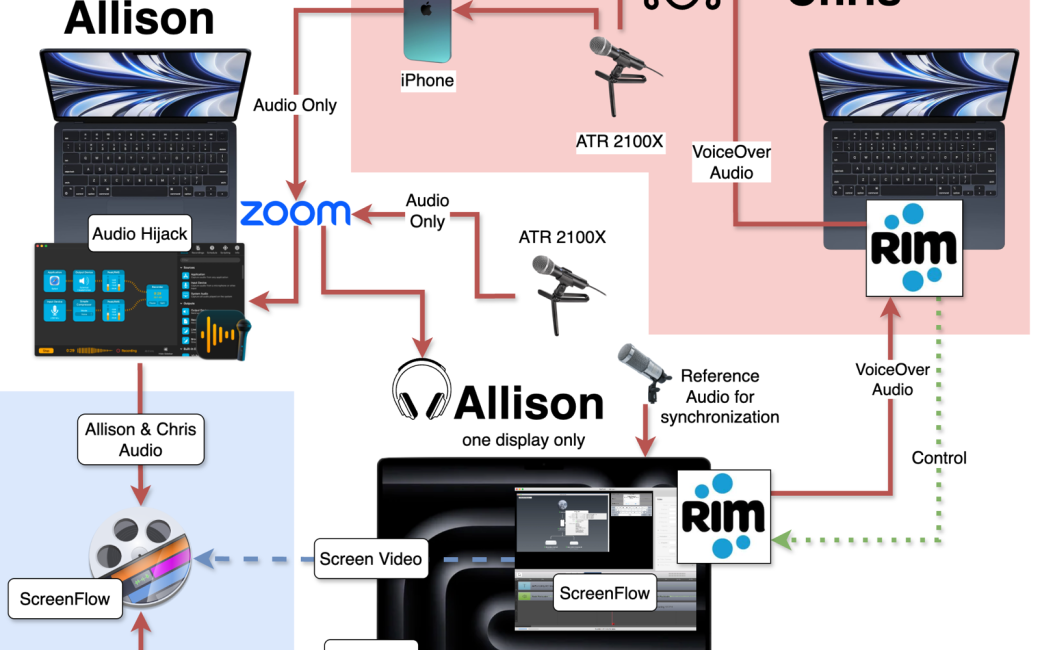
In order to get this to work, we ended up using one iPhone, three microphones, and three Macs.
My MacBook Pro will be the target device for Chris to control using the Remote Incident Manager. As a side note, I have a large display connected to the MacBook Pro, but when Chris is controlling my Mac, she doesn’t have any way of knowing which of my displays she’s using. That will make it hard to record, so I put my MacBook Pro in screen mirroring mode.
Since my MacBook Pro is the target, that’s where I’ll run ScreenFlow to record video of the screen and audio from VoiceOver.
In order to capture our voices, we need to use a VOIP tool like Zoom. If I run Zoom on my MacBook Air, and she uses her iPhone to call into Zoom, then we’ve removed whatever is causing the double delay for Chris. With Zoom running on my MacBook Air, I can run Audio Hijack and capture a stereo audio file with her iPhone audio on one track, and audio from my ATR2100x USB-C microphone on the other track. Chris also has an ATR2100x, and we figured out that she can use it as a microphone for her iPhone, so her fabulous voice will sound good on the recording.
When you use the ATR2100x USB-C microphone on an iPhone, you also have to connect headphones to the monitor port on the microphone in order to hear the conversation. You have no control over sending the audio out to anything else, not even the speaker on the iPhone. No big deal, Chris has high-quality headphones. But now if she has her headphones listening to me on the Zoom call, how is she going to hear VoiceOver on her Mac in the Remote Incident Manager?
Chris came up with a brilliant solution. She has two sets of headphones that each cover only one ear. She’ll be able to listen to the Zoom call in one ear while hearing VoiceOver from the Mac in the other ear. I told her we could only do this if she promised to take a photo of herself wearing two sets of headphones, and she immediately agreed. I told you she’s fun. Ok, back to the setup.
My plan was to hit record on Audio Hijack on the MacBook Air and then record in ScreenFlow on the MacBook Pro and later combine the recordings. That introduced the problem of aligning the audio tracks from Chris and me chatting on the MacBook Air with the audio of VoiceOver and video on the MacBook Pro. And that’s where the second microphone comes in. I connected my Heil PR-40 mic to the MacBook Pro and added that input as a second audio track for the video in ScreenFlow. The Heil voice recording will simply be a reference track. When I bring the stereo recording of Chris and me from the Zoom call into the ScreenFlow recording, the Heil recording will make it easy to line up. Then I can delete either the Heil or the ATR2100x voice recording of me. I was proud of that solution.
Of Course There’s a Diagram
Chris and I ran through a quick example demo with the setup I described, and I was able to capture Chris and me, VoiceOver, and the screen as she controlled my Mac. I aligned the voice tracks using that reference track and then muted the reference track. I felt like we had made fire when we were done! I immediately sketched out how we configured everything using a pencil and paper, and then I made one of my world-famous diagrams using draw.io.
I’m not missing the irony of using a diagram to explain what we’re doing when the folks at Pneuma Solutions are blind, so they won’t be able to appreciate our genius without the written explanation.

Bottom Line
The bottom line is that while it was frustrating at times, Chris and I had a blast working on this puzzle together. I suspect you’ll hear more of this story as time goes on. I fully expect and hope that the NosillaCastaways will step forward with better solutions that start with, “Well, actually, Allison, it’s quite simple. All you have to do is …”