The Problem to be Solved
When Apple came out with the 14” MacBook Pro models, it created a problem for screencasters like those of us at ScreenCastsONLINE. The problem is that the displays are a 16×10 aspect ratio, while video on just about every platform is 16×9. If I produce a video using the display on my 14” MacBook Pro, there will be black bars above and below the content.
When we first ran into this problem, J.F. Brissette (our editor) and I worked together to find the least-annoying screen resolution for me to use. The native resolution of 1512×982 works ok, but because of the 16×10 aspect ratio, all videos I create have black bars on the top and bottom where there could be valuable content instead.
J.F. found a great solution. He saw a video by Chadwick Shoults, (a great ~DaVinci Resolve educator on YouTube~) in which Chadwick explained that you can use a tiny, inexpensive piece of hardware called a Virtual Monitor EDID Emulator (EDID = extended display identification data), or as they’re more colloquially known, a dummy HDMI dongle. I’ll mix the two names and refer to it as a Virtual Monitor Dongle.
This device resembles a tiny thumb drive, but instead of a USB connector, it’s HDMI.

This palm-of-your-hand-sized dongle plugs into the HDMI port on your computer and fools the operating system into thinking an HDMI display has been attached. The virtual monitor can be of a very high resolution and aspect ratio that your internal MacBook Pro display doesn’t natively expose.
As soon as I learned from J.F. about these HDMI dummy dongles, I toodled off to Amazon to look for one. Turns out there are zillions of them out there. I bought a pack of three 4K UHD dongles for the grand total of $7 from a company I’d never heard of. By “zillions”, I mean six pages of them on Amazon.
I’m sure the dongles I bought are the best because they get a blue light on them when they’re plugged into your Mac.

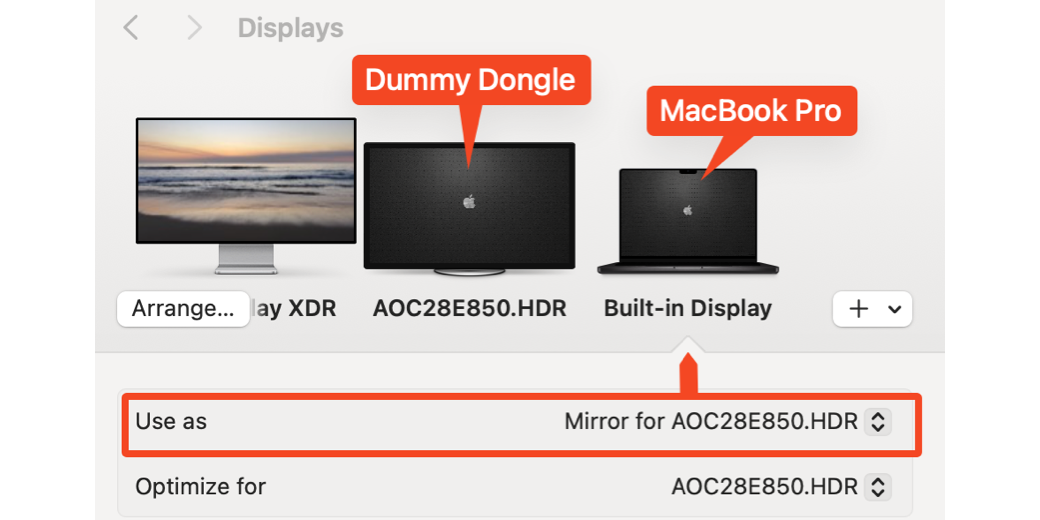
The steps are very simple to make this work. Plug the dummy HDMI dongle into your HDMI port. Open System Settings to Displays, and now instead of just your built-in display, you’ll also see another (much larger) display. The display created by the dongle I bought calls itself by the very catchy name, “AOC28E850.HDR”. When selected, it shows an impressive list of resolutions, defaulting to 1920×1080, which is exactly what we need for screencasting. I can bring it down to as low as 1152×648 and as high as 3024×1964.

This is all interesting, but the real magic comes when you switch to your Built-in Display on the Mac, and then choose Mirror for and the name of the dummy display. Now the internal display on the MacBook Pro will be the resolution of the virtual monitor; in my case, 1920×1080. This gives me black bars on the top and bottom of my built-in display, but the final video recording will not have black bars.

When I’m done recording, I can just pop the virtual monitor out of the HDMI port, and my MacBook Pro goes back to its normal resolution. The only possible problem I can see with this solution is losing these tiny, chicklet-sized dongles. I have to think of a place to store them that I’ll remember every six weeks when I make a ScreenCastsONLINE video. Can y’all remind me when I ask later that I put one in my top left drawer of my desk in front of the pencil tray, and one in my travel pouch of cables and dongles?
Despite the fear of losing them, I’m delighted that such an easy and inexpensive solution solves this problem.
Virtual HDMI Monitor on Apple TV
But wait, there’s more. Coincidentally, I learned of another use for a virtual monitor HDMI dongle right around the same time J.F. told me about them. As you know, I listen to the awesome Double Tap podcast hosted by Steven Scott and Shaun Price. On a recent episode, one of their listeners, Jeff Armstrong, sent in a really cool solution to a problem he had.
Jeff likes the Apple TV for its content, especially the Apple Podcasts app, and also to play Netflix movies with audio descriptions. In order to use an Apple TV, you need to connect a TV to the device. But since Jeff is blind, buying and attaching a TV to his Apple TV is a waste of money, energy, space, and even generates heat, all while adding zero value for him.
You can see where this is going, right? Jeff simply plugged a virtual monitor HDMI dongle into his Apple TV, and voilà, he’s in business. But he went further in this solution. He connects an Amazon Echo speaker via Bluetooth to his Apple TV.
When he wants to use the Apple TV, he says, “A-lady, connect”. From there, he uses the microphone button on the Siri remote to search the Apple TV interface for the content he wants. That’s how Steve and I navigate the Apple TV, too. Life’s too short to try to remember which service has the show we want, so search is our constant companion.
When Jeff wants to play music through Amazon Music, he simply says, “A-lady, disconnect” and then talks to the Echo directly. He uses both services and has the best of both worlds. I thought this was a genius use of a Virtual Monitor HDMI Dongle.
Headless Device
Jeff’s solution reminded me of a hundred years ago when I needed to have a headless Mac mini, and back then, I had to wire up a DVI connector adapter using a couple of resistors I stole from my buddy Ron’s house to fake it out. It did the same thing as these dongles, but it was a wee bit more work.
If you have a Mac mini or even a Mac Studio that you only access remotely, a virtual HDMI monitor might be the right solution. If you plug in one of these dongles, through the network, the Mac will appear to have a display, and you can share the virtual screen.
I tested using one of the HDMI dongles on our Mac mini, and it worked well with no display attached, but after reboot, I was unable to screenshare directly into the Mac. A bit of research showed that I could enable automatic login, but I didn’t want to do that. I think I could have ssh’d into the Mac mini, but I was too lazy to test whether I could log into my account and get back to screensharing. I’ll leave that as a project for the student.
Bottom Line
The bottom line is that these virtual HDMI dongles are inexpensive and can solve a whole host of problems. You gotta love that!
Very interesting !
It could be possible with this dongle connect the mac mini to whatever Imac like monitor ?
If yes, there are some settings in both macs to do ?
Thanks for your answer.
Léo
No, it doesn’t work that way. What you’re thinking of is Luna Display.
That is a shame about the imac. Would have been a cheap solution to mirror over an ethernet cable.