When I explained to you how I mind mapped all of System Settings for macOS 26, I stumbled across some applications hidden in macOS that I’d never seen before. I explained that while I knew about those in /Applications/Utilities (which some folks may not have realized were there), I’d found some buried even deeper. I told you at the time that I might come back and tell you about one of them. Later is now.
Panel Editor
The oddest and most intriguing app I discovered is called Panel Editor. When opening every single option in System Settings, and spelunking deep inside Accessibility, I wandered into the section for those with Motor control needs, found Keyboard, and within there saw the option to toggle on something called Accessibility Keyboard. Within the same area, there was a button that said Panel Editor… and it explained, “The Panel Editor allows you to customize the panels shown by Accessibility Keyboard.”
I found Panel Editor again within the Motor section of Accessibility, but under Pointer Control.
We’re going to do a deep dive into the Panel Editor application, but when I discovered the option to open it, I got curious about where on earth this application lived on my system. As I said, it wasn’t in Applications, and it wasn’t in the Utilities folder within Applications either. I used the delightful app Find Any File from apps.tempel.org/… to figure out where Apple had buried this app.

It was buried in /System/Library/Input Methods/Assistive Control.app/Contents/Resources.
Path of Discovery
My standard method of telling you about tools is to start with a problem to be solved. This time, though, I thought it would be more fun to go through my discovery process. I had no clue what Panel Editor was when I started. I just started poking buttons, so I’m going to walk you down the same button-poking path to see what we can learn.
When Panel Editor opens, it has three panes. The left pane is completely blank, the center pane is an empty grid, much like the fancy engineering graph paper that shows you thicker lines every inch and thin ones for the smaller increments. At the top is a button that says Add Panel with a plus sign and a greyed-out minus sign button that says Remove Panel.

The right pane is also blank, but helpfully says No Selection. Above the right pane are four icons. The first three, Add Button, Group, and Ungroup, are greyed out. The last icon is Inspector, and tapping it simply closes and opens the right pane. I guess I can start calling it the Inspector pane.
That leaves us with literally one button that does anything, and that’s Add Panel. This opens a dropdown menu with a list of items to choose from: Empty, Current Text, Dwell Actions, Dwell Home, 8 different keyboards like ANSI, ISO, JIS, and Numeric, and finally Typing Suggestions. Since I have no clue what these mean, I think I’ll start by selecting Empty. I’m rewarded by the word “Empty” in the left section, written in blue, indicating that it’s selected.

Once we have an empty panel, the Add Button above the Inspector is now available. Let’s push it and see what happens! This puts a dark grey, rectangular button in the middle of the grid called “untitled”. In the inspector, we now have lots of things we can do to our button. We can name it, change the font and font color, and change whether the title is centered in the button or above/below it.
We can make the button an image, either by adding our own image or selecting from a list of images representing functions like double click, drag and drop, or keyboard. We can also change the color of the button. But what can this button do?
Under Action in the Inspector, there’s a dropdown where you can choose from:
- None
- Go Back
- Open Panel
- Show / Hide Toolbar
- Dwell
- AppleScript
- Enter Text
- Press Keys
- Open App
- Run Shortcut
- Open Panel Editor
- System Event
- Typing Suggestions
- Current Text
Let’s have it enter some text. Under the action, when Enter Text is chosen, there’s a field to type the text you want, so I put in, “Hi, this is Allison Sheridan”. Pretty inventive, right? There’s a checkbox to treat this as a sticky key if we want.
I skipped over Spoken Phrase. I presume this means I could talk to my Mac to invoke this, but it’s greyed out, as is the section below it that lets you choose a sound to play. I went down a rabbit hole trying to figure out what these are for and how to enable them. I do know that Spoken Phrase requires you to enable Voice Control, but I never got it to work. We’ll leave those two options as an exercise for the student.
Ok, I renamed the panel from “Empty” to “My First Panel”. I named the button “Introduction”, made it red with white medium-sized text, gave it the drag and drop image, and told it to enter the text introducing myself. Great. Now … How do I use this?
Accessibility Keyboard
What we’ve been doing is creating buttons that you can access through something called the Accessibility Keyboard. This is an onscreen keyboard that goes by another name in macOS that you may have played with before — Keyboard Viewer. Oddly, you can’t open the keyboard by either name directly from Panel Editor. To get quick access to Keyboard Viewer, we’re going to put an icon in the menu bar.
Open System Settings/Keyboard and then under Text Input, you’ll see Input Sources with an Edit… button. This brings up a panel of options, one of which is “Show Input menu in menu bar”.

When you toggle that on, you’ll see a wee tiny icon in your menu with three lines, a ⌘ symbol, and 3 dots in the upper left. When selected, this Input Menu has an option to Show Emoji & Symbols (so the menu bar icon is useful for that), and you’ll see Show
Keyboard Viewer, also known as Accessibility Keyboard. If you require the Accessibility Keyboard to be on all the time, it can be toggled on by going to System Settings → Accessibility → Keyboard → Accessibility Keyboard → On.

Let’s say you don’t have any accessibility issues. Keyboard Viewer is a super useful tool for figuring out how to add accents to letters and how to type characters not normally on your keyboard. I’ve had it in my menu bar for as long as I can remember.
Whether you use the easy menu bar method or the tedious System Settings method to get to Keyboard Viewer, you’ll be treated to a floating black window representing the Mac’s keyboard. I learned to use this tool to figure out how to put an accent aigu over an “e” like the French spell the name Renée. I hope it makes Sandy and J.F. happy when I speak French.

If you hold down the Option key on your physical keyboard, every key types something different than what’s on the key. Keyboard Viewer will show you exactly what character will be typed. For example, with Option held down, the character “w” will now type the capital Greek character sigma: ∑.
Some of the characters will show an orange box around them, which means they’ll only be typed after you also type a “regular” character. For example, the character “e” changes to the accent aigu I mentioned earlier. But it has the orange box around it, which means you hold down Option, hit the “e” key once, let go, hit e again, and you get é. You can put that same accent over other letters, such as “o” by typing Option-e-o.

Sadly, using this method is a lost art. With modern versions of macOS (and iOS), you don’t need to use Keyboard Viewer to do this. Simply hold the “e” key down extra long, and you’ll see all of the options to accent the character, including my beloved accent aigu. You kids today don’t even have to work to add a circumflex or an umlaut when you need it.

However, if you want to talk about money with Bart, you might need to use the Keyboard Viewer. It reveals that if you hold down Option-Shift-2, it will type the symbol for Euro (€).

Back to Panels
Ok, that was enough about Keyboard Viewer, and why you might want it at your fingertips, but what does that have to do with accessibility and this Panel Editor we’ve been playing with?
In the upper right of this floating black Keyboard Viewer is a tiny three-dot menu. Among other options, at the top, you’ll see Custom Panels, and then a flyout menu reveals any panels you’ve created over in Panel Editor. In my example, I can see My First Panel.

When you select the custom panel you created, the entire Keyboard Viewer collapses, and you see just your panel. I only created one button, so I simply see the red button with the white drag-and-drop icon. The panel floats above all apps, so it’s available for me to click at any time to type the text, “Hi, this is Allison Sheridan”.

Once you’ve got your panel open, if you want to get back to editing, you can use the 3-dot menu to choose Customize from the dropdown button, and it will open Panel Editor again.

While you’re editing your custom panel, the panel continues to float on screen, but you won’t see the changes reflected automatically. If you save from Panel Editor, you’ll be asked, “Would you like to restart the Accessibility Keyboard to begin using the updated panels?” If you say Yes, the panel will disappear, and in a few seconds the Accessibility keyboard will come back up onscreen, and then you can use the three-dot menu yet again to open your custom panel.
I tested adding a button to launch an application, telling it to open the app Mona for Mastodon. I grabbed the icon from Mona and made that the image for my launch Mona button. Now that I understand how these images work, I changed my text entry button to look like a keyboard.
I used the Action “Press Keys” in Panel Editor to run a Keyboard Maestro macro that opens whatever image is in the Clipboard with Shottr. You can rearrange the buttons on the grid, change their sizes, and align them so they look nice.

Is This an Onscreen Stream Deck?
At this point in my discovery, I started to understand how powerful Panel Editor combined with the Accessibility Keyboard can be for those with motor control issues. Combined with voice and eye-tracking devices, it would be a lot easier to use a Mac with the right setup.
At the same time, I started thinking about how this could be very useful even to those without motor control challenges. I’ve been able to build essentially a virtual, onscreen Stream Deck, much like what Elgato introduced back in June.

One of the reasons Stream Decks are so powerful is that you can have multiple pages of buttons. With Panel Editor, you can create multiple panels, and then put buttons on each panel to switch to other panels … just like a Stream Deck.
Opening up my panel is a bit tedious, even with the input menu in my menu bar, because it opens to Keyboard Viewer, not to my panel. I found a way to make it even easier.
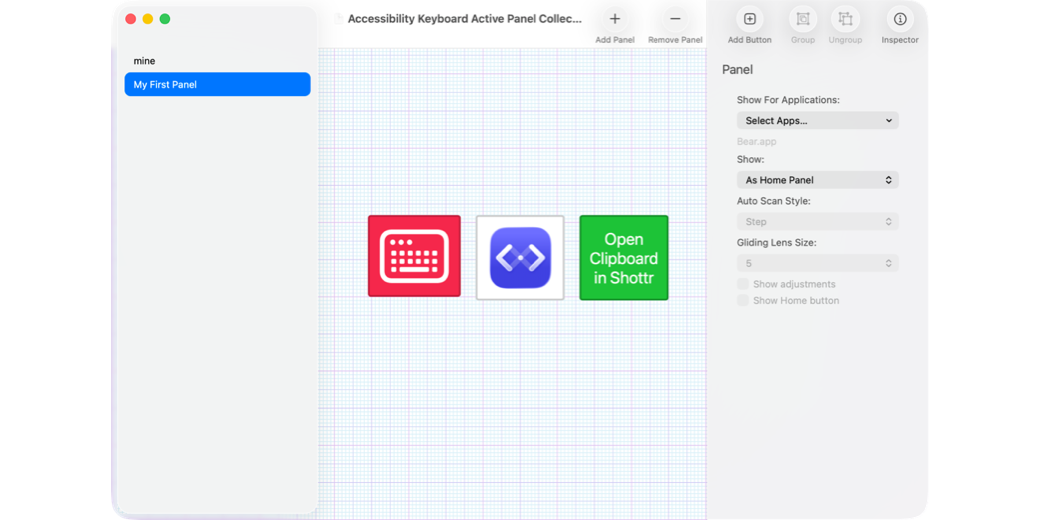
Back in Panel Editor with a specific panel selected but no buttons selected, the right pane has a dropdown called “Show:” and by default, “In Custom Panel List” is selected. That’s why we can get to it from the three-dot menu in Keyboard Viewer. But if you change it to “As Home Panel”, then it comes up automatically when you choose Keyboard Viewer from the Input menu in the menu bar.

If you’d like to have your custom panel and Keyboard Viewer showing (especially if you actually use it as an accessibility keyboard), then change Show to “As Toolbar” and you’ll see your buttons above the keyboard.
I mentioned one of the reasons Stream Decks are so popular is that even with a smaller Stream Deck with fewer buttons, you can have lots of pages to flip through, depending on what you’re doing. In Panel Editor, you can set a specific panel to auto-show for specific apps.
Let me explain by example. In the Panel menu, I can set my custom panel to show for specific apps. Let’s say I want it to show when I’m using Bear to write the shownotes. Instead of making my 3-button panel the default, I can leave it as part of the custom panel list. That will give me Keyboard Viewer showing in its default condition, but when I switch to Bear, it automatically changes to the little 3-button panel I created. Isn’t that cool? You can assign a specific panel to be shown for multiple apps as well.
Multiple Macs and Sharing
Whether you’re currently abled or need assistance, you may want to move your panels to different Macs. Perhaps you’re helping someone else build the panels that they need to comfortably and efficiently use their Mac. Or perhaps you live the multiple Mac lifestyle.
The panel you’ve created is buried deep in the system, but it’s easy to save a version where you can actually find it. In the File menu, choose Duplicate. The window title across the top will be VERY long, but it turns out that it actually gives you access to the Save As dialog box if you widen the window and select it. Save the file and share it with yourself or your friends, family, and even co-workers if you like them.
You can’t double-click the file to open it, because while it looks like a single file with the .ascconfig extension, it’s actually a package file. But on the recipient Mac, open Panel Editor and from the File menu, you can easily choose “Import Panels…” to bring it in.
Just in case you want to try this, I compressed My First Panel as a zip file and provided a download link to it in the shownotes. Give it a try!
Bottom Line
The bottom line is that I had a lot of fun discovering this hidden gem buried in macOS, and I hope you enjoyed the circuitous journey I took you on before you got to know what the heck I was teaching you. I’m not sure this is for everyone, but we’re a pretty nerdy crowd around here, and I hope you’ll give it a try and see what Panel Editor could do for you.
Believe it or not, I skipped over a lot of stuff, so maybe you’ll find even more fun to be had.