Astrophotography by Stealth, from looking up at the night sky, to hanging a picture on the wall which takes your breath away. Learning to Edit.
Hello and welcome back. I’m Brian Hoffman, and if you have been following along, you know I made it to the point where I stacked some of my pictures and did some simple editing.
While that was a great starting point, there is so much more to learn. I have learned a lot about taking pictures, and now I am starting to understand more about editing my astrophotography pictures.
To bring everyone up to speed, I’ll talk about each step from right after I took the pictures up until I have a wall-hangable picture. However, fear not, I know there is so much more to learn about editing and, frankly, taking the pictures.
I knew I needed dozens and dozens, if not hundreds, of pictures to collect enough data to be able to create a picture worthy of being hung on the wall. The number of exposures needed depends on distance and brightness.
As it turns out, I took over 700 exposures of Andromeda, the only other galaxy you can see with your unaided eyes. Some of the images were 30-second exposures, some two minutes, and most exposures were five minutes long. All in all, I have 37GB of data, which is well over 40 hours of imaging taken over the last two years. I may have gone a little overboard, so let’s see how I did.
Stacking my pictures was the first thing to do. To do this well, you need several references like flat frames, bias frames, dark frames, and of course, your pictures, which are called light frames. If you use them all, you can figure out each pixel very well.
One of the great ironies of “light” frames, your pictures, is that they contain limited data. Some of the data is noise, some of the data is real information about the object being imaged, and some of the data is a hallucination or made up data.
Nothing is perfect. You are trying to take a picture of an object that is millions and millions of miles, or even light-years away. The fact that we have sensors which can collect those photons and actually produce a picture is, well, mind-blowing to say the least.
To stack my pictures, I use PixInSight. It is a commercially available program which uses mathematical processes to count the photons from the same pixel of all of the images and determine if it “sees” light and at what intensity and color before saying “yep, there is light there and it counts”.
Do this for every pixel, and you have a picture. Think of it as each image gets a vote on every pixel. The more images and references you give the process, the better the program can determine the color and amount of light it is “seeing” for each pixel.
If you take 10 images, your picture will have a lot of noise and will not be a wall-hangable picture. Collect 100 images, and you will have a better outcome. Collect 1000 images, and you should be able to image very distant and dim objects.
In astrophotography, the rule of thumb is double the number of images you use to see a marked improvement in your output. I find that the more detail I want, the longer I will be imaging. For Andromeda, 700 images were all I was able to collect by the end of this “Andromeda Season”. I wanted more, but that is what I was able to get.
Pixel by pixel, PixInSight processed the data. With 700 images, getting rid of errors was going to be easy. However, it did take some time to process the data with the M4 in my MacBook Air, but now I had my “Master”.

In this picture, we can barely see the heart of the Andromeda Galaxy. All the data is there in the file, but because of the low light levels, even after 40 hours of imaging, this picture is mostly black with some stars being visible.
With your master in hand, you think, ” Cool, let me take a look at my masterpiece”, then you do. However, at this point, the image looks entirely unimpressive as you are not able to see the details yet. The linear data, while there, needs to be stretched. What this means is that you need to move the goalpost on your data.
Think of it this way: your data is in a dark room. All the details are in the room, but until you turn up the lights, you can’t see the details. So think of stretching as nothing more than turning up the lights for your picture.
Stretching is a tool that allows you to “see” your image while being able to manipulate the data. This allows you to clean up the picture while enhancing the parts you want to see. However, this stretch is only temporary.

In this picture, we can see the heart of the Orion Nebula and Running Man. We can see hints of the dust surrounding both of the Nebulae, but after we process this picture, the image will come alive. After all the cleanup stages are complete, you can then make the stretch permanent by adjusting the levels, but we aren’t close to that part yet.
No matter how hard you try to stabilize your telescope during imaging, blur is going to be introduced due to mechanical processes, wind, or walking up to the telescope. Getting rid of that blur is our next step.
This process is a balancing act; sharpen everything too much, and it looks very fake. Not enough, and the details are lost. Trial and error will get you close, but once you do it a few times, you will start to know what your setup needs to reduce these errors. This is one of those processes that takes a lot of practice to perfect, and I use that term loosely.
After fixing the blur, removing the stars from the main image is next. This allows you to see all the nebulosity and edit it without the stars needing to be adjusted. However, don’t worry, we will put the stars back later; for now, they will be in another file.

In this picture, we see all the nebulosity of the Horsehead and Flame Nebulas. The red dust around the Horse’s Head and the Firebird-like structure of the Flame Nebula inspire my imagination. All that dust and color just waiting to be set free.
The next step allows you to find the black point and the mid point of your data, which will bring your image to life. This is one of the most important steps and requires patience as well. Here, it is far better to make a lot of small adjustments than any large adjustments at all.
As you make adjustments, you move the black level up and the mid point down. You will know when you have found the black and mid points you desire because your picture will come alive. We are about halfway finished editing our picture using our simple set of processes.

In this picture, you see how I have adjusted the light levels up and balanced some of the colors to show off the dust in the image. We are now seeing even more of the nebulosity because of the editing process.
Since the background of any picture is nearly as important as your subject, the next thing we need to do is clean up the background so we don’t detract from the subject of our picture.
There are several tools that extract the background and clean it up. The choice is yours, but when you clean up the background, your picture will be further enhanced, and errors will be eliminated. Now, most of the noise has been removed.
At this point, I am usually getting pretty excited. I have corrected most of the errors, and now it is time to enhance or accentuate the main subject of the picture. But before I do that, I need to make the stretch permanent.
To set the light level, I use several functions together to set the intensity to the correct level and lock in those corrections. The image file now contains the new, higher light levels, and you can see the image natively.

In this picture, you can see just how much extra nebulosity you can bring out of the data with some patience and effort. While the colors are a little Red, seeing all the dust so far away from the heart of the Nebula inspires and amazes me.
The only thing left using these processes is a slight enhancement to, say, a color that may need a little more enhancement, or perhaps, enhance a part of the picture where it needs a little more or less brightness. Think of this as very fine localized edits.
After that, it is time to create a High Dynamic Range (HDR) image and add the stars back into the picture. Here you can adjust the brightness of the stars to further enhance the image.
Too many or too bright foreground stars mean you will not be able to appreciate the nebulosity you are trying to image. Not enough, and the picture loses its authenticity.

In this picture, I did it. I created an image of the Andromeda galaxy that contains more detail of the stars in the arms as they swirl around the Super-Massive Black Hole, which binds the galaxy together. Together with all the dust and nebulosity-looking features, Andromeda has come to life on my wall.
At this point, I sit back and look in wonder. My 85mm telescope has just brought part of the universe to me in all its wonder as if I had travelled among the stars, and I get to decide if it hangs on the wall.
After nearly two and a half years of work, I now have images of the Orion Nebula with Running Man, the Andromeda Galaxy, and the Horsehead and Flame Nebulas ready to hang on the wall.
One of the things I decided early was that I wanted to enhance things like nebulosity to higher levels. I am amazed there is so much dust and other elements in the visible sky, and I wanted that nebulosity to be seen in my pictures. Overexposing and enhancing the nebulosity brings out colors and textures only visible with these extra efforts.

Here is my finished Orion and Running Man image. It contains so much dust and nebulosity. I wonder how it all got there and what will happen to it over time? The final images of this picture were taken on the 21st of November 2025. The large heart shape and the accompanying running man remind me of a DTNS contributor whom I admired and who sadly died on that day. Tom Merritt has this picture on his wall to remind him of his friend. It reminds me of him as well. RIP brother, you made the lives of so many better while you were here.
I’m still learning so much, and I have used far less than 20% of PixInsight’s capabilities. Each time I watch a video of someone else’s process, I learn another option on how to edit and make my images come alive.
In the crawl, walk, run mantra, my editing skills are at a brisk walking pace. I continue to learn, and I continue to create pictures I will happily hang on the wall. I am just glad I have several walls left to fill.

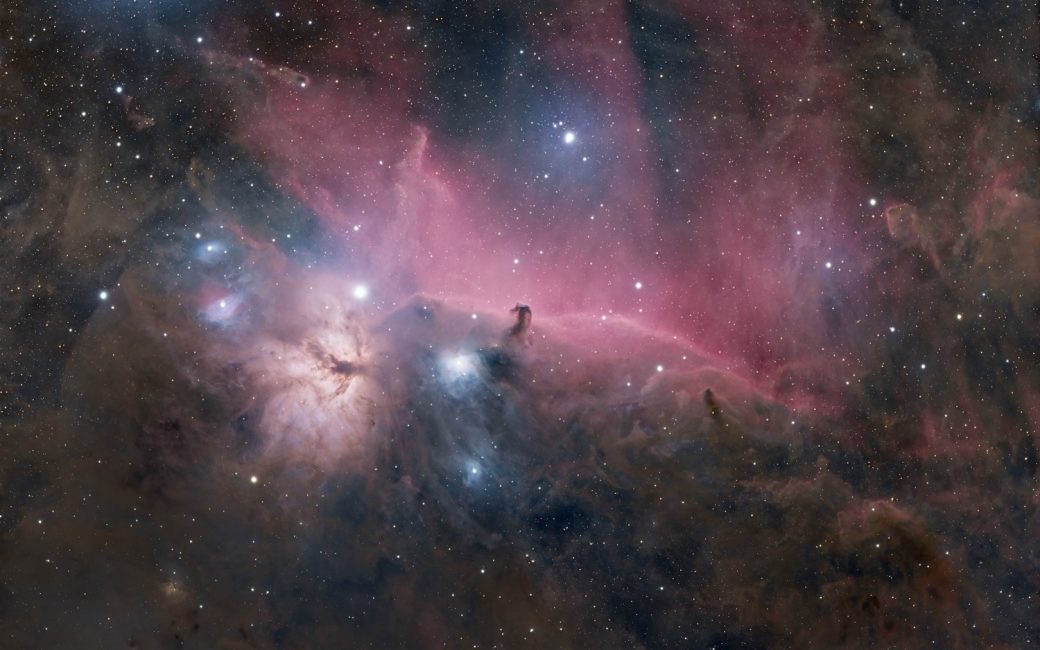
In this picture, I enhanced the dust and nebulosity of the Flame and Horsehead Nebulas. I took a few of the colors to higher levels, so some of the other colors, like the browns, would become visible. The stars that project through some of the dust further highlight the details that become visible with processes like these.
In the future, I expect even my images of Andromeda, the Orion Nebula, and Flame and Horsehead Nebulas will get even better. I am learning so much about editing and frankly taking the attitude with my astrophotography images that improvement is the only path forward. And I love it!
As Galaxy season begins again, I will be imaging M101, M104, and of course M106 and others. Those pictures should be wall hangers as well.
With my improved skills, I hope to create enjoyable images. How many will have their breath taken away? Well, here is to that list being long and distinguished. Wish me luck.