Like all good nerds, I’ve trained my friends and family to apply operating system updates as soon as they get the notification. Most people actually take my advice, so that’s neat. But this week, a system update caused a problem I’d never seen before.
Teri is my daughter Lindsay’s mother-in-law, also known as my co-grandmother. She’s one of the best at paying attention to security updates, but when 26.5 came out for macOS, things went horribly wrong.
She found a good time to run the update to her MacBook Air and gave it the permissions required. The update process went through the usual folderol of asking her when she wanted it, asking for authentication, and doing the download. Finally, it shut down and came up with the Apple logo, and the little white line started to progress. Everything was going along as expected.
But then it stopped progressing. For hours.
She looked online to see what to do about it, and suggestions were to use the power button to shut down and then boot back up. This is exactly what I would have advised her to do. She gave it a try.
The Mac came alive, but it didn’t boot into macOS. Instead, it showed her a black screen with a white exclamation point inside a white circle. Below that, it simply said support.apple.com/mac/restore. And that’s when she called me.

I told her I’d never seen such a thing, but followed the link onscreen to an article titled, “If your Mac starts up to an exclamation point in a circle”. This support article had the subheading, “The firmware of your Mac needs to be revived.” I’ve been using a Mac for 42 years, and I’ve never heard of reviving firmware before.
The article went on to say:
In very rare circumstances, such as when a power failure interrupts macOS installation, your Mac might start up to a circled exclamation point. This means that the firmware stored in your computer’s memory needs to be revived or restored.
While that was swell, the article didn’t say what to do about it, but did give a link to another article: How to revive or restore Mac firmware.
This article started by explaining the conditions under which you might need to revive or restore, starting with “Starts up to an exclamation point in a circle” with a link back to the article we just read. You might also need to revive or restore if your Mac starts up to a blank screen, or if you see the status indicator light pattern for firmware recovery mode. I’m not sure what that light pattern looks like, but there’s a link to go read more. Let’s stay focused, though, kids, shall we?
What You Need to Revive or Restore a Mac
In order to revive the firmware on a Mac, you need another Mac. They say the second Mac needs to be running macOS Sonoma 14 or later, which isn’t as precise as it should be, as we’ll learn in a bit. You’ll also need a USB-C to USB-C cable that supports data and charging. Note that the cable Apple supplies with the USB-C charger they sell you with your laptop is a charge-only cable, so hopefully you have a full-featured USB-C cable lying around. They also specifically say not to use a Thunderbolt 3 cable, which I found curious.
If you’ve been around the Apple world for a long time, you’ll remember on occasion having to do a DFU restore on your iPhone. DFU stands for Device Firmware Update. This nuclear option was required in the old days if a software update went sideways, leaving the phone in a boot loop or worse. I suppose it might still be happening to folks in the current day, but I haven’t seen it in a decade.
As it turns out, Macs with the Apple T2 security chip, and all of the newer Macs with Apple Silicon, can also enter DFU mode in order to revive or restore them. Reviving the firmware should bring a Mac back to its previous condition without wiping the system. Restore, on the other hand, does wipe the system.
At this point, it was just Teri and me discussing what she could do to salvage her computer, but it was time to bring in the big guns, so she took her Mac over to Lindsay’s house. I had every confidence that Lindsay could pull this off. She is, by far, my most technical relative when it comes to things like computers and networking. Sorry, Kyle and Steve.
Requirements to Revive
The revive or restore process is similar to the old target disk mode, if you remember that. After connecting both Macs to power, you plug the USB-C cable into both Macs. Now here’s where it gets interesting. Macs have only one USB-C port designated as the DFU port. That meant we had to figure out which port on Teri’s Mac was the DFU port.
I had her look at the bottom of her MacBook Air, and it showed that the model was A3113. I launched the fantastic, but sadly inaccessible app MacTracker, and searched that model number in the Notebooks section to determine that hers is a 2024 MacBook Air.
Armed with her model number, we followed yet another link to the Apple Support article on How to identify the DFU port on Mac. That page helpfully explains why you’d want to identify your DFU port, which not only links back to the reviving or restoring firmware page, but also to a page titled How to use an external storage device as a Mac startup disk. Now that sounds interesting too … but FOCUS, people!
The location of the DFU port on your Mac is explained through an elaborate table. For example, on the MacBook Neo, it’s on the leftmost USB-C port when you’re facing the left side of the Mac. But for the MacBook Pro, you have to drill down into which MacBook Pro you have to know where the DFU port is.
We know the MacBook Pro has to be new enough to have a T2 chip at the very least to have its firmware revived or restored. Even if you have one of these later models, the location of the DFU port depends on whether you have a T2 or a newer Apple silicon model.
Even if you narrow it down to a MacBook Pro with Apple silicon, you still have more variables to consider. The Apple silicon 14″ MacBook Pro with M4 or M5, excluding the Pro or Max versions, has the DFU port on the rightmost USB-C port, while other models of Apple silicon MacBook Pros have the DFU port on the leftmost port. Good grief!
I’m not going to go through all models to that level of detail, but we do need to figure out where the DFU port is on a 2024 MacBook Air for Teri. Sticking with just Apple silicon MacBook Airs, the 2025s and later have the DFU port on the right, but the 2024s and earlier have it on the leftmost USB-C port when facing the left side of the Mac.
I decided not to show off by telling Teri the path I used to figure this out, and instead simply told her and Lindsay to use the USB-C port closest to the hinge on her MacBook Air.
Ok, we know we have to revive the firmware on Teri’s Mac, we know what we need in order to do it, and we know which port to use on the “affected” Mac. I love that they use that phrase — it’s just like when talking about an injured limb, you’re not supposed to call it “bad” because that would hurt its feelings.
Revive Process
With both Macs connected to power, the unaffected Mac connected to the Internet, and the USB-C cable plugged from the DFU port on the affected Mac to any USB port on the second Mac, it’s finally time to enter DFU mode on the affected Mac laptop.
To enter DFU mode on the affected laptop, you’re supposed to press and hold the power (Touch ID) button for up to 10 seconds until the Mac turns off. Once the Mac is completely shut down, you press and release the power button. Immediately after you let go of power, you press and hold Control and Option on the left side of the keyboard, Shift on the right side of the keyboard, and the power button all at the same time.
The next step is different for T2 chip Mac laptops, but for Teri’s Apple Silicon Mac, you’re supposed to hold those four keys for about ten seconds and then release all except the power button. The last step, since you’re already holding the power button, is to hold it for ten more seconds until the unaffected Mac shows a DFU window in the Finder.

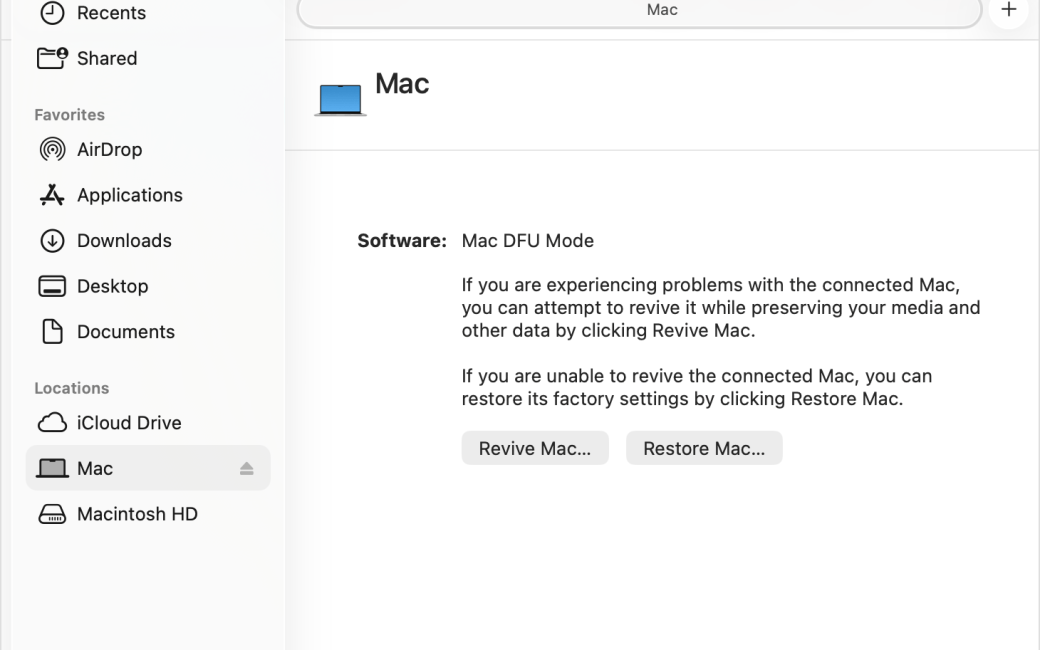
Lindsay managed this game of Finger Twister to get Teri’s Mac into DFU mode. The DFU screen shows what looks like a Finder window, where in the left sidebar under Locations, you should see the affected Mac. In the right pane it will say “Software Mac DFU mode” with the explanation:
If you are experiencing problems with the connected Mac, you can attempt to revive it while preserving your media and other data by clicking Revive Mac.
If you are unable to revive the connected Mac, you can restore its factory settings by clicking Restore Mac.
Below that, you get a Revive Mac button and one to Restore Mac.
Remember earlier when I mentioned that it was misleading when it said the secondary Mac has to be running macOS Sonoma or later? While not incorrect, it wasn’t nearly as specific as it should have been.
It turns out that the secondary Mac has to be running an operating system at least as recent as the one on the affected Mac. Lindsay was running macOS 26.4.2 on her MacBook Pro, but Teri’s Mac had evidently been successfully upgraded to 26.5 before the firmware got borked.
While most people would flinch at the idea of installing an OS that had just bricked another Mac, Lindsay is fearless and updated her Mac to 26.5 so she could help Teri.
The first attempt to revive the Mac failed. Lindsay is still kicking herself for not taking a picture of the screen, but she said it said something about corruption and offered the option to try again. She quickly clicked that option, and the good news is that the second attempt to revive Teri’s Mac actually worked.
The way Lindsay knew it had worked was that the affected Mac booted into recovery mode, asking her to select a user name for which she knew the password, and offered Teri’s account.

After receiving confirmation that the authentication was successful over on Teri’s Mac, the DFU mode window on Lindsay’s Mac confirmed that Teri’s Mac had been revived and that it was safe to disconnect.

Teri’s Mac then booted up to her lock screen showing all of her delightful grandchildren.
Bottom Line
After Teri got the text from Lindsay telling her that her Mac had been revived, she expressed her delight with the text message:
Can’t thank you two enough for helping me restore my computer! I was way over my head!!👏👏👏
I wrote back and said:
To be fair, it was over all THREE of our heads. It takes a village – a woman village.
I was being perfectly honest when I said that. If Teri hadn’t kept track of what happened with details on what OS she installed and sent me a picture of the screen, I never would have been able to figure out how to fix it. I’ll take a little bit of credit for the research to figure out what needed to be done and dig through the quagmire of figuring out which was her DFU port, but after that, it was all Lindsay. She took photos and recorded everything that she saw (except that one pesky corruption error), and she fearlessly upgraded her own Mac to be able to perform this critical function.
It is of note that Teri bought AppleCare on her laptop (she says she bought it because I told her to), and she was fully prepared to take her Mac into Apple to get it fixed if Lindsay hadn’t been successful. She keeps her Documents and Desktop, synced to iCloud as well as her Apple Photos, so she knew her data was safe if her Mac had needed to be restored to factory settings by Lindsay or Apple. We all felt pretty smart getting this done, and I certainly learned a lot.
The only scary thing is that we have no idea how her firmware got borked in the first place.
Allison — Would love to see a post from you describing how you are currently backing up.
Hey David — I’m afraid it would be a pretty short post.
I use Carbon Copy Cloner to do a full backup of my MacBook Pro to an attached 4 TB SSD. I use Backblaze for off-site backups, and I recently started using Carbon Copy Cloner with CloudMounter to back up Google Drive and Dropbox to a B2 bucket that I set up when I found out that Backblaze wasn’t backing up those files. I have Documents and Desktop syncing to iCloud as well as iCloud Photos.
The only tricky thing was the CloudMounter to B2 part, but it was confusing enough that I didn’t feel qualified to write it up as a generalized solution.
My MacBook Air is also syncing Documents/Desktop/Photos to iCloud and offsite backups on Backblaze, but no local backup. I probably could stop backing that Mac up since it doesn’t really have much that’s not common with the MacBook Pro.
Is there anything else you would have wanted to know?