Listener Michael Gs voicemail, apodder.org podcatcher for the visually impaired, join Views from the Coop live on Fridays at 9am CST at smartchik.homecw.com, host your own virtual conference room (for a fee) at co-opworld.com, MoRu for better OSX searching from windstormsoftware.com, beta test of Desk Lamp for desktop OSX search from desklampx.com, youtube.com tutorial, another web 2.0 home page called Bitacle from bitacle.org, Google alerts at google.com/alerts, Shrink photos in iPhoto tutorial, how the RDX tech package can save your marriage rdx.acurazine.com; pics of RDX at http://homepage.mac.com/asheridan/RDX/index.html, video of the RDX testdrive at http://www.youtube.com/watch?v=jxm8YNruMWE
Subscribe to the Podcast –> 
Listen to the Podcast once – 39 min 07 sec
Views from the Coop
I hope you enjoyed the Views from the Coop podcast, I sure had a lot of fun on that show. I should explain that they have a very unique setup. they use a virtual conference room created by a company called Co-Opworld from co-opworld.com. the idea is that at a designated time, everyone clicks on a link, a small file is downloaded to the desktop and it launches a new browser window. when that comes up the users see a place to type in their names, and then enter the virtual room. Once inside, on the upper left side there’s a chat window for text chatting, the main body of the window is an area where the person running the meeting can show presentations or show websites.
The fun part is in the bottom left where there’s a list of the people in the room, and a microphone button. If you push the microphone while no one else is talking, you have the floor. you have to remember to push it again to give up the floor. If you want to talk but someone else is already talking, you still push the mic, and your name in the list gets a little 1 inside it, if someone else wants to talk they get a 2, and so on. You can release your name from the queue just by pushing the mic again. the room moderator can also allow only certain people to control the microphone, so you don’t have chaos if it’s a big crowd. the moderator can also record the conversations, and that’s what Paige does on Views from the Coop.
Because of the use of the virtual conference room for Views from the Coop, you can actually participate in their podcast if you join in at 9am Central Standard Time by going to smartchik.homecw.com. I should warn that the virtual conference room doesn’t work on the Intel-based Macs yet, but it works great on Firefox on a PowerPC like the G4 or G5s, and also on Windows. Views from the Coop is a PC tech show with some really interesting characters in there, so if you do check it out be sure to identify yourself as a NosillaCast listener!
listener Michael G
Listener Michael G sent in an audio voicemail to my gmail account ([email protected]). Let’s give a listen:
PLAY MICHAEL G HERE
FOR TEXT ONLY
He’s a partially sited listener who has a radio show on interactive.acbradio.org. He plays old 78 recordings, like top 40 countdown by decade. He also has his own website that is all about his vast collection of old music, you can check out his site at mikesmess.com. anyway, the reason he wrote in was to talk about how he appreciated the fact that I throw in accessibility things once in a while, like playing the new screenreader application due out in Leopard next spring.
END TEXT ONLY
Thanks for the great feedback Michael G – I’m so glad you find good stuff in the NosillaCast. I have another tip for you. Listener Susan has written a podcatching client specifically written for the partially sighted, recognizing that there are different requirements for the partially sighted than there are for the blind. As you mention you don’t use your screen reader that often, but you would have the requirements for larger, maybe high contrast text for example. Susan’s podcatcher is designed to meet those needs. Check out her tool, it’s called @podder, and it’s available at apodder.org. Hope that helps you out, and if you do try it send some feedback to us.
Quality Control Director Steve
Last week I gave a Quality Control Director Steve a hard time for being so picky, but he came back with an excellent retort – he says that the reason the NosillaCast is such a high quality show is because of his CONSTANT diligence in finding and correcting my mistakes. I’m sure our entire listening audience appreciates your efforts Steve.
MoRu for better Spotlight Searches
My buddy Ron has been helping unearth some alternate choices on searching the Mac desktop instead of using Apple’s bulit-in Spotlight search. I’m pretty happy with Spotlight overall, so I’m a tough audience on hwo these tools can help. Spotlight, for the non-Mac users amongst us, is a feature in OSX that automatically indexes the entire disk constantly so it’s quickly searchable. There’s two ways to use spotlight – in the upper right corner of the screen there’s a little magnifying glass you can click at any time to start a search. Enter your search terms and as you type it already begins to show results. it also sorts those results into piles by documents, folders, presentations, etc. It even searches inside emails, PDFs, contacts, music, and bookmarks!
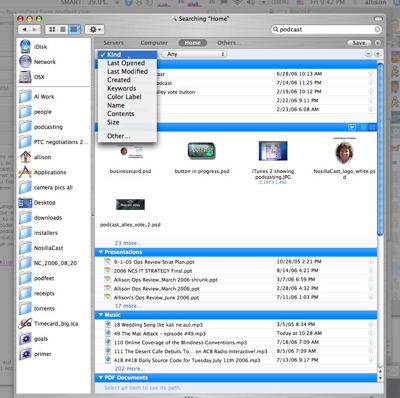 The other way you can use Spotlight, and it’s actually my usage of choice, is to open a Finder window (that’s like Explore in Windows) and then click on the folder you probably think your missing item is, and then there’s a search field in the upper right where you can put your search term. Let’s break that down to a simple example – you’re looking for a file with the word “podcast” in it. You’re pretty sure it’s not in your applications folder, or any of the libraries, but probably in your user folder. Click on your user folder, and then in the search field type in podcast, and as you’re typing in the characters the window is filling up with responses again categorized by their file type (presentations, images, etc.) What’s cool about this way of getting there is that you now have an option to increase the fidelity of your search. There’s a little plus sign in the upper right, and if you click that, now you have the option to filter your search by date created, date modified, keywords, and also by whether the name contains, starts with, ends with, etc. Oh, and I should mention, this search is FAST. It’s nothing like searching in Windows, which is abysmally slow! I just searched my home directory for the word Macintosh, and it found 3409 items in 4 seconds.
Spotlight has the ability to save searches. Let’s say you do a search for stuff who’s name contains the word podcast. A folder with a weird gear symbol in it is created, and whenever you create a file or folder with the word podcast in it, it automatically shows up in that saved folder. That’s a really handy feature. i frequently create primers on different subjects, so I keep a saved search called primer and I always know where they are no matter what the subject is.
The one thing I wish I could do with Spotlight is to start a search with Name contains “whatever”. That’s because I usually have a clue what at least ONE of the words in the file name are (I just can’t remember for the life of me where I put it!), but I have to go to that secondary search to get to that level of granularity. Ron recommended a shareware tool for the Mac called MoRu from windstormsoftware.com, and it’s only $10. MoRu comes preloaded with a bunch of saved searches (again that gear symbol) that might be helpful. It has Applications, modified in last day, desktop, documents, pictures, images, photoshop images, pdf documents, mail, ms office docs, and iTunes music.
I tested MoRu against spotlight, by searching all MS office docs for the word primer (and the default is set to filter by name the way I wish it were in Spotlight.) Unfortunately MoRu came up woefully short. In my primer folder from Spotlight, there are 14 MS office documents with the word primer in the name, but MoRu only found 4. I waited a long time to see if it would eventually come back with more returns, but it didn’t, and I also double checked to see that both were searching my home folder. not sure why MoRu has a problem here.
I did a search from scratch in Finder and MoRu on the word Money in presentations, and they both found 9 so we’re okay there. Finder uses the generic term Presentation since it could be a Keynote presentation, but Moru allows you to specify exactly what type of file you’re looking for, from Powerpoint through every type of document format, to every kind of image format, the list is practically endless. I think MoRu gives way more capability in terms of narrowing down your search in really specific ways, but Spotlight is just THERE waiting for me in every window so I don’t have to as much work as with MoRu to actually launch a separate application. Ron keeps MoRu running in the background at all times (he has it in his startup items folder) so maybe that’s a cool way to have it as handy as Spotlight. I know I haven’t scraped the surface of what MoRu can do, but you can check out MoRu on your own for 30 days for free from windstormsoftware.com.
Desk Lamp X
I found another spotlight enhancer called Desk Lamp from desklampx.com. They say that this tool focuses the power of Spotlight on your documents, projects, and work flow. Desk Lamp is in beta right now, and while that would scare most people away, that’s just the kind of thing to get me to download it right away! it’s hard to figure out how to download the program, there’s no button for download, only for PAY, and I just don’t think you should have to pay for beta testing for someone! I figured out finally that clicking on the graphic window in the middle of the page actually downloads it (I had clicked it a couple of times expecting it to come up in a new window only magnified, but it turns out it’s the download button.
Desk Lamp is freely available for download and is fully functional except the ability to save searches. To save searches you must purchase a license, available for US$20 until release 1.0 when the price will be US$25. that’s pretty steep compared to MoRu, it better knock my socks off at that price!
Anyway, on to testing. Desklamp’s interface is not intuitive for me. there was a search window but nothing else showing to speak of. There was a black arrow thingy that looked like something you should click and then it would fold down for more information, but it turns out it was a play button that turned into pause. I like the idea of a pause button, so many times I’ve seen that Spotlight already found my search and it would be great to stop it before the window filled up with all the other glop it found, making it harder for me to see my item in the list. I used my “primer” test, and at first shot it found 97 items, so I know it’s looking way beyond file names. then it got hung up with the spinning pizza wheel.
Ok, try this again. Search on Primer, and it found 28 items right off the bat, but it’s still got a gear spinning like it’s still looking. I’ll pause just in case right here. It found not only the 14 primer presentations and word docs but also the saved primer search folder from Spotlight, and several emails with the name primer in them. I clicked on a file it found, and on the right pane it has a beautiful display of information. Most prominent is the icon for the document type (it was the Mail symbol), the title, and then a link to the location of the file. Ok, this part blows me away – I clicked on that link and INSTANTLY there was the email I’d sent with the word primer in it on August 11th 2004 open in front of me! Not in a list, but open so it was totally right there where I could use it. Awesome.
the right pane also incldues the author, creation date, file type, and a preview pane showing the document in a very readable and yet small form, and you can make it bigger by widening the window. Very very cool. Ok, they’ve got my interest now! the pane where the list of found files and folders live is a bit misleading, there’s a column heading you can click above the icon representing each file type (powerpoint, email, whataever) but when you click on it, it doesn’t actually sort by that, but hey, it’s beta, right?
At the top they have three icons that look sort of like list view, column view and a third one in the finder, but they’re not the same at all. The one that looks like list view is the list I’ve been talking about. the next one that looks like column view actually gives you the option of seeing the files it found by type, keywords, projects, rating, and a few othr choices. Type was the most interesting, it says Microsoft word document, html document, RTF document, etc. If you click on one of these file types it shows you the files of that type that it found in the list. and then it crashed again.
Back up and I tried the selection content modified, and that gave me another column to choose from, which had this year, today, and historic. that was really cool, about the kind of granularity I’d want, maybe this month would be a good edition. And then it crashed again.
Bottom line is that Desk Lamp shows some promising features, but it’s far to buggy to even be having a conversation about paying for it yet! Let’s give this one a few more revs and revisit, shall we?
Youtube tutorial
So you’ve all heard of youtube, and seen how everyone else puts movies up there and it MUST be easy, right? but somehow it seems intimidating, maybe because everyone else seems to know how? That’s the way I feel about eBay, I’m sure it’s easy if so many people have sold stuff on it but I’m still scared! But this is about youtube, I thought I’d walk you through exactly how easy it is to put up a movie.
If you have a recent digital still camera, it probably has reasonable video capability, so shoot a small video of less than 5 or 10 minutes. connect your camera or card to your computer, and drag the video file somewhere on your computer where you can find the file. Now open a browser to youtube.com. At the top you’ll see a link that says sign up. You have to give your email address, a user name, and your date of birth and gender. there’s a captcha, one of those squiggly letter things. As I’ve mentioned before, these work great for those of us who can see, but screen readers can’t work with them. Luckily they include a link that says “can’t read”. I clicked it to see what it does, and it turns into completely readable text! Pretty cool, most sites make you submit an email and then someone will help you, but it delays your enjoyment. Nice that they make it a little easier.
I’m too lazy to create a new account since I did it already, but as I remember, you have the option at this point to enter a bunch of interesting information about yourself, but lets move ahead to uploading videos, shall we? I could go through every menu, but my goal is to not overwhelm you, rather to show you the easy parts. now that you’re logged in you’ll see a very clean set of tabs, and the one on the far right says Upload.

click that tab to get started. They explain here that videos are limited to 100MB and 10 minutes. Enter the title, description, and tags. Tags allow people to find your videos, so make up any set of words that individually describe your video. I’m going to upload a video I took on the island of Guadalupe of a wrecked sailboat that really gives me the willies (I’m terrified of sunken or wrecked boats, don’t know why, it’s the only thing that really scares me.) I’ll use the tags sailboat, shipwreck, and Guadalupe. We’re supposed to enter the tags separated by spaces. Next there are some radio buttons next to categories so you can choose what category your video will be placed in. I’ll choose Travel & Places. next there’s a pulldown for language, I’ll leave it at English, and hit continue. We’re getting close now, the next screen (step 2 of 2) you’ll see a place to click browse to find the video on your disk to upload. Before it uploads they want to know if you want it public which most people do so it’s the default, or you can choose to make it private, and viewable only by family and friends who you’d define in another screen. For this demo, we’ll stick with the Public option. Click upload Video!
They tell you to be patient, this may take a while….doodedoo….hey, it’s done! You can’t view it instantly, takes a bit of time to propagate through their system, so let’s check out my FAVORITE part of the whole youtube experience. As soon as you’ve uploaded your video, they give you three cool ways to share it with friends. first is an email sharing tool, which allows you to share the video in email right from the site. Second is a url of the video that you can cut/paste into an email or in instant messenger to share with your friends, and finally probably the best thing, they give you a pile of html code that you can copy and then paste into your website. once you paste this code into your website, the video that used to be huge is actually a very lite flash video that plays automatically on your website! the quality is definitely degraded, but it’s SO easy, it’s awesome. I put the html in the shownotes so you can see for yourself how it looks.
One nice thing I like is that you can get back to these links later, because youtube saves all of your videos together in your login, very nice. there’s LOTS more to youtube, but hopefully this will get you started with youtube and you can be hip too!
by the way, I got a REALLY funny error when i tried the first time to go into Youtube’s website, I included it in the shownotes, but what it said was “500 Internal Server Error. Sorry, something went wrong. A team of highly trained monkeys has been dispatched to deal with this situation. In any case, please report this incident to customer service.” Cool. I uploaded it to them because they made me laugh!
Bitacle
Perusing my referral urls for my website I found a link to something called Bitacle from bitacle.org and I followed the link and found it to be another web 2.0 home page thingy like Pageflakes. Looks like fun, let’s give it a whirl! I created a user, and it let me go right in, didn’t have to respond to an email or anything. there’s a menu at the upper left that says Menu, so I clicked it and it has tons of good stuff there. I can select blogs, add modules, find weather and flickr photos, add in my gmail account, all kinds of good stuff. time to add some bits to Bitacle!
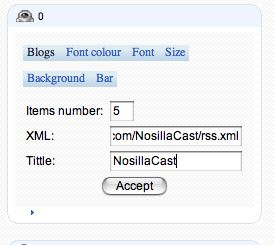
They have a nice directory of blogs, sorted by subject – in tech/internet I found engadget and wired news, which are two of my favorites, but they only had a TOTAL of 5 in that category. I tested adding an RSS feed by hand (of course starting with the NosillaCast, what else??? I clicked on RSS, and it lets me enter the information, including the XML link, the number of items I want to see, and I can give it a title to identify it on my bitacles page.
However, a couple of things got weird here. When i came back the next day, the feeds I’d added were gone and then it got even more buggy. I clicked on RSS which is for adding a feed by hand, and it added the BBC news blog instead. I tried it a bunch of times, even reloading the page which didn’t help, but finally it did let me enter he blog again. the next time I tried to add RSS by hand it put in the New York Times!
if you can get bitacles to load an RSS for you, within that little window you have options on background color, font, font color and size. pretty sweet. Just like any self respecting Web 2.0 application, I can drag the bits around on the screen and reorganize at will. Bits can be deleted easily, like I don’t have near the fascination with weather that the rest of the world evidently has, maybe because i live where the weather barely changes, but whatever, I deleted it!
Like Pageflakes from last week, bitacle allows you to add tabs so you can have your content sorted into separate piles. I added gmail to the window, but it wouldn’t accept my name and password, not sure what was wrong with that. I decided to take advantage of their offer to let you report a bug (I figure that shows they really do want to run this as a beta) but when i clicked on that link, it changed to “Thanks for your report”! I never told them anything!!! And even if that were a way to have it take a snapshot that collected a log file or something, now I can’t report another bug since it stays saying “thanks for your report!) I think I’d give Bitacle a little time to settle down before making it your home page, for now Pageflakes and Google/ig are much better solutions. they have more content options and are more stable.
Google Alerts
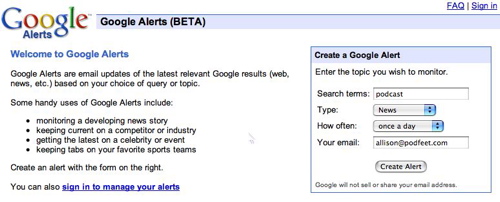
those crazy folks over at Google have done it again. Has there ever been a topic you really want to stay on top of with up to the minute news, or would you like to get an email with info on a favorite topic once a day? Listener John told me about Google Alerts from google.com/alerts. All you have to do is enter a search term, choose from a pull down what type of search you want – News, Web, News & Web, or Groups. then you choose how often you want to receive an email – once a day, as it happens, or once a week, and then you tell it the email address in which you want to receive the alerts.
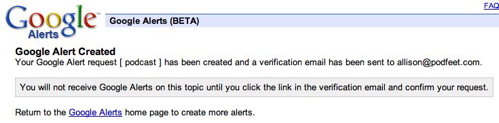
Once you click Create Alert on that screen, you’ll get a message saying that a confirmation email will be sent to your email address and that until you respond to the link in the email, you won’t get the alerts. this is comforting, because you can see how spammers could really go nuts on this if they didn’t have this control!
I should mention that you can enter any email address in Google Alerts, you don’t have to have a Gmail account. However, if you do have Gmail and you login, then Google Alerts assumes you want your alerts sent to Gmail. that confused me at first because I happened to be logged into my Gmail account.
Shrink photos in iPhoto
With all the rage about MySpace and other sites where you can’t resist uploading photos to entertain your friends, a lot of us are having to deal with large photo sizes that take FOREVER to upload, and then the service shrinks them down anyway so they don’t kill their bandwidth. My daughter asked for help shrinking her photos to put on MySpace, and I showed her how install and to do the shrinking in Photoshop Elements using a batch process. This week at a user group I found out that she could have done it in iPhoto where she was to start with!
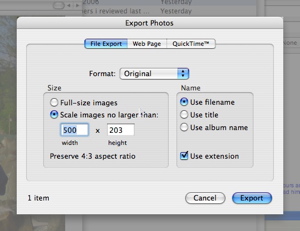
Open iPhoto, click on a photo, then select File — > Export.
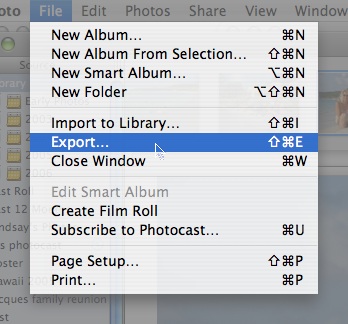
Then click on File Export tab, select to scale the images no larger than (it will keep them in proportion), then you can set how to name it, and then you can change the format of the photo, or leave it the same as the original. You probably want to keep it as a jpeg, so you may not need to worry about that dialog box, but it’s there if you need to change it to TIFF or PNG.
Once you select Export, it asks you where you want to save it. I even tested selecting a whole bunch of photos, and yes, it will do all of them at once!
I also noticed another great tab in there, you can quickly and easily make a web gallery of your photos.
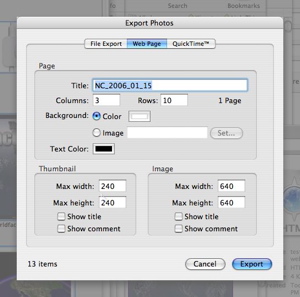
There’s nothing as advanced as all the options in the free cross-platform jAlbum I’ve reviewed before, but you can set the number of rows and columns, change the background color, set sizes for both the thumbnail and full image, as well as turn on titles and comments for the thumbnails and images. I put a link in the shownotes to a page I threw up there using just the defaults right out of the box so you can see how it looks. Good for a quick and dirty thing at least! test of iPhoto web page creation.
Next week I’ll show how to shrink photos in Picasa, which is as cool as iPhoto but runs on Windows and Linux. I’m ASSUMING it shrinks photos, it does everything else!
RDX on Acurazine
So my husband Steve is OBSESSED with the new RDX coming out from Acura (as I mentioned last week), which is a small SUV which was just officially released last weekend. He’s been hanging out on message boards at rdx.acurazine.com since February with a bunch of folks who are as crazed about it as he is. The reason I bring it up here is because of the tech package available on the RDX – hey, it is a tech show, right? The new RDX comes with a bunch of cool stuff (if you pay extra). the best thing in the tech package is the satellite navigation system. If you’ve thought about getting one of these and hesitated because they cost an arm and a leg, I understand completely. If you’re married though, I urge you to consider how much your marriage is worth to you.
Have you had this conversation: Husband: which way do I turn? left or right? which way? I gotta know NOW! (giving wife 3.6 seconds to respond before imminent demolition into cement wall dividing left and right choices). Wife: LEFT! (and she’s saying this only because a decision is better than nothing because of that wall coming up fast, and besides, she was happily reading a magazine and has paid no attention to where they even are even though she was supposed to be the navigator). And of course, left is the wrong answer and that’s when the REALLY happy talk begins, which usually ends in magazines thrown down with words like “FINE!”
I don’t mean to imply by ANY means that Steve and I EVER had that conversation, but I suggest this only for illustration’s sake. I can say, however that since we got Jake (that’s the name we gave to the little man who lives inside my satellite nav on my car) we’ve been blissfully happy when going places we’ve never been too far. The only time we have trouble is when we argue with Jake, like there’s this one street that he ALWAYS insists on taking, and we never want to take it, but finally one time we looked at the route he’d planned and it was WAY shorter if we did what he said!
Okay, back to the RDX tech package – it’s also got a backup camera mounted above the window on the back, so you can actually see where you’re going backwards on the same display as the satellite nav. I could really use something like that, we have a nitwit kid in our neighborhood who likes to ride his skateboard down the sidewalk, not standing up so I could actually give him a fighting chance, but laying down head first! I have a wall on my left as I back out, so one of these days I’m going to squish him, I just know it!
the other really awesome thing in the tech package is built in blue tooth. This is something you’ve probably heard of in a car, and thought “huh? what the heck is that for?” I have it in my car and it’s my favorite thing. Basically it makes your entire car a cell phone. You push a button on the steering column and say out loud “call 800-555-1212” and the darn car actually tells your bluetooth-equpped phone to call that number! then when it connects, you can hear the person you called through the speakers in the car, and they can hear you through a speaker in the headliner above the rear view mirror. It’s the ultimate hands free headset. You can even answer the phone when it rings by hitting a button on the steering column.
The RDX is only a 4 cylinder and you’d think that’s lame for even a small SUV (or they call them crossover vehicles), but the RDX comes with a turbo engine so it’s really responsive. It’s also got something called Super Handling All Wheel Drive, which means that when you make a turn, it actually SPEEDS UP the outside wheels! That reduces the lurching you get on a turn, especially in a high profile vehicle. this is a really cool technology I think.
If you’re interested in seeing Steve’s video of our adventure test driving the RDX, or look at still shots of the RDX, ehck out the two links in the shownotes. Or, if you go to youtube.com, just type in RDX and look for the movie uploaded on 8/12.
pics at http://homepage.mac.com/asheridan/RDX/index.html
video at http://www.youtube.com/watch?v=jxm8YNruMWE
The sad part for Steve is that our son doesn’t get his license till December, so he can’t get the RDX till right before then because otherwise we’ll have 3 cars and only 2 drivers, and it’s only job will be to cost us insurance money and to be moved back and forth on the street for street cleaning! Poor Steve, I hope he can make it till then.
I think that’s enough NosillaCast for now, thanks for all the great feedback, please keep it coming! Remember you can email me at [email protected] or send me a voice recording at [email protected]. thanks for listening and stay susbcribed!
Hey Allison,
Love the Podcast. I just wanted to add to your list of Web 2.0 home pages. I have tried most all (goowy, protopage, pageflakes, google/ig, windows live, yahoo) and the best is Netvibe. Take a look. http://www.netvibe.com
Although I am not a Mac expert only a novice, but can you use Automator to create a “Name Contains” search from Spotlight?
Have a great day. – Will
Thanks Will – I had trouble with your link, turns out it’s http://www.netvibes.com (note the “s”). this looks cool, I’ll check it out and review!
It looks like I’m going to have to break down and learn that darn Automator! Many times I’ve sat down to try and figure it out but I never had a good project to start with, but that one might actually be a good one, not too complicated for a beginner. If I figure it out, I’ll give you credit for pushing me into this!
Allison
NosillaCast at http://podfeet.com
hey love the shout out on utube, I love that site! I recently removed my videos but i watched all ur videos on ur tube and i liked the one of the burning t-rex. Also the Ilap thing is great I dont know if that was coverd in this episode or another but my X got me one and i love it, not great for trevel but fits perfectly everywhere in the house. (espically in the bak yard) but uhh yeah love the pod cast keep it up!
….luv from arizona’s finest.