Quicksilver blacktree.com as an outstanding application launcher, iClip from inventive.us/iClip, two-fingered tap for right-click on OSX, last.fm, iBook hard disk replacement, onetruemedia.com to create photo and video montages on line, Elgoog from elgoog.rb-hosting.de, Ryan Sakamoto’s wonderful gift from graphicforce.net.
Subscribe to the Podcast –> 
Listen to the Podcast once – 37 min 30 sec
Michael Harvee audio comment
Last week I told you about a fan of the show named Michael Harvee and about his great podcasts. he left an audio comment for us, and I thought you might enjoy it – plus he had a question. Let’s listen to Michael:
INSERT AUDIO COMMENT
I didn’t quite catch that url Michael, what was it again? I love the vision of your teeny little icons in your dock so you can’t even recognize them! I do have the perfect solution, and even if I did ‘cast about it before (can’t even remember), it must have been ages ago so it’s worth bringing it up again. Probably the single best shareware application for the Mac is called Quicksilver from quicksilver.blacktree.com. Quicksilver allows you to launch an application with a keystroke! the default is to hit control-space and up comes a little transparent window thingy – and then you hit the first couple letters of the application name. This sounds more complicated than it really is once you get used to it. After just a couple of days I could never give it up. You can use it to find files and folders too, but since I probably have 32,547 files on my Mac, that feature doesn’t feel that useful to me. there’s all kinds of features in there I don’t ever use, so you may find even more you could do with it. No doubt this is the single most useful application you can put on your Mac!
another thing you might not have used much is the finder sidebar. that’s the side stuff on the left of any Finder window but under the little grey bar. You can drag all of those things out of there and they just go poof goodbye. Better things to put in there are folders you use all the time, or even just a folder you need a LOT in one week. for example, I always put the folder for this week’s podcast in the sidebar so that it’s ready for me to dump stuff in there throughout the week. Then when the next week comes around I just drag it out and it goes poof, and I drag the new one in there. I should mention that when it goes poof, it doesn’t throw the folder away, it just disappears out of the sidebar. You can even put applications in the sidebar for easy access. I use this feature constantly, dragging folders in and out depending on the task of the day or the week. I don’t use it for Applications, because Quicksilver is SO much faster than going back to the finder and then clicking on an icon. Let me know if you find either of these features useful.
iClip vs. Sidenote
 Last week I reviewed Sidenote that gives you a little popout window on the side of your screen that allows you to jot down little notes. Pretty capable little app, but I had some trouble with it when I attached an external monitor. It left a white rectangle blocking part of my external monitor which seemed to be related to where it thought it should be based on the size of my smaller laptop screen. If I put my cursor up against the side of the screen, Sidenote would jump out but then jump back in! I found I had to hover over the empty white rectangle instead. I’ve stopped using Sidenote because of that.
Michael Harvee had trouble with Sidenote too – he had performance issues when he would switch identities on his PowerBook (he keeps separate identities for Me-Me and Day-Job-Me). The edge-hugging app he uses a lot these days is iClip, from inventive.us/iClip, which is a $20 shareware clipboard application. Based on his recommendation, I decided to give it a whirl. Hey, I haven’t installed a new application on my Mac in almost 24 hours! I was having withdrawls!
iClip installs as any other app, and it puts a little clip symbol in your menu bar that when clicked will show the application. You can, of course, make iClip appear by using Quicksilver, but the easiest way seems to be to hover over the side of your screen. It defaults to the right side, which is my only empty real estate left, so that’s where I left it. iClip has clipping sets, which are sets of things you might want to put together. For example, i created a clipping set called podfeet, so i could throw things related to the podcast in there. A new clipping set defaults to 8 bins, which are little square in a vertical row. Each bin has three symbols next to it – an arrow out, an arrow in, and a gear. if you have something in the bin and you click the arrow out, it will copy the item out into the clipboard and automatically paste it into your open application. If you want a little more control, you can hold down option when you click the arrow out key, and it copies to your clipboard, and then you can place your cursor in the app you want, and then do a paste.
to add things to the bin, you can select text, or graphics, or a url, and simply drag it into a bin. you can also select the item first, then click the arrow in symbol. Finally the little gear symbol is where you can delete the clippings, and do other context-based activities. For example, if your clipping is a url, you’ll see Open Internet Address under the gear. A much easier way to do that though is to just double-click on the bin for the url you want and it will launch your default browser and take you to that address.
another interesting thing to use the bins for is to store file aliases. Let’s say you’re getting into a file pretty regularly, you could click into a bin, pull down on the gear and select Store File Alias… and navigate to the file you want to access. any time you double click on that bin your document will be launched. Might be easier to just drag the file you need into the sidebar of an open finder window, but then again you would have to switch to the finder to launch it where iClip is always available in all applications. A feature I really like about iClip is that you can hover over a bin and the entire contents of the bin will show up in a quick little window. You can also put a name in for your bin so the cryptic text or graphics within won’t be shown but a few simple words of your choosing to jog your memory.
I noticed one cool thing in the iClip preferences, it has an option to always open iClip in the primary display. If I keep that disabled, I might be able to keep it on my laptop screen and avoid any possible weirdness with the secondary display like I had with SideNote. then again, maybe iClip won’t have the weirdness at all. I’ll have to test that soon. iClip looks pretty interesting, you can try it out 10 times for free – go to inventive.us/iClip if you’re interested in an easy way to store info at your fingertips. Thanks for the type Michael Harvee with 2 E’s.
Two Finger Tap to right-click
 So one of the cool things about REAL mice (read real as NOT any mouse from Apple) is the right click button. This button unleashes a plethora of context-sensitive menus that Mac people can only get by using a real mouse, or by holding down the control button when clicking. This has depressed me deeply, so imagine my delight when my hero, Leo LaPorte describe a great way around it on the new Intel-based Mac laptops.
In System Preferences click on the Keyboard & Mouse preference pane. For you PC folks, that’s the same as a control panel, for some reason Apple changed the name a few OS revs ago just to confuse us. anywho, under the Keyboard and Mouse preference pane, you can choose some nice alterations to the standard installation. Under Trackpad Gestures, you can select “use two fingers to scroll”, which is unbelievably awesome, once you use that, you’ll never go back. You can also select to allow horizontal scrolling which is mildly useful, but comes up just rarely enough that I forget to use it.
The real fun starts when you select clicking for a trackpad gesture. Basically this means that you don’t have to press down hard on the big button, but rather lightly tap on the track pad with your finger to select something. Finally here’s the best part – click the box that says “Tap trackpad using two fingers for secondary click”. Now if you want those lovely contextual menus, just hit the trackpad with two fingers and up it comes! I love this. It even works inside Parallels on Windows, which is awesome because control-click does NOT work in there. It’s funny how a little thing like this will make me so happy.
listener Robert on last.fm
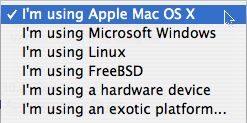
Listener Robert gave me an interesting cross-platform fun tool. It’s hard to explain exactly what this is – kind of one of those things you just have to try to “get” it. It’s called last.fm. You download a client for either OSX, Windows, linux, FreeBSD, and there’s even a choice for hardware device or “I’m using an exotic platform”.
The idea of last.fm is to allow your friends to see what music you’re listening to on your computer. I can’t tell yet if it’s only for iTunes, but it lets you create a playlist for your blog that shows your friends what you’re listening to, sorted by how often you’ve listened to different artists. the other social networking part of last.fm is that it will help you find people who match your music tastes based on what they’re listening to, and then maybe find new music through their lists. If you have OSX, you can get a Dashboard widget to track what your friends are listening to right within the dashboard.
Here’s some hints about how last.fm works from their website: “Once you’ve signed up and downloaded last.fm, just listen to music through your computer’s music player as you do every day. The name of each song you play will be automatically sent to our servers and saved in your musical profile. We call this scrobbling, and it’s the basis of everything we do at last.fm, from personalised recommendations to radio, music charts to musical neighbours, and much more.”
This is going to be a weird one for me to test, because I don’t listen to music. I don’t mean I don’t listen often, I mean I really don’t listen to music! with 3 iPods and an awesome car stereo (it even does DVD audio in Dolby 5.1) I only listen to podcasts about technology! don’t feel sorry for me and PLEASE don’t send me music, I’ve come to peace with this fact and I’ve decided to stop worrying about why I’m deficient in this area. the sad thing is I come from a musically talented family, one of my brothers is actually a professor at the Berklee School of Music in Boston! Oh well, I’m happy in my geekdom. Maybe last.fm will find me people who listen to the same podcasts i do, and I’ll find new tech podcasts I like!
The installer for last.fm scares me – 25 MB! It seemed to put all kinds of stuff in all kinds of obscure places, this one will be a bear to extract when I’m tired of it! how to get rid of stuff is important to me because if I left every application on there that I install it would be crazy! the last.fm install also answered a really important question I’ve been struggling with – do I actually HAVE fans in my MacBook Pro! In all the time I’ve had it with all the heat issues, it occurred to me a few weeks ago that I’ve never heard the fans kick in. Well, while last.fm was transferring all that slop to my hard disk, one of my processors started CRANKING and suddenly I heard the sweet sound of a fan kicking in! good news, sure wish it would kick in a lot sooner though!
I’m sorry to report that after all this, the last.fm application won’t launch on my MacBook Pro under 10.4.7. I went to the forums and found a whole bunch of people on G5s and G4s running 10.4.7 and they can’t launch either. So I went outside and waxed Lindsay’s car instead. That’s what I wanted to do anyway! If anyone else can run last.fm and wants to tell us about it, be sure and drop me a line at [email protected]
iBook hard disk replacement
My daughter has a 12″ iBook that’s about a year old, and the other night she tried to copy a gigabyte worth of photos and videos from a recent concert she attended, only to discover that she had only 300MB of disk space left. I thought I’d just clean her disk up a bit, toss out unneeded applications and she’d be in business, but it turns out she only has a 30GB drive, and with 15GB of photos and movies from her digital camera, and 5GB of music (which isn’t all that much really) and then throw in applications, and you can see why she doesn’t have any disk space left!
the bad news is that to swap out the disk on an iBook is just a tad more difficult than a spleen transplant. I’ve looked at the websites that show how to remove the disk, and all it takes is the removal of about 438 screws, cracking the case open without breaking the 17 clips, unplugging 3 connectors, and picking up the Holy Grail on the way. I checked out external notebook drives first, and found they were around $120 on the low end for a 60GB drive, a bit more for an 80Gb drive. I knew I wasn’t up to the complexity of the replacement, so I had Lindsay call a really good place called Mac911 in Santa Monica to see what it would cost to replace the drive. they quoted $400 for a 60GB drive and labor! yikes! for about 2.5 times that i could get her a new MacBook for cryin’ out loud! Hmmm…gotta rethink this plan. Can’t take too much time though, Lindsay leaves to go back to college in a week!
Then I got the brilliant idea that I know a bunch of system administrators, one of whom is AWESOME with hardware. I asked him if I could pay him instead of the Mac911 guys, and Namdar readily agreed. He said the last laugh would be on me when i saw how quickly he got the job done. The good news is that Nam LOVES hardware, so the chance to see how the iBook is put together sounded great to him.
I want to rewind to broad-based statement I made a month or two ago about how easy Macs are to work on, and that if it seems hard, that means you’re doing it wrong. Well, I should make the disclaimer now that the iBook is the exception that proves the rule. The good news is that Apple saw their evil ways, and the new MacBook is so easy to work on, it’s literally less than a minute to pull the hard disk. I put a link to a video on YouTube showing just how easy it is if you don’t believe me.
Ok, back to our saga. I figured I might as well buy a notebook drive that’s already in an enclosure, that way i could put the old 30GB drive in the enclosure after I’m done and then I’ll have a nice little external drive for backups. I checked around for instant gratification on buying the notebook drive – had to have it NOW, and most of the good deals at CompUSA and BestBuy were sold out. I took a chance and went to Costco to see what they had, and really lucked out. They had a 120GB Western Digital USB drive (no firewire) for $140. Grabbed that baby and hoofed it up to Namdar’s house.
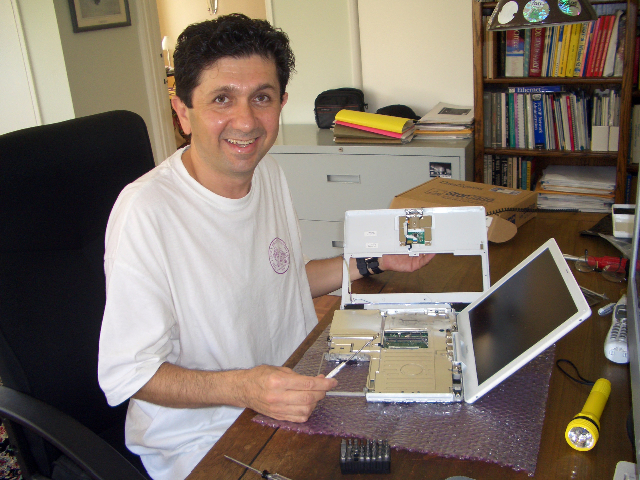
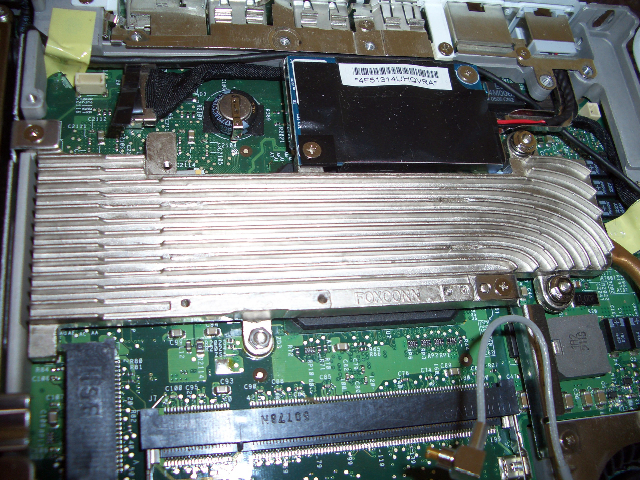
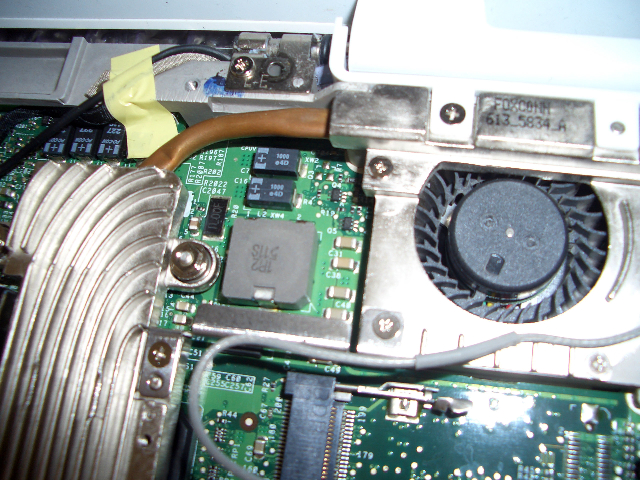
I won’t do the entire blow by blow, but if you subtract goofing off time (Nam kept trying to focus and I kept trying to distract him), and 15 minutes for chowing down a quick lunch, the total time Nam spent disassembling and reassembling Lindsay’s computer was a FULL four hours. I put some pics in the show notes – one of Namdar looking really happy about the whole experience, one of the really cool lookin’ heat sync, and a third one that’s a closeup of the heat sync showing how there’s a copper tube drawing liquid to the fans for cooling. Okay, so maybe only the hard core geeks will like them, but I think they’re cool.
there was some good comedy along the way, Namdar gave me the incredible responsibility of getting the 120GB drive out of the enclosure. I pulled, I pried, I squeezed, I pried some more, I twisted, and then I searched the internet for instructions. I never could find anything to tell me how to get it out, so I finally ended up prying really hard…until I finally just snapped off two of the plastic pieces holding it in place. well, got the job done, didn’t I? the sad part was that I actually finished getting it out RIGHT at the moment Nam pulled the drive from the iBook! It’s possible I don’t focus quite as well as Nam does, but hey, it was HARD.
Ok, so fast forward to the finish line, the new drive is in, and I pop in the Tiger install DVD. It gets to the part where you are supposed to click on the hard drive on which you want to install…and nothing comes up. Heart stops. Fear. Dismay. At this point Nam starts talking about how he had a bit of trouble with the connector on the hard drive, that it seemed to pull away from the ribbon cable a bit, and he was really worried about it. Fear increases. Head in hands. Mind swirling at how I’ll have to explain to my husband why I end up spending the night away from home because we have another 4 hours to put the old one back in! and then I thought maybe I should launch Disk Utility to see if it would be able to find the disk.
HUZZAH! the disk was there!!! the only problem was that it was formatted in Windows FAT32 format. Let me explain for a sec what that means. there is one format that can be read and written to by both Macs AND PCs and that’s FAT32. It’s convenient to have a format for both, but unfortunately it has a couple of major limitations. You can’t have files bigger than 4GB, which seemed pretty large till video came around. the other big problem is that there’s a 32 character file name limitation. Again this doesn’t seem too bad, but it turns out the length of the name includes every character in the names of the enclosing folders! So if you have a file maybe 3 or 4 folders deep on your disk, you could have a file that can’t be transferred to a FAT32 drive.
Ok, that tech lesson aside, the wonderful news is that at this point I was able to erase and format the drive to the Mac HFS format, and then the Tiger install DVD could see the drive, and I was able to get it up and running! yay!!! Many high fives between Nam and I, let me tell you! When I got home, I connected the external drive that now has her old disk in it, and I launched the OSX Migration Assistant. this assistant is awesome, it let me move all of her home directory including all of her settings for applications and even all of her applications! Took a little over an hour, and her machine was almost there. I had one brain fart when I created the first account during the OS install. My daughter’s account was called lindsay on the old drive, so I called the fresh install account lindsay too. When I went to migrate her user account, I realized I’d have two accounts with the same name, which I was sure it wouldn’t let me do. while I thought this was catastrophic, it turns out in Migration Assistant t one of the options was to replace the account with the same name! awesome.
One thing I screwed up but never saw coming was that her Mac’s authorization to iTunes was on that drive, so now I have 2 authorizations and no idea how to get the other one off. I did put the little 30GB drive in the enclosure, so I suppose I could boot off of it maybe? then I could deauthorize that “computer”. never thought of a disk as a computer, but I guess that’s the way they do it. I thought it was by MAC address or something. I know I could deauthorize all, but they only let you do that once a year (or so they say) so it’s not worth screwing with that anyway.
Finally, I ran software update to get all the security updates, and then I fixed disk permissions and she was 100% back on line. what an interesting experience, and she’s now got a bigger disk than I do! Wonder what Nam is doing next weekend…
One True Media
We’re all becoming crazy with photography and video, posting to YouTube and Flickr and all that, but what if you could create a photo and video montage online adding music and transition effects all through the web and for free? Enter One True Media at onetruemedia.com. At One True Media you upload photos and videos, lay them out in the order you like, clip the videos easily to capture just the parts you like and even add music from their list or upload your own mp3s. When you’re finished, you can email a link to One True Media’s site where your video montage lives, or you can take the code they give you to imbed your video in your blog.
I was distracted at first because there are many options beyond what I describe that you can only get through their premium service which is either $3.99/month or $40 for the full year. First you create a free login with your email address and a password. Next click on Create a Montage, and choose one of the four free settings which are pretty plain greyscale looks. with the premium service you have a lot more choices, like wedding, baby, our vacation, that kind of thing. Next you click Pick theme. this confused me for a while, I think they intermix the words setting and theme, so I thought I was doing a second operation but it’s really saying yes, I want that setting I just picked. Now you can name your montage and give it a description. Time to upload some files – video and photos, or if you already have some up there you can work from those. click done, and now you have a bunch of fun choices.
Strangely the first choice is not to sequence and edit, but rather to share and post online, buy a DVd of your creation, r to download to your iPod or to a quicktime movie. Obviously we have to skip past these to sequence and edit. this is where the beauty of the interface comes out – I uploaded a very short video, but I wanted to clip it from there. they gave me the set of photos and video I’d selected, and if I hovered over the video a choice of “clip this video” came up. I clicked on it, and then I saw my video with a representation of all the frames. I hovered over the frame where I wanted to start and two buttons came up on screen right there – start and end. i clicked start, then went to where I wanted it to end, clicked end, and then saved and my video was ready. VERY easy and intuitive.
At this point you can click on each photo and change how long it lasts, how it will transition from a fairly limited set of transitions like fade and push. You can also have the Kevin Burns effect where as the photo is up on screen it sort of zooms in a bit or slides across the screen to give the feeling of motion. You can now select music to add to the track, and on the video you can choose to have the music and video tracks play at the same time (very annoying) or to pick one or the other to override. You can preview your montage now, and then save and share! I grabbed the html they supplied me for my short video and I’ve posted it in the blog so you can see how it looks. I was jealous of the premium plan though, you could have it look like it was in a little retro orange TV set if you’d paid the $40. Check it out in the shownotes, I promise it’s not long. check out this fun tool at onetrumedia.com
![]()
Elgoog
Listener Neil sent in one of those websites that you just have to pass along to your friends, but which provides no technical value whatsoever. It’s called Elgoog, and it’s available at elgoog.rb-hosting.de. To put it quite simply, it’s Google backwards. Literally. when you go to Elgoog, you see what looks like Google only everything is spelled backwards. that’s mildly clever, but it gets more entertaining when you start to do searches. I should caution that while with Google a carriage return selects the search button on the left called “google search”, and you have to actively choose the I’m feeling Lucky button, but on Elgoog, of course the buttons are reversed so if you hit the carriage return you’ll get the functionality of I’m Feeling Lucky instead. Of course it’s spelled backwards but I’m not going to begin to try and pronounce that!
As you type your search term into Elgoog, it spells it forwards for you, but on the right hand side, and then executes a search for the term backwards. For example, I typed in Allison, and hit a carriage return and was taken to nosilla.com. Sadly that is not my domain, but another Allison got to it first. You’d be surprised how many Allison’s have used nosilla. Don’t be fooled by imitators though! As I said, this site has no redeeming value, unless you find silliness redeeming as I do! Thanks Neil for the silly tip!
Ryan Sakamoto’s gift to the NosillaCast
I want to end the show with a wonderful gift the show has gotten from one of our listeners. Ryan Sakamoto from graphicforce.net created a BEAUTIFUL logo for use on my website. It sort of looks like an audio player, it keeps in the sort of turquoise green of my blog, brings out the pod feet into two pudgy looking feet oriented the same as my logo, and it says NosillaCast with Allison Sheridan. I am in love with this artwork. Let me read you his letter:
“Alison, I really luv your podcast show and look forward to each and every episode!!! I took the liberty of designing a logo for your podcast. If you like it it’s your to keep and use anyway want to, no charge of course. Just my way of saying Mahalo for your efforts. Keep up the GREAT work! I gotta giv props to all the podcasters out there for their continued efforts of producing each and every podcast, I know it’s a ton of work!”
Ryan, I can’t thank you enough for taking so much time to make such a wonderful gift. I absolutely love it. My plan is to make either a flash player to imbed in the site or use Quicktime, and make the new artwork the skin for the player. Wouldn’t that be cool? You can get a look at the artwork on the website, I did a preview there.
![]()
He also made a new “now playing” logo that’s cool too – that would be perfect to put in the little album artwork window that shows up on iTunes while you’re playing the podcast, or in your iPod if you have the later model. I’m not sure if I’ll keep it, but I’ll probably give it a try too. I put the artwork for that in the shownotes too.

Be sure to head over to his website at graphicforce.net and look at the wonderful work he does.
I know I’ve said this before, but it hasn’t ever been more true than now, when people ask me what keeps me going doing all this for free, I have to say it’s the feedback I get from my listeners that makes it 150% worth my time. thank you to all who continue to support me in this, I look forward to hearing from even more of you.
As always you can email me at [email protected] or send me a voice recording at [email protected]. thanks for listening, and stay subscribed!
[…] He traded that one in for an identical m250. so far he says the firmware seems buggy, or he doesn’t know how to transfer music to it properly. I should point out that Nam is a UNIX system administrator with about 25 years of experience, so he’s no dummy. He specializes in component level hardware diagnostics, and is the first guy I turn to with a hardware problem. Remember the photo tour we did on show number 60 when I had Lindsay’s iBook hard drive replaced? That was Nam doing all the work while I took photos. […]
Greetings!..
alaska best fishing+ king salmon