In this episode I answer why you shouldn’t use your built-in microphone, and then I go through the details of setting up Cam Twist for video, Wiretap Anywhere for audio, and the settings on Ustream itself. Watch the live show at 5pm GMT-8 on Sunday nights at ustream.tv/nosillacast.

Listen to the Podcast Once (16 min 38 sec)
[tags]podcasting, Ustream, Wiretap Anywhere, Cam Twist, recording[/tags]
First some listener questions – MANY people ask if it’s ok if they just use the built-in mic for recording the podcast. Well technically you certainly can, but I highly recommend against it. The sound quality is simply dreadful. It will also pick up ambient room noise much more than a real microphone will. You don’t have to spend a ton of money on a headset. I put a link in the shownotes to the Plantronics DSP400 over at Amazon (using my Amazon affiliate link of course) which is an excellent starter mic for $44.
I’ve used the DSP500 and it sounds pretty good for the money. When you do get your real microphone, do some experimental recordings with the mic and the internal mic and then you tell me which sound more like something you’d want to listen to. The quality of your audio is second in importance only to the quality of your content, so make sure it’s as good as you can get it for the money you’re willing to spend. Can you remember a show you’ve listened to where they had consistently bad audio? Do you still listen to it? I’ve stopped listening to a single episode of one of my favorite shows because the audio was bad. Alex Lindsay, who does very high end video podcasts, was asked at the New Media Expo, “what’s the most important thing to know about doing good video?” You can see where I’m going of course, he said “audio”. In fact I believe said, “audio, audio, audio.” Hope that clears it up!
Live Show
![]() I’ve mentioned a bunch of times that I record the show live on Ustream on Sunday nights (at 5pm GMT-8) at ustream.tv/nosillacast. I thought it might be kind of interesting to explain how this all works. It’s pretty interesting from a geek perspective and pretty amazing what we’re able to do. the first thing I do is go to ustream.tv and I log in as nosillacast. I get a big “broadcast now” button for me to click. the one danger of going to ustream when you’re streaming on ustream, is you could end up hearing and watching yourself! That would be a disaster of course, because there’s a several second delay. You can imagine how distracting that would be. No one’s brain can handle that! I find it works really well as the host to us Firefox with the Flashblock plugin, which lets me log in and instead of seeing myself and hearing myself, there’s just a big arrow there in it’s place. I’m sure there’s other ways to avoid it but that’s how I do it.
I’ve mentioned a bunch of times that I record the show live on Ustream on Sunday nights (at 5pm GMT-8) at ustream.tv/nosillacast. I thought it might be kind of interesting to explain how this all works. It’s pretty interesting from a geek perspective and pretty amazing what we’re able to do. the first thing I do is go to ustream.tv and I log in as nosillacast. I get a big “broadcast now” button for me to click. the one danger of going to ustream when you’re streaming on ustream, is you could end up hearing and watching yourself! That would be a disaster of course, because there’s a several second delay. You can imagine how distracting that would be. No one’s brain can handle that! I find it works really well as the host to us Firefox with the Flashblock plugin, which lets me log in and instead of seeing myself and hearing myself, there’s just a big arrow there in it’s place. I’m sure there’s other ways to avoid it but that’s how I do it.
But WAIT! Before I actually go live, I have to set some things up. First I plug in my audio input and output devices (my mic and headphones). I plug my Heil PR-20 mic into my USB interface called the Fast Track from M-Audio, and the USB interface into USB on my Mac. I plug my headphones into the headphone jack on my Mac. Next I launch GarageBand. If you launch Garageband before you plug in your audio devices, Garageband will pick up the internal mic and external speakers first, and then you’d have to tell it to go use the Fastrack and headphones. It’s especially time consuming in GB to do that – it makes you wait a few seconds after each change – very boring! You can do it that way but it’s more efficient to plug the components in first. So now I’ve got my mic and headphones set, and my recording software set up.
 Now it’s time to think about the people who will be watching live. How do I send video information to ustream and what should I send? If you just want to send your talking head, then you don’t have to do much setup, assuming you’ve got a built in iSight camera, or you’ve got an external video camera set up. Navigate to your channel, log in, click broadcast now. Ustream will pop up a window where the top half is the video with some information to tell you what stage ustream is at in the process of getting you set up, and down below that will be the chat room for your show.
 Once the connections have been made properly on the ustream end, a small secondary window will pop up with Flash requesting to be allowed to use your video as an input device to ustream.
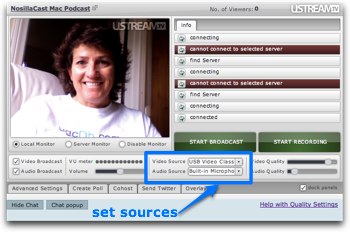 If you click Allow, your iSight will turn on and become active. Now dead center in the middle of the screen you should see two pulldowns, one for audio source and one for video source. For the example in the shownotes, I set the audio one to the internal mic, JUST like I told you never to do, and the video to the iSight. With that set, I can now see my own video showing up in the upper left corner. Once that’s working, it’s time to actually start by clicking the Broadcast Now button.
That’s pretty much it if you just want a talking head show. et’s back up now a step or two though – if you watch my live show, you don’t just see my talking head and hear me yapping, you also get to see my screen while I’m working, and you can hear anything I play in Garageband, or if I’m using Skype you can hear the other person talking. Let’s walk through how I do that.
There are two tools to accomplish this – one to combine all of the video things I want to send to ustream, and one to send all of the audio components. First let’s talk about how to combine the video effects.
![]() Enter the free Cam Twist from allocint.com. Cam Twist allows me to send the video of my screen to ustream, AND to send the video from my isight for picture in picture. Camtwist does a ton more things, like I can have a halo over my head, make it rain, crack the screen – many useless but entertaining special effects. Camtwist is non obvious how to set up, and I have to thank the chat room audience on the live show for helping me figure it out. I can’t remember exactly who it was that gave me the pointers I needed – wish I could so I could give a shoutout!
Enter the free Cam Twist from allocint.com. Cam Twist allows me to send the video of my screen to ustream, AND to send the video from my isight for picture in picture. Camtwist does a ton more things, like I can have a halo over my head, make it rain, crack the screen – many useless but entertaining special effects. Camtwist is non obvious how to set up, and I have to thank the chat room audience on the live show for helping me figure it out. I can’t remember exactly who it was that gave me the pointers I needed – wish I could so I could give a shoutout!
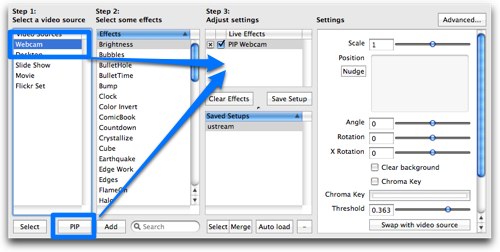 When you first launch Cam Twist, you’ll see three vertical panes titled Step 1: Select a Video Source, Step 2: Select some effects, Step 3: Adjust settings. Remember that our goal is to create a picture in picture experience for the viewer where they’ll see your talking head floating around with your desktop as you’re working displayed under your head. In the first pane, click once on Webcam, and then look down at the bottom left of the pane and click once on PIP. You’ll notice that now your webcam shows up in the 3rd pane below the title Effects in use, and it will be called PIP webcam. We’ll configure your webcam in the 4th pane once we get your desktop working too. Now for the exciting part, in the left pane, double click on Desktop. Now under Live Effects in the 3rd pane you’ll see both your desktop and your PIP Webcam.
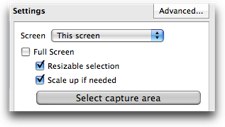 Let’s configure the desktop first. You’ll have to decide how much of your screen you want to show. The temptation will be to leave the checkbox on the 4th panel set to full Screen, but things will be so teeny on screen that it won’t add any value at all. Uncheck that tempting full Screen button, and now a button will become live that says Select Capture Area. Unfortunately I can’t easily capture a screenshot of what happens next – a black bordered, transparent box will show up onscreen with handles at the corners and along the edges, with a button that says done in the middle. In order to get a good idea of what your viewers will see, click the Window menu and choose Preview.
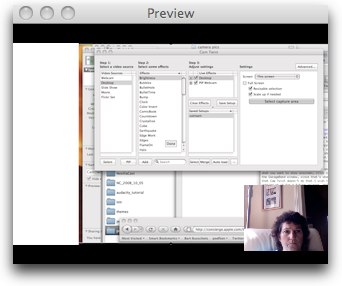
Drag the box around by the border, and resize using the six handles, and when you’ve got it over what you want to show onscreen, click the Done button. In my case, I set it to capture a portion of the GarageBand window, since that’s what people voted they’d most like to watch. The only thing that Cam Twist doesn’t do that I wish it did was to show my cursor. the developer evidently is working on it for a future release, and that’ll be great when it’s done. So many times I’m explaining something to the chat audience and i want so desperately to POINT at something on screen and I can’t – drives me nuts! I’ve even gone as far as moving my PIP around so i can point with my finger at Garageband, but since the image is in reverse I almost always point in the wrong direction! Great for the comedy of course, but not of much instructional value!
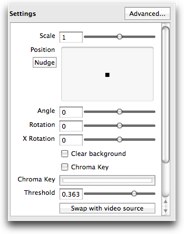 Now that we’ve got the desktop set up, we can figure out where we want to plop our talking head, also known as picture in picture. Click on the PIP Webcam in the 3rd pane, and you’ll see, amongst other things, a button that says Nudge, and a little black square on a big background. Simply drag that black button around on screen and you’ll see your face moving around on the background in the Preview button. You may also want to use the scale slider to shrink your talking head until you’ve got it the right size. there’s LOTS more options in Cam Twist, but I’ll leave you to doing that experimentation on your own! One final step – click on the Save Setup button in the 3rd pane and next time you won’t have to do much configuration beyond sliding the background around to match your windows.
Finally we can now launch Ustream again. Get yourself back into broadcast mode. Once you’ve said allow for Flash to use your camera, you’ll see two pulldowns – one for my video, and one for audio. On the video pulldown all i have to do now is choose Cam Twist instead of my iSight camera. Again, the order of events is important here, you have to get Cam Twist up and running first before you jump into the broadcast, or it won’t show up in the video source list.
For most people, this will be the extent of what you’ll want to do for your live show. The reason i think most people will stop here is because this is where “free” stops. If you want to send multiple audio source through to the live show, the same way we just set up multiple video sources, you’re going to have to fork over some dough.
 For a long time I just pulled the audio down to my FastTrack USB interface which picks up my mic, but the people watching the live show used to get really bored whenever I was listening to something in GarageBand because they couldn’t hear what I could hear. They’d see me dancing to Victor Cajiao’s Dumb Question Corner music but they couldn’t hear it. enter a brand new beta product called WireTap Anywhere from Ambrosia Software.
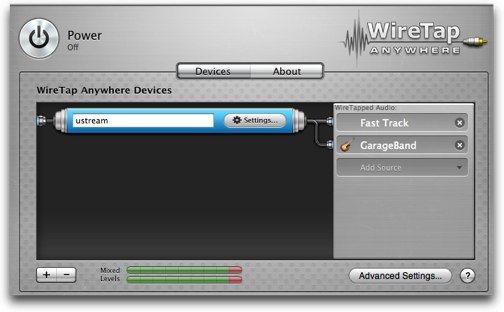
Much like Cam Twist for video, WireTap Anywhere combines several audio sources into one. WireTap Anywhere works as a very simple System Preference pane. I choose first my own microphone, which in my case shows up as the Fast Track interface, and then I add Garageband as a source, and they combine into one audio source. You can name that combined source, and in my case i choose to name it ustream. Now when I go into Ustream, for audio i have a choice of built in input, my Fast Track, OR I can choose ustream which is the combination of my Fast Track and Garageband that I created using Wiretap Anywhere. Unfortuanately I think WireTap Anywhere is high price if this is the only use you have for it, it lists out at $120US. I know, YIKES! Maybe for that price your listeners can stand to be bored while you listen to the music! WireTap Anywhere has many other
One last thing – for some reason when I play something in Garageband, it blows the eardrums out of the listeners ears. I have to remember on each show to pull the volume down in GarageBand to keep everyone from typing in really really angry capital letters to TURN IT DOWN! It took us a while to figure out where I needed to go to fix that for me – I’m pretty sure it was Willie who cracked the code on it, and everyone in the chat room thanks him!
So the bottom line is the show goes live on ustream.tv for free, I use the free Cam Twist to provide picture in picture of my talking head along with my desktop for maximum entertainment, and finally WireTap Anywhere to combine my mic with the sounds coming out of Garageband.
this has been a LONG Podcasting on Podcasting, but I wanted to get all those technical pieces together for you to give you the full picture. If you’d like to give me feedback on the show, ask questions, or give advice, shoot me an email at [email protected]. If you feel like buying something at Amazon, click the link in my sidebar to get there and a small percentage of whatever you spend goes to help support the show. i suppose you COULD skip the middle man and click the Donate button too if that’s easier for you! Thanks for listening, and stay subscribed.
Hello,
Thanks for this post. I was looking for this solution. unfortunately, there always seems to be a problem to have my desktop appear on ustream screen.
The screen is either blurd in red, or the image is great, but ustream screen appears black. I’m kind of lost.
Have you had similar problem in your begining ? If so, how did you solve it ? I’ll keep looking for a solution on my side though.
Thanks again.
Great post. I was checking constantly this blog and I am impressed! Very helpful info specifically the last part 🙂 I care for such info much. I was seeking this particular information for a long time. Thank you and good luck.
Thanks a lot greatly for your helpful post. It’s just exactly what I need pertaining to my study. Kind regards!
Cool! Thanks, that was very helpful! Btw, if you want to record a live stream on Ustream, for example a conference or a video that is not necessarily yours, you can use a recording software. Like the one that I am using for example (it’s called Audials – it’s really easy to use) or something similar. I wanted to record a training I could not attend and it was possible. There is also a step by step tutorial on how you can record a live stream video on Ustream you can take a look at. It works quite good. I am very excited about it and I totally recommend it, because I tried recording some really cool live streaming videos on Ustream (just to have them on my pc) for some time and this works great. Hope you find my info useful as well.