Mifi hack to keep it on Wifi even when plugged in from evdoinfo.com, Planets for iPhone by Evan from Q Continuum. In Dumb Question Corner we talk about how to get photos off your iPhone. Camtasia comes to the Mac from techsmith.com. In Chit Chat Across the Pond we talk about how you need to update Flash at http://www.adobe.com/software/flash/about/ if you upgrade to Snow Leopard. Then we walk through the steps Bart recommends for upgrading WordPress, and you SHOULD upgrade WordPress! See my tutorial at WordPress Upgrade Tutorial.

Listen to the Podcast Once (1hr 17 min)
Today is Sunday September 6th, 2009 and this is show number 222. Ooh – are any of you old enough to remember Room 222? Good times…good times….
This week I was on the Mac RoundTable this week – we had SO much fun! Katie Floyd, Victor Cajiao, David Sparks really enjoyed ourselves while we talked about Snow Leopard. Check it out at macroundtable.com – show #69.
Mifi charge only Update
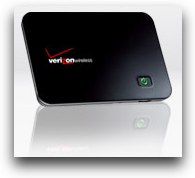 It’s time for my favorite part of the show – the Mifi Charge Only Update! If you’ve been following along with our home game, when I did my original review of the Mifi, the tiny little device from Verizon (and Sprint) that turns a cell service into wifi, I complained that when the battery died and you plug in the micro-usb cable, it switched off the wifi signal. Instead you had to use it just like a cell phone card, using the reasonably good VZAccess software, but becoming selfish and not being able to share the signal with 4 of your closest friends.
First Drew wrote in with a link to a hack where you put a little paper shim into the USB port to block the data pins. That didn’t work too well, so then Drew sent me a link to Pre Central where I could buy a charge only cable, intended actually for the Palm Pre. I bought the cable and it works great.
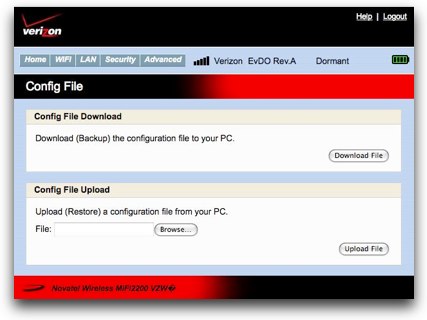 But I’m afraid Richard Kirkland wrote in with the most elegant solution. Don’t get me wrong, I loved the paper hack, but Richard’s discovery cannot be topped. He found a post on evdoinfo.com where they explain that you can actually edit the configuration file inside the Mifi itself. They explain that you connect to the Mifi over wifi, then navigate to 192.168.1.1 to access the administration panel of the Mifi (just like on a Linksys or other router). Log in so you can mess with the controls, and there’s an Advanced tab where you can download a backup copy of the configuration file. Opening the config file in a plain text editor (say Notepad ++ on Windows or TextWrangler on OSX) reveals a setting called routeroverusb, and it’s set to a value of 0. All you have to do is change it to a value of 1, save the file, and then upload it to the Mifi using the same administration panel and you’re done!
I did notice that it appeared that the Mifi actually rebooted because I got a very interesting effect I’d never seen on the Mac – the wifi signal strength was moving – instead of showing one bar or four bars or anything in between, it was migrating from 1 to 2 to 3 to 4. during the 30 seconds it did this, I couldn’t access the web, but suddenly it went solid and then I was back on the air. (I suspect this is a new feature of Snow Leopard, but it was still cool.) I plugged in the normal cable, and the Mifi kept serving up wifi. I love this solution – it’s so elegant and so very geeky. Thanks Richard for this latest installment of Mifi Charge Only!
Evan Planets
Next up, Evan has a review of an application called Planets from Q Continuum.
=====INSERT PLANETS=====
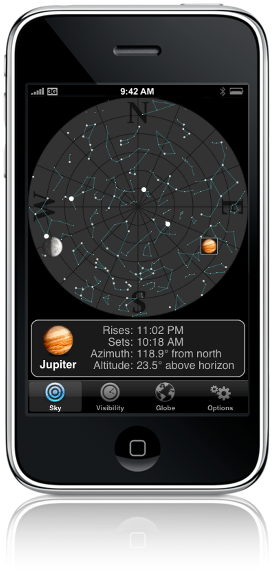 have you ever been out on a walk after dark and wondered if that light in the sky was a star, or planet? Have you been out at night an just wondered if you could see any planets at all? Or are you just planet curious? Then “Planets” is for you. Basically what the app does is show you a map of the sky with North, South, East, And west indicators, so you know where to look. It Uses the location services in your iphone to know where you are, so it can accurately tell you where the planets in sight will be.
It only works after dark, and if you try to use it before dark it will show you where the sun is, and tell you to check back after dark to see where the planets are. When you launch the app you are presented with the map of the sky, with any planets that you will be able to see on the map of the sky. There are constellations on there too, but I am not to good at picking those out in the sky, but if you are better at it than me, this feature might be useful. You tap on the planet you have interest in, and near the bottom it gives you information such as: The time the planet Rises and sets, The Azimuth in Degrees from north. And the altitude in Degrees above the Horizon.
Along the bottom there are different tabs you can tap for more options. “Sky” is on the left, and is the map of the sky I just described. To the right of that you have “visibility”. Tap this and you get a list of all the planets (along with a thumbnail picture of it). It shows you a little, I guess I will describe it as a graph of sorts. That pretty much shows at what time of day the planet would be visible, assuming it is in the sky above you. Tap on the name of the planet you are interested in and you are presented with information about the planet. The information includes: Type, Radius, Mass, Orbital Radius, Orbital Period, Eccentricity, Rotation Period, Named Moons, And Atmosphere.
The next tab along the bottom is “Globe”, which by default shows you a view of the earth, showing the part of the earth where you are right now, including where on earth it is day and where it is night. Along the top of this screen you get a list of all the planets (and the moon). Tap the planet you want and it will show you the same planet view of the planet you did for earth. You can scroll around the planet, pinch to zoom, and so on.
The last tab along the bottom is “Options” which as you might imagine has things like the option to turn “Automatic location”, “Automatic date and time” and “Unaided eye” on and off. It also shows you a few neat thing like your current coordinates, the current time and so on. It also works with the ipod touch, but since it updates the location of the planets every time you launch the app, which requires an internet connection, you are tied for wifi, which is fine if you are in your backyard, but if you are on a walk and looking at the sky, chances are you don’t have wifi, and therefor the app is of little use.
I am sure that if you are a “Professional” astronomer you are probably looking for something a little more beefy, with more info. But for people like me, who just want to find some details about planets. It is perfect. It is easy and intuitive to use. And for FREE it is an awesome deal in my opinion. The app is available in the app store from “Q Continuum” And I gave Allison the itunes link, which I am sure she will put in the shownotes. To find out more about what I do, and whats in my mind, you can follow me on twitter at twitter.com/vanmo92
Dumb Question Corner
iPhone Photos
I got this next question through FaceBook:
Ciao Allison, I have a question for you. Is there an efficient way for me to transfer photos from my iphone to my Mac? The only way I can find so far is to email them one photo at a time to myself. Uuuuhhhhhg.
Ciao da Rick
Hey Rick – if you don’t mind I’m going to use this for my show in a segment I call “Dumb Question Corner”. the segment is based of course there are no dumb questions.
There’s a VERY easy answer to this but I only figured it out just a few weeks ago. There’s an application that comes with OSX that’s been around forever, but has been advancing quietly behind the scenes and is now a powerhouse. It’s called Image Capture. If you plugin your iPhone and open Image Capture, you can actually tell it what to do when a camera is connected. Image Capture considers an iPhone a camera so you can tell Image Capture to open when the iPhone is connected. If you’d rather have your pictures pull into iPhoto (or Aperture) you can tell Image Capture to open those if you’d prefer.
In any case you can always just open Image Capture when your iPhone is plugged in and it will give you the option to download pictures and video to your Mac.
ScreenSteps
This week I had to send someone some instructions on how to do something in WordPress, and I was delighted to remember that I had already written them in detail using ScreenSteps. That’s one of the beauties of ScreenSteps, if you document the first time you answer a question, the next time you don’t have to do any work at all! So anyway, the point of this story is that I pulled up the tutorial and I realized it was written in WordPress 2.7, and there was a dramatic change in the entire menu structure and layout and look of WordPress between those two versions. Instead of shaking my head in dismay, I realized that I could quickly go through the tutorial and replace each screenshot with the new ones, maybe mess with the annotations a bit and make sure my text still made sense, and then hit the Export to PDF button and I was done! I didn’t have to worry about wrapping text around images correctly or any of the annoying, time wasting effort that goes into creating tutorials without ScreenSteps. If you’d like to have a tool that makes your life this easy, head over to screensteps.com and download the free 30 day trial, then when you inevitably buy it, make sure you use the coupon code NOSILLA for 25% off!
Camtasia for Mac
I”ve been using Tech Smith’s Camtasia Studio on Windows for about a year now, and while I’ve had my struggles with it, it’s an incredibly powerful screencasting application. There are a lot of lower end screencasting apps on the Mac, but I haven’t seen anything as powerful as Camtasia Studio on Windows. Betsy Weber of TechSmith, makers of Camtasia has been very kind to me – we seem to run into each other at every trade show I attend from MacWorld to the Podcast Expo.
I was delighted to find out that TechSmith released Camtasia for the Mac this week. Before I dig into the review, let me explain what I mean by “struggles” with Camtasia Studio. This tool is SO powerful that the learning curve is pretty steep to get really good at it. There’s a gazillion and one options and I think I’ve only experimented with about a half a zillion of them so far! there has been some hinkiness in the application, but with the help of their great tech support we’ve been able to solve most of my problems.
Given that experience, I was daunted by the idea of reviewing Camtasia for Mac – how much time would I need for a full review? Not sure if it’s good news or bad, but Camtasia looks to be a simpler application. Time will tell whether I miss any of the more complex operations or not, but the interface is very clean and Mac-like so I liked it right away.
 When you first launch Camtasia it’s a little confusing, it simply opens the recording panel. You get to play with whether to record picture in picture with your camera, and a big red record button, and that’s about it! I think that once you’re familiar with Camtasia that’s probably where you want to start, but for the first time out you probably want to see the main project screen first. The great news is that they start you off with a familiarization video so it’s easy to jump in without reading no stinking manual.
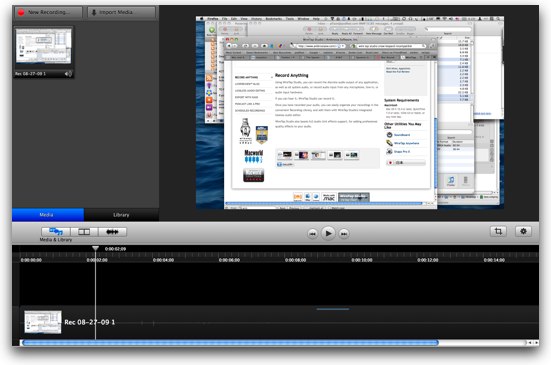
The project window is essentially the same as on the Windows version but looks more polished, very mac-like. That’s one thing that concerns a lot of people with Windows-ported applications -that they’ll have that soviet war era Windows XP look to them when they get to OSX, but I’m pretty sure this was written from the ground up for the Mac because it’s gorgeous. The screen is broken up into panes – the largest part shows your video you’ve captured. The left column is the familiar media bin where you see each of the clips or music or photos that you’re using or plan to use in your video. In watching the instructional videos they explained that if a clip is in the media bin, it’s saved within the project. I need to check to see if that’s true on the Windows version because today I save all the clips outside of Camtasia Studio but I also have them in the clip bin inside the program – might be saving every one of those huge uncompressed videos twice unnecessarily! Across the bottom you have the timeline.
I’ve talked to Slau of the Sessions with Slau Podcast about how important a visual audio track is to me, and since he’s blind he finds it funny that I have to see it. Luckily Camtasia fits my needs – you see the video and audio tracks down below in the timeline. When I reviewed Screenflow when it first came out I gave it a thumbs down because it didn’t show the audio track, but evidently they’ve put it in now so it’s worth another look. Keep meaning to get around to that – will have to give it another run after playing with Camtasia to see how they compare.
The basic workflow is you record a clip, it drops into the clip bin if you have a project open, then you drag it into the timeline. Record another clip, drop into the timeline until you’ve captured your entire screencast. From there you can apply effects like transitions between clips, callouts like text, arrows, and thought bubbles. When you’re done, you export using their options (more on that later) and you’ve got your finished product. Now let me get into some observations:
- On the Windows version during the editing process, you select an area you want to cut out by dragging on the timeline, but then you have to click the scissors button. Even thought I know this, EVERY time I instinctively hit the delete key instead, and nothing happens. Imagine my delight when I did the same thing on the Mac, and delete DOES delete! No scissors in sight!
- Camtasia is very very fast. All actions took place nearly instantaneously, even tricky special effects.
- On Camtasia Studio for Windows I find that if I make recordings over a couple of days, invariably my audio isn’t at the same level from day to day. that’s not a problem at all though because I can select a clip and just push the volume up bit by bit with the built in tool for it. With the Mac version I can only take it to 150% max of what I already had. One would hope that I’m a tiny bit more skilled doing audio on my Mac but there doesn’t seem to be any actual evidence of that so far! Audio levels seem to wander all over the place, so this will be a disadvantage of the Mac version of Camtasia. I’d like to see that slider level be up to my discretion, even if i cause distortion in my recordings as a result – should be my choice to botch it up!
- I haven’t entirely figured out how to work with the canvas yet, this is where you can crop the movie, and move the movie around so different portions of the screen show in the cropped area, but one thing I know I’m going to like are the yellow snap-to lines. As you move things around you see these yellow lines pop up to show you you’re on center, or you’ve aligned an edge. They even have them as you’re moving clips in the timeline so you know if you’ve got the clip snapped to the previous one. Very nice.
- I liked how in the tutorial they showed how to do some operations with hidden menus, like changing the canvas size can be done by control-clicking on the blank area around the canvas. I thought at first this was the only way to do it, but later I found it in the menus too. Perfect to have both options.
- If you’ve got a movie in the clip bin, you can scrub the movie just like in iMovie – as you slide your cursor across the image representing the movie, it actually shows you the movie advancing with a yellow line to show you haw far you are into the movie. This feature is not available in the Windows versoin of Camtasia.
There’s one limitation of Camtasia that I hope I’m wrong about. On Camtasia on Windows you can record full screen, one window, or a defined physical area on screen. I actually came up with a trick I’m rather proud of on Windows that helps me make great videos. Here’s the issue – I want to demonstrate something, say in Excel, but if I do it full screen (which is 1400xsomething on my windows laptop), and then produce a 640×480 video, the text is too small to see what I was doing. So then you say, well just make your screen resolution 1024×678 while you’re recording, then full screen in Excel will be the right size. Well, that doesn’t work either because it’s a nightmare to work in 640×480, everything’s huge!
Here’s how I solved it – I created a black rectangle that’s 1024×768, made it my desktop wallpaper, but told it not to stretch to fit, and made the remaining background a dark grey. Then I took my Excel file, drag it onto the rectangle and stretch it to fit which makes it 1024×768. Now my videos are incredibly sharp, my text is all the right size and it’s easy to work in that environment. I tried to suggest my brilliant strategy to Don McAllister of Screencasts Online and he pointed out that this works only in Windows because the menus are on the window, not in the menu bar. I was so bummed he pointed that out – this WONT’ work on OSX!
On Camtasia for Mac, They only have the option of full screen capture. The problem with this is the thing you’re trying to demonstrate will be REALLY teeny, and the problem gets worse the higher resolution of your monitor. Even using the MacBook Pro monitor at 1440X900, videos come out super teeny and hard to read, imagine if I used the 24″ cinema display at 1920×1200 to record and then shrank it down to a reasonable size for viewing??? I thought maybe I’d just set my screen resolution really low, say 720×450 so I could record full screen but that turned into a goat rope. It was REALLY hard to work at that resolution, and plopping the clip into Camtasia was problematic – it didn’t seem to want to work at that resolution at all, couldn’t shrink it down to even fit in that resolution. Even after setting the resolution back up to normal, Camtasia was borked, trying to make it full screen just caused it to jump to the bottom of the screen. Quit Camtasia and reopened and all was well afterwards.
Now what they do let you do is crop the canvas after you record. I think this is going to be where a good workflow could evolve but I’ll have to spend some time working this out. I may have to do my black rectangle method so I’m sure the window I’m recording is inside some contraints, then I could crop the video to match to the window, maybe taking into account the menu bar. I could slide the window up and to the left, calculate the height of the menu bar, subtract that from 1024×768…sigh. Oh wait – I could use MercuryMover to define a window size, couldn’t I? Remember that’s the tool where you can define window sizes AND locations, and then assign a keystroke to get your windows to that resolution automatically. I think I’m onto something here! But for normal people, who aren’t willing to do all this math, I wonder how they can make videos for detailed work that are actually readable.
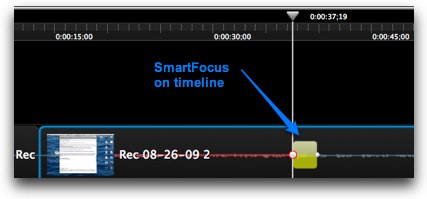 One of the features I’ve been afraid to mess with on Camtasia for Windows is the SmartFocus option, and that might be the answer to how normal people would deal with the full screen issue. SmartFocus is the feature where Camtasia automatically figures out that you’re focused on a small area of the screen and zooms in on the video to see what you’re doing. That sounds crazy but now that I’ve tested it on the Mac, it’s pretty darn good! You simply make a movie more than 30 seconds long, and take care to hover for a second or so when you’re doing some work that might be good for a zoom in to see what you’re doing, like filling in a dialog box, or showing your viewers what a button looks like. When you’re done recording, you simply drag the SmartFocus action onto the timeline for your clip and just a short second Camtasia creates the zoom in/zoom out points for you. Now you know they can’t do it perfectly the first shot, but I found it to be pretty good at guessing what I wanted it to do. Even better, you can see the zoom in/out areas in the timeline, and you can adjust the end points and slide it around until it’s perfect. In one case I had inadvertently left my cursor unattended on the side and Camtasia assumed I meant to focus there. A simple click to select it and a quick delete key and things were right as rain. If you prefer more control you can manually create focus areas to get exactly what you want.
One of the reasons I don’t make video screencasts is because it’s such a nightmare to figure out how to output good quality. On Camtasia Studio for Windows I’ve spent probably 60 hours dedicated to testing the gazillion options they give you till I found a path that works for me and gives me good quality video.
Another problem in exporting movies is that you just run into weirdness if you try to use the standard settings so suddenly you find yourself studying codecs and containers and bit rates and sample rates and key frames and …..
 I was hoping maybe Camtasia for Mac would make my life easier, but my first shot out of the gate showed that the dream of easy video creation was not to be. i chose the simple iTunes export, and chose the large format which is 720×450. It exported quickly but I was immediately disappointed. The white areas of windows were this weird pink color and the text was impossible to read at normal resolution. I blew it up to full screen which often looks remarkably good for most videos, but unfortunately it looked just awful – fuzzy and the pink area that should have been white were even worse.
Sigh, off to the advanced settings. My first shot out of the gate was even WORSE, I tried to change up the resolution to 1280×720 and I made it completely unviewable. changed from 64kbps to 256kbps, still garbage. tried h.264 and now it looks good as long as it’s not moving, but then if I move it turns into an impressionistic painting. lovely. Now I started thinking – if my screen is 1440×900, that’s a 1.6 aspect ratio, but 1280×720 is 1.777, so maybe that’s messing it up. So I clicked on custom, and typed in the 720×450 that the preset had in it originally. Nope 5 tests and I still have garbage. next up I changed the frame rate from 15 frames per second to 30 fps. Of course to keep track of all this you either have to create a complex spreadsheet, or maybe make the names really long, like “06 test 30fps 720×450”. The best part of all this is that after 6 tests the best one so far is the automatic one Camtasia did for me originally, but I still wouldn’t consider giving that to someone!
I won’t take you through all 11 of my tests, where I changed just about everything in the advanced menus, but I’ll give you the punch line. There’s a button called, simply, Export. You have only one option on Export, and it’s whether or not you want to have html to embed it into a web page. I clicked that bad boy and got GORGEOUS, perfect video that’s 720×450 just like I wanted! I tried it with the html and it makes a beautiful display, really really nice. So don’t bother with any other controls, just click Export!
I mentioned callouts way back at the beginning of this marathon review. Callouts are a very cool feature of Camtasia Studio on Windows. The idea is you want to draw attention to something on screen, you can throw in a giant colored arrow (implying “hey moron, look HERE!”) I use them a lot on Windows, mostly to make jokes in my videos. You find the shape you want, drag it into the timeline, move it around on screen and then you can change how quickly it fades in and fades out on the timeline. On Camtasia for Mac, they appear to be slightly less sophisticated. The first thing I noticed is you have very little control over the shape of the callouts. For example the arrows are a specific aspect ratio – you can make them bigger or smaller, but not thinner or shorter. The other downside is that you can’t put text inside the callouts – not even the thought bubble! You can put text on the video but it’s a separate callout not moving with the callout. I can see one advantage of this though, I do spend a lot of time on Windows fooling around with the size and shape of the callout to make the text fit properly, having them as independently controlled will give some more flexibility.
In the tutorials the folks at TechSmith suggest that you make short clips and add them together instead of trying to make one long flawless video. They suggest this because chances of making one long flawless video are zero, so i definitely subscribe to this idea. I usually only go a minute or two on each clip, that way if I botch up it’s way easy to start over. One way to make your video screencast more professional looking is to add fade in/fade outs between your clips, rather than just jumping from scene to scene. On Camtasia for Windows the fade default is about 5 seconds which is WAY too long for people to wait, so i always end up editing those down to about 2 seconds. I was chagrined to find in Camtasia for Mac that you can’t actually edit the transition times. The good news is the fade in/fade out time default is nice and short the way I like it, so that might not be a problem.
Callouts don’t fade in/out automatically like they do in Camtasia for windows, but again that gives you additional flexibility. you can actually add actions to callouts just like you do to entire clips. As I played around with this I found it to be really easy to test things out and go “oh, that’s how it works” very quickly. Except for that befuddling canvas, never did figure that out!
I should give some mention to the one pane I haven’t mentioned, you can view a right sidebar where you have control of the oddest things. Select a clip, open the sidebar, and you can rotate your clip 45 degrees. Why on earth would you do that? I can see 90 if you shot it sideways, but having full control of that angle seems pretty odd. You can also change the opacity of your clip. why would you want to make your video harder to see? I can understand changing the opacity and rotation of callouts maybe, but the entire video? You can even rotate your video about the vertical axis, so it’s thinner and at an angle away from you. Again, why or when would someone want that feature?
Camtasia for Mac comes with a series of cool effects and filters you can apply to your video screencasts. I mentioned the fade in/fade out effects, but you can also throw in some fun ones like having the video zoom in from the middle, or spiral in from the left, or you can have the video slide in from the left and out to the right. Sometimes when you get effects like this you can really make things look awful and distracting but I found these few effects very pleasing. I should explain that all you do is drag the effects out of the effects bin onto the timeline and you’re all set. You do have the properties you can mess with but I didn’t find that all that necessary. The effects looked great just as they came out of the box.
I wanted to put an effect partway into a clip and at first I thought I couldn’t do it, until I realized that there’s an easy way to achieve my objective. All I had to do was split the clip right where I wanted the effect. Move the cursor on the timeline and watch the video to find the exact spot where you want the effect, and then select Edit, Split All at Playhead. Then you can drop in any transitions you like.
They also gives you Filters, but I couldn’t see much use for them. For example, you can turn the whole clip pink. Now why would you want to do that? They have a drop shadow and reflection filter which sounded cool, but when I exported the videos with those filters on, nothing seemed any different. I presume I was doing something wrong because they surely woulnd’t make a filter that didn’t do anything but I sure couldn’t figure it out. The one filter that’s definitely useful is called Window Spotlight. This filter fuzzes and fades out all of the background windows and highlights the one in front. I can definitely see how you could use this to spotlight what you’re trying to teach.
There’s one way you can repeatedly get Camtasia to crash – give it two videos of different size. I had a video I was working on, and I was experimenting with that confusing canvas thing, I recorded a 2nd clip at full size and boom, crash and burn. I did it again and sure enough, giving Camtasia two different size videos is a 100% repeatable crash. I can see why Camtasia can’t tolerate it, but it would be better if they blocked you from doing it with an explanation of how to proceed (like make your first movie full screen again before importing) instead of crashing.
I really like Camtasia for Mac, and find it much prettier than the Windows version. it’s not nearly as capable, doesn’t have so many options on the output format, but to be honest the simplicity allowed me to get proficient much more quickly than on the windows version. I’m not saying Camtasia for Mac will make you the Don McAllister of your day but you can do some really good work with it, and for $99 compared to the $300 for the full Camtasia Studio suite for Windows, I think this product hits a real sweet spot. Check it out at techsmith.com
Honda Bob
This week I’d like to have you hear an actual testimonial from a slightly shy Honda Bob customer:
========INSERT LINDSAY HONDA BOB========
Ok, I have a confession to make, that was my daughter Lindsay, but the testimonial was 100% true. She has a full time job now so she pays her own bills, and she chose Honda Bob 2 hours away rather than go to anyone local. Remember, if you’re in the LA or Orange County area, give Honda Bob a call at (562)531-2321 or email him at [email protected]. HDA Bob’s Mobile Service is not affiliated with Honda, Acura or Honda Worldwide.
Chit Chat Across the Pond
Security Light
Snow Leopard Security boo boo:
- Snow Leopard shipped with out of date Flash
- If your flash was up to date before you installed Snow Leopard, it won’t be after!
- Go to Adobe’s site and download and install the latest Flash
- Even if you’re not on Snow Leopard – no harm to check to make sure you’re up to date:http://www.adobe.com/software/flash/about/
Main Topic – Keeping your WordPress safe
Bart’s Suggestions
- VITAL – KEEP WORDPRESS UP TO DATE – and I mean TOTALLY up to date. Subscribe to the RSS feed from WordPress so you know when there are updates – and do them IMMEDIATELY
- Set a STRONG admin password – 12 characters alphanumeric at the very least
- Install as few plugins as possible and keep them up to date too – each plugin is a vulnerability – so less is more
- Keep all installed plugins up to date
- Do not allow the web server write access to your wordpress install – this disables the one-click update but prevents any web process from editing the wordpress executable code. The idea of having executable code writeable by the webserver is nothing short of insanity – the one-button upgrade is a disgrace and should never have been written IMO – the is bad on a dedicated server (arbirary code execution becomes "badguys can install anything"), but even worse on a shared server where there is generally only one web server user serving all sites on the server. Since ALL sites run as the same user, giving that user write access gives all sites on your server write access to your wordpress. You could be really diligent, but if even one other person on your server isn’t, that hack can compromise your WordPress!
Bart’s Update proceedure:
I wrote up Bart’s process as a ScreenSteps tutorial a while back so for screen shots reference:
https://www.podfeet.com/wordpress/tutorials/how-to-upgrade-wordpress/
- Some people advise disabling all plugins before starting – since I believe in having as few as possible, this is not an issue for me
- Do a full backup of DB & files
- Delete all wordpress files except wp-config.php and the folder wp-content and .htaccess
- upload fresh versions of all files and folders except wp-config-sample.php and wp-content
- If it’s a major upgrade, go into wp-content/themes and update the standard themes (consider deleting the classic one), and also wp-content/plugins and update the standard plugins too
- visit the /wp-admin/upgrade.php URL
- If you disabled your plugins, enable them again
WordPress Voodoo:
- I see a lot of wordpress voodoo out there. Time-comsuming and mostly pointless hackery that makes your wordpress non-standard, takes a lot of time and effort, and acheives virtually nothing.
- One you see quoted a lot is 10 Tips To Make WordPress Hack-Proof– with a hyperbolic and absurd title like that – be suspicious!
- Lets break down the 10 steps!
- Upgrade to latest version – definitely!
- Update plugins – absolutely!
- Change database table prefix – pointless. Closing the stable door after the horse has bolted. Only comes into effect AFTER a hack, and at that point the attacker can just read the prefix from the config like wordpress itself does! It MIGHT slow a poor hacker down a little, but really, once you’re hacked, game over!
- Delete default admin user – has some merit. Doing this takes the pressure off your admin user password. If you don’t want a strong admin user password, consider this step.
- Use a good password – duh!
- Hide your wordpress version – if you update promtly this is pointless, even if you don’t, it’s mostly pointless. May fool an idiot script kiddy, but not a determined attacker – they’ll just try the exploit. If the exploit works, that’s all that matters!
- Ensure WP error logging is off – if you are up to date, it is so 100% redundant
- Remove WP meta tag – a re-hash of 6 and equally as pointless the the second time around
- create a .htaccess file in admin – can’t see any point at all – the blank index.php files wordpress ships with do the exact same thing – just don’t delete them!
- Put a .htaccess on wp-content/plugins – i.e. a rehash of 9
- Bottom line – IMO, a massive waste of time an energy for negligable gain over just keeping up to date and having a good password.
Well thanks for tuning in this week, if you’d like to get to know other NosillaCast listeners and really get to participate in the show, come join us during the live show on Sunday nights at 5pm GMT-8 at podfeet.com/live. Now if you’re in Australia that will actually be Monday morning, but you get my point. Send in your dumb questions, praise, even the odd criticism now and again can be interesting – send them in to [email protected] and if you’re of the Twitter persuasion, follow me on Twitter at twitter.com/podfeet. Thanks for listening, and stay subscribed.
Hi Allison well I was so excited about the MiFi system preferences change (sad aren’t we), I have a model over here in Europe the model part number 0101857 version 1.1.
I tried the changes as described and also saw the WiFi signal search on the Mac as described while the unit rebooted, I went back in to the config to make sure the change had been correctly changed, which it had, however I still get the same issue when plugging in the USB cable (the one from NovaTel) and can only go tethered.
Will take a look to see if there is anything else out there that I have to change, I’ll let you know if I find anything.
So my excited was soon dashed 🙁
Gaz.
Perhaps I should have also said the Model is Novatel MiFI2352.
Hmmm…mine is the Mifi2200. Have you posted a comment at the EVDO info link I put in the shownotes? maybe they know something?
I done the “get a USB extension cable and hack it trick” for the time being, ie I spliced the cable and cut the green and white cables.
I have left a couple of requests out there in different places, including the EVDO forum, I’ll keep you posted.
Can you provide a list of the WordPress extensions you use on your site? You mentioned them on the podcast as you went through them but they are not listed in the show notes. My wife and I run a WordPress blog and would like to make sure we have all the plug-ins that we need. We don’t have the backup plug-in for instance.
I would like a list of which plug-ins you have and why you have them installed so we can add the ones that we should have. It makes me wonder why WordPress would not include a backup plug-in by default. Isn’t backups a good idea?
Thanks Allison,
Bruce.
Hey Bruce – good idea – I’ll try to get to it this week. I probably won’t go through ALL of them, but I’ll put in the ones that I think are important/useful. I don’t want to bore everyone with! And you make a good point – a built-in backup plugin would be a brilliant idea I would think.