Square Perfect Lightbox model SP400 and how to do white balance and tether the Mac in Aperture. Dumb Question Corner about creating ad hoc networks, and George from Tulsa explains how to use Gmail for backups (George’s ScreenSteps Tutorial for Gmail Backup). Interarchy for FTP from nolobe.com doesn’t make the cut. Katie Floyd of macpowerusers.com joins us for Chit Chat Across the hallway and gives us how to go paperless.
[twitter-button][fb-like-button]

Today is Sunday January 23rd, 2011 and this is show number 296. This is the Sunday before Macworld and we’ve got a real treat in the live show – Katie Floyd of the Mac Power Users is in the house! Chit Chat Across the Pond will also be with Katie, we’re going to dump a bucket of water on the floor in the studio I think.
I’m really happy with how the NosillaCast News is going – in spite of the fact that I accidentally had it suspended until mid week because I was trying to fix the fonts in it. The reason I’m excited is that it’s not the usual suspects who are signing up, it’s lots of people who’ve never contacted me. I like that because those are the people I want to tell if something goes wrong with the show, or if a server goes down or something. Glad so many of you have signed up! If you haven’t yet, just enter your info in the sign up fields on the right side of podfeet.com. Ok, let’s get this show on the road, shall we?
Light Box
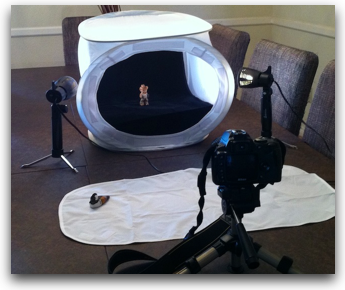
Last week I mentioned that Steve bought me a light box for Christmas, and I finally got around to playing with it. WAIT! we haven’t described a problem to be solved! Lots of times I have a gadget that I’m going to talk about on the show, and I want to put an image in the shownotes for you, or I want to tweet a photo. In my early days I would either navigate to the company’s website to take a picture, or maybe I’d just search online for anyone with a picture of the item in question, but I really shouldn’t have been doing that. nowadays I take my own photos, but you’ll notice often you can see my carpet around them because I just put it on the floor and take a picture shooting straight down on it. Not exactly the professional look I’m going for!
A light box gives you an area with diffuse and consistent light to take pictures of subjects. You can get these light boxes in many different shapes and sizes, mine is a 16″ cube made out of a frame with a diffuse white fabric covering. When I first started looking at these I thought that’s all you get, but then I found a site called Square Perfect that sells a package that includes so much more. I got the model SP400 that comes with:
- the light box
- two acrylic tables 12″ square
- four colored drapes for the inside in white, black, blue and red
- two halogen lamps with built-in stands
- a tiny little tripod just for getting to the right height
- a carrying case including a bag to collapse the light box
This whole bundle of joy is only $140, isn’t that amazing? I was amazed at how much stuff was included for that much money.
 So the first time out I opened the little package that had the light box itself inside and it POPPED out and nearly scared me to death! Steve couldn’t stop laughing at that. It’s quite a trick to get it back into that container, but once you figure it out it’s not too bad. I decided to test the light box with a tiny little carving my father made many many years ago. I think I mentioned it last week.
I put one of the little tables inside the lightbox, after screwing on the four legs. The legs aren’t terribly well made, one of them was still loose but it’s not like you’re balancing on this thing, the legs are only about an inch tall for a 12″ square table. Then I got out the white drape and tried to connect it to the velcro spots on the inside of the lightbox. I say tried because they didn’t line up quite right. I’ve got to sit down and really pay attention to wether I’m putting it in right because it seems like it wouldn’t be that hard to line up. They do line up enough to catch, so the drape held in place. Then I stood my little cowboy up on the table.
Next I took out the adorable little tripod that comes with the light box. The whole thing isn’t 8 inches tall! It has all of the adjustments of a full-sized tripod, with extendable legs (again, adorable because they only extend about an inch), a head that rotates in three directions (azimuth, elevation and roll). All of these degrees of freedom are good but it’s actually rather hard to work with being so small, it’s not like you can brace it on the ground while you work another rotation. At one point Bart suggested I’d probably be better off using a full sized tripod on the ground shooting into the light box on the table, but I was too stubborn to go get it.
By the way, i chose my nifty fifty fast lens, the one with an f/1.4 aperture because I wanted to get a super shallow depth of field. Remember that, it becomes important to the plot later!
The two lamps that come with the light box are halogens so they get REALLY hot, but they’re super bright. You can shine them in the front of the box, or into the sides to create a nicer diffuse lighting. Ok, I’ve got everything going – subject? check! light box? check! lamps, check! table and drape? check! camera on tripod? check!
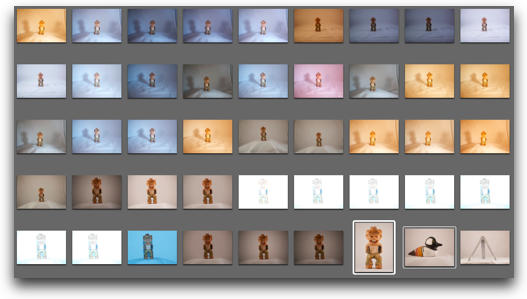
So I took a picture and the white balance was WAYYYY off. It was almost orange even where the white drape was. Well no worries, Bart taught me how to fix the white balance, I just have to dial in the right lighting. Let’s see: I’ve got incandesent, fluorescent, sunlight, flash, shade…but no halogen. I tried just about every one of these options, and swung the settings on each one wildly to either extreme, and after about 20 photos I had successfully created a pile of orange pictures and a pile of blue ones! And then I had a brilliant idea – I decided to bring Bart right into the room with me by calling him on Facetime!
We had SO much fun, it was almost as good as having him right there with me. Learning photography from someone real time is the only way to learn. We tried a bunch of changes to the white balance with little success. And that’s when Bart taught me something I’ve ALWAYS wanted to know how to do. He taught me how to manually set the white balance. I’ve heard for years about holding up a white card and setting it, and the people who talk about that kind of thing always talk about things like how much percentage grey the card is supposed to have, and they do explain that the idea is to teach the camera what white looks like in the current light…but no one ever tells HOW to set the white balance!
Just in case you have been frustrated by the same thing, here’s how Bart told me it works on the Nikon D40. First using the menu buttons navigate to the white balance options where you can pick sunlight, incandescent, etc. If you scroll all the way down, there’s a custom preset option. Next the camera will ask whether you want to erase whatever preset it thinks it already has. Next you take a picture of your white card (or in my case the white back of my light box). Next the camera should simply accept that as white. You take a picture and it looks perfect.
But when I tried to take a picture of the back of the light box, it couldn’t auto-focus because there was no detail in the white. So I had to figure out how to go into manual focus. Since I was using the fancy pants lens, I had to use the menus to do that. Ok great, focus on a corner, ready…but now I have to dig back through all the menus again to the white balance preset. But then when I tried to take the white picture, it came back and said it couldn’t do it. What the heck? Bart and I fussed with a lot of stuff and then Steve happened to notice that the camera was still set on ISO 1600 from the night before! Ok, now through the menus to the ISO settings, back again into white balance, and it worked! Huzzah! You know you learn so much more when you make mistakes than when it works the first time.
Next up Bart taught me something REALLY cool, probably the coolest thing I learned all day. So I’m taking a zillion pictures with all these different options, and as I take a half dozen, I’d pull the SD card out and stick it in my Mac, wait for it to mount and then wait for the pictures to copy into Aperture. It never occurred to me that there might be an easier way. It turns out that in Aperture, there’s a mode that allows you to tether a camera so that when you take a picture, it plops right into your library! Isn’t that cool? It even gives you a software button to click so that you don’t bump the camera! I LOVE this feature. it never occurred to me that Aperture could do this – the only other time I saw this feature was in using Boinx iStopMotion.
 The final step in the fun lightbox play date for Bart and I was when he convinced me to stop using my fancy pants nifty fifty lens. Oddly the problem was that my images had a depth of field that was actually TOO shallow! When we looked at the better shots, I could get the cowboy’s teeth in focus but his knees would be out of focus. Ok, that’s a little too shallow, I’ll admit. I thought since I’d bought such a cool lens, it should be used for this, but Bart said I could get a nice shallow depth of field by using one of my zoom lenses and just pulling back from the light box. We slapped on my stock 55-200mm lens and I set it at 125mm and started shooting.
This made a huge difference, now I could control the depth of field and actually get a much better closeup on my subject. Once I had all of this set up, I was able to shoot a picture of one of my dad’s little ducks without any adjustments at all. Next up I put the black velvety drape in place, and took a picture of the Compass Stand for iPad that came out really cool with the silver on black!
Overall the light box from Square is a HUGE success, gave me everything I wanted, and it was so fun to get to learn from Bart even though he was halfway around the world.
Dumb Question Corner
This week’s dumb question comes from New Zealand, long time listener but first time contributor Al van Seventer. He sent in his dumb question in audio:
This is Al van Seventer here from New Zealand and I have a dumb question for you.
I recently got a Macbook Pro from work and wanted to use Keynote in conjunction with my iPhone for presentations. Problem is that I need to do these presentations offsite at someone else’s premises. As you know Keynote and Keynote Remote work thru Wi-Fi and when I’m offsite I don’t always have Wi-Fi to connect to. So… Is there a way of connecting my iPhone to my Mac without a Wi-Fi connection available. I guess I could get a Wi-Fi switch or something like that but I really don’t want to have an extra device if I don’t need it.
Thanks heaps and also thanks very much for the show, I’ve been a long time listener and I have really enjoyed the NosillaCast.
How lovely to meet you Al! I’ll answer your Q on the show – and this is a perfect Dumb Question! It’s perfect because I did a bit of Googling and came across the answer, and it was something I should have thought of on my own.
The Mac (and Windows for that matter, probably Linux but I’d have to check with Knightwise) can create what’s called an ad hoc network. That means that with your Mac you can create a wireless connection and have other devices join it. This becomes a mini-network with just those devices in it, not connected to the internet. If you had your Mac plugged into ethernet hard wired, you could then actually share your internet connection over wifi to your other devices, like your iPhone or another computer for that matter.
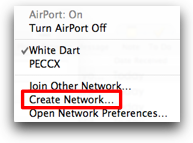
 But back to the problem to be solved. All you do is go up to the antenna signal thingy up in the menu bar and pull down to Create Network… In the next screen, give your ad hoc network a name and set a password if you want to and click ok.
You should now be able to connect your iPhone to your MacBook Pro’s ad hoc network just like any other wireless connection. Let me know how that works, and practice it before your next presentation! Thanks for a great audio comment – just love your accent. Any time you want to make a recording I’d love to hear it.
ScreenSteps
![]() You know I just love it when people write into me about ScreenSteps, because you guys can hear about how cool it is from real people using it to get real stuff done! If you’re new to the show or haven’t heard of ScreenSteps before, this is a fabulous tool for writing instructional material on the Mac or PC, including text instructions, screen snapshots and annotations on the images. It changes the drudgery of making documentation into actual fun. But you don’t have to believe me, Al Van Seventer who you just heard from included a p.s. on his note that I want to read to you.
You know I just love it when people write into me about ScreenSteps, because you guys can hear about how cool it is from real people using it to get real stuff done! If you’re new to the show or haven’t heard of ScreenSteps before, this is a fabulous tool for writing instructional material on the Mac or PC, including text instructions, screen snapshots and annotations on the images. It changes the drudgery of making documentation into actual fun. But you don’t have to believe me, Al Van Seventer who you just heard from included a p.s. on his note that I want to read to you.
Bought Screensteps today, have been using the trial for a week or so and found it so easy and such a time saver that I told my boss I had to have it. I used to do the old screen shot and paste into Word but now I can punch out short tutorials in a flash. Well worth the little amount of money it costs I recon. Even better news was that I had installed Screensteps on my PC (just hadn’t bought it yet) and had created a few tutorials. With the new Mac I transferred all “My Documents” over and as I installed Screensteps all the old tutorials came straight in, fantastic!
Al makes two great points here – using ScreenSteps makes the job so much faster, AND the licensing on ScreenSteps allows you to use one license for your Mac and PC instead of having to buy two copies, or for a desktop and a laptop as long as you’re the only users. If you haven’t bought ScreenSteps yet, you’re really missing out on some productivity joy. Check out the free trial at ScreenSteps.com and when you inevitably buy it like Al, don’t forget my coupon code NOSILLA for 25% off the purchase price of ScreenSteps Desktop Standard or Pro.
George on part 2
Last week George from Tulsa teased us with the first half of a story about when your backups are so old the technology to play them is gone. Here’s part 2.
IN #294 Allison was wondering how best to backup Steve’s frequently changing “small” data files, like spreadsheets. I responded by offering to tell how to use Mac software to put encrypted backups in the “Cloud.” For free. My suggestion is ideal for Steve’s “small” data files. Now there’s spreadsheets, and there’s SPREADSHEETS, but even my largest are far smaller than movies or even pictures taken by new smartphones.
“My” backup method can surely handle every “data” file you’ll make in a lifetime. But not movies, thousands of photos, and large files in formats that don’t compress. Think PDFs and MP3s. If you want store lots of files like those in the “Cloud,” you’re gonna’ have to pay, though the price can be surprisingly low. Let’s save that segment for another day.
Before “going instructional,” I think it’s important to define “the Cloud.”
On the site of popular backup service Carbonite, there’s not a cloud in sight. No pretty little cumulus clouds float across their pages. Credit Carbonite’s honesty; Carbonite is not a cloud service. They say very clearly that your data is backed up in one data center, one location.
No question, using an online backup service can keep your data safer. Yet it doesn’t take much Googling to find lots of tales of backup recovery disaster. If you use an online service, verify your data’s actually there, and that you can restore it. You want a backup, not a starring role as lead plaintiff in a class action.
My wife worked for Amoco, the oil giant swallowed by BP. She was involved in a lot of projects. One to convert staggering amounts of data from old mainframe database reel tapes into a new server friendly format on disk packs. The old reels, and backups of the new disk packs, were stored deep underground in old salt mine in a geologically inert part of Kansas.
Amoco went further and duplicated its main Tulsa data center in Houston. For protection, the new Houston gear went underground. Comes the hurricane, and Amoco’s IT staff is scuba diving in sub-basements. A total loss. Amoco’s main center was still intact in Tulsa, though there were some nervous hours as hurricane remnants moved north, spawning tornadoes here.
Subscribe to MobileMe or not, you know MobileMe’s Icon is a friendly little cloud. That Icon stakes out MobileMe’s claim to be a “cloud service.” I stopped to wonder if it is.
Apple is notoriously secretive, which is probably why I Googled long and hard to find any reference to MobileMe’s infrastructure. The only source I turned up says MobileMe exists in one data center in Newark, California. Think Metro San Francisco. Think earthquake. If MobileMe really does live in just one data center, I don’t think its earned a Cloud Merit Badge.
There ARE some “true Cloud” services on the net. The one you surely know best is Google.
Google has multiple data centers scattered around the planet. Google’s data is redundantly replicated, in real time, across multiple centers. That means your Gmail is stored simultaneously in perhaps thirty or more Google data centers all over the planet. In theory, one or several could, using Google’s euphemism, “go offline,” and users shouldn’t even notice.
By now I bet you’ve figured out I’m going to suggest Gmail as your free cloud backup service. If you already have a Gmail account, and who doesn’t, you could use it to to store your backups. But I’m suggesting you set up a new one, just for backups. Google doesn’t seem to care if we have multiple Gmail accounts, so get one just to use for backing up.
I don’t want drone on, and while everything I’m suggesting is easy, the Tutorial I made using Allison’s favorite teaching tool, Screensteps, explains it far better than audio. There’s a link in the Show Notes. For now, here’s a brief overview.
You’ll need:
- A password manager, or workaround.
- A new Gmail account ONLY for backups and never for email. Run silent, run deep, be anonymous. What hackers can’t find, they can’t hack.
- Keka, a Mac donationware program that creates compressed and encrypted 7z archives.
- Some time to organize your backups efficiently.
You’re going to use Keka to squash and encrypt your files. Use a good Keka password, and no one, including Google, will be able to read your files. Last step, within Gmail, you’re going to use the excellent label and text search features as you email your Keka archives to yourself.
LINKS:
George’s Tutorial for Gmail Backup
Keka.app, the Free Mac OS X File Archiver: http://www.kekaosx.com/en/
Gmail: gmail.com
About Carbonite: carbonite.com
MobileMe Infrastructure: seekingalpha.com
Newark, CA http://www.newark.org/residents/disaster-preparedness/
Google “Cloud” info: http://www.google.com/apps/intl/en/business/cloud.html#8
http://www.eweekeurope.co.uk/news/google-steps-up-data-protection-with-synchronous-replication-5676
7z: http://en.wikipedia.org/wiki/7z
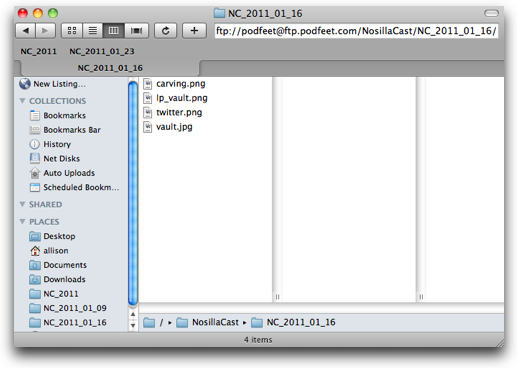
Interarchy
This next review isn’t fair. I’m going to try to do an honest and unbiased review of an FTP client when I’m already in love with a different application. Let’s start from the beginning though, what’s an FTP client? When you manage your own website, you have to move files from your computer to your web server, and a hundred years ago someone invented a language to do that, which they called File Transfer Protocol, or FTP. In the good old days you used a command line terminal with commands like put and get to put files onto your server and get them back.
In the much more recent past developers have come up with graphical user interfaces instead. They give you a pane on the left where your files are on your hard drive, and the server on the right showing the files you’ve already uploaded. The kinds of things that are important to me in an FTP client of today are:
- A way to save the different servers I need to deal with
- A way to bookmark folders in the server and on your hard drive for easy access
- The ability to have more than one FTP window open up at a time for the rare occasions where I need two servers up at the same time
- Good feedback on how my file transfers are going
- Easy to understand icons in the menus
One of my first loves in FTP-land was the free Cyberduck from cyberduck.ch. It has a really cute rubber duckie and met most of my requirements. Somewhere along the line, being fickle as I am, I fell out of love. I wish I could remember why, but my wandering eye took me to the $34 Transmit from panic.com/transmit/.
Now Transmit didn’t do anything bad, didn’t fail me in my time of need, didn’t come home late with perfume on his collar or anything, but when i bought the MacUpdate bundle and found the FTP client Interarchy from nolobe.com right there in front of me. Like I said at the beginning, this is a tough sell because Transmit gives me everything I need, so what could Interarchy give me that would convince me to leave my precious Transmit? Well that’s what I wanted to find out.
 Interarchy uses terminology that takes some getting used to, like setting up a server to which you want to FTP is called “new listing”. No idea why they had to name it something weird like that, reminds me of trying to learn Sharepoint, they rename normal things to other words. I figured I’d just import my bookmarks (the name that both Cyberduck and Transmit use for the various servers you ask them to remember) but sadly there is no import bookmarks or import listings option. When I switch back to Cyberduck from time to time, it actually recognizes that I have Transmit and automatically offers to import my bookmarks. With Interarchy I had to do it the old fashioned way, setting it up by hand.
Most FTP clients give you a two pane view, the left side shows your hard drive, the right side shows the server. Some FTP client, can’t remember which, calls it “your stuff” and “their stuff” so you can remember which is which. Very oddly Interarchy doesn’t have two panes, it only shows you one pane, which can be either your stuff or their stuff but you can’t see both at the same time. I don’t get it. Do they expect me to open a Finder window, and drag from there into the Interarchy pane? how very annoying.
 The single window of Interarchy invites you to create “Places” in the left sidebar, which are like how in a Finder window you can just drag in a folder, application or file for quick opening. The problem with the Places in Interarchy is that once I create them, I’ll be darned if I can figure out how to get rid of them! I like to put a folder for easy access and change it up every week when I do a new show. I know, you’re shocked to find I’m so anally organized on my web server, right? Anyway, I tried right clicking to delete the old Places, I tried dragging them off the window, nothing worked. This would be a mess after just a few weeks for me.
Interarchy has several view options like you would see in any Finder window, but their coverflow view while it technically works, doesn’t actually show you the thumbnails of what you’re looking at so it’s pretty worthless.
I decided while I was working on this review that I should just read the online Help. Unfortunately while it had a table of contents on the left, none of the links actually worked. I wanted to make sure it wasn’t just me, so I switched browsers and had several people on Twitter and they all confirmed it was broken.
I wrote to nolobe.com, the makers of Interarchy to tell them that it was broken and they took four or five days to respond. They did fix it but that long time delay to even respond gave me a bad taste. Even worse though, the help is just about worthless. For example, under adding bookmarks it says, “To add a Bookmark choose Bookmarks » Add Bookmark…” They don’t even tell you that you have to navigate to the location first, or you’ll be naming some random directory the name you type in, it doesn’t let you create the location in that window. I was still trying to figure out how to delete places, but they didn’t even mention places in the help file.
I understand there are supposed to be a lot of advantages of Interarchy, like there’s all kinds of plugins and scripts and stuff to extend its capabilities but I couldn’t find enough to like about Interarchy to dig any deeper into its capabilities. Interarchy is a Universal application for both Intel and PowerPC Macs, and works on Leopard and Snow Leopard. it’s available for $19.95 from nolobe.com
Security Lite
In the words of Elmer Fudd, “be vewy vewy quiet…” because there’s no security news at all this week. Shhhh! you’re going to wake up the hackers! zip it!
Chit Chat Across the Pond
Honda Bob
 I asked Katie what she wanted to do when she got to LA. I’m thinking she’ll answer Hollywood, Grauman’s Chinese Theater, the beach, but no. The first thing she wanted to do was meet Honda Bob! Yup, the intergalactically famous Honda Bob was her first request. It may have been that she had spent so much time going back and forth to the Toyota dealer in the last couple of weeks for some minor services and trying to get the darn clicker replaced for her door locks, that made her want to meet the man that keeps us from ever having to go to a dealer. Unfortunately he doesn’t make house calls to Florida, but she can dream, right? If you live in the LA or Orange County areas, and you drive a Honda or an Acura, give Honda Bob a call at (562)531-2321 or send him an email at [email protected]. HDA Bob’s Mobile Service is not affiliated with Honda, Acura or Honda Worldwide.
Main Topic
Going Paperless Presentation (from Macworld)
Find more atkatiefloyd.me/goingpaperless
Why Go Paperless?
- Environmental
- Efficient
- Saves Money
- De-Clutter
Getting Started: Get Rid of Needless Paper
- IRS Publication 552:http://www.irs.gov/publications/p552/ar02.html
- Bankrate Article:http://www.bankrate.com/finance/personal-finance/how-long-to-keep-financial-records.aspx
- Financials
- Insurance
- Warranty Info/Reciepts
- Info for large purchases
- Home/Auto
- Business related
- Tax-related
- License/Professional Infomration
- Reference Materials
- Receipts for gift purchases
- Everyday Receipts
- Information that’s stored in another trusted system
- Anything easily accessible online.
- Scan first and then deal with it, or deal with it and then scan it?
- Don’t create needless paper along the way!
- My Workflow
- Slightly different workflow for paper vs. digital
- Automate wherever possible
- TextExpander
- Hazel
- Automator
Scanners:
- Types:
- Flatbed
- Sheetfed/Document
- Portable
- Portable Camera
- iPhone
- iSight
- Single-Pass Duplex
- Document Feeder
- Reasonable scanning speed
- Supported file formats/software
- Features
- OCR
- Double-Feed Detection
- De-Skew
- Blank Page Detection, etc
- S1100 – SingleSheet Scanner
- Debut at CES this year
- Smallest and lightest
- Simplex scanner
- No Document feeder
- $199
- Still has a small document feeder
- $295
- Faster scanning
- Larger Document Feeder
- Requires AC Adapter
- Includes Bundled Software
- $495
Searching Scanned Files
- OCR
- Better Scan = Better OCR
- Abbyy Fine REader
- Acrobat Pro
- PDFPen
- Some Document Management Solutions
Producing Less Paper
- Print to PDF
- Print to your Document Manager
- Organize your Email
- Sign Documents Electronically (PDFpen)
- Paperless Faxing
Managing FIles
- Finder: Files and Folders
- Pros:
- Non-Proprietary
- Easy to backup, share and move
- searchable with spotlight
- Not as feature-rich
- May be ore Difficult to manage
- Gotta Stay on top of filing
- Automation Helps
- Hazel
- TextExpander
- Use in combination with scanner Softare
- Paperless from http://www.marinersoftware.com/products/paperless/
- Evernote http://evernote.com
- Yojimbo http://www.barebones.com/products/yojimbo/
- Neathttp://www.neatco.com/home.aspx<== not recommended
- DevonThink http://www.devon-technologies.com/products/devonthink/
- Yep http://www.ironicsoftware.com/
Backup and Security
- Backup:
- Backup Data Before the Orginals are Destroyed
- More important the data, more redundant backup should be
- Secure your backup too!
- This is some of the most sensitive data on your computer.
- Lock down your computer
- Consider using a disk-image for sensitive files
- SaveCheck non-proteced files for sensitive information
Final Tips:
- Respect History and Nostalgia
- Give some thought to your workflow and how others will interact with it
- You don’t have to do this overnight.
Well we’re off to Macworld, hope to get a lot of good interviews this time, Steve had his new wireless mic for me to use with his camcorder so I we’re all set. He got the one Donald Burr recommended a while back. I’m not sure how responsive I’ll be able to be while on the trip next week but still keep your letters coming by emailing me at [email protected] and follow me on Twitter at twitter.com/podfeet. Thanks for listening, and stay subscribed.
Thanks for the post on the light box and Square Perfect – now I know where my next birthday present will come from! 🙂
George why not just keep your sensitive data in an encrypted file setup w Disk Utility???