Track your computer in case of theft with Prey from preyproject.com. Rod Simmons of The Simple Mobile Review Podcast reviews the i.Sound Portable Power Max from isound.net, and mentions the Zagg Sparq 2.0. I take you through the history of my 22″ ADC cinema display including all the Frankensteinian tools I’ve used to keep that 9 year old monitor gorgeous all these years. Open beta of Clarify from bluemangolearning.com/clarify. Another 4G hotspot review, this time the Sierra Wireless Overdrive Pro 3G/4G Mobile Hotspot from Sprint. Larry Bushey of the Going Linux Podcast hosted at goinglinux.com joins us in Chit Chat Across the Pond to talk about Linux Mint from linuxmint.com.

 Hi this is Allison Sheridan of the NosillaCast Mac Podcast, hosted at Podfeet.com, a technology geek podcast with an EVER so slight Macintosh bias. Today is FRIDAY August 12th, 2011 and this is show number 325. Yes, we’re early this week because we’re actually going on vacation for a week. In case you’re wondering, we have our very own Mrs. Kravitz across the street (see Bewitched) to keep a nosy eye on our house, come in and out at will to feed Buzzy, so we can go away with peace of mind.
The other good news is that next Sunday’s show (August 21st) will be hosted by none other than Katie Floyd of the Mac Power Users Podcast. I said last week that it would be on Ustream, but then we figured out there’s no reason she can’t do it on Justin.tv, so we tested it this week and it’s all good. Remember, we need you to send in audio recordings to [email protected] so she doesn’t have to work so hard. The best part of the arrangement is that Steve and I will actually be back from our travels by Sunday night, so we’ll be able to make snarky comments in the chat room during the show. I just don’t feel like doing any WORK on vacation! But maybe we better get this show done before I officially start goofing off.
Prey
My son Kyle turned me onto an interesting service I want to tell you about. Let’s start with that venerable problem to be solved. You have a lovely laptop or phone that you adore. It might be a Mac, a windows machine, or Linux. You’d be devastated if you lost it, if someone stole it, and maybe you don’t want your data out there floating around. There are a whole bunch of services you can pay big piles of money for to keep track of your device, but they really are expensive.
 Kyle found a FREE service that will track your device. It’s called Prey (with an e) and it’s available at preyproject.com. Prey lets you keep track of your phone or laptop at all times, and will help you find it if it ever gets lost or stolen. It’s lightweight, open source software, and free for anyone to use.
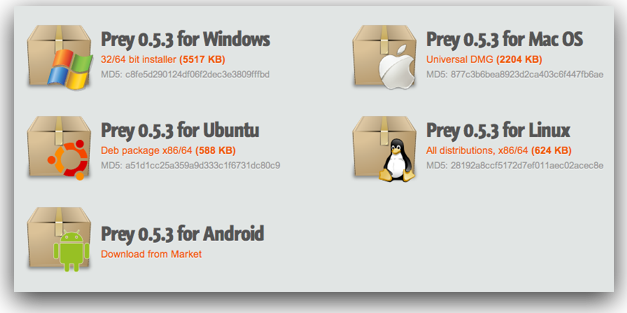
First you install the Prey application on your device. They have the application for Windows, Mac OS, Ubuntu, a generic LInux install and one for Android (it’s actually in the Android Market!) Once you install the software, it asks you to go back to the web and create a user account, and it send you an email to verify you’re human. That email takes you to a control panel where you can configure exactly what you want to have happen in case of theft.
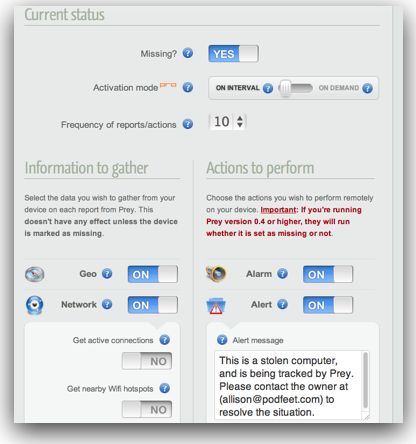 You get a switch to declare your device missing, and then there’s a series of switches you can toggle on for what to do about it. By default Prey will geolocate your device on a map, takes a picture with the webcam of the person with your device, takes a screenshot of what they’re doing, and even provides you network info on the device. Get this – since the info is actually being sent by your computer, it sends it’s external IP address, and the LAN IP address.
I tested it with the default connections, and every 20 minutes it pulled all of this data. I let it go 7 times, and 6 out of 7 times it nailed my location dead nuts on. the one time it missed, it missed by more than a mile. Not sure what messed that up that one time. I was really watching closely to see the camera take the picture of me, and only once did I actually catch it in the act. It was this really quick little green glow. I think that’s a good thing because maybe you don’t want the bad guy to know you’re tracking him or her.
 Ok, let’s get a little more advanced with Prey. How about setting an alarm to go off on your machine? or put an alert message on screen? The default message, which you can edit, is to say “This is a stolen computer, and is being tracked by Prey. Please contact the owner at (your address) to resolve the situation. You can even have it say that message out loud with text to speech. There were two more options but I got scared to try them – one was to lock the screen and require a password, but it’s a password on the Prey site. I just thought that might go wrong for some reason. You can even have Prey hide emails, and delete cookies and passwords set on your computer. I assume they mean the kind where you let a web browser remember passwords, but you’re all too smart to ever do that, right?
When I told Prey my machine was stolen with that alarm and message playing it was REALLY disturbing! A crazy loud siren went off and this very robot-like voice yelled at me that the computer was stolen. You can close the window with the message, but the shrieking goes on for quite a while, and then it comes right back at the next time interval you set from 10-40 minutes.
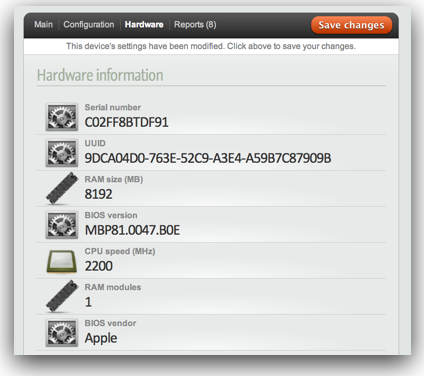
But that’s not all! You can get Prey to send you a list of modified files, so if the snot who took your computer is messing in your files, you’ll know which ones. All of this is with the FREE version of Prey for up to 3 devices. If you pay for a pro account, you can get sent reports if your machine doesn’t report in for a certain length of time. You can also receive your reports SSL encrypted, with ciphered instructions. When you first activate Prey on your machine with the free account, you get a full hardware scan, If you buy the pro account, you can run a hardware scan any time you want, and you can have Prey updated remotely.
Even though this is an open source project, you’d never know it from the look and feel of the website where you control the tool, it’s beautiful, clean and easy to understand. Now the one way they show their open source colors is that it’s actually hard to figure out how to pay for a pro account! I finally found it after some scrolling and digging.
A personal account is only $5/month for up to 3 devices, but even then they give you a 10% discount if you pay by the year. If you have a lot of devices, you can get a home account for $15/month for 10 devices. there are plans for 30, 100 and even 500 devices, so if you run a company’s IT devices, this might be a great option for you.
Prey even has a really good support section with a knowledge base where you can find answers from the makers of Prey, and a forum where you can get help from the community.
If you want to be able to track your computer or Android phone in case of theft, I think you should really consider putting Prey on your devices now before it’s too late. Check it out at preyproject.com.
ScreenSteps
I’ve really been getting into using the public beta of Clarify from bluemangolearning.com, the makers of ScreenSteps. Clarify is designed to help you clarify instructions you’re giving someone, either in email or by pointing them to a beautifully formatted web link with screenshots, annotations and a bit of text around the screenshots to help clarify your instructions.
At first I was a bit confused to the difference between Clarify and ScreenSteps, but I totally understand after using both products. ScreenSteps is intended for true documentation. Writing manuals for your company’s software, of creating sequential lessons to teach a complex subject, for answering FAQs by your customers. Clarify is really for saying, “Dad, here’s how you start iChat to do a screenshare with me so I can fix your computer”. Clarify is for short form, maybe you don’t even want to title each step (you don’t have to with Clarify) just to get the job done quickly and painlessly. I’m finding I’m using Clarify constantly with my communications between friends and family, but saving ScreenSteps for the heavy lifting. They’re very similar so it’s easy to Clarify if you’ve already mastered ScreenSteps, but they’re for different purposes.
Like I said, Clarify is in free trial right now, so go over to bluemangolearning.com/clarify and help them give it a good shakedown before they release the product to the wild. I think you’ll like it! And have I mentioned that you should go buy ScreenSteps over at ScreenSteps.com lately? Be sure to tell them you heard about it here!
i.Sound Portable Power Max by Rod Simmons
Next up we have another fabulous review from Rod Simmons of The Simple Mobile Review Podcast on the i.Sound Portable Power Max from isound.net.
You can read his full review here: simplemobilereview.com/review-i-sound-portable-power-max-16000-mah/#more-17276
So a lot of people, notably Dean Elger, have complained that listening to the NosillaCast is a very expensive operation. I think I know what you guys are talking about now – I bought the DryCase as soon as I heard Rod’s review last week, and as soon as I heard about the i.Sound I had to buy it too! How can you argue with $77 for 16,000 mAh? I actually thought he misspoke when I heard that – the HUGE power packs for the iPhone are in the thousands of mAh’s, not TENS of thousands!
Rod made a point offline to tell me that the i.Sound only charges at 5v vs 10v so the iPad charges like it is using an iPhone charger. The only great device for Charging the iPad at full speed is the Zagg Sparq 2.0 but the battery is small. His version of “small” is interesting – I checked out the Zagg Sparq 2.0 and it’s actually 6000 mAh all by itself, nice little compact wall charger/battery pack combo. I made a point of using Rod’s Amazon affiliate link over on The Simple Mobile Review website.
New Apple Cinema Display
 When it comes time to buy a new monitor for your Mac, it’s hard to figure out what to buy. On the one hand you could buy a spectacular Apple Cinema Display and take out a second mortgage on the house, or for about half the price or less you could get some other brand, like a Dell for example. This has been a dilemma for years and years. I’ll tell you why I picked an Apple Cinema Display the last time in spite of that temptation.
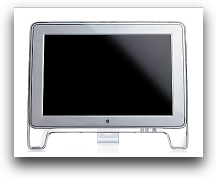
Nine years ago, I got a 22″ Cinema Display at work. This model was the one with the giant 2 inch white border around it so it looked huge. This was the first time Apple decided to change up all the connectors. They had come out with the ADC connector, which carried USB, power, and video all on one cable. Of course you needed a special graphics card for it, a 32 Megabyte card dontcha know. It was soooo cool at the time.
 And then Apple decided to change to DVI. Grrr. That meant you couldn’t use the ADC display on any new Macs. So aggravating to have this super expensive monitor with no way to plug it in. Luckily the folks at Dr. Bott came out with an adapter that would take that ADC cable as an input, and then split it out into power, USB and video. Sort of defeating the purpose of the whole idea, but at least I could use my monitor. This “adapter” as I call it wan’t some tiny little device, I remember a reviewer at the time aptly describing it as “the size of a 3 egg omelette”. This thing was HUGE. But at least it was expensive and clumsy with four cables coming out of it, and the ADC cable was super thick and inflexible so it was hard to maneuver around.
Well that solved my problem though, a couple hundred dollars lighter, but at least it worked. That particular 22″ ADC display had cost a couple thousand dollars, so breathing new life into it was a great investment. Now fast forward to about 3 years ago, when I was forced to use a PC. Even though the world has gone to digital connectors, most PC laptops seem to still come with VGA connectors. Now here I am with an ADC to DVI adapter, but no VGA. I thought, no worries, I’ll just buy a DVI to VGA connector adapter, easy peasy. Bought two of them before I figured out (or a smart person told me) that you actually need what’s called a scaler to make that work. I think it had something to do with the graphics card in the PC not being able to drive the native 1600×1200 resolution of the display.
I found a company called Gefen and bought their scaler for about $350. Now the scaler isn’t NEARLY as big as the Dr. Bott device, but lucky for me, it ALSO comes with giant thick cables that are entirely too stiff to move around easily. one is for power, one for the VGA that’s about half the thickness of my finger. It took some real fiddling with it, and some severe tech support from Gefen to get it to work, but in the end I finally had success.
So why do I tell you this horror story of the Frankenstein I built with all this junk hanging off of a 9 year old monitor? Because about twice a month, someone new comes into my office and says, “wow! how did you get that cool monitor???” I’m not making this up, it happens ALL the time. I love this monitor, even though there are much higher resolution ones out there, it’s gorgeous. The colors are still bright and the display is pretty clear. now I must confess another reason I like it is because it has such low resolution for its size. Remember George from Tulsa describing how he had to keep wiping nose prints off the glass on the 27″ iMac he bought because the text was so tiny? Turns out that’s not a problem with a 22″ display that’s only 1600×1200! I love how big and bright it is with fonts I can actually read.
At the same time that work bought the 22″ ADC Cinema display, we bought a 17″ one for home. Late in 2010 I gave away the computer it was hooked to along with the 17″ ADC display, and it looked just as good as the 22″ one does at work after 9 years, and showed no sign of slowing.
The moral of this story is that if you’re looking at the Apple Cinema Displays and drooling but you think they’re just priced too darn high, consider my story – this display could last you a decade if they’re as well made as they were in the early days. I bought a 24″ Cinema Display when they came out, even though it was a ton more money than the typical Dell display but I think it’s been worth it. The new Apple 27″ display is a thousand dollars. I decided to see what a 27″ 2560×1440 LED backlit display would cost from Dell. Now the Dell U2711 is the same resolution, but it doesn’t have the iSight HD camera, it doesn’t have thunderbolt (it has DMI and display port and DVI and VGA instead). And guess how much it costs? A thousand dollars. I’m just saying’.
TextExpander
You know I’m crazy about TextExpander, but I thought it would be fun to find out how other people are using TextExpander – maybe trigger in your mind how you could use it to make you more productive and reduce repetitive stress by reducing typing. I got a couple of responses from Twitter in time for the show. @BonnyFace (aka Julie Kuehl) said her favorite TextExpander snippet is how she can type in resume with an apostrophe, and TextExpander changes it to résumé with the correct accents on the e’s for her. I didn’t even know about that one – very cool! I took a look at the automatically included snippets you get under “accented words” and there’s a ton of cool ones. My favorite is débâcle – did you know there’s an accent ague on the e and a circumflex on the a? I didn’t until I typed it while TextExpander was running and it did it all for me!
Maybe Julie and I are a bit nuts about the accented words being correct, How about some more common uses? Brian Sailer (@bsailer) is often in correspondence with students, and he finishes every email by simply typing “iyhaq”, which expands to “If you have any questions, please let me know.” That’s a great use! Nik (aka @bleepnik) responded to my question of what he uses TextExpander for the mod, and said sadly, it’s kind of my boring: my signature. That’s not sad – that’s probably the single thing we ALL have in common, so the best use of TextExpander. I post on message boards all the time, and whenever I do I make sure to market the podcast, and a simple sig ; and you get everything you’d ever want to know about the NosillaCast. Mark Dalton said A couple of my most useful are xTemplate which produces a full HTML template for @TheTechLounge Show posts, while Kyle Maguire uses ad; to expand to the first line of his address, and em; expands his email (which is really long) – Mark Dalton has similar snippets for email and phone number. And finally Verso has Boilerplate markdown text for bits of posts that are always the same: liveblog posts or the @TUAW Talkcast instructions.
so you can see that there are all different kinds of uses for TextExpander, not everyone uses it the same, but they’re all passionate about how much time they save. I love hearing about these different ways of saving time and work, keep these ideas coming! If you feel left out and don’t have TextExpander yet, head on over to smilesoftware.com and get the free trial and when you’re hooked – buy TextExpander! Be sure to tell them the NosillaCast sent you!
Sierra Wireless Overdrive Pro 3G/4G Mobile Hotspot from Sprint
I’ve done reviews in the recent past of the Samsung 4G hotspot, the Novatel 4G Hotspot, and the Clear Rover Puck. This week I’ve got yet another device, the Sierra Wireless Overdrive Pro 3G/4G Mobile Hotspot from Sprint. Again with the really long names – let’s call this one the Sprint Overdrive Pro, shall we?
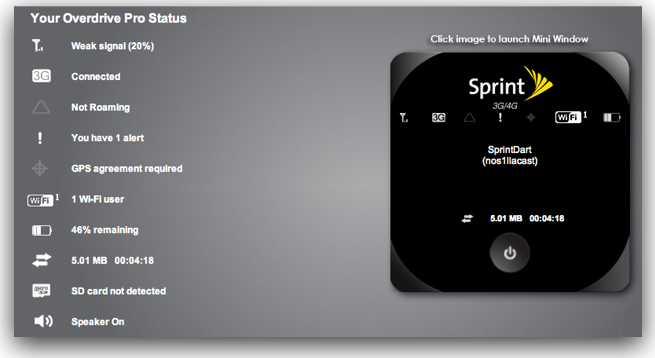
It’s really interesting to see how different each of these devices have been, the varying sizes, lack or existence of displays of varying quality, and completely different shapes. The Sprint Overdrive Pro is 2.7″ x 2.7″ x 0.69″ thick. It’s kind of chunky, and a little bit heavy, but it’s shiny and pleasing to hold. It has a very large color LCD screen on the front – the best display of any of the devices I’ve tested so far. It shows you the cell signal strength, tells you if you’ve got 3G or 4G, the number of connected devices, and a big battery indicator. It also tells you the name of the network and the password you’ve assigned (you can turn off the display of the password though).
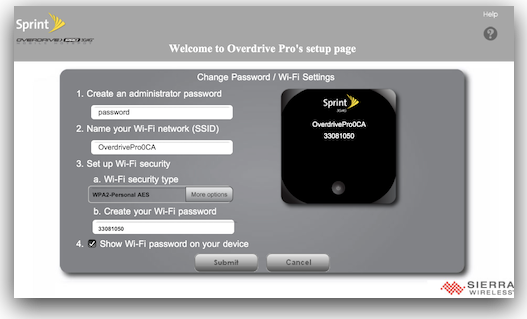 When you first power up the device and connect to it, opening a web browser automatically gets you into the admin screen. I LOVED this. It forced you to look right at the settings for encryption, naming the network and setting an administrator and wireless password. For the novice user this is really ideal. Once you’ve answered those few questions, you’re free to wander the internet, or dig into the control panel a bit more. When you go to the url for the Sprint Overdrive Pro later, you’ll get a really cool display showing you everything you can see on the screen of the device, but also descriptions of each indicator. It showed two bars on the battery on the device, but on the browser it explained that I had 46% battery life remaining.
I forgot to mention, the display on the device also shows you how much data you’ve used in the current session, but the web interface is even better. It shows you how much usage total for the current month, and you can even set what day of the month that counter resets. How cool is that? Who else lets you monitor the usage like that? I’ve mentioned before that I thought it was odd that you could only have 5 devices hooked up to one of these wireless hotspots, like why not 4 or 6? why are they all exactly 5? Well the Sprint Overdrive Pro let’s you set exactly how many devices can connect, from 1-8. So there, it IS arbitrary, I knew it!
Remember how sad I was that the Novatel 4G Hotspot would not allow me to use it when I was charging it via USB? and how excited I was way back when when I found out how to hack the original Mifi to let me use it while plugged in to charge? Well the Sprint Overdrive Pro wins over all of them. Not only does it allow you to use the wireless aspects while plugged in via USB, you can actually control that behavior with a software switch on the web interface! Your choice are to always have wifi available when plugged in, or to intentionally block wifi when plugged in and use it as a USB modem (when you don’t feel like sharing), or to never have wifi turned on, so you always use it as a USB modem. This flexibility is fantastic! I do have to say though that the Sprint Overdrive Pro gets SMOKING hot when it’s plugged into USB, almost too hot to touch actually.
I could go on for hours about every cool thing they have in the web interface, but I have to say this is the most user friendly, pleasing to look at and helpful interface I’ve seen on ANY router, including Linksys, D-Link, Apple and all of the hotspots I’ve played with so far. Bar none Sprint has done the best job.
The Sprint Overdrive Pro has an odd little thing – it makes noise. Happy little noises – like when you first turn it on it beeps and boops, when someone joins the network a little beep goes off, when it’s going into standby mode, more cute little beeps. The good news is if all this cheery cuteness gets on your nerves, there’s a mute switch on the device.
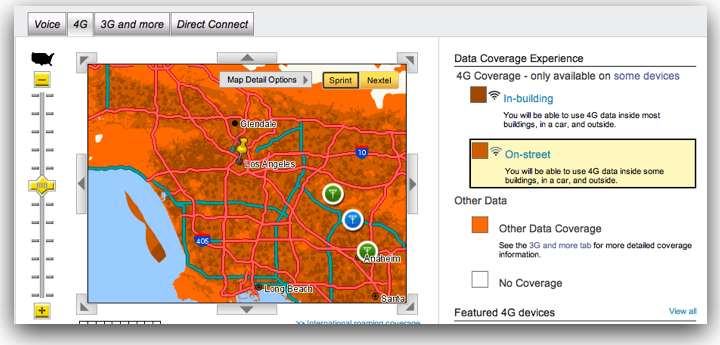 And now for the bad news. Sprint’s network where I tested it is the worst I’ve ever seen. It’s horrible. Their coverage map shows three colors – light orange, medium orange, and dark orange (to make it harder to tell the colors apart I guess). light orange means 3G, medium means 4G but only if you’re out doors, and dark orange means you can get 4G even inside a building. In Los Angeles county, the dark orange spots look like freckles on the city. It’s VERY spotty. Medium orange is a bit more pervasive, but the areas where I live and work have no 4G coverage at all.
 Now I could almost stand this if it weren’t for the fact that the coverage they call 3G is the worst I’ve ever encountered. I ran a speed test over at speakeasy.net/speedtest three times. The download speeds were from 110-430kbps. That’s the download speed. yeah, less than half a mbps. Hold onto your seats, though, the upload speeds were as low as 20kbps. For those of you too young to remember the old dialup modems, those were at 56kbps! seriously. This thing used at my house ran less than HALF a dial up modem speed. I did three tests and it was going slower and slower on each test, I was afraid it would stop altogether if I kept testing it! I kept forgetting which network I was on and I’d get really confused why my FTP client wouldn’t connect to my server, and then I’d think, “ohhhhh…it’s the Sprint network…” I tested it a few times at work, and I got 1.1mbps down and 230kbps up, which was a heck of a lot better than at home, but even Sprint says 3G is 3.1mbps down.
I am so bummed about this, and I can’t imagine how bummed the people are who designed the hardware and software for the Sprint Overdrive Pro (which is made by Sierra Wireless by the way). these people designed a very pleasing box, created easy to view and understand indicators on a gorgeous LCD display, they wrote best in class software for the web interface…and then had their work put on such a dreadful network! That must be killing them!
The Sprint Overdrive Pro will run you $250 without a contract, but around fifty bucks with a 2 year contract, pretty standard pricing for these devices. You can get plans for 3GB for $45/month, 5GB for $60, or 10GB for $90. Hopefully you live somewhere where you can actually download that much data in a month. At the speeds I was getting, if I left it on for 24 hours a day for 30 days, I could jut barely use 5GB of data!
Bottom line time – if you check the Sprint network and find you do have good 4G coverage in your area, DEFINITELY try out the Sprint Overdrive Pro, you’ll love it. But if that map isn’t showing you dark orange, then don’t even think about getting it. It will only make you sad. Or, keep an eye on Sprint and when/if they get good coverage, then get yourself one.
Chit Chat Across the Pond
This week we’re joined again by Larry Bushey of the Going Linux Podcast hosted at goinglinux.com.
Linux Mint
- Last time we talked, I suggested you try Linux Mint. How’s it going?
Problem to be solved:
1. You love Mac hardware, and you love the simplicity of the Mac OSX design, but you are a geek.
2. You want more control. You want to be able to tweak your computer in ways that Apple’s products just don’t let you do.
3. You appreciate Mr. Jobs design philosophy that there should be just one way to do something but you want more options. You want 8 different ways to do things! That way you can choose the method that works best for YOU instead of using the method that works best for Steve Jobs.
4. You DO NOT want to be subject to the risk of viruses and malware that Windows would bring.
How much change will I see?
Linux is much more similar to the MacOS than it is to Windows. (Those common UNIX origins!)
- Home folder, not “My Documents”
- sda & sdb drive partitions, not “C:/” and “D:/”
- virtual desktops (think “spaces”)
- expo desktop effects (think “exposé” on steroids)
- Software Manager (think Mac App Store where everything is free)
- geek out with: terminal, SSH, sudo, scripting & regular expressions
Linux Mint
- OK, let’s get you started…
- Download and create your CD: http://goinglinux.com/screencasts.html#glsc003
How to Burn an ISO on your Mac: http://osxdaily.com/2009/09/11/how-to-burn-an-iso-on-your-mac/
— Why Mint, and not Ubuntu any more? and what if I don’t HAVE an optical drive any more? can I put it into VMware Fusion or Parallels?–>
How to install: 1. Boot from CD or USB flash drive 2. Double-click the “Install Linux Mint” launcher on the desktop 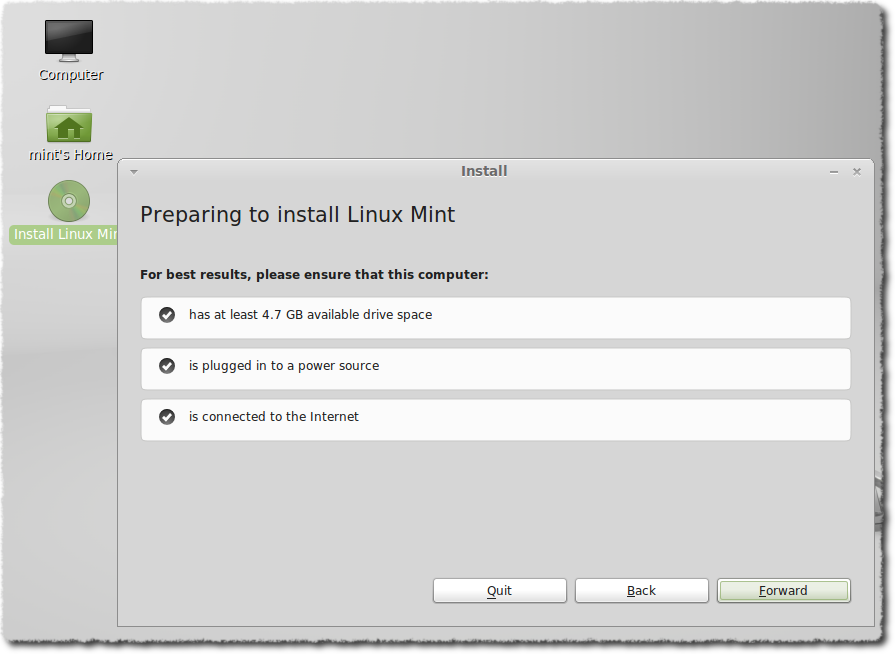

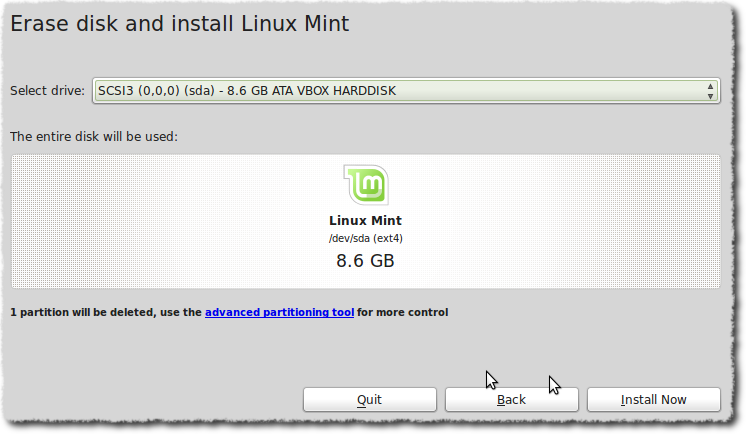
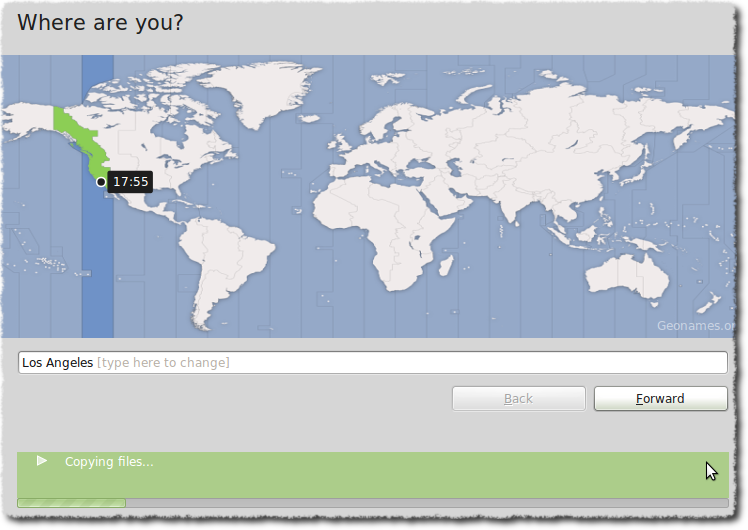
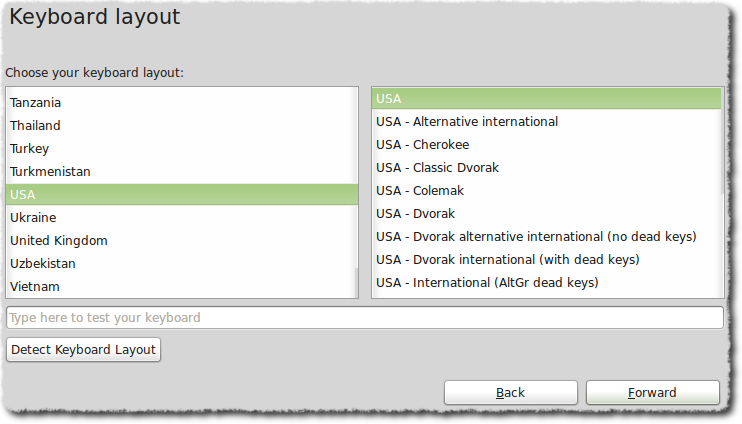
- Give the installer your full name, a name for your computer, your login credentials (username and password)
- Reboot
If you are installing Mint 11 on a virtual machine (VirtualBox in particular) you will need to change a setting to get it to behave properly. Release notes: http://linuxmint.com/rel_katya.php (Modify /etc/xdg/autostart/gnome-settings-daemon.desktop and replace ‘Exec=/usr/lib/gnome-settings-daemon/gnome-settings-daemon’ with ‘Exec=bash -c “sleep 20; /usr/lib/gnome-settings-daemon/gnome-settings-daemon”‘.)
As you heard during the interview, I actually did install Linux Mint into a virtual machine using VMware’s Fusion. I’ve been playing with it all week and it’s VERY cool. I mentioned that I always get stuck on the installing software part, and have had to enlist Kyle Maguire’s (@kylemag on Twitter) help on MANY occasions because I’d get stuck, and he’d take me into the command line where he’d tell me what to type. While fun and geeky, I could rarely reproduce what he was teaching me the next time I got stuck.
Using Linux Mint has been a dream in comparison. For example I installed Pidgin with a couple of clicks in the Software center. Pidgin is an open source app that lets you connect into various chat services like AIM, Gtalk, and even Facebook. I live on Adium on the Mac, and I was able to immediately get on line with all those services on Linux.
The one dodgy part was when I had to install the VMware Tools into Linux Mint. Whenever you build a virtual machine, using any VM tool, and any operating system, you have to install the tools or things won’t work exactly right – maybe printing will be a problem, or sharing folders between your host and guest OS will be janky, or your optical drive won’t be visible, things like that. I tried to install the tools on my own but all it would do was mount a virtual optical disk on my Mint desktop. I tried opening it and it mounted another one that appeared to be a compressed tar file. Ok, opened that and saw an installer inside, but double clicking that didn’t work.
I started penning a long whiny email to Larry to tell him that LInux was crap, but as I wrote the email I had another idea. My problem was that I was thinking like a Mac. On the Mac you see, if you double click an archived or compressed disk, it uncompresses. But then I remembered that on Windows double clicking an archived file doesn’t unarchive it – you have to specifically ask it to uncompress and only THEN are you truly touching what’s inside it. I thought maybe Linux was doing it the Windows way (which I consider a COMPLETE tease by the way, letting me see it what’s inside but not touch). Sure enough, I right clicked on that and there was the option to unarchive it – and then I had the REAL VMware tools right there to double click to install.
I decided to keep my whiny email going to Larry but to include my discovery so he’d know I had success. He of course loved it because halfway through he thought he’d be spending the next week teaching me unix commands that I’d forget anyway, but then he was rewarded by learning my success using the GUI instead so no work at all for him.
I’m impressed by Linux Mint – and plan to play with it a lot more – thanks for pushing me Larry!
That’s going to wind this up for this week, many thanks to our sponsors for helping to pay the bills: ScreenSteps, and Smile. Don’t forget to send in your Dumb Questions, comments and suggestions by emailing me at [email protected], follow me on twitter at twitter.com/podfeet. If you want to join in the fun of the live show, head on over to podfeet.com/live on Sunday nights at 5pm Pacific Time. Thanks for listening, and stay subscribed.
MONITORS & MINT
a twofer comment
MONITORS
Back in #287 I reviewed the 27″ iMac and Cinema Display Screens noting how Apple uses the shiny black glass cover to punch up contrast and brightness.
AND how the 2560 x 1440 dot pitch is “a resolution too far” for the human eye.
Since then I found a blog post with a cure for the glare, if not the dot pitch.
http://www.fireandknowledge.org/archives/2009/04/21/a-free-easy-way-to-make-your-glossy-imac-screen-glare-free/
Simply get a couple of suction cup glass pullers and take off the glass. You’ll be left with a regular monitor minus the shiny, glaring, reflective surface. Works because the glass on Apple’s 21.5 iMacs and 27″ screen are held on by magnets.
iFixit sells a kit including the suction pullers, but you can probably buy those at most hardware stores.
That said, I’d like to recommend my current monitor of choice, ASUS VE278Q 27-Inch LED Monitor. It lovely 27″ 1920 x 1080 matte finish monitor with DVI and HDMI inputs. Includes speakers (adequate) and even has some USB connectivity (I don’t use). I have no trouble seeing any text on this monitor, and it has essentially ZERO GLARE or REFLECTIVITY. It definitely won’t cause headaches and eye strain you will find mentioned about Apple’s displays in lots of postings (including the blog referenced above).
The best part: currently $329 on Amazon. That’s right. 1/3 the Apple Cinema Display cost. and a savings on aspirin and eye drops.
———–
MINT
I tried to install Mint on Parallels 6 three or four (?) months ago. I also tried to install straight Ubuntu. At that time it was not possible to install the “Parallels Tools” that help link virtual machines to the underlying Mac hardware.
If anyone happens to read this and know if that has changed, I’d be interested.
Looks like you’ll have to fire the NosillaCastaways again – you clearly said “Friday, August 11” and they didn’t catch it. (Note that I was not in the channel at the time and am therefore exempt from the firing.)
…uhh, never mind.
Re: why would Prey tell you the Internal IP as well as the External IP? Well, imagine if your hypothetical evil laptop thief were to log on from a large organization, say a school or a corporation, or even an apartment or condo complex that provides internet access to its occupants (yes, they exist). Many of these organizations use NAT to
Well, in cases like this, knowing the external IP isn’t enough information; it only traces the thief to BigAssUniversity.edu or MegaCorp.com or CheapApartments.net. Tracing the user any further – say, to Apartment 31-B, or 3rd floor of the SomeFamousRichGuy Building – will require the internal IP address.
Uh, that should read “Many of these organizations use NAT to allow them to host many connections while using only a few of those oh-so-precious public IP addresses.”
re TextExpander, Here is how I use it.
I have a variety of WordPress plugins that perform various functions based on “shortcodes” that I type into the text of a post or a page. Trouble is, most of these are pretty arcane and cryptic. Here are some examples:
* To create a star rating I have to type “[xrr rating=4.5/5]”
* To insert a Commission Junction affiliate link, I may have to type something like “[cj_show_items advertiser_ids=”joined” keywords=”virgin +mifi” records_per_page=”5″ sort_by=”salePrice”]”
* To insert a HTML5 video player object, I need to “[video src="http://media.otakunopodcast.com/videos/ONPV1234.mp4" width="640" height="360"]
Well, I have a hard time remembering all of these, plus some of them are just really quite long. So I created snippets for them. For example, my “insert a star rating” snippet is “rrate”. My “insert CJ affiliate link” is “ccjkey”. And my “insert HTML5 video player object” snippet is “vvideo”.
Also most of my snippets prompt you for various pieces of information as well; for example, my ratings snippet prompts you for what star rating to give it; my “insert HTML5 video player” snippet asks for the filename of the video to play; etc.
Oh yeah, I also use it for boilerplate text like everyone else does. Really helps me fill out new user registration forms quickly. For example, my “oobio” snippet expands out to:
Otaku no Podcast is a podcast dedicated to all things Anime and Manga. Here, you will find news on the latest releases and other goings-on in the industry; our “man-on-the-street” reports from anime conventions and Japanese cultural fairs; reviews of cool (and not-so-cool) titles, both new and old; and commentary on various otaku-worthy topics. We’ll also occasionally venture forth into other territories of interest to many otaku, such as video games, music, travel, and Japanese food and culture. So grab that box of Pocky and strap yourself into your giant robot cockpit, you’re in for one wild ride!
Yeah, that one has saved me quite a bit of typing.