I got to be on the Simple Mobile Review Podcast: simplemobilereview.com. Apple comes out with a firmware fix for the 24″ display flicker problem a week after they gave me the new monitor, but then pulled the update? Why I hope to get an Amazon Kindle Touch for Christmas and I think Amazon will make a fortune because of the Kindle Fire. Allister Jenks returns with a review of Jettison to eject disks from St. Clair software in the Mac App Store for $1.99. Jim Sewell has this week’s dumb question – why he can’t see all the locations for saving a file in the Save-As dialog box. Kirschen from FreeRangeCoder.com reviews OSX alarm program Pester from sabi.net/nriley/software. Full review of Camtasia Studio 7 from techsmith.com. Rod Simmons of SimpleMobileReview.com reviews the Bowers & Wilkins C5 In-Ear Headphones. In Chit Chat Across the Pond Bart explains the improvements being worked on by Moxie Marlinspike on the SSL Certificate problem. Bart also unveils his secure password generator at https://www.xkpasswd.net/.

Hi this is Allison Sheridan of the NosillaCast Mac Podcast, hosted at Podfeet.com, a technology geek podcast with an EVER so slight Macintosh bias. Today is Sunday October 2nd, 2011 and this is show number 332. I had the good fortune to be on the Simple Mobile Review Podcast this week – you should check it out at simplemobilereview.com.
Scoche Boom Can giveaway
It looks like my bribery idea worked out great – we’ve had a 21% growth in NosillaCast News subscribers because of Rod Simmons’ Scoche Boom Can giveaway. The one thing I hate about giveaways is when the podcaster takes 23 minutes to read off the names, and you’d already know if you won. so let’s keep it simple, the winner is…Donald Stein, aka the Tall Man. Now here’s something funny about the whole contest. When I sent out the email to the NosillaCast News subscribers, I was very particular that spelling counts. I said that because I set up a smart mailbox to capture all of the emails in a pile, where the title had to say Scoche in it (spelled scoche). One person, Henri V. spelled it Scosche, so I wrote back to him that he’d never win if he didn’t spell it right. Well guess what? I was spelling it WRONG! it DOES have a second “s” in it. In looking back I also see that kevin Sadler was smart enough to spell it BOTH ways in his entry. Anyway, congratulations Donald, enjoy your Schosche Boom Cans!
Monitor update
Last week I reported that I had received the new 27″ Apple Cinema Display because of the flickering problem on the 24″ display with a thunderbolt Mac. Well THIS week, Apple sent out the firmware update for the problem! On the one hand I feel lucky that I got a free monitor out of the deal, but more importantly I’m happy for all of my compatriots with whom I drew comfort when Apple had abandoned us. I’m still reading the forum because it’s so fun to hear them rejoicing. Well, they’re rejoicing except the folks who bought 3rd party displays and still have the flickering problem. Now here’s an odd thing – the firmware update came out just a couple of days ago, and now the link is broken! What’s up with that Apple?
Amazon Kindle Announcements
 I’m sure by now you’ve heard that Amazon announced a whole new lineup of Kindles. I’m really intrigued by what they’ve done. First of all, the Kindle I want for Christmas is the Kindle Touch. This is an ad-supported, touch screen only e-ink display reader for $99US. I don’t want a keyboard, I don’t have a lot of emergency book needs when I’m away from wifi so the lack of 3G is not a problem. What I DO want is an inexpensive reader for the very few occasions a year when I want to read outside. I do go to the beach occasionally and I do sit out at a pool on most vacations, and the iPad is the wrong device because of the display AND I don’t want an $850 device out on the sand! I do buy all of my books through the Kindle app anyway, so I could sync the Kindle Touch before I leave over wifi so it knows where I left off reading on my iPad, throw it into my beach bag and I’m good to go. The Kindle touch has the same size screen as the older Kindles, around 6 inches, but they simply removed all of the hardware below the screen where the keyboard used to be, so it’s even smaller with no sacrifice. Definitely something that solves a lot of problems for me.
 Now the sexiest device is the new Kindle Fire – a 7 inch tablet evidently based on the Blackberry Playbook hardware. That hardware was really nice, very responsive screen, same resolution as the iPad but at half the size the pixel density is actually doubled. They’ve taken the Android operating system and heavily customized it to make it Amazon-specific. They have built the PERFECT gateway to spend money at Amazon. think about it – you want to read a book? Here’s the Kindle bookstore. Want some music? Here’s the Amazon music store. Want some cool Android apps? Can’t go to the Android Marketplace, but don’t worry, we have the Amazon App Store for Android. Want to watch a movie? Amazon movies. How about TV shows? Amazon has that too! Magazines? Sure, Amazon has subscriptions for those too!
In one single step, they created what has taken Apple years to pull together. Apple started with just music and the iPod and those two things together changed the music industry. Then they added movies, books, apps, piece by piece. Amazon built all the pieces first, and then plopped in this beautiful little tablet to tie them all together. And then they priced that tablet at $200. A gateway drug if ever there was one. I think Amazon is brilliant and they’ll make a fortune.
Is this an iPad killer? No…but it may limit how low Apple can go into the market. People unwilling to shell out $500+ will have a way to continue that resistance by getting a Kindle Fire. Sure it doesn’t do half of what the iPad can do (no camera, no 3G, half the size) but if you’ve never had an iPad maybe you wouldn’t miss those things. Time will tell, but I think Amazon has a hit on their hands with the Kindle Fire and I think they’re continued progress on the e-ink models will draw in people like me – $100, why not?
Allister on Jettison
Hello Allison and the NosillaCastaways. Allister here from New Zealand again.
As I’ve just bought my first Mac laptop, a shiny new MacBook Pro 15”, I’ve had to begin adapting my habits that I built up in almost 5 years using an iMac. While I did on occasion move my iMac out of my study to the dining room table, it was something of a mission undertaken as a project rather than on a whim.
Now I frequently carry my MBP up to the lounge and sit in front of the TV with it. It sure is handy that all the ports are on the side so I don’t have to stretch my way around the back like the iMac made me do.
But herein lies a small problem to be solved. I’m a hoarder. No, that’s not the problem I’m trying to solve. Although… The problem I have solved is how to deal with all my external hard drives. At last count, including my Time Machine drive, I have 8 partitions on 5 physical drives. Hey! That’s after I consolidated! Don’t ask why I have so many. As far as I know, I have various forms of video on a couple of them and clones of old and new Macs and possibly clones of clones. It’s hard to say for sure!
 Anyway! Every time I want to “undock” my MBP, I have to unmount 8 partitions. Yes, OS X will let me unmount the 5 physical drives, but it’s still a pain. One step I took was to attach one of the drives to my Airport Extreme, as it contains the video I’m most likely to want access to when undocked. The solution I found for the rest is a small app in the Mac App Store called Jettison. For the princely sum of $1.99 (US) you get (another!) menu bar icon that gives you a small number of actions in a drop down menu.
The software’s party trick is that it is supposed to be able to automatically eject the drives when you tell your laptop to sleep. However, I don’t trust it on that score yet because the beep I told it to emit when completed only sounds after I wake up the computer again!
In any case, the other available options include “Eject external disks now”, which is the one I have been using with great success, “Eject and sleep now” and “Sleep now”. I’m thinking I may try the “Eject and sleep” menu option sometime, but only when I’m sure I am not going to corrupt my drives if it doesn’t work.
In short, although I’ve not proven the automated function of Jettison, it does provide me with a two-click method of ejecting all my external drives before closing the lid. It plays a sound when it has completed the task, which makes it easy to know when it’s safe to close that lid. Now I don’t dread the undock and I know my drives will be safe, if a little lonely.
Jettison can be found in the Mac App Store for $1.99 from St. Clair software.
I bought Jettison as soon as I heard your review, Allister! I’m not quite the hoarder that you are, but my external backup drive is partitioned into 2 or 3 drives and it bugs the crud out of me to eject and have it says “did you mean all the drives or just the one you pushed on?” I also hate remembering to unplug my iPod and iPhone before putting my mac to sleep. Inevitably I wake it back up. Thanks Allister!
ScreenSteps
This weekend Bart told me that he and Stu have decided to do another marathon International Mac Podcast, otherwise known as 12×12 – 12 guests in 12 hours. I don’t know what on earth possesses them to do such a thing, it’s pure insanity. In any case Bart asked me if I’d be up for doing one of the segments with him, and I thought that simple 50 minute commitment sounded grand. He asked me to think up a topic and right away I knew what I wanted to cover. I told him I’d like to talk about how to make really great documentation, to help out family and friends. I jumped at this idea because it’s such an easy topic for me. I can talk about ScreenSteps for hours on end, siting examples of where I’ve been a hero to someone, how I’ve impressed someone with my amazing talent at documentation, or where I’ve saved my own bacon because I had documented something complicated the last time I figured it out so I’d never have to figure it out again. I’ve created 121 tutorials for myself and others at home, and another 171 in my work life and that’s not even counting all the ones I’ve done with the new beta product Clarify. Think about that – I VOLUNTARILY wrote nearly 300 tutorials with ScreenSteps. Why on earth would someone do that to themselves? Well because it’s fun, it’s easy, and people will love you for it. I even agreed to do a 90 minute talk on this very subject during Mac Mania 15 – I wonder if they’ll be able to stop me at 90 minutes? You could even launch a second career if you learned ScreenSteps, there always seem to be job openings for people who know how to document. Head on over to ScreenSteps.com and download the free trial, and find out how for less that 40 bucks you can be a hero. If you want to give some feedback on Clarify, check out the free beta at bluemangolearning.com/clarify. when you DO buy ScreenSteps, be sure to tell them you heard about it here.
Dumb Question Corner
Jim Sewell has a dumb question for us today:
====================
Hi Allison, Here’s a dumb question for ya. Many times I am downloading files, pictures, you name it and I am given a Finder-ish dialog asking where to save it. In Windows you can navigate to any folder you wish, as painful as it is to trickle down to where you want, and then store the file there. On the Mac it seems I have to choose from the list of locations usually on the left side of a finder window. If I want to save it under Desktop/NewStuff I can’t… I only have the option of Desktop. Please tell me I’m missing something and the Mac OS doesn’t limit us to the folders it decides we should use! I am guessing I could add a folder to the Finder favorites that would show up in my download dialog but that requires premeditation – not something I am known for. 🙂
Thanks Allison! You’re the best! Jim
Jim and I had this conversation through email and I did figure out the trick. Now I love this kind of dumb question because as soon as I showed him the answer, it was obvious to him, so he was happy and I was happy. I explained first that if things are working properly, when you do a save-as, you should see the desktop icon in the left sidebar, and then navigate down into folders on the desktop.
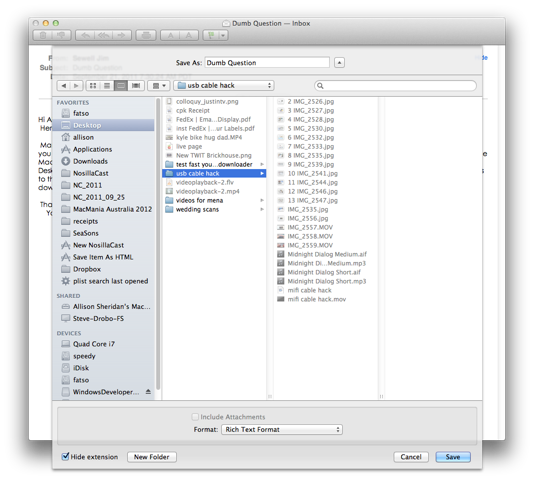
Since he wasn’t seeing that, I told him that sometimes when I do a save as I get a very minimal list, but there’s always a disclosure triangle on the right that will pop down a more complete version of the window.
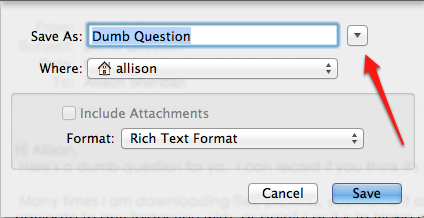
When I told him about that disclosure triangle he wrote back,
AHA! You are the smartest computer lady I know! (now he sounds like Professor Albert) I was seeing the 2nd version from your email and jumped to opening the where and was mentally “stuck” there looking for the solution instead of the (should be obvious by now after 3 years of owning a Mac) disclosure triangle one-level-removed. That’s exactly what I needed. I KNEW Windows wasn’t better than OS X in any way! 🙂 Thanks for saving my adoration for my Mac… you’re the best! Have an awesome day! Jim
And we have another happy ending to a dumb question.
Kirschen on Pester
Hello there Allison and fellow Nosillacastaways, Kirschen here from FreeRangeCoder.com and I have a software application review for you.
Do you need to time a hard boiled egg in the kitchen, where all you have is a MacBook Pro? Wishing for the days of OS 9 so that you could use the ever so handy Alarm Clock desk accessory?
So what’s the problem to be solved? You’d like to set up a timer to alert you when it’s time to do something, such as turning off the hose when watering the garden, or when your ratatouille is ready on the stove. You could fish out your iPod Touch or iPhone and set the countdown timer (sorry, but there’s no clock app on the iPad – bummer). But what if you needed to time more than one event? You could buy several iPod Touches, but… there’s an easier and less expensive way!
 I found the free (that’s right, free) Mac OS X application Pester while exercising a little Google-fu. Back then I was happy as a clam with my PowerMac G5, and I had a need for a countdown timer application so I could carry on working on my Mac while waiting for, say, the potatoes to cook.
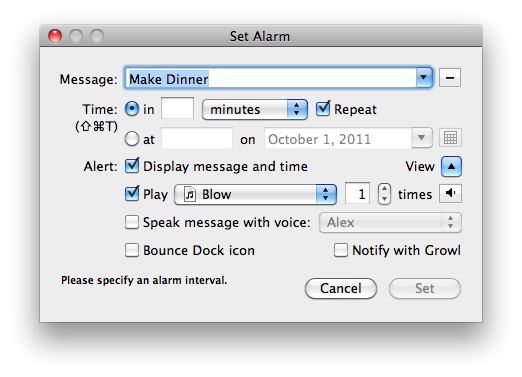
That’s how I found Pester – it’s a little unobtrusive application which puts up a very simple settings dialog box. You enter a short reminder message and the number of minutes from now (or hours, seconds, days, or even weeks!) – and Pester will put up an alert when the timer expires. That’s it!
 But wait there’s more – users who fondly remember Mac OSes from bygone days (remember 0.97? I do) will recall the Alarm Clock desk accessory. It has a little twist key on the right hand side which revealed more features – time, date, and alarm. That’s right, the Mac 128K from 1984 could set an alarm right out of the box while my sorta new iMac 27″ can’t. Fortunately Pester has the ability to set an alarm to go off with a message at the user specified time.
You can make Pester play an alarm sound, speak the alert message, even put up a Growl alert! It’s very flexible. More than one alarm? Not a problem! Repeating countdown timers? Doesn’t break a sweat. And I can recall previously used messages? Nice!
And did I mention it was free? Can’t beat that price!
Pester is compatible with Mac OS X Lion and can be used from Mac OS X 10.1 onwards (sorry, the three people who are still using 10.0, you’ll have to look for something else). There’s even a universal binary for 10.4 and later.
You can find Pester at Nicholas Riley’s website: sabi.net/nriley/software. Links in the show notes.
Once again, this is Kirschen from FreeRangeCoder.com and I’ll see you in the bitstream!
Thanks Kirschen – I love this! As Tim Verpoorten would say, Pester does one thing, and does it well. I downloaded it right away and set some alarms for myself. What a lovely little application!
Camtasia Studio 7
You’ve heard me whine about Camtasia Studio for Windows on the show before, but let me recap in case you’ve forgotten. Camtasia Studio is pretty much the only game in town for screencasting on Windows. On the Mac we have lots of choices – Camtasia Studio for Mac, Screenflow, SnapZ Pro, Screenium, like I said, lots of options. For some reason there’s a dearth of options on Windows. Several years ago I bought Camtasia Studio version 5 for $300 list. It was garbage. I had a list of problems a mile long, and I tweeted about it every time I had to use it. Eventually the folks at TechSmith got tired of my complaining and sent me a free code for Camtasia Studio 6.
Camtasia Studio 6 wasn’t a lot better. The kinds of problems I complained about included:
- voice and video got out of sync
- audio wave form would simply disappear, have to restart to get it back
- tracks in the timeline would slip, piling on top of each other
I actually could beat the tool into submission, but a 10 minute video would often kill the better part of a day.
I finally got tired of fighting with Camtasia Studio 6 and broke down and bought 7. Since I hadn’t bought 6 in the first place, that meant shelling out another $300 for Camtasia Studio 7. Now remember, tools like Screenflow are $100, and we’ve spent $600 so far. Heck, Camtasia Studio for the Mac is $100 too. See what competition does?
I’ve started using Camtasia Studio 7 and I have to say it’s a LOT better than 5 or 6. They did a major overhaul of the interface and the workflow is so much more intuitive and smooth. I found myself flying as I was editing in comparison to version 6. The layout of version 7 is significantly different.
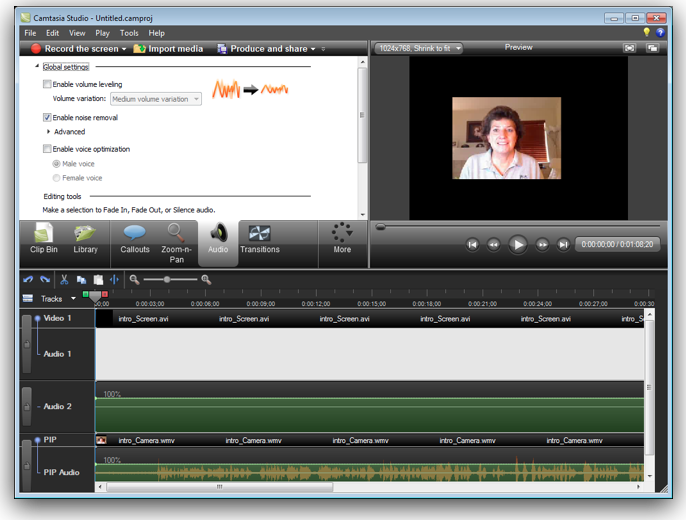 You still have the traditional clip bin in the upper left, you still have the video preview in the upper right, and you still have the timeline going in a straight line across the bottom. Not some stupid wrapping timeline like in iMovie, a straight line like God intended. The big difference is that there’s a sort of ribbon across the middle. Don’t think annoying Office 2007 ribbon, just a row of big, pretty, easy to recognize buttons. The buttons have big help things that come up if you hover over them as well. Not all tools are available in the ribbon but if you tap the “more” button it will reveal the hidden ones. Once you select one of those, it stays up and hides something else, so that whatever you use stays accessible to you. These buttons are the key feature that makes the workflow so much easier.
Let’s say for example you want to put in a callout – maybe a clever thought bubble to come in partway through the video and fade out again. In Version 7, you tap on callout, select the type of callout and all the options. you can then tap the button to go back to looking at the clip bin area again, or you can tap the plus sign to add another callout. In the old version you had to click Finished and go back in again. Since callouts tend to be something I tend to do all at the end, this saves me a couple of steps for each one, and it’s much more intuitive. For some reason I could never see that Finished button. Evidently it wasn’t just me who had trouble with it!
I’d like to go through some examples of what ted to drive me crazy in 6 that’s so much better in 7.
In 6, if you selected a region to remove in the timeline, you had to find the little scissors icon, then drag the remaining pieces back together. In 7, the delete key does the delete, AND it snaps the pieces together keeping everything smooth. I was able to cut some sections and it was unnoticeable that I’d done a cut. Every time I used the older versions of Camtasia Studio I instinctively tried to use the delete key and then swore under my breath when it didn’t do anything.
Lots of times you need to zoom in on a region in the timeline to look at the audio waveform to figure out exactly where to cut. (I know, Slau laughs at me because he edits audio blind for a living and has no idea why SEEING an audio waveform is important!) Anyway, to zoom in on version 6 you had to tap on a little magnifying glass over and over again, then the zoom out magnifying glass to get back out. With version 7 you still have that granular control but you also have a nice slider that’s way way easier.
A feature I used often in 5 or 6 was the volume up/down buttons within a selected region. They work great, but the only problem is that the icons are REALLY hard to tell apart from some other ones. Now there’s a volume adjust button in the ribbon and it shows the icons real big and says “volume up/volume down” in great big letters. I love that!
The audio waveform has a lot more information in it now – instead of just showing the wavy line, now there’s a 100% line that shows you if your audio is peaking so you can lower it. You can also add audio points and then drag them up and down to increase or decrease the audio levels within a clip. Again, that might have been there before, but visually it was obvious to me that I had this new capability. Really nice feature, not something you use all the time but man, when you need it, you need it.
I have to say overall that it’s way more stable than the previous version, but I still get the disappearing wave form problem. I created a video with about 7 separate segments, and one of them showed no waveform, but still played the audio just fine. Makes it hard to edit. I also had a clip get split somehow, and the small chopped off piece slid on top of another part of the video. Luckily it was on a separate track so I was able to just slide the two of them back where they belonged.
One problem I have recording on the Windows Laptop I have is that the machine generates a LOT of noise. The fan is on 100% of the time, and every mic I’ve tried picks it up. I’ve tried the Logitech 9000 camera mic, I’ve tried a Logitech headset mic, I’ve tried the Zoom H2, and they all have this lovely, rumbling hum in the background. I’ve taken to putting a notebook on my lap and placing the Zoom on top of the notebook in front of me to try and isolate it – it’s better but I can still hear it. I was in the Audio section of Camtasia Studio 7 and I noticed a reduce noise checkbox. I clicked it. In about 5 seconds it analyzed a section where I wasn’t talking, and then every single audio track and clip changed color. I clicked play, and the hum was completely GONE. Seriously – on an 11 minute video, it removed the noise and left my voice sounding perfect. Well, as perfect as it gets. Unbelievable. I wonder if the feature was there all along and I just never noticed it?
There’s one very odd thing about Camtasia Studio 7 vs. 6 – the text size of callouts behaves very differently. I usually record the beginning of my tutorials with me in picture-in-picture in the bottom right hand corner, with a text callout banner above my head, and one to the left. In the old version, the font size for the top one was 36, the left one was 28. Using those same font sizes in version 7, the text is WAY smaller. I bumped it put to 48 and 36 and it’s still a bit small but workable. I also noticed that the location designations for the pip are completely different (putting in the x/y coordinates). If my image is 640×480, I type in 640 for the x location, the pip pops to the bottom right where I want it, but then changes the number of 640 to something like 312. In fact, I have no idea why 640 is the right number, the screen is 1024×768, so shouldn’t I have to give it 1024 – 640 as the x location? It works, but I have no idea why.
Camtasia Studio comes with a tool called Camtasia Recorder, the application that actually captures your screen. This tool worked well, but if I leave it open when I put the machine to sleep, it crashes. Happened pretty consistently. Suppose I should tell them about that bug.
Bottom line time – Camtasia Studio 7 is now for the first time a respectable piece of software that allows you to create screencasts on Windows. I haven’t even touched the surface of many of the capabilities of the tool – transitions, subtitle creation, PowerPoint capture, the list goes on and on. I do still think that it’s overpriced, but with no competition in this space to speak of for a full video editor, I guess they can continue to charge $300 when on the Mac you can get a great tool for $100. I was so enamored with the new version of Camtasia Studio that I created two screencasts in one week for work, which I never could have pulled off in version 6 because of all the swearing and kicking of computers. Check out Camtasia Studio 7 at techsmith.com
Rod Simmons on Bowers & Wilkins C5 In-Ear Headphones
Link to full text at SimpleMobileReview.com
Thanks Rod – I’m pretty sure some of the listeners actually listen to music, so I bet some people will consider the B&W C5s. I’m so used to listening to mono 64kbps mp3 files, I wouldn’t know good audio if it bit me!
Smile
I think the company that makes TextExpander was very aptly named – they call themselves simply Smile. I was thinking today about why that’s such a great name – TextExpander makes me smile. Every time I don’t type out something, like when I type cca ; and out spits Chit Chat Across the Pond, I smile. I append my full signature to an email including my podcast tag line with sig ; and I smile. I enter a header 3 tag in html with , h3 and I smile. I type in end ; and about 12 lines of the end of the show spits out on screen…and I smile. I look at the stats in TextExpander and see that I HAVEN’T typed over 200,000 characters this year, and I smile at the repetitive stress I avoid. I even hear the little bloopy sound it makes when it expands a snippet for me and I smile. I look at the price of $35 for all this fun, and I smile yet again. Head on over to smilesoftware.com and check out TextExpander, PDFpen, and Disclabel so you can smile too – and be sure to tell them Allison sent you!
Chit Chat Across the Pond
Security Light
- Emergency Security Update for Flash – on the 21st of September Adobe released and emergency update to Flash to patch a vulnerability that is being actively exploited in the wild. For anyone using a reasonably modern version of Flash they should have gotten the update automatically by now, but anyone stuck on the pre-auto-update versions of Flash will need to got to Adobe and manually get the latest version –http://www.adobe.com/support/security/bulletins/apsb11-26.html
- Skype have patched their version for iOS which had a nasty XSS vulnerability that allowed attackers to steal your entire address book simply by getting you to read a chat message – the update will come through the iOS app store/iTunes – http://blog.intego.com/2011/09/28/skype-releases-ios-update-to-patch-cross-scripting-vulnerability/
- Convincing “Flashback” Trojan picking up momentum, and appears to be successfully exploiting many Mac users – http://blog.intego.com/2011/09/28/skype-releases-ios-update-to-patch-cross-scripting-vulnerability/&http://blog.intego.com/2011/09/28/flashback-trojan-spreading-mac-users-should-be-wary-of-flash-installers/
- Note on Recent OS X Password Vulnerabilities:
- The first vulnerability was the most serious, but affected almost no one as it only applies if you configure your Mac to authenticate off your LDAP server (and how many of us have LDAP servers are home!) –http://www.macnn.com/articles/11/08/29/hole.allows.any.password.to.be.used/
- The second vulnerability has been some-what miss-represented as allowing anyone to change any password – WRONG! It allows the password of the CURRENTLY LOGGED IN USER to be changed without needing a password. This is not good, but not catastrophic, you should never leave your Mac un-attended and unlocked, PERIOD, this is just one of a million other reasons never to give strangers unsupervised access to your Mac – http://www.macworld.com/article/162398/2011/09/lion_vulnerability_lets_attacker_change_user_password.html
- Side-note – The Register like to make the most spectacular headlines they can, IMO, often irresponsibly, I never believe anything I read on The Register until I see it verified in a trustworthy source – once bitten, twice shy!
SSL Followup – Convergence
To Mac users the name “Charlie Miller” is synonymous with “top-class Mac security researcher”, well, the SSL equivalent of Charlie Miller is a guy who goes by the name Moxie Marlinspike. He presented a fantastic talk at this year’s blackhat on his proposal for a new trust model for SSL that removes the reliance if Certificate Authorities. The talk is VERY approachable, and would be at a lower technical level even than the great Security Now podcast. You can watch the whole talk here: http://www.youtube.com/watch?v=Z7Wl2FW2TcA
Not only has Moxie come up with an idea, he’s also release a FireFox plugin that lets you free yourself from CAs TODAY! –http://convergence.io/
The idea is simple, you take the idea of keeping local copies of certs and checking for suspicious changes (as implemented by the Certificate Patrol plugin we talked about last week), and add a way to have confidence in the cert on the FIRST time you see it, which is where Certificate Patrol falls down. The additional idea added to the mix is that it’s easy to Man-in-the-Middle (MITM) one person or place, but HARD to MITM the entire world!
Instead of your browser trusting CAs, trust would be anchored in so-called Notaries. Each notary would run multiple servers all across the world, and those servers would look to see what cert they get, and if they all agree with the cert you see, then you can be confident you are not being MITMed and and that cert you are storing to trust in future really is safe to store and trust.
Anyone could run a notary services, and the EFF have already offered to run one! Users would choose to trust one or more notaries, and could revoke that trust without losing access to sites. Right now, every CA can compromise every website on the planet, and removing trust from a CA will kill ALL sites on the web that are authorised by that CA. No matter what a big CA does, it’s not practical to strip trust because then 20% of sites on the net would stop working! But with notaries, you can strip trust from one that you no loger trust without losing any functionality.
The big advantages are that no changes are needed on the server side for this to work, and the CA system can be included in the notary system by trusting a notary that uses CA authentication rather than poling to give your browser an answer.
It’s not all a bed or roses though there are some draw-backs:
1) your trusted notaries can see all the secure sites you visit, so they need to be someone you really trust not to spy on you (like the EFF)
2) the out-going calls to the notaries are likely to be blocked by corporate firewalls
3) this system CANNOT work for intranet sites, where traditional Certs will need to continue to be relied on
The nice thing is that this is a real, concrete, live technology that shows us that we are not trapped in the CA system, and that there is hope for a better future much sooner than I’d dreamed to predict two weeks ago!
Main Topic – Secure but memorable passwords
Some background first – Steve Gibson has shaken up a lot of people’s views about password security with his Password Haystacks project (https://www.grc.com/haystack.htm). The core idea is that it’s not about your passwords being complex, but about them being long. So take a bunch of dictionary words, concatenate them with a character of your choosing, and perhaps pad it out with some more copies of a symbol of your choosing on one or both ends, and make a password that is long, but easy to remember.
This concept was expertly communicated by this XKCD comic:
I was in the shower on Tuesday (this week) and it came to me that I should write a Perl module to implement this idea, so that I could auto-generate passwords for myself that would not be hard to type (ask Allison about my old wifi password), and would still be secure. So as soon as I was dried off I sat down and started coding. I had a workable Perl module a few hours later. Then I figured this might be something others would like to use, so I decided to release the code for free – and I mean free, BSD licensed, so even commercial software can use this code legally. Then I thought that I should go one step further, and not just release the code, but also make an interface to it, to allow anyone to generate passwords with it, without having to learn how to code themselves!

So, I put up a website, and I’m launching it right here on the NosillaCast – https://www.xkpasswd.net/
The core library had also been published on www.bartb.ie (or at least it will have been when the show airs), and expect some more tools from me over the next few weeks to bring this functionality to more users. I’m working on an OS X service, and perhaps also a desktop app.
That’s going to wind this up for this week, many thanks to our sponsors for helping to pay the bills: ScreenSteps, and Smile. Don’t forget to send in your Dumb Questions, comments and suggestions by emailing me at [email protected], follow me on twitter at twitter.com/podfeet. I contribute a fair amount over on Google Plus nowadays so just search for me by name if you want to circle me up. If you want to join in the fun of the live show, head on over to podfeet.com/live on Sunday nights at 5pm Pacific Time and join the friendly and enthusiastic NosillaCastaways. Thanks for listening, and stay subscribed.
Gaaaaah! Safari is insecure, Firefox won’t do Lion fullscreen and Chrome doesn’t use Lion’s typing enhancements (autocorrect, accented characters).
Also, Bart, look up the definition of “memorable”. I think you really meant readable or pronounceable.
Meaning to take absolutely nothing away from Bart’s accomplishment, I’ve always found the Password Generator built into the Mac OS X Keychain adequate. There’s several “types” (including memorable), and a slider to set length. Want to stick it in a haystack? Add your own hay. Or goose down. Or polyester fill.
@ Allister –
Disregarding my loathing of Lion Full Screen mode, I find Moom (an app you can buy on Apple’s App Store) a better alternative anyway.
It will essentially turn any App into full screen mode with one click, but it doesn’t hide the Menu Bar. Don’t know why I’d want to hide the Menu Bar, anyway. Doesn’t take up much space, and that’s where I have my clock and calendar, and more.
When Moom does its thing, it leaves your external monitor alone, thereby letting you (as I do) use both, which Lion doesn’t.
Moom also has a very handy feature I use a lot in Excel. With one click I it will put an Excel sheet exactly filling the top half of my monitor, with another it will put an Excel sheet exactly filling the bottom half of my monitor. Makes comparison so much easier. And helps enormously when I need to copy from one and paste in another.
FREE TRIAL of MOOM on Developer’s web site: http://manytricks.com/moom/
@George thanks for the tip. However, I don’t think Moom is for me. I don’t have much in my menu bar that I need to look at all the time – I’ve actually taken the clock etc out to save space. The difference between “making an app go full screen” and a true Lion fullscreen is that the latter puts it on its own desktop automatically. Firefox already sensibly reacts to the green blob in the upper left of its window to do ‘old fashioned’ fullscreen. I also no longer run an external monitor. Partly because I’ve learned to use Spaces/Mission Control and partly because I wanted to learn to do without so I could reclaim some of my limited desk space and also so I wouldn’t have to adapt when taking my laptop away from the study.