Reviews by me of the GRID-IT cable/gadget organizer from Cocoon Innovations, The MeshWe Bluefin holder for Apple Bluetooth extended keyboard and trackpad, and the Innergie 2.1Amp Pocket Cell Portable Pocket Rechargeable Battery and Charger. George from Tulsa talks about Disk Drill and Data Rescue as well as the free application GNU ddrescue and TestDisk all for recovering a disk just enough to wipe it before donation. In Chit Chat Across the Pond Bart reviews the Just-Mobile AluPen stylus, the open source, cross-platform Stellarium for astronomy from stellarium.org and RedShift, the premium Mac astronomy program available in the Mac App Store.

Hi this is Allison Sheridan of the NosillaCast Mac Podcast, hosted at Podfeet.com, a technology geek podcast with an EVER so slight Macintosh bias. Today is Sunday May 20th, 2012 and this is show number 367. I finally got a complaint that the show was too long – I was wondering where that upper limit was! I have thought it was getting tool long for a while now but since no one complained…Anyway I’m going to get the show back to the 1 hr – 1 hr 10min. Enough dilly dallying around, let’s get to work then.
GRID-IT
 When Steve and I were at Macworld | iWorld in January, I realized that I’d left an adapter back in my hotel room. I wasn’t terribly worried since I was at a convention literally filled wall to wall with geeks like me, all with Macs. I tweeted out asking who might have this particular adapter, and then had to laugh when Chuck Joiner of Mac Voices leaned over at the same table and said, “I’ve got one!” But what was more interesting than my dopeyness at using an international messaging service to find the person sitting right next to me in meat space was how he showed me that he had the right adapter.
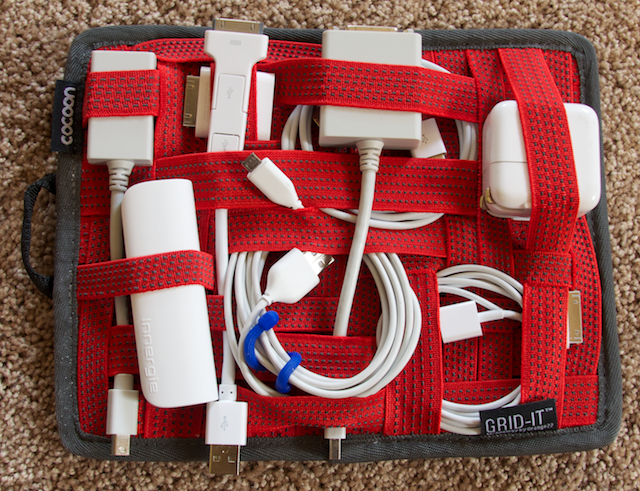
He pulled out a thing called Grid-It from a company called Cocoon Innovations. It’s a flat thing with these sort of stretchy ribbons that weave in and out of each other. The stretchy ribbon things are covered with little tiny rubber bumps on both sides. Ok, that description is dreadful, let me try from a different angle – what problem it actually solves. You’ve got a terrific backpack for your laptop, your iPad, your power cables, plus the tons of little cables like iOS cables, micro AND mini USB cables, iOS power adapters, not to mention all the min-displayport to hdmi/dvi/vga adapters. You reach into your bag and fish around for them, hoping the twist ties have held them together (they haven’t) and hoping you can pull loose the one thing you need (you can’t).
with the Grid-it, you simply weave these cables and adapters under the rubber bump-covered ribbons and they stick in place so that no matter how you shake it they stay in place. Even things like charger blocks stay still. The Grid-it comes in all different colors – lavender, blue, black, or the red that I liked best. They come in lots of sizes, from the small 5×7 I got for only $10, up to one that holds a 13″ Macbook Air with all your cables and adapters on the outside. I was showing the Grid-it’s to Bart and he found one for the iPad that goes in a sleeve and keeps all your cables organized in a side pocket thingy.
I put an Amazon affiliate link in the shownotes to the little 5×7 one I got that’s perfect for my day trips, I’ll probably buy a bigger one for big vacations too. You can also peruse all the options at cocooninnovations.com but be careful of the shipping charges – they wanted to charge him over 60 Euro to ship a $30 item! He got it through the UK Amazon store and it was free shipping. So…start with my affiliate link if you can! If you get one, let me know which one and if you used it for something creative – they show people using it for tools, holding multiple cell phones, even school supplies.
MeshWe Bluefin
One of the fun parts about speaking at conferences is that you sometimes get a schwag bag, and the one from Macworld is pretty good. Some of the stuff is super cool – like I got a copy of Parallels. I’m pretty greedy – I keep most of the stuff, but I bring some stuff in. This year I got something that sounded cool, but then looked lame. It’s called the MeshWe Bluefin. First of all that’s a pretty weird name, can you even guess what it is? It also came in a cardboard box that got smashed in my luggage so it looked even worse.
I got the Bluefin back in January and just this week I figured out that I love it. I guess we should back up and talk about the problem to be solved, right? Well that’s what took me so long to figure out. We have a Mac Mini in the family room that we don’t get as much use of as we hoped, but from time to time we fire it up to play with it. Here’s the problem though, it’s really hard to sit back on the couch with a keyboard in your lap but no place for the mouse. I bought one of those little laptop thingys for your lap that has a slideout piece for the mouse, but reclining on the couch makes the mouse slide and move the cursor. I’ve also become enchanted with the Magic Trackpad as I’ve mentioned before, and I don’t really like mice so much any more.
The Bluefin is a simple piece of molded plastic – molded to exactly fit a standard-side Apple bluetooth keyboard and a Magic Trackpad side by each. We got a bluetooth keyboard with the Mac Mini but we got it back before the trackpad came out so we got a stupid Magic Mouse (can’t stand it actually batteries seem to be dead more often than not. But when I got Steve his new iMac, I purposely ordered it with a Magic Trackpad thinking he would love the idea. But I was wrong, he hated the idea of using a trackpad – he loves his mouse.
So that meant I now had a trackpad to go with the keyboard and finally gave me an excuse to use the Bluefin. The keyboard and trackpad pop satisfyingly into the cylindrical slot and lay smoothly in the Bluefin. It feels like they were all made for each other. That’s a dumb thing to say – they WERE made for each other.
I laid down on the couch, put the Bluefin on my belly and I was able to navigate around the Mac Mini with ease, using gestures to zoom up when I couldn’t read the screen and even type without the whole thing wobbling all over. I think the Bluefin is designed for a desk, but on my desk I like the trackpad at an angle to the keyboard which is another reason I hadn’t thought to use it.
While the Bluefin is simply a piece of molded plastic, it does provide a niche product that you might really like, and for that it will run you $35. I’d like to have seen it priced cheaper than that, but if this does fit your need it might be worth it. I’m sure I’ll continue to use it, even though it has a silly name and comes in a flimsy box and looks even goofier when you take it out of the box, it really is making me happy in my family room. I put an affiliate link in the shownotes to the Bluefin MeshWe on Amazon so go check out the pictures there and you’ll be able to see what it looks like too.
ScreenSteps
This week my buddy Niraj messaged me that he’d figured out something really cool. He said it was complicated, but at least he got it working. I told him I was really interested in learning how to do it, and he said, “I’ll ScreenStep it later for you.” I replied to him and wrote, “you intend to, but you won’t.” He wrote back and said, “ok FINE, I’ll do it right now.” The good news is that in about 5 min he was able to take the screenshots of the process right after he figured out how to do it, so I know it will be clear, AND right. Now he didn’t yet do the next part of explaining each step and annotating the images so it’s clear what buttons to push. I watched a webinar recently by Greg DeVore of Bluemango Learning, makers of ScreenSteps and he showed what he does if he’s in a hurry and the instructions are just for him or his brother. He just uses the arrow tool to point at what button to push on each step. When you’re making tutorials for yourself or someone who’s familiar with the material you’re working with, this is probably just fine. I loved that Niraj’s instinct was to reach for ScreenSteps so he’d be able to capture the material quickly and get it back to me (with a little goading along the way by me). If you’d like to be able to create documentation quickly and easily head on over to BlueMangoLearning.com and check out ScreenSteps Desktop.
Innergie
 The whole field of untethered battery rechargers continues to be more interesting. I think the Richard Solo was one of the first – a device that plugs into your dock connector on an iOS device, giving it a charge boost in a rather precarious form factor. The Mophie Juice Pack and the Fastmac IV are big favorites, both are essentially like iPhone cases that make your phone bigger but give them a full extra charge. These are awesome for events like Macworld where you feel compelled to tweet all day long to annoy your followers. I favored the FastMac for a long time but they never updated for newer phone models, and when Barry Fulk, the nicest man in the world simply gave me a Mophie Juice Pack I was a convert.
Rod Simmons of the Simple Mobile Review Podcast recommended the i.Sound battery pack – which takes the award for worst named product in history since it has nothing to do with audio. That’s a giant battery pack with 16,000 mAh, enough to charge iPhones and Blackberrys and even iPads multiple times. I love mine, bring it on travel and often use it instead of hunting down a wall outlet if I’m only gone a couple of days. It weighs a ton but it sure is useful to keep at the hotel.
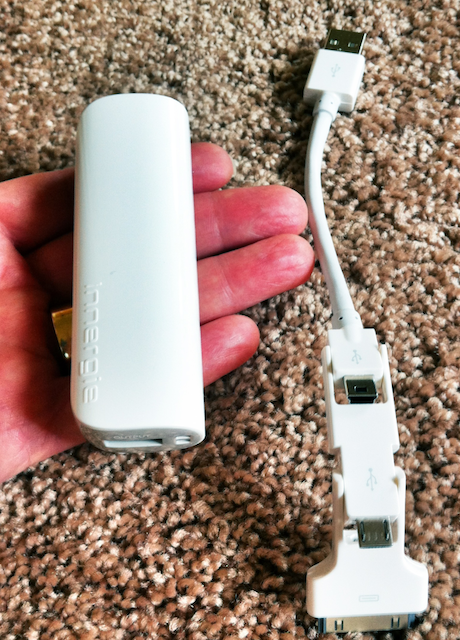
This week my friend Jennifer showed me a new battery source that really enchanted me. It’s called the Innergie 2.1 Amp Pocket Cell Portable Pocket Rechargeable Battery and Charger. That’s a mouthful of a name, so let’s call it the Innergie Charger for short. This is a very small white almost cylinder that fits in the palm of your hand. on one end it’s got a microUSB port, on the other end a full-sized USB port. It comes with Innergie’s patented 3-in-1 USB Cable with Mini USB, Micro USB and Apple 30-pin Connectors. Again with the mouthful. In more simplified terms, it’s a single cable with three connectors in line on the end, that sort of pivot out of the way to let you use micro, mini or the Apple Dock connector. That means with one cable (that doesn’t have a 3 headed chimera thing on the end) you can charge an iOS device, a BlackBerry or Mifi, or a device that take Micro-USB if you still have any of those around. Innergie sells this cable separately, a very nice thing to have all by itself even if you don’t need the Innergie charger.
On the side of the Innergie charger, there’s one button and when pushed it highlights four blue LEDs showing you the charge level. It’s not obvious but you also have to push this button to actually start the Innergie charging your devices. The MicroUSB end of the charger is how you actually charge the device itself. If you get confused, they politely typed Input and Output for you on the two ends. The Innergie charger feels great in your hand, weighs nearly nothing (6.4 ounces). The Innergie charger is a 3000mAh device, in comparison the Richard Solo is only 1800mAh and the hefty i.Sound is 16,000mAh. If those specs mean nothing to you, Innergie has a table to explain what you can do with 3000mAh on their charger. They describe it in how much you can extend the life of your devices. on the iPhone it extends talk time by 25 hours, extends iPad use by 4.5 hours (so not a full charge by any means), and a BlackBerry by 15 hours.
I’m delighted with the Innergie charger because I can have it with me at all times with it weighing nothing, and I know in an emergency I can add life to every device I carry (except my Mac I suppose). The Innergie 2.1 Amp Pocket Cell Portable Pocket Rechargeable Battery and Charger will run you $80 on Amazon or you can buy just the wicked cool 3-in-1 USB cable for only $20.
Turning iMacs into Boat Anchors by George from Tulsa
My daughter’s been trying to decide what to do with her six year old iMac. It’s a 20″ Core 2 Duo with high end video and a 2.33 ghz processor, in pristine condition, except that while the hard drive’s not quite bricked, it won’t boot.
I’ve replaced lots of hard drives over the years, but after a look at iFixit’s Guide to repairing this iMac, decided the job’s best left to an experienced pro.
Which I guesstimate would cost as much as the iMac’s worth. Since I sold my boat, I don’t need a new anchor.
Dropping the computer at Goodwill, or for a stranger to repair aren’t good options. The computer isn’t worth much, but think of King Tut’s Tomb, filled with forgotten treasure. That’s a computer hard drive, and in the wrong hands even a dead drive can enable a bad guy to steal its owners identity, bank, broker, and credit card accounts.
Enter ddrescue and TestDisk, two free Unix utilities ported to Mac. If you’re willing to read instructions and use Terminal, these programs will mine and recover any data on a dysfunctional but not completely dead drive.
After running, it’s worth a try to boot from a DVD or external drive and attempt a repair using Disk Utility. Or perhaps you’ll want to skip straight to Disk Utility’s Secure Erase. Then run ddrescue or TestDisk again to confirm it’s really erased so you can donate or take it to a shop for repair.
These are powerful utilities, not dumbed down, idiot proof, diaper protected applications like so many in Apple’s Mac App Store. Use with care! And check any downloads with an AV scan. They’re probably safe, but since they’re compiled from open code, there’s a small possibility a bad guy dropped in something noxious.
ProSoft’s $99 Data Rescue 3, reviewed by Shai Yammanee a couple of weeks ago, is a much more user friendly path to the same result. But probably not a good investment if you’re turning iMacs into boat anchors.
Nosillacast #363 with Shai’s Review
Ubuntu Guide to Data Recovery, applicable on Mac to ddrescue and TestDrive
GNU ddrescue (compiled) on Sinful iPhone.com
TestDisk Download on Macupdate.com
Disk Drill, a slightly cheaper commercial alternative to Data Rescue
ProSoft Data Rescue 3 (Google the net for cheaper sources!)
Chit Chat Across the Pond
Security Light
Important Updates and Patches in the last 2 weeks:
- Apple release iOS 5.1.1 –http://support.apple.com/kb/HT5278
- Apple release OS X 10.7.4/Security Update 2012-003 for OS X 10.7 Lion/OS X 10.6 Snowleopard (contains patch for the FileVault1 flaw)-http://support.apple.com/kb/HT5281
- Apple releases Safari 5.1.7 – automatically disables out of date versions of Flash –http://support.apple.com/kb/HT5282
- Microsoft release a critical update to Office for Mac –http://www.intego.com/mac-security-blog/microsoft-releases-critical-update-for-office-2008-and-2011/
- Adobe initially try to force CS5.5 users to pay for an update to CS6 to get security patches or “be careful” – forced to back down in the end –http://nakedsecurity.sophos.com/2012/05/11/adobe-photoshop-security/
Some token Security updates for OS X 10.5 Leopard:
- Apple release Flashback removal tool for OS X 10.5 Leopard – also disables Java (rather than patching it) –http://support.apple.com/kb/DL1534
- Apple releases Security Update 2012-003 for OS X 10.5 Leopard – disables out of date versions of Flash –http://support.apple.com/kb/HT5271
- None of these updates actually fix any of the known bugs that absolutely litter Leopard – they just block the most trivial vectors of attack, without actually dealing with a single underling problem. This is giving Leopard users an utterly false sense of security.
Main Topic – Potpourri of Little Topics
Mini Topic 1 – The AluPen from Just Mobile
- A chunky iPad stylus made of aluminium with a shape like a child’s pencil – a thick hexagonal cross-section with a black rubbery tip
- very comfortable in the hand, and absolutely ideal for manipulating the screen when giving a demo so you don’t block what you’re showing
- Also comfortable for free hand sketches
- Comes with a nice leather case holder to keep the tip safe in your bag
- xtand.net/alupen.html – €24.95 or $24.95
Tested diagramming etc using Paper by FiftyThree – a very simple app that mimics a paper pad nicely. Technically free, but, need an in-app purchase to get the nice pens. If you want everything, will cost you €5.99 – itunes.apple.com/ie/app/paper-by-fiftythree/id506003812?mt=8
Mini Topic 2 – Astronomy apps on OS X
When it comes to Astronomy apps, things have historically not been great on the Mac for anyone but beginners. This is because there is only one app I advise for beginners, and it’s free, open source, and cross-platform! It’s called Stellarium, and you can get it from stellarium.org/
Stellarium:
- Free app that lets you see what the sky looks like from anywhere on earth at any time from stellarium.org.
- App designed to run in full-screen mode, so UI is not OS-specific, and take a little getting used to – there are two semitransparent menu bars in the bottom left corner that are the key – find those and you’re away!
- This app is ideal for people who will be observing with just the naked eye, or with binoculars, but, doesn’t really have enough detail for people who will be using telescopes.
- Has a few quirks in OS X – you have to click in the VERY VERY centre of the close button in the HUDs, and scrolling is quite jerky and inaccurate – works best at the default zoom level
When you out-grow Stellarium things used to get difficult on the Mac. The best app you could possibly get was KStars from the KDE project over on Linux. This involved installing a Linux packages manager like Fink on your Mac, and then compiling most of KDE from source to get KStars, which you’d then have to run in X11 (which you’d have to get from the OS X install DVD), and launch it from the X11 XTerm. I did this for years, and I dreaded having to re-do it each time I got a new Mac!
The other option was to pay for Equinox, which definitely had a good database of objects, and could control a telescope, but, had an annoying UI, and was over-priced at about $60. Things have changed a little in that regard, you can now get Equinox from the MAS for €31.99 (itunes.apple.com/ie/app/equinox/id406854281?mt=12), but looking at the screen shots, the UI does not seem to have evolved much.
On the PC, the “creme-dela-creme” was always RedShift, and the great news is that it’s now come to the MAS for the excellent price of just €14.99 – itunes.apple.com/ie/app/redshift-astronomy/id515282894?mt=12
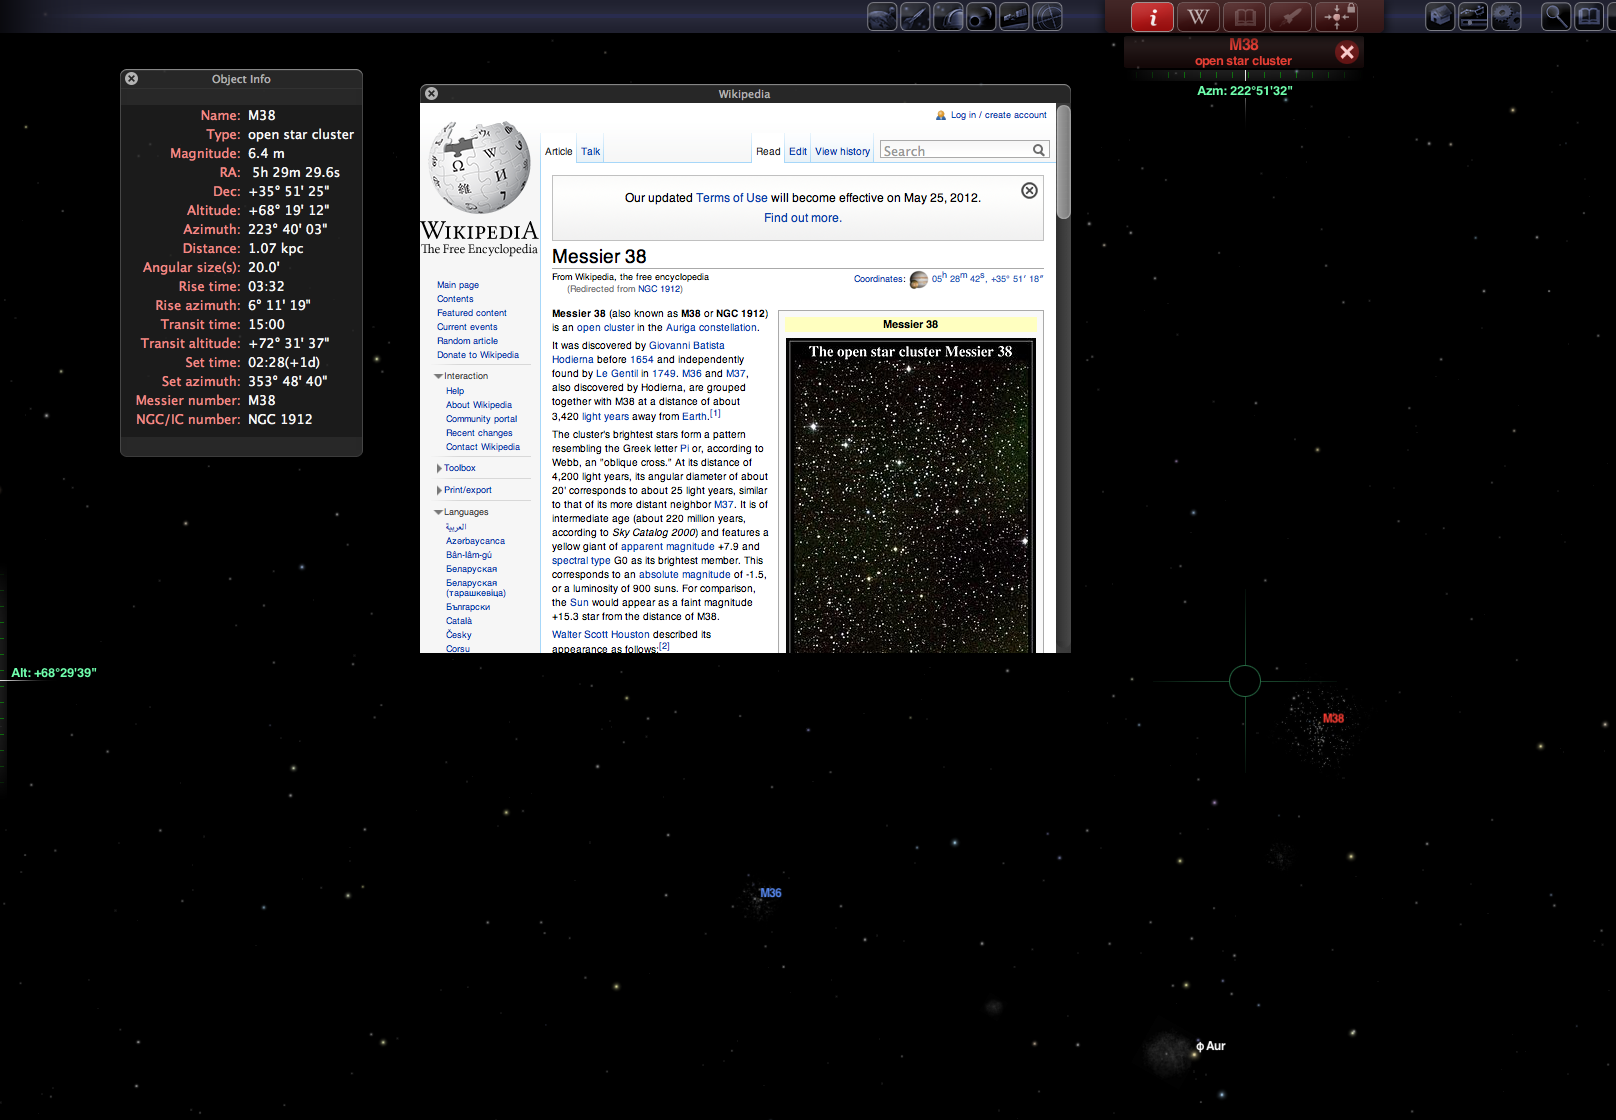
RedShift:
- Redshift has been around for decades – the first copy I bought cost about £100 (if memory serves), came on 2CDs, and was for Windows 95, and that was version 4!
- The graphics will just blow you away – being both breadth-taking, and very smooth as you navigate around the sky.
- The view of the sky you get is a hybrid of a map and photos, with the stars and planets being mapped, but the nebulae and galaxies being shows as scaled images. (see attached screenshot)
- Just grab and drag the sky to move around, and zoom in with the standard OS X gesture/mousewheel
- The Observatory button lets you quickly jump to an object you’re interested in
- Standard HUD gives you information on the object you have selected including rise and set times from your location, as well as position in the sky, brightness, and angular size
- As well as the standard HUD there is also a Wikipedia HUD which lets you read the wikipedia entry for the object you’ve selected right within RedShift (see screenshot attached)
- A massive library of stars and deep sky objects, with more objects coming into view as you zoom in, and then vanishing again as you zoom out (avoiding clutter). Also option to download more transient objects into the DB like comets, asteroids, and even manmade satellites.
- To avoid clutter, constellation lines are only drawn on the constellation you have centred – this gives a much cleaner feel than any other astronomy app I’ve ever used
- You can lock and object to the centre of the field of view, and then watch that object move as you scrub time forward/back (e.g. lock Saturn and watch it’s Moons orbit around it)
- Includes a sky diary with interesting up-coming astronomical alignments
- Contains built-in dictionary of Astronomical words and terms
- Has detailed globes of the planets – e.g. click on Mars, then the rocket icon, and you fly to it, and can explore mars in a very google earth way. (when you’re done you need to use the rocket icon on the far left to “fly back home”)
- Probably the best value for money I’ve seen in the MAS yet.

That’s going to wind this up for this week, many thanks to our sponsor for helping to pay the bills, Blue Mango Learning at bluemangolearning.com makers of ScreenSteps and Clarify. Don’t forget to send in your Dumb Questions, comments and suggestions by emailing me at [email protected], follow me on twitter at @podfeet. I contribute a fair amount over on Google Plus nowadays so just search for me by name if you want to circle me up. If you want to join in the fun of the live show, head on over to podfeet.com/live on Sunday nights at 5pm Pacific Time and join the friendly and enthusiastic NosillaCastaways. Thanks for listening, and stay subscribed.
Hey George, am considering the possibility of getting me a new laptop computer, and then donating the old one to my mom for her being able to use iCloud with her computer, along with Lion, Mountain Lion, and the like. Would the utils you suggest be good, or do you have an alternate suggestion? (This is for a decided non-geek, as she only got into the iOS ecosystem because of my constant nagging/urging/convincing/whatever.)
Thanks in advance George!
BJ
[…] Also AR (Augmented Reality) Astronomy app – free Stellarium for macOS, Windows, and Linux – recommended by Listener Bill on Episode #50 of the NosillaCast in 2006 (and later by Bart in Episode #367 in 2012) […]