Why I broke down and bought the Google Nexus 7 – my first Android device! Won’t get it till mid-July though so stay tuned. I presented Blindfolded to the South Bay Apple Mac User Group (SBAMUG) and this time it went flowlessly! Link to the video + slideshow. WillP (aka @beiju) came back after a long hiatus to explain how USB 3 can be backwards compatible. Rod Simmons of the Simple Mobile Review Podcast brings us another great review, this time for the Bowers & Wilkins P3 Headset. In Chit Chat Across the Pond Bart explains why to use a Circular Polarizing Filter, and suggests the Hoya HRT CIR-PL UV filter. Then he goes on to walk us through the experiments he did to find the best way to mount the Go Pro HD Hero2 for cycling video. Here’s a link to his video showing all the different options he tested: youtube.com.

Hi this is Allison Sheridan of the NosillaCast Mac Podcast, hosted at Podfeet.com, a technology geek podcast with an EVER so slight Macintosh bias. Today is Sunday July 1, 2012 and this is show number 373. When you hear what I have to talk about, you might call it an ever so slight Android bias actually.
Before we get into that though, I’m happy to say that my second rendition of Blindfolded! went even better than the first. On Wednesday I did it to a crowd of about 30 people at the South Bay Macintosh User Group. They were a fantastic crowd, laughed at my jokes, and seemed to really enjoy what they learned. I actually pulled off the actual blindfolded part of the demo without a hitch which was way more fun for me. I’ve embedded the video into the shownotes so you can view it there, and of course there’s an accessible link so you can listen to it too using a screenreader. There’s a nice slideshow at the end of the video thanks to Congolia Breckenridge who was nice enough to get some great shots with my camera during the talk.
Using a Screen Reader? click here
This week was Google’s developer conference called Google I/O. They managed to keep a live stream of the keynote going almost to the end, made me wonder why Apple can’t do that? maybe they don’t want to endanger the livelyhood of all the live bloggers out there? I got caught up in the moment and actually laid down a cold hard credit card to buy the new tablet from Google, called the Nexus 7. The Nexus 7 will be running the latest version of the Android operating system, the just announced Jelly Bean. Stats I’ve seen lately show that the current version, Ice Cream Sandwich, is only enjoying a 4% penetration into the Android devices, so sorta weird that it’s the old news already.
I should explain what compelled me to wander into the Android world. It’s actually Stefaan Lesage’s fault. Stefaan is a lovely Belgian who speaks English quite well, but he asked me if I’d proof read his review of the Samsung Galaxy S III smart phone. I was happy to oblige, I think I missed my calling, I could have been a professional proof reader. Unless they ever asked me to proof read my own stuff that is, my arrogance seems to keep me from seeing my own errors.

Then I got to work the next day and my buddy George had already received his Galaxy S III. I hate to tell you, but it’s even more beautiful in real life than it was in Stefaan’s description. It’s not a giant goofy phablet like the Samsung Note, but it is definitely big. It’s a 4.8 inch diagonal screen, which makes it 37% larger than the iPhone’s screen at a measly 3.5 inches. The S III is sleek and smooth and curvy. I have to say my iPhone looked old and clunky when I went back to play with it. The other thing was that the android OS itself was incredibly smooth and responsive. George hadn’t put anything on it yet but the stock apps flowed around on screen with instant reaction to my requests.
So what was I to do when Google announced the Nexus 7 tablet? I was powerless to resist as they described the quad Core Tegra 3 processor, a 12 core GPU (I’m going to have to become a gamer now I guess) and the 1280×800 7 inch screen. Sure it doesn’t have a memory expansion slot, and it only has a crappy 1.3 MP front facing camera, and it doesn’t actually have any of the features of the Galaxy S III that so entranced me, but for $200 I can jump into the Android world and get my toes wet. I always say that the people who win are those, like Knightwise who slide between all the operating systems with no religious attachment to any of them. But it’s very rare that I step outside of my Apple comfort zone and put my money where my mouth is! The Nexus 7 ships in “mid-July” so expect to hear more about the Nexus 7 when I get my hot little hands the new hotness! If you want to join in the fun, head on over to play.google.com to order yours.
WillP explains USB3
Hi Allison & Co. Will here. You probably don’t remember me, and that’s my fault, but I’ve finally broken radio silence to answer a question Allison had on the last episode about how USB 3.0 could be backwards compatible with USB 2.0 and even USB 1.1. My experience mostly comes from my attempts to get an external hard drive, USB hub, extender cable, ExpressCard to USB 3.0 adapter, and old 2008 MacBook Pro to cooperate, with a little bit of information from the internet to help.
By the way, as a part of that same upgrade project I upgraded my internal hard drive to a Momentus XT at the suggestion of fellow NosillaCastaway Leon Walsh. I’m really liking it, and would recommend it to anyone looking for some of the benefits of an SSD without all of the cost.
But enough of my upgrades. I’m here to explain why USB 3.0 is not only backwards compatible, meaning you can plug a USB 2.0 cable into a USB 3.0 port, but also forwards compatible, meaning you can plug a USB 3.0 cable into a USB 2.0 port. Both of those are important to making better standard without completely confusing users.
Most of the compatibility problem of USB 3.0 is resolved the same way as in USB 2.0, 1.1, and 1.0, so I’ll start with those. With them, the physical plug is exactly the same. The difference is in the transfer protocol, and therefore also in the controllers that translate to and from that protocol. There’s a controller at each end, which explains why both devices need to support the newer protocol in order to use it to pass data between them. The question of which device supports which protocols (because USB 2.0 chips also support the 1.1 protocol, and maybe even 1.0) is answered in the initial connection process. When the devices connect, each tells the other most modern protocol they know, and then they use the fastest one that both devices support.
USB 3.0 backwards- and forwards-compatibility incorporates this, but also has to deal with hardware changes. From the initial introduction of USB up through the 2.0 standard, the plugs have been exactly the same. There’s the outer metal housing, which simply carries power. Inside that, there are four strips of conductive metal which carry the actual data signal (technically, one of them carries ground and the others carry data). The advances in USB up until how have been in finding ways to use those same four pins to transfer data more quickly. Now, however, the 10x increase in speed that USB 3.0 provides requires more than just four pins — now there are nine (although one of the 5 new pins is for ground, meaning there are effectively eight pins).
The clever part is how the new pins are configured. Instead of having nine in a row, which wouldn’t fit very well in that small connector, they split the plug in half. The front part, closest to the opening of the metal housing on the male end, is the same four-strip configuration as in all previous USB standards. The back part, closest to the opening on the female end of the connector, has the other five pins. If both devices tell the other that they support USB 3.0, then they both use the extra four pins (four because one is for ground) to transfer the data more quickly. Otherwise, the newer device leaves its extra pins dormant and just uses the old ones, and the old device is none the wiser. This specifically refers to the most prevalent connector, USB-A, which is the type you see on computers. The USB-B plugs common on printers and USB-Micro-B plugs common on small electronics both added the new pins in a bulge that sticks out from the old connector. It’s structured so that it will be backwards-compatible — you can still plug an old cable into the new port— but a new cable is physically unable to fit into an old port, making it not fully forwards-compatible without an extra inexpensive converter piece. There are other USB standard plugs, but I haven’t looked into how they solve the problem.
This scheme is a clever way to make old USB 2.0 ports backwards- and (mostly) forwards-compatible with the new standard, but it does have a drawback. For you to achieve USB 3.0 speeds, every cable along the path needs to have those extra five pins. That means that as soon as you put an old USB hub, or even an old extender cable, in between the two devices your speed will drop to USB 2.0 levels. With previous revisions, since the connectors were the same, you didn’t have to worry about what was in between at all. Because the physical properties of each port matter now, and the differences are so hard to see (especially on USB-A’s male end, where the old-style four pins are in front), there’s an interesting non-technical part of the standard. In all USB 3.0 cables, the plastic inside the metal housing that holds the pins is a very noticeable blue. I’m guessing color was always part of the standard, because all the USB 2.0 cables I have on hand have a white plastic part, but it had never been important before. Now it’s an easy way to tell if you’re buying a device or accessory that’s USB 3.0 compatible (though I wouldn’t suggest buying something based on its plug color without checking its specs).
Long story short: Because of the USB 3.0 designers’ effort to make it as seamless as possible, you can get crazy fast speeds now as long as you can manage to coordinate everything in your chain of devices. If not, you can be blissfully ignorant of the new standard, mix devices which use different USB standards, and it’ll all work fine at USB 2.0 speeds until you upgrade something (a computer, device, or something in between) and suddenly you’ll be working at 10 times the speed — and still be blissfully ignorant of why.
Clarify
Two weeks ago I mentioned the awesome NosillaCast app that Donald Burr is writing for us, but I didn’t tell you very much about it. It will allow you to listen to the live show AND participate in the live chat room without having to launch a separate app. That’s something you can’t do today without it. You only have to put your login credentials in once, and from then on it auto-logs you in as soon as you launch the app. You can also see all the past full episodes and play them right from within the app. In the settings section, you can even turn on a feature he playfully calls, “annoy Allison mode”. That causes you to send a SAVE!!! message to the chatroom at intervals of your choosing. If you’ve been in the live chat you know why it does that, it’s because once or twice in years my machine crashed during the live recording and lost everything. The NosillaCastaways always remind me to save so it will never happen again.
I’m really excited about the new app, he’s put a lot of work into it already and he’s not done yet. While he’s getting it going, he’s asked people to help him test. He wanted to make it as easy as possible for people to understand how to download an app that’s not in the app store yet, and how to configure it. How do you think he did such a thing? Well of course he used Clarify from BlueMangoLearning.com! He took screenshots of his iPhone and imported them into Clarify, added some annotations to, well, clarify what the user needs to do, and then posted the PDF to his Dropbox account. He could have posted it to Clarify-it.com for free if he’d wanted and just sent out the link. I put a link in the shownotes to Donald’s instructions so you can see how great they look and how easy they make it for anyone who wants to join in the fun. If you want to buy Clarify, you can simply click the Clarify logo in the left sidebar at podfeet.com, or you can go to BlueMangoLearning.com and do some more research before you buy.
Rod Simmons – Bowers & Wilkins P3 Headset
Rod’s written review is available on the Simple Mobile Review site: simplemobilereview.com/bowers-wilkins-p3-headphones-review/
Chit Chat Across the Pond
Security Light
Security News of Note:
- Adobe are sticking to their guns and really killing flash for mobile – will not be supported in Android 4.1. and will be removed from Google Play store on August 15 –engadget.com/2012/06/28/adobe-confirms-it-wont-support-flash-on-android-4-1
- Opera gets the Do Not Track cookie – it looks like DNT just might get the traction it needs to succeed – intego.com/mac-security-blog/opera-update-fixes-vulnerabilities-adds-do-not-track
- Yet another example of why open Wifi is a BAD idea – if your network is open, anyone could be using it to do anything, and if someone does dosomething naughty, it will be your address the law comes calling to! – nakedsecurity.sophos.com/2012/06/29/swat-team-raids-wrong-home-wifi
- FaceBook users might want to have a read of this article about the dark side of the new @facebook.com email addresses all FaceBook users now have – nakedsecurity.sophos.com/2012/06/26/facebook-user-default-email-address/
- MountainLion will check for critical security updates daily – arstechnica.com/apple/2012/06/mountain-lion-likely-to-phone-home-daily-looking-for-security-updates
Main Topic 1 – Now is a good time to pick up a CP Filter for your DSLR
We’re getting into the height of the northern hemisphere summer (sorry Allister, Rose, Jane & friends down south), so the chance are good many of us will be taking some kind of holiday soon, and, probably, going somewhere pretty. When we go to some pretty place we don’t usually live, our instinct is to try capture it in a landscape photo, but, being summer, the likelihood is high there will be a high and bright sun illuminating the scene. This will have some negative effects on our shots:
1) every leaf on every tree, and every blade of grass will reflect the sun back at the camera, giving millions of small blown out highlights which will rob the scene of colour. You’ll see lush greens, but when you look at your shots you’ll be disappointed by the lack of saturation and vibrance.
2) the sky will not look as rich and blue in your photos as you remember it being
3) anything reflective will add glare to your shots
How can you tackle this? Simple – pick yourself up a nice Circularly Polarising (or CP) filter.
You don’t have to spend an arm and a leg, but avoid plastic filters like the plague! Also – be careful that you get one with the right diameter for the lens (or lenses) you’ll be using!
I picked up a 52mm thread Hoya HRT CIR-PL UV filter a few months back for about €50, and I’m very happy with it. You can some of the results I’ve been getting with it below:


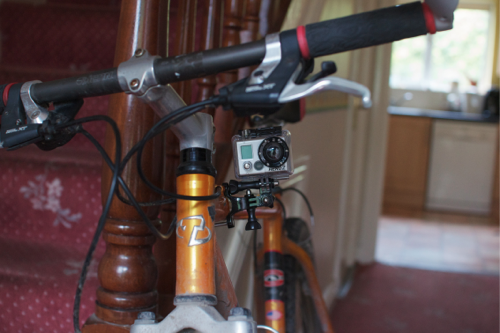
Main Topic 2 – GoPro HD Hero 2
I purchased the GoPro HD Hero2 Outdoor Edition a few weeks ago for ($299.99)
What is it?
- A small compact full HD video camera
- As well as shooting 1080p (and smaller formats), it can also shoot stills as single images, bursts, or time lapses
- It has a 170 degree field of view
- It comes with a rugged waterproof housing
- The camera is designed to be mounted on the massive range of GoPro adapters and mounts (letting you mount on anything from you to cars to bikes to surf boards and more)
- The camera ships in a number of editions, with different mounts included by default in each edition
This rugged little camera has so many uses it will take me months or even years to figure out all the uses I’ll have for it. For now, I’ve been focusing on getting the best cycling footage I can.
I’ve compiled a video, with examples, showing the various different things I’ve tried:
Using a Screen Reader? click here
I’ve experimented with three mounts:
1 – the head strap mount
(part of the outdoor edition, or available separately for $14.63 (Headstrap mount on Amazon)
Good – low vibrations and as good a sound as you can get through the waterproof housing
BAD – VERY disorientating, will make your viewers seasick!
I won’t be using this for filming on the bike – definitely a failed experiment!
2 – the Handlebar and Seat-post Mount
($19.39 – Handlebar mount on Amazon)
This mount is disappointingly plasticky, in hind-sight, the more expensive Roll Bar mount might be a better and stronger option – $29.99Roll Bar Mount on Amazon
I tried to use this mount in three ways:
2a – Video while “traditionally” mounted on the handlebar
Good – much less disorienting than the head strap mount
Bad – although it won’t make you sea-sick, the handlebars on a bike move from side to side a lot more than the bike changes direction, so when you speed the footage up it becomes quite disorientating
Bad – vibrations travel up through the frame of the bike giving both horrible road noise from the tyres (utterly blows out the sound), and even on a good road, you will often see rolling shutter effects caused by vibrations (making the scene look like it;s made of jelly) – if you speed up the footage that rolling shutter is not so noticeable
2b – Video while mounted sticking out to the side from the crossbar
Good – you can frame the shot with the handlebars, so you really get the feeling that you are seeing a video shot on a bike
Good – much more stable than mounting on the handlebar, the camera is always pointing where you are going, so much better for speeding up
BAD – you need to use a 90 degree converter to get the camera to stick out from the side of the crossbar, and that removed a lot of the rigidity, making all the vibrations much worse – the rolling shutter effect is unbearable, even on a good road. The sound is also just as bad as when mounted on the handlebars
Potentially bad – the camera is very low down, so the landscape you are cycling through is less visible, and can easily be blocked out together by high grass along your path
2c – Time-lapse while mounted sticking out to the side from the crossbar
Good – get the same pleasing framing as above
Good – the same great stability as above – works great at 12x real time (time-lapse shot every 0.5 seconds rendered at 24p)
Good – the time-lapse almost completely kills the rolling shutter effect
OK – since there is no sound at all, the horrible hum is gone
Bad – can’t be used for real-time footage, so slowest you can get is 12x real time
3 – Chest Mount Harness
($38.85 – Chest Mount Harness on Amazon)
This mount is surprisingly expensive, but when you get it it’s also surprisingly sturdy and well made
OK – I had expected the chest mount to be the most stable option, but it’s not – you bob around quite a bit when cycling, so although it’s OK at 1x speed, it does not work sped up at all
Good – you can see both arms and the handlebars, so you really get a sense you are seeing a video shot on a bike
Good – because your chest is high up, you get a good view of the landscape you are cycling through
Good – because your arms and legs isolate you from vibrations very well, there is no rolling shutter effect. The camera still bounces around as you do, particularly when you go off-road, but, it the movements are not sharp enough to give that horrible jelly effect.
Good – assuming you mount the camera well so that your cloths (or headphone cables) don’t keep banging off the housing, the sound is as good as it gets with the gopro (not saying much granted) – no horrible hum at all
Bad – absolutely can’t be sped up
Conclusions
- For shooting in real-time the chest mount harness is probably the best way to go – good view, clearly taken on a bike, no rolling shutter effects, and as good a sound as you’ll get
- For compressing time the handlebar and seat post mount attacked to the side of the crossbar and used in time-lapse mode gives the best and most stable results
Steve’s Pug Cam:
Using a Screen Reader? click here
I put a link in the shownotes to Steve’s Pug Cam video too because I know you’re just dying to see it, right? That’s going to wind this up for this week, many thanks to our sponsor for helping to pay the bills, Blue Mango Learning at bluemangolearning.com makers of ScreenSteps and Clarify. Don’t forget to send in your Dumb Questions, comments and suggestions by emailing me at [email protected], follow me on twitter at @podfeet. I contribute a fair amount over on Google Plus nowadays so just search for me by name if you want to circle me up. If you want to join in the fun of the live show, head on over to podfeet.com/live on Sunday nights at 5pm Pacific Time and join the friendly and enthusiastic NosillaCastaways. Thanks for listening, and stay subscribed.
Hi Allison,
Thanks for the feedback on my Samsung Galaxy S III review. I still have the device (I think for another week or so) and haven’t even looked back at my iPhone yet. The only time I use my iPhone is to start a timer in the Billings app, which is an app I use for my Time Tracking and Invoicing. Other than that … I’ve been using the Galaxy S III exclusively.
And … since the Samsung Galaxy S III … my wife seems to be getting interested in a smartphone as well. She never had that when I was using the iPhone. No idea what it is exactly, but I think the bigger screen makes a difference to her.
Regards,
Stefaan
You can buy step-up and step-down rings, that let you convert between different screw thread sizes. When I bought my CP filter, I bought for my largest thread size lens (my 70-200 f/2.8L IS USM which has a 77mm thread), then bought step-down adapters to fit my other lenses. Works out quite well, and the step-up/step-down rings aren’t that expensive (and they often come in sets with the most common sizes).
ooh! my 72mm Hoya CP fileter just arrived today – how do I find step down rings to fit my 52mm?
I like what you guys are up too. Such clever work and reporting! Keep up the excellent works guys I have incorporated you guys to my blogroll. I think it’ll improve the value of my site :).
[…] us how much fun he’s having with his circular polarizing filter, which we explained back in show #373. Then he walks us through his workflow and apps he uses on the Mac and iOS for reading RSS […]