 This story might be super old news to everyone else but the results surprised me so I’m telling it anyway. A while ago my buddy Niraj asked me for help with something. He had been tasked with helping at a work event where they wanted to be able to do impromptu video recordings of individuals using an iPad with a minimal setup. He wanted to know what software he should use to record and edit on the road with just the iPad.
I did what I always did and made him step back and figure out exactly what problem he was trying to solve. Was the purpose to make sure it was easy? Yes, it turns out Niraj himself wouldn’t be there, so it had to be dead on easy. He’d have maybe an hour to explain to someone how to rig things up when they got at the remote location. How important would audio quality be? I answered this for him – VERY important. We are highly tolerant of poor video quality but poor audio quality has us reaching for the stop button immediately. The good news was that there would probably be good lighting.
I figured if I was going to advise, I’d better test an idea or two. I had heard good things about iMovie on the iPad but my hatred of the interface on the Mac had held me back from ever trying it. I assumed he’d have to record in the camera app and then import to iMovie but I wasn’t sure, so I downloaded iMovie to my iPad and got to work.
I was faced with three options across the top: Video, Projects and Theater. Video immediately gave me access to all of the videos stored in my Photos Library which was pretty cool. Note that I NEVER use the camera on the iPad to take photos much less videos so these had to have come across from my iPhone syncing to my Mac and iCloud. I tapped on Projects and was invited to create a new Project by tapping the + button. From there I could choose Movie or Trailer so I selected Movie. That showed me eight templates across the bottom, one of which was CNN iReport which I thought could be fun for his needs. It has a red banner across the bottom, some nice fancy transitions and looks like a real news report.
![]() After choosing the template, I had two choices: to get video from the media browser (coming from my Photos app or iCloud Drive) or I could tap the camera icon and record right into iMovie. That’s good news, one less app for Niraj to have to explain to the person running the iPad at the event.
After choosing the template, I had two choices: to get video from the media browser (coming from my Photos app or iCloud Drive) or I could tap the camera icon and record right into iMovie. That’s good news, one less app for Niraj to have to explain to the person running the iPad at the event.
One of my goals in testing was to prove to him that the front facing camera on the iPad Air was dreadful and should be avoided at all costs. I set up my iPad on my dining room table where I’ve got good lighting and started to record. Would you believe it looked good? I don’t mean passable, I mean really good. Definitely good enough to be pasted into blog posts on the company’s intranet.
I figured the most we could ask of the person on site would be to trim the front and back of the video an then maybe “top and tail” it with some stock branding, and without reading any of the help files I quickly figured out how to do that. I tapped on my little recording and the familiar yellow trim markers from QuickTime were right there. I slid the back one forward a bit, the front one back a bit and boom, I’ve got a trimmed video.
I tapped on one of the folders of video in the media browser and it highlighted and showed a little down arrow. All by myself I figured out that meant to drop it down into the video timeline. As long as they remembered to load to their top and tail video assets onto the iPad they’d be in business.
When I dropped the 2nd video into the timeline, it automatically added a transition. I tapped on the little symbol and to my delight up popped six icons for six different transition options: none, theme, dissolve, slide, wipe and fade. I played around with the options to see what I personally liked but the important thing was that I determined it was trivially to figure out how to do it. No Clarify document required!
To complete the video project was the only confusing part – I guess I’m old school because I kept looking around for how to save! I finally tapped the back arrow in the upper left, and instead of going back to where I’d started, it took me to a screen where I could name my great masterpiece and then one of those share sheet icons (the box with the up arrow) that when tapped offered to put it back into iCloud Photo Library, put it in iMovie Theater, post to Facebook, YouTube, and more or save it locally, or email the movie. Sine the company he works for allows no cloud services for internal stuff, it was great to see the option for email. I know that sounds annoying and it is, but at least the option is there.
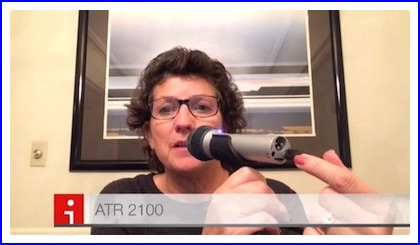
 Ok, next step was to convince him that he needed an external microphone. I created three recordings with three mic options to show him what a little bit of money would do for the video. I made one with the internal microphone which to my delight was as bad as I thought it would be. Next I tried my Samson Go Mic which is a little bitty mic that could clip on top of the iPad facing the person being interviewed. Finally I used the ATR2100 XLR/USB mic that I really wanted him to buy. It’s only around $50 so I figured he’d be able to afford it. The little Go mic did pretty darn good but the ATR2100 was clearly the best option.
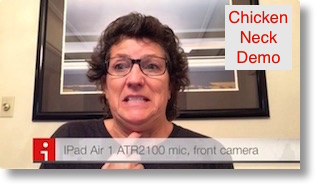
I decided to give him some unsolicited advice on how to do this. I suggested that to be kind to his interviewees, they figure out a way to prop the iPad up high, hopefully at eye level. The worst thing in the world is chicken neck looking down at these devices. I also suggested that they put a red dot sticker on the iPad near the camera so people knew where to look.
I ended up torn on whether to use the front or back facing camera. The advantage of the front facing camera would be that the person being interviewed (who would be standing) would be able to tell if their face was on screen and keep them from rocking or wandering out of view. The downside is that it would probably be WAY more intimidating to be looking at themselves on screen while talking. The good news was that if they had good enough lighting they’d look great.
The surprising things I learned doing this was that while this sounded like a really hard thing to execute on the road, iMovie for the iPad was definitely up to the task, easy to use and required very little skill on my part. I bet the iPad Pro will be awesome for this kind of work. I was very happy to see that the front facing camera would be up to the last, and thought it was a really fun project to work on. Oh wait, I don’t work there any longer, do I?