 This week I’ve been working on another screencast for Don McAllister’s ScreenCasts Online podcast. I thought it might be interesting to walk through the process I use to create these, including what I’ve learned from Don. There’s really a lot that goes into making a screencast so I thought it might be fun to get a peak under the curtain.
1. Figure Out What to Review
The first step is to figure out what to review. I start this process about 2-3 weeks before the due date. For a broad-based podcast like ScreenCasts Online, it’s important to make sure that a large percentage of the audience would be interested in learning the tool you want to teach. I have a lot of really awesome apps I use all the time that only 2% of the audience would find interesting. I usually start by flipping through Launch Center to remember all of the apps I have loaded. I think this is the only thing I ever use Launch Center for!
The next problem is that I have a very poor memory for what I’ve already considered teaching so I jump over to Evernote (using a really nice interface called Alternote) where I have a list of apps I’ve considered and those I’ve rejected to remind myself why I didn’t ever do it. Once I’ve got an idea, I jump over to ScreenCasts Online and do a search to make sure that Don didn’t already do it, or at least did it so long ago it’s worth another look.
Final criteria is whether there’s enough meat on the bones to fill a 30 minute show effectively. This is where I often get tripped up because I find that I’m a fan of one-trick pony apps, not giant, complex apps. Many of my screencasts are montage episodes so I can squeeze in a couple of cool tools. I like those kinds of shows more myself too because I bore so easily if I hear too much about one app! Of course then I get approval from the boss.
2. Create an Outline
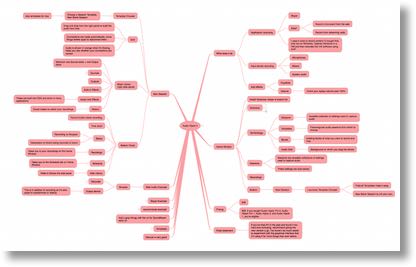 Now I’ve got my idea, it’s time to start noodling an outline. I start this no less than 2 weeks before the due date. I wish I was a linear thinker, but I apparently am not, so I launch iThoughts X from Toketaware.com on my Mac and start up a mind map. I love doing it this way because I can jot down a feature, then something about a menu item, then throw in a use case, and jump all over the place with my ideas as they come to me. I also love doing it this way because if an idea for the show comes to me when I have my iPad or iPhone in hand I can still jot them down because iThoughts syncs across devices beautifully via Dropbox. I start this so early because I need time for the ideas to come to me. At the end of this part I simply rearrange the little bubbles to make sense in a coherent order, unlike the jumbled way I think them up.
I’ve learned from past experience that it can be very useful to give the developer a heads up that you’re about to create a screencast of their product. The biggest reason to do that is you don’t want to find out AFTER you’re deep into it, or worse yet completely finished, that the tool is getting a major release next week. The other big reason I like to give the heads up is to ask them to please be available for emergency emails if something goes wrong. That has come in super handy when something doesn’t work just right or when I can’t figure out how something should work. Definitely worth the few minutes it takes to fire off an email.
3. Get Tools Ready
Don likes a consistent look across his shows. One piece of that is that I had to create a second user account simply entitled ScreenCastsOnline. At the very least this means you won’t see some dorky user name in the menu bar when I’m recording. He has a branded desktop image so I apply that to the account. I use Dropbox to store the files while I’m working because I need to be able to access them from my main user account and from my ScreenCasts Online user account. I tried other methods – I used the Public folder on one account but ran into more permission problems than I could count, I tried iCloud Library but that got messy too. Finally I buckled down and paid for Dropbox so I could store these huge files along with the auxiliary files use in creation of the tutorials.
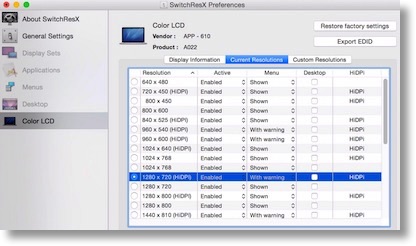 Don has done a lot of experimenting with screen resolutions over time and he’s discovered that the best experience across devices including the retina screens is 1280×720 1600×900. The best way to achieve this resolution in the end product is to set the display resolution to 1280×720 hiDPI 1600×900 HiDPI while recording. Apple’s Display preferences doesn’t let you choose that though, so we use a tool called SwitchResX from madrau.com which gives you access to a a plethora of resolutions.
I can’t stand working in this mode though because everything is giant on screen so you can’t really see anything side by side. My method for getting around that problem is that I use my MacBook Pro monitor for the screen recording at 1280×720 1600×900, and my Apple Cinema Display at full resolution for all of my editing work while I’m recording. That seems to work pretty well.
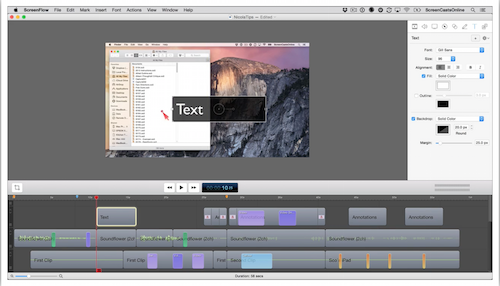
The most crucial tool for doing screencasts is ScreenFlow from Telestream.net to actually record the screen. You can talk to me about other tools but there’s nothing like ScreenFlow for doing really professional screencasts. Don did a set of videos on how to use ScreenFlow and it was a fantastic reference guide for me to get up to speed. He revealed things in ScreenFlow that I never would have found, like the fact that every element on screen is on a separate layer so you can for example, highlight a window by itself or just increase the size of the mouse pointer.
With some prodding, I got Don to send me a template file to start with. This again is a crucial part of the consistency between tutorials. He has his intro music for each section, a little “bug” that stays on screen in the bottom right for branding, he has a particular font and a background rounded rectangle for urls. It might seem restrictive to have to use these elements but it actually makes it much easier because I don’t have to design these elements on the fly.
Don taught me about yet another tool that’s crucial for screen casting, and that’s Moom from manytricks.com. This tool lets you set your windows the way you like them and then at any time get them back to exactly that position. If I was better at this, I could do a whole screencast in a single session but it takes me days to get these done so I’m in and out all the time and if the window doesn’t come back EXACTLY to where I was before, you would see a jump in the video and that’s really unprofessional.
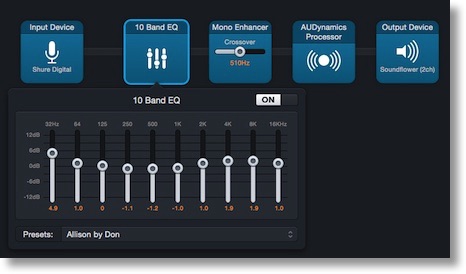 At Don’s suggestion I’ve added Audio Hijack into the mix to improve my audio. He had the audacity to add a 10 channel mixer to enhance my voice after the fact, so I thought why not put that in my workflow on the front end. Audio Hijack lets you share sessions, so Don just gave me the one he’d used for me with my audio set the way he likes it in the equalizer. So I launch Audio Hijack, and launch my stored session and sometimes even remember to choose the preset for the equalizer that Don created! I added into the session an Audio processor that cuts out the bird sounds at my house too.
I’ve now switched to my 2nd user account, launched the template in ScreenFlow, launched Audio Hijack, started hijacking my audio, launched iThoughts X to see what I’m supposed to say…but there’s more on my checklist. I have to look at this list because I ALWAYS forget something if I don’t.
- Turn down the intercom so the doorbell doesn’t ring
- Unplug the landline phone so it doesn’t ring
- Put my phone in do not disturb so it doesn’t ring using the easy glance from the Apple Watch
- Take the collar off the dog so SHE doesn’t ring
- Put the Mac’s notification center in do not disturb so IT doesn’t ring
- Set the MacBook Pro as the main screen by dragging the menu bar to it in the Displays preferences (otherwise when I open windows while screencasting they’ll open on the wrong monitor)
4. Record the Screencast
Starting to record is the single hardest part for me. I can come up with every excuse in the book to keep myself from starting. Wow, look at the time, must be time for a snack? I bet the dog needs to be walked? I really should fold the laundry you know… Starting can take from 1-3 days.
When I finally start to record, I start with the introduction bit where I explain to the audience what problem this tool will solve. The early outline is critical to this step because if I don’t have that ready I won’t be able to explain with enthusiasm why this tool should be in their toolbox.
![]() One of the fun parts is tracking down the logo to put up on screen. First you find the application in the Finder, and right click on it and select Show Package Contents. Every application is actually a package that you can open up and find goodies inside. Dig in far enough and you’ll find the Resources folder, where you’ll find the images and other bits and bobs used to make the tool interface. One of those files will end in the extension .icns which is the icon file. Make a COPY of that file somewhere else on your disk and then open it up in Preview. You’ll see a whole bunch of versions of the image for different uses, one for when it’s clicked, smaller versions, so select the version you want and export it as a png or jpg file. Now you’ve got a beautiful, high res icon to show in the video.
One of the fun parts is tracking down the logo to put up on screen. First you find the application in the Finder, and right click on it and select Show Package Contents. Every application is actually a package that you can open up and find goodies inside. Dig in far enough and you’ll find the Resources folder, where you’ll find the images and other bits and bobs used to make the tool interface. One of those files will end in the extension .icns which is the icon file. Make a COPY of that file somewhere else on your disk and then open it up in Preview. You’ll see a whole bunch of versions of the image for different uses, one for when it’s clicked, smaller versions, so select the version you want and export it as a png or jpg file. Now you’ve got a beautiful, high res icon to show in the video.
Now we start the really hard part. I normally do screencasts on products I know and love so I know my material cold but you’d be surprised how many dumb little mistakes you can make in what you say and what you click on. Have you ever noticed for example how you find something in a menu? If you’re like most people, you scroll down past the item, back up and then back down to it. Every. Single. Time. Well on a video you look like an idiot doing that.
How many times do you say something like iBook instead of Macbook or iWatch instead of Apple Watch? Or how about megabyte instead of megabit? All of these things are unforgivable. If you were creating a video with no audio, you could just pause for a few seconds and start up again and just cut that part out. Same is true with audio, but if you’re doing both audio and video at the same time, you have to back up enough and get the screens exactly as they were before and figure out where to start the audio back up. Drives me nuts! I can take 5 cuts at a 1 minute of video sometimes!
One trick I have learned in doing this is that if you bork up a word (that’s a technical term), simply pause for a heartbeat or two, and then repeat what you said starting at a natural spot. When you drag the recording down into the timeline in the editor the heartbeat wait you did gives a visual clue so you can see where to cut the video and audio. Of course you can stop recording and start over, but after a while that gets real old and you just want to get moving!
Another tricky bit is transitions. Lets say you spent 4 hours recording 11 minutes of video (I’m not exaggerating here), and you look back and realize that there was something different between the end of one segment and the beginning of the next. If it’s not too bad, you can do a transition that fades between the two. It’s still there but it changes so subtly that it won’t bother anyone. There’s a trick to doing this though. The transition can only be on the video track, which means you have to beginning of the audio in one of the clips over the transition. This sounds harder than it is, but it’s important to leave yourself a second or two of silence at the beginning of each recording just in case. I often forget to do it and I kick myself every time.
Whenever things change a lot on screen, especially intentionally, a page curl transition looks really nice. If you bang the two video tracks up against each other and just apply the page curl at the front of the second clip, you’ll see black on the back of the page curl. Again, cut off a second of the front of the audio on the new track you’re laying in, drag the video (and audio) over by a second so the video overlaps but the audio doesn’t, and change to a 1 second page curl and instead now the back will be the image of the page instead of black.
Another thing Don likes to give people are chapter markers. This means that after you’ve watched a tutorial all the way through, when you go to use the new tool yourself and you get stuck, you can jump right to the chapter where that bit was explained. Adding chapters in though is harder than it sounds. It’s easy to drop in a marker, but when you inevitably slide the video right and left at the end of production, the markers don’t move with the video! I secretly hate putting in the chapter markers so I hope you guys appreciate them!
There’s a ton of little tricks Don has taught me over the last year on how to do this right, and I thought you’d enjoy learning just a few to show you the kind of detail that goes into each show, even if it’s just 30 minutes long. This is why I usually do an audio podcast!
I should mention that I wrote up this article as a way to procrastinate from working on that video I owe to Don…
Allison,
I ended up doing some screencasts for a web site as well as a live presentation, using Screen Flow of course. Mine are much shorter than yours or Don’s, but for short ones, I used the following workflow, which worked well for me:
– Write a script with everything you’re going to say and hints about what should be going on on the screen.
– Record the audio only, in my case with Garage Band, making any corrections in the audio world alone.
– Start Screen Flow and record the screen only (no audio) while playing the audio back from Garage Band or Quick Time Player or iTunes, if you’ve exported it.
– import the audio into Screen Flow and line it up with the video (this only needs to happen once).
– Voila
I found this was a shorter workflow for me than trying to talk while recording the screen because I couldn’t seem to go more than a minute without screwing up the audio. Your suggestion about pausing and starting again is also a good one. I like my workflow because I can craft what I’m saying ahead of time.
Anyway, this is just another workflow. Yours sounds fine, and your screencasts are terrific and a lot longer than the ones I’ve done.
If you’re interested, you can see a 2 minute video I did with Screen Flow on the home page at http://www.formulaforge.com. It’s really a marketing video, not a screencast, but I liked how it turned out.
Thanks for all the great stuff you do (podcasts, blog, screencasts, etc.), too numerous to count.
What a great article, Allison. I own Screen Flow and have been meaning to do some screencasts for my podcast listeners, but I still find it a little overwhelming. This article is really helpful in laying out your steps.
Laura
George – that’s an interesting workflow. I have thought about doing it that way, but I bet I couldn’t accurately predict/remember what the software is going to do on each step unless I was following along while writing. And getting the timing right would be hard, what if I spoke a section quickly and it took a while for the software to catch up? I liked your video, and the tool sounds pretty cool too! I’m an Excel nerd so it’s right up my alley. And thank you so much for the kind words about the work I do, it’s fun but I love a little pat on the head for it!
Laura – if you ever want any help with it let me know. I’m not the master that Don is but I do muddle through! My goal was to scare everyone away though…
VERY much like what I do with my online lecture videos. Great minds, eh? Then again, I too was inspired by Don and his work over at ScreenCastsOnline, so the influence is shared. By the way, thank YOU for your own suggestion to me to add AudioHijack into my workflow. My latest videos have had much less worry about background noise thanks to that critical piece.
I really enjoyed the well written post, Allison. Thank you!