Hi there, Castaways! Terry Austin here, online professor since 2012. Way before the pandemic.
Let’s talk about a problem to be solved that I deal with pretty much every day. Making videos for my online class. Many of these videos involve taking my students, or other faculty I that consult with on video-based tours of websites.
My daily workhorse monitor is an HP Envy 34” Ultrawide curved display, which usually sets to the right of my 2020 16” MacBook Pro.
This beast of a monitor has a 21:9 ratio with a resolution of 3440 x 1440.

Sitting in front of this screen is, frankly amazing, but to try and watch a video in that format at full resolution would be painful. It’s really wide and short and all the fonts are tiny in a video shot in native format.
So in comes PixelSnap…. For all of you SetApp users, PixelSnap is part of the gang, load it up and give it a spin. If you’re not a SetApp user you can still get PixelSnap. Easy to remember, just to getpixelsnap.com For a single Mac it’s $39, which makes me appreciate SetApp that much more.
Let’s get to business though and was through how this works
As I prepare to shoot a video, I open the web page (or app in a window) I want to shoot anywhere on my screen.

I then open PixelSnap and issue the “Find Dimensions” command which gives me a crosshair cursor. I move that cursor to the top left of my browser (or app) window. Personally I don’t want the navigation bar from the browser in the video so I go just below that to the main part of the web page.
From there I click and hold the mouse and start dragging. A pale red rectangle appears and in the center, I see an ever-changing resolution indicator that changes as I continue to drag.
Once I have the rectangle to precisely the resolution I want for my final video. For me, that’s usually 1920 x 1080, but it could be anything you want, I stop.
Now the magic starts. With the keystroke “CMD SHIFT F“ the translucent red rectangle freezes in place I then grab the corner of my webpage and drag it to match precisely!

I then go back to the menu bar and tell PixelSnap to “Clear All” and the red rectangle goes away, leaving me with a perfectly sized webpage, ready for recording at exactly the resolution I want for my final video!
From there I’m ready to fire up my favorite video recording app, which for me is Screenflow, in the reassurance that the area I’m interested in is precisely the right resolution for my final video.

And there you have it, problem solved. It makes no difference what monitor I’m working on, or how unwieldy it might be for the final viewer. I know their video that they’re going to watch from me is going to be scaled exactly right for them.

Allison here – I was so intrigued by Terry’s description of PixelSnap that I downloaded it from Setapp to see for myself. I want to add a caveat to his review and add a little bit more about the app I discovered. Terry’s monitor, as he said, is 3440 x 1440 which is not a 4K display nor is it what Apple calls a Retina display. It’s huge and perfect for him, but if you try to use PixelSnap to do what Terry did using the internal display on a MacBook or using a 4K display you won’t get the same results. Back in OS X 10.9, Apple started using a technology called pixel doubling.
Enabling pixel doubling simply draws every pixel in the desktop as a 2×2 block of pixels on the screen. This makes everything exactly twice the size. Without pixel doubling, everything on a 4K or Retina screen would be wee tiny, especially the menu text.
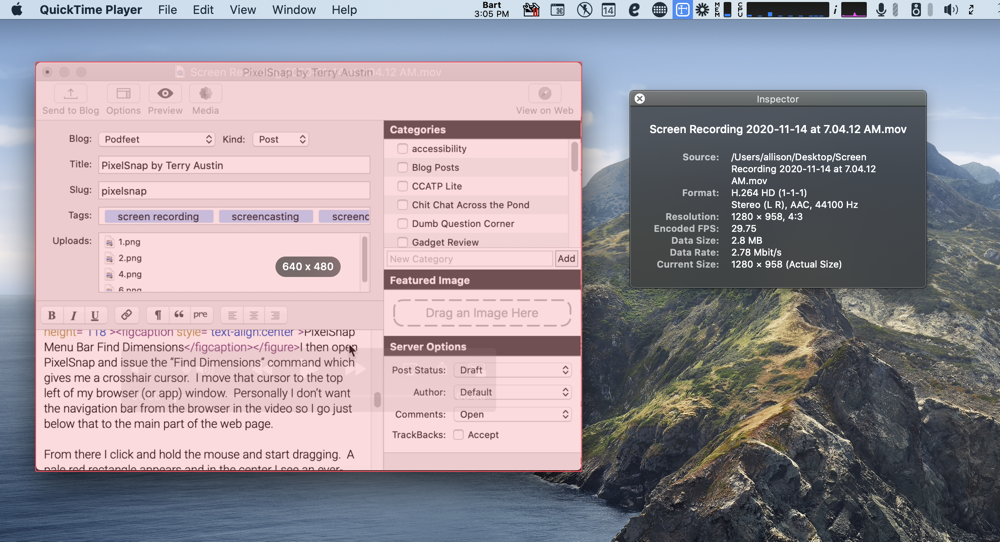
The reason I bring up pixel doubling is that if you follow Terry’s instructions on a Retina or 4K display, you get a video twice the size of what PixelSnap said you were capturing. I tested PixelSnap by creating a pink box that was 640×480 on my 16″ MacBook Pro, and then dragged my window over the box and recorded just that window. The resulting video was 1280×960 instead of 640×480 (oddly QuickTime says 1280×958 so a pixel got dropped along the way).

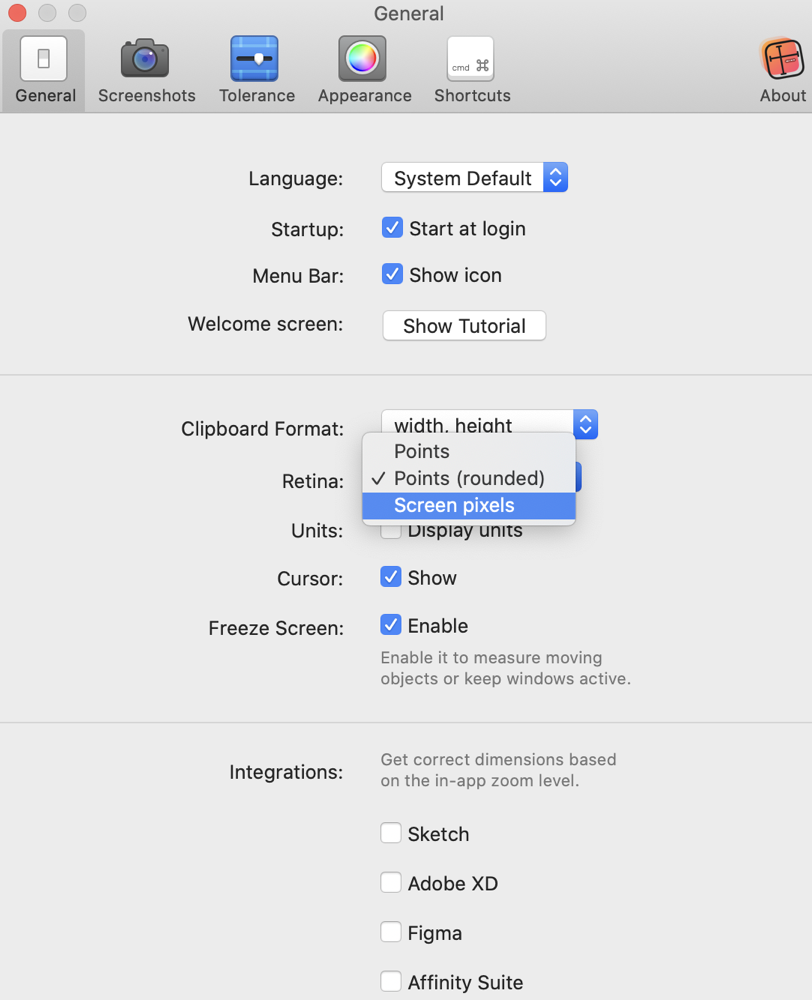
At first I was dismayed thinking PixelSnap wouldn’t be as useful as I hoped, but I gave a poke at the preferences and found a setting labeled “Retina”, and the dropdown next to it is is defaulted to “Points (rounded)”. I’m not sure what rounded means, and there’s a non-rounded option of Points as well, but there’s also an option for “Screen pixels”.
If you’re using a retina or 4K display, simply change the recording to use Screen Pixels and you’ll be able to correctly match your recording area to match your desired output recording dimensions.
Terry’s “problem to be solved” is quite clever, but I think PixelSnap’s main purpose is to allow you to measure things onscreen. For example, as a web developer, you may find times where things aren’t lining up quite right and you’d like to know the actual measurement between elements. PixelSnap is designed for this task.

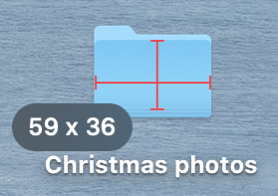
With PixelSnap enabled by the keystroke ⌘-⇧-F as Terry described you get red crosshairs on screen. You also will see two numbers, which are the horizontal and vertical dimensions it’s detecting. This can be the distance between two images, or between some text and an image, or if you hover over a graphical element it will show you the size of the element. For example, if you hover over a folder in macOS, you’ll see that the icon is 59 pixels wide by 36 pixels tall. This is very clumsy to explain and completely intuitive when you see it.
You have a couple of options when showing these dimensions. If you hit the enter key, the dimensions are copied to your clipboard. There’s a couple of things I haven’t figured out yet. When testing PixelSnap for this addendum to Terry’s review, I noticed that the Touchbar on my MacBook Pro had been activated with a couple of buttons. As I described before, moving the cursor around you have an actively changing set of dimensions showing. But the Touchbar gives me two buttons which allow me to freeze either the horizontal or vertical dimension on screen. In fact I can keep tapping it to get many different dimensions recorded.

There’s also a horizontal and vertical button on the Touchbar that gives me a line that goes all the way across my screen (horizontally or vertically) showing its absolute distance from the edge, and if I click it freezes on the screen.
Both of these sets of options seem useful but couldn’t find any instructions on how to leave the dimensions on the screen without the Touchbar. I looked at all the options in Preferences and while I did find some keystrokes under Shortcuts, I didn’t find any clues on how to execute the options enabled in the Touchbar. I did discover that if you drag across an area (creating that pink box Terry talked about upfront), you can use the C-key to copy a screenshot to the clipboard, or the S-key to save a screenshot to your desktop. But I still didn’t know how to activate the options from the Touchbar.
I finally resorted to holding down all kinds of keys like option, control, and command while clicking, none of which did a darn thing, and then finally just poked every key on my keyboard. I discovered the V key freezes the vertical dimension and the H freezes the horizontal dimension.
Now that, like a child, I had smashed all the keys I could think of, I resorted to watching their introductory video. They showed a contextual menu popup, which made me realize that a command or right-click displays a menu for adding the horizontal or vertical guide (the one that goes full length or width), and for freezing the horizontal or vertical distance on screen. Not only that, it showed that shift-H and shift-V are how you freeze the guides on screen. Maybe I should have watched the video upfront when they offered it on the opening screen.
But even after watching the video, it still took me a bit to figure out how to get the guides to “stick” on screen. You hit the keystroke, such as shift-V for the vertical guide and you’ll see the guide but to get it to stick you have to click onscreen. It will immediately revert back to measuring so you have to do a second shift-V then click to get a second guide to stick.

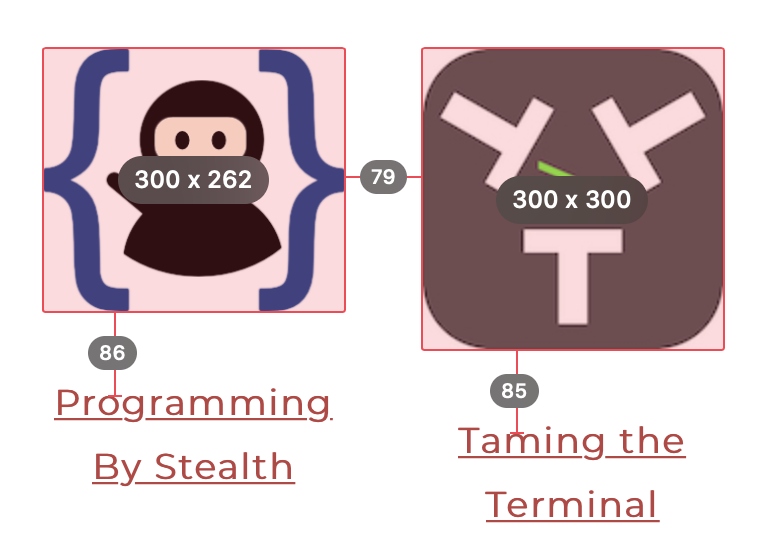
Another thing I realized watching the video is that PixelSnap has object detection (given the right kind of background). This means you can simply drag across an icon on a white background and the dimensions will snap right to the edges and leave the dimensions up on screen. I tested this on the Programming By Stealth logo which has the squirrely brackets and the little dimension indicator slide right along them going in and out as I went up and down the bracket. Pretty amazing.
Sometimes when you’re working with PixelSnap it might grab the wrong content, especially if you’re measuring between lines of text. PixelSnap allows you to adjust the tolerance, either in the Preferences or simply by using the T-key to flip between high, medium, low and zero. I found the T-key to be invaluable to adjust quickly to just the kind of dimension I was trying to capture.
I want to re-mention one thing Terry said way back before I butted in on his review. After you’ve plopped dimensions and guides all over your screen, hitting command-shift-F again gets you out of PixelSnap but the dimensions and guides don’t disappear. You have to go back up to the menu bar app and select Clear All as Terry said. If you find it tedious to go all the way to the menu bar, you can add a keystroke to Clear All in the Preferences.
PixelSnap integrates with four applications, Sketch from Google, Adobe XD, Figma, and the Affinity Suite. If you enable any of these integrations, PixelSnap says it will get the correct dimensions based on the in-app zoom level. I turned it on for the Affinity Suite and was instructed that PixelSnap would have to be set to points rather than screen pixels. I didn’t test this but I’d be curious here to see if it would truly get the correct dimensions on a retina or 4/5K display.
The bottom line is that I haven’t ever seen an app that can do what PixelSnap can do, it does it elegantly, and it’s so unusual I’m surprised it’s even allowed to do what it does! If you don’t have a Setapp subscription, you can buy PixelSnap for $39 for one Mac and it’s available from getpixelsnap.com/…

What a fun story to write, and some awesome additions from Allison!