You know I’m a big fan of taking screenshots, and if I can find an excuse to annotate a screenshot I’m even happier. I have lots of tools to do this and if I’m doing lots of annotations I bring out the big guns like Folge or Captio.
But if I want to do a quick screenshot, my go-to is still the built-in screenshot utility in macOS. I’ve also gotten quite fond of doing annotations using Preview. Even if you’ve been on the Mac a very long time, I’m betting I can tell you a few things you may not know about these two tools.
Screenshot Utility
Let’s start with the built-in screenshot utility in macOS. This utility is in your Applications folder but one level deeper in the Utilities folder. It is named, quite imaginatively, Screenshot. You can double click it from the Finder, drag it into your Dock to launch, use Spotlight to launch or you can invoke it with the keystroke command-shift-5. We’re going to be learning some more keystrokes in a bit but let’s focus on the utility itself first.
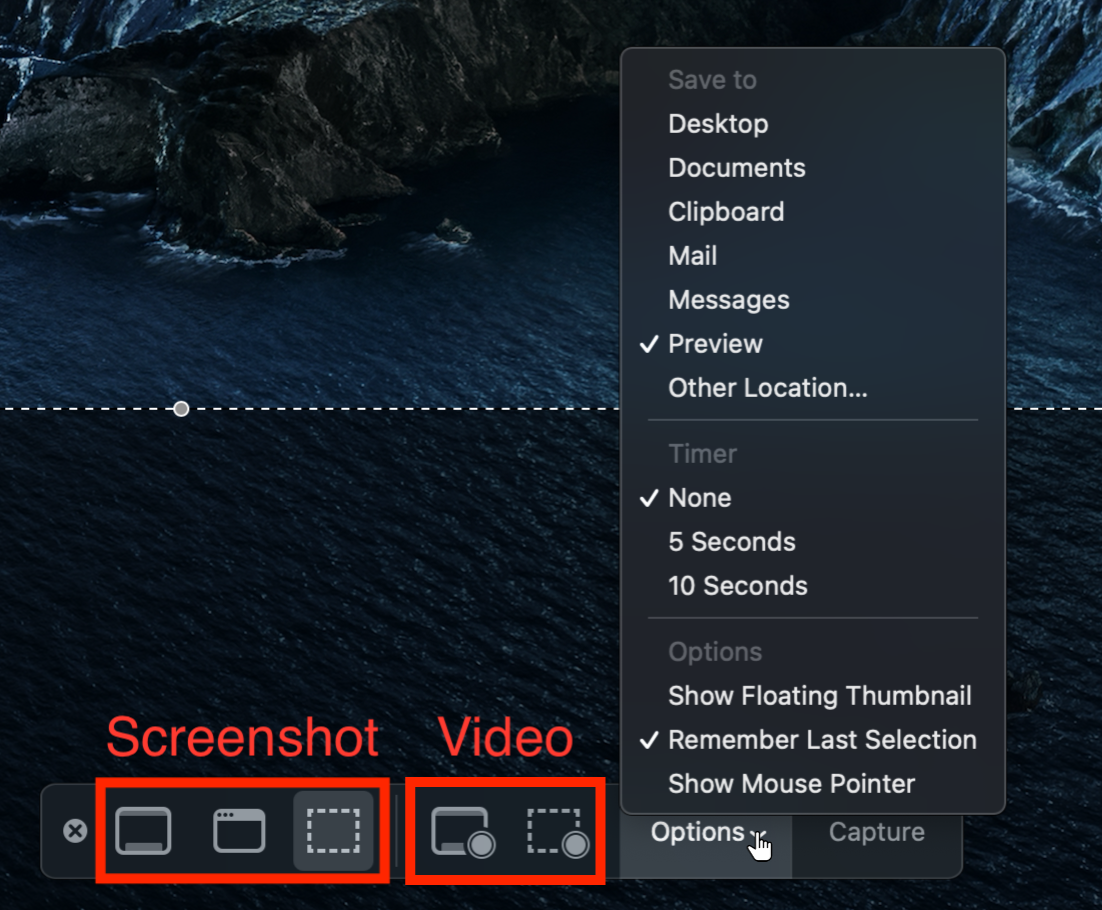
No matter how you invoke Screenshot, when it opens, it’s not really an app. You’ll see a dotted marquis rectangle overlaying whatever is onscreen and you’ll see some buttons below the rectangle, but if you look at your menu bar, it doesn’t say Screenshot, it says the name of the forefront application on your screen.
Screenshot is actually super capable. The left three buttons are to capture screenshots. You can do full screen, a window or an area which is the default with the marquis. The next two buttons are for video, allowing video of full screen or an area, again with a marquis.
Options in Screenshot

Next, you’ve got some options that are pretty important because they affect how screenshots work, even if you don’t invoke them using the utility directly.
The first option is where to save screenshots. By default, it will choose the Desktop which is a terrible place in my opinion. Leaving screenshots on the desktop is just inviting you to be messy and disorganized.
The Save To menu lets you choose an alternate location, but you can also choose to have screenshots automatically go right to an application such as Mail, Messages, or Preview. Personally, I like to have them open in Preview so I can make sure they look right and add annotations if required. If you’re recording video, one of the options will be to open your masterpiece in QuickTime when you’re done.
I can save the file if I really need it for later, but after annotating I often hit command-A to select all, then command-C to copy, and then command-V into an application such as Mail or Telegram, or Slack. Then I hit command-W to close the screenshot, at which point it will nag me to save, but a simple command-delete will hit the delete button for me. Of course you can do all this via the menus but I prefer the speed of keystrokes.
If you ever need to capture a dropdown menu or some other ephemeral effect, the options menu in Screenshot will even let you set a countdown timer for 5 or 10 seconds.
Floating Thumbnail Option
If you’ve set your options to save your screenshots to a file, by default it leaves a floating thumbnail in the bottom right of your window. I’ve always found that to be supremely annoying because you have to wait about 5 seconds for it to disappear. In the Options menu, you can toggle off the floating thumbnail.
But don’t be too hasty to be annoyed. As I was studying this to write it up, I realized that perhaps it has some value. I described in detail how I like to annotate in Preview and then copy and paste from Preview, and maybe that’s not the most efficient way to do that.
Let’s explore how the floating thumbnail might be helpful. If you don’t need to deal with the screenshot right away, you can ignore the floating thumbnail and capture more images. You don’t have to wait for it to go away.

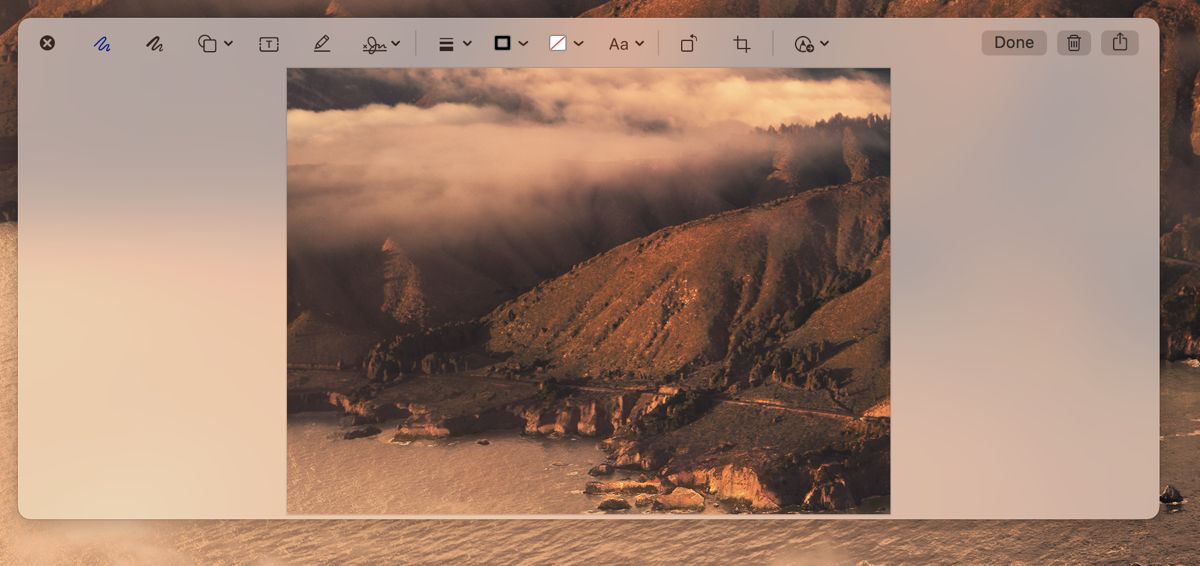
But if you DO want to annotate the screenshot, you can click on the floating thumbnail and it comes up in what I can only call Preview Lite. It’s not really Preview because there’s no app running, but it has many of the same markup tools across the top.
I say “many of the same” because it’s got one that’s even better than Preview and it’s going to blow your mind. Or at least it blew my mind. One of the buttons looks like a little pen tip, inside of a circle, with a wee, tiny (like 10 pixels across) arrow to the right. (If you’re still on macOS Catalina, it will be a rectangle with a diagonal line in the bottom right. It doesn’t work as consistently on Catalina either, better on Big Sur.) Next to the icon is a downward chevron.
That chevron reveals your iOS devices that are on the same network. Curious, I selected Mini Me (my iPad mini) and the screenshot jumped to my iPad mini. I used my Logitech crayon to draw on the screen and the annotation UPDATED ON MY MAC. How crazy cool is that???
But wait, it gets cooler. Once you tap this magical icon the first time, the next time you take a screenshot with your Mac and select the floating thumbnail, it automatically jumps to your iOS device for annotation. It will even wake your device up if it’s asleep AND locked. When you tap done on the iOS device, the screenshot disappears and the iOS device is still in its locked state. It’s just like a little drawing pad attachment to your Mac.
I’m no longer going to complain about the floating thumbnail, this absolutely rocks. It’s way easier to annotate with a Pencil or Crayon on an iPad than it is with a trackpad or mouse on a Mac! Not sure I would use an iPhone for this, but iPads are perfect as touch screen drawing attachments for your Mac.
Now that I’m in love with the floating thumbnail, we should finish up the explanation. Let’s say you take a screenshot, tap the floating thumbnail, and realize it’s not quite what you wanted. Hit your escape key and it disappears. You can use the close button or the delete button if you’d rather. The important thing is that it doesn’t save the file at all. This is WAY better than my method of taking the screenshot straight into Preview.
After all of this excitement with the floating thumbnail, the last two options in Screenshot seem like kind of a letdown. You can have Screenshot remember your last selection, which can be handy if you’re screenshooting the same area repeatedly. Most of the time I think we take screenshots of all different parts of the screen, and moving and resizing that remembered area is tedious. If you uncheck Remember Last Selection, then you get to do a simple click-drag to take screenshots.
Finally, you can choose whether or not to show your mouse pointer in the screenshot. Sometimes that’s exactly what you want and sometimes it’s exactly what you don’t want. Nice to have the option.
Keystrokes for Screenshot
I mentioned at the beginning of this tale of adventure that you can use command-shift-5 to invoke the Screenshot utility. You can also invoke the different kinds of screenshots with keystrokes. Unfortunately, since Screenshot isn’t a real application, it doesn’t have Preferences for you to find the keystrokes.
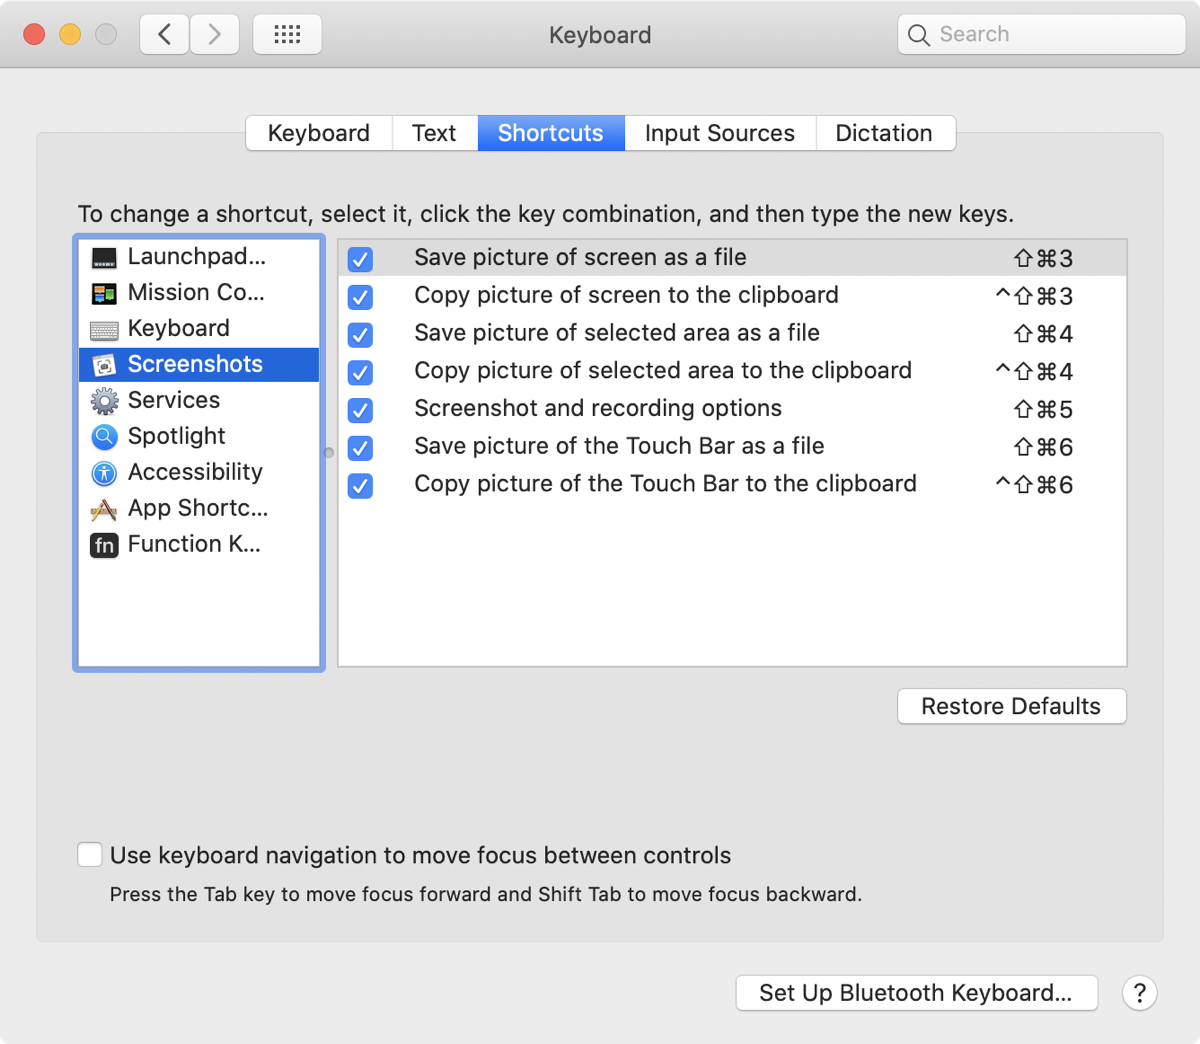
To find the keystrokes, you have to open System Preferences → Keyboard, select the Shortcuts tab, then select Screenshots in the left sidebar. Yeah, that’s the first place I thought to look too. Sheesh.

There are basically two types of screenshots as we learned earlier, full screen and a selected portion. You’re going to hold down command-shift and add a number. Full screenshots use the number 3, and selected portions use the number 4. So command-shift-3 for full screen, command-shift-4 for partial.
With these keystrokes, you’ll be saving the shot to a file. Remember that if you have the delightful floating thumbnail you can grab it and mess with it before it saves.
But what if you want to just copy to the clipboard? Just add the control key to the mix. So command-shift-3 becomes command-shift-control-3 to do a full screenshot to the clipboard. Likewise, command-shift-4 becomes command-shift-control-4 to do a partial screenshot to the clipboard.
I know that sounds like a lot of keys but if you do it a few thousand times you’ll get good at it. Also, how often do you really want the entire screen? Not that often. This means you really only need to remember command-shift-4 and adding in the control key to send to the clipboard.
Remember with using the full utility we had the option to capture a window? We can do that even with the keystrokes. You start by using your partial window keystroke, command-shift-4. When you do this you’ll see a cross-hair that lets you click and drag across an area.
If you want a specific window, instead of clicking and dragging on the window, hold down the option key and the entire window you’re hovering over will highlight. Then simply click on the window and your screenshot will be created.
Allister Jenks gets the credit for this next screenshot tip. He just stumbled across it this week and posted about it in our Slack (https://podfeet.com/slack).
When you take a screenshot of just part of the screen, using command-shift-4 to go to a file or adding control to go to the clipboard, your screenshots will have a drop shadow applied to them. Now I’m a huge fan of the drop shadow, but the one applied by macOS is HUGE. It’s comically large and wastes too much space.
There are two ways to keep from getting the giant Drop Shadow of Doom (™ Donald Burr).
Once you’ve done the keystroke dance, and you’ve already hit the spacebar to highlight the window, before you click the window, hold down the option key and click. The resulting screenshot will not have a drop shadow.
Just in case anyone is still following along, that’s command-shift-control-4, spacebar, option-click. Easy peasy, right? Believe it or not, I do this often enough that it is absolutely muscle memory!
If you don’t want to try to remember the magical option-click at the end, or you’re sure you hate the giant drop shadow as much as I do and never want to see it, open up the Terminal and enter the defaults write command:
defaults write com.apple.screencapture disable-shadow -bool true
And then restart the SystemUIServer with another command:
killall SystemUIServer
Now you’ll never need to see that giant drop shadow again. If you ever change your mind and want it back, just rerun the defaults write command with -bool false instead of true.
Bottom Line
I rewrote this article about 5 times because I kept learning new things, and in fact, the entire subject of the article changed. I’ve still got the previous idea ready but it will be a tiny tip compared to what you learned in this one. I’m thrilled to find out that the floating thumbnail is super useful and will be annotating my little heart out with my iPads from now on.

Wow. Who knew this feature did all that? And here I thought I was all Mr. Fancy Pants already knowing the keyboard shortcuts!
Thanks for the great article, Allison.
Thanks, Todd – I learned so much working on this one!
This was a great article. I learnt how to use the Screenshots utility. Thanks for your efforts.
I have my screenshots formatted as PDFs (I did that with a terminal command) because that’s how a like the majority of them. BUT it would be great if the screenshot utility allowed the user to pick a format in the options. Do you know if there is a way to accomplish this on the fly? I open in Preview and “export as” when I want a different format but that is cumbersome. Also, I didn’t know about the copy to clipboard keyboard shortcuts. Thanks Allison for another super useful article!
One “gotcha” I’ve run into is using Command-Shift-5 and then selecting Clipboard under options. This is persistent. If you forget to change this, and copy multiple screenshots using Command-Shift-4 the next day, you lose all but the last. Sometimes, they cannot be recreated, and so this is a dangerous practice.
Ooh, good point, Paul. Can I interest you in a clipboard manager? I’m a fan of Copy ‘Em (formerly known as Copy ’em Paste).
https://www.podfeet.com/blog/2019/09/copy-em-paste/
I never thought I needed one but your issue here would be perfectly solved by a clipboard manager.