In the Beginning

Many years ago, Steve bought a Vantage Vue Weather Station from Davis Instruments. This weather station transmitted over radio frequency to a base station with a display inside our house so we could see the temperature, humidity, rain, wind direction, and speed. He was delighted with it, even though in Southern California it’s always 72 degrees outside. As fun as it was to see the weather on the little display inside the house, he also wanted to see this same information reported on the Internet to a service like Weather Underground so he could access his weather information from anywhere.
Steve worked for literally weeks on a way to accomplish this, and in the end he was successful.
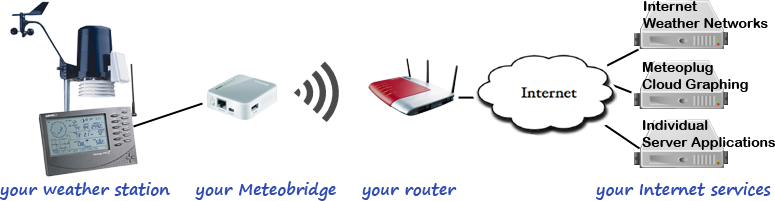
The basic problem was that the base station that goes inside the house didn’t have a network card. He bought a device from Ambient called a Meteobridge. The Meteobridge is basically a little TP-Link Router with an Ethernet jack and a WiFi card. It comes preinstalled with the Meteobridge software, which is how you can tell the weather station to talk to the Internet.
I remember after he finally got this working asking Steve to write a review about the Davis Weather station and specifically how he got it on the Internet. At the time he said, “I couldn’t possibly explain what I had to do, it was far too complicated!” I believed him, as at one point he actually had to get NOAA involved in helping him. And yes, I do mean the National Oceanic and Atmospheric Administration. Turns out they really like that people have weather stations and share the data because it gives them the data to work with for their cause.
We’ll circle back to talking about the Meteobridge software in a bit, but I want to explain why I’m talking about it many years later.
New Ambient Weather Station

Back when Steve first set up the Davis Weaterstation and had to do a bit of Frankenstein assembly to get it on the Internet, only serious weather nerds were doing this. But now weather stations are all the rage. The technology has advanced quite a bit, and there’s hardly any faffing about required to get them on the Internet. We know this to be true because for Christmas, Steve bought our son Kyle and our son-in-law Nolan each an Ambient Weather Station WS-2902C and they were a breeze to set up.
Steve helped them install their weather stations and because the base stations come with built-in WiFi and the software necessary to communicate with weather services online, it took maybe a half hour to get them displaying data on the Internet.
The only problem with the new Ambient weather stations for the kids was that they were way cooler than Steve’s older Davis weather station. The new ones collect more data than Steve’s Davis and they have bright LCD displays. Steve didn’t complain but I knew that Steve would be really happy if I got him one of the new ones for his birthday.
I also figured he had to have an even better one than his kids, so I splurged for the Ambient Weather WS-2000 which is one model up from theirs. Now he can track all of the weather info he had before, but also solar radiation, UV levels, as well as sunrise and sundown times. The base station inside the house is a beautiful, bright TFT display that is absolutely gorgeous.
And most importantly, it was a breeze to get on the Internet.
Davis Weather Station Going to a New Home
A few of our friends have gotten weather stations recently and I was pretty sure our friend Diane was feeling left out but didn’t really want to spend the money to get one for herself. We knew the Davis would find a good home at Diane’s house. The weather station is still perfectly functional and if you view the stats on the Internet, it’s really swell.
But that meant that we had to figure out how to get it on the Internet at her house. And this is where the real story begins. It was quite a nerdy adventure, and I don’t believe that we ever would have succeeded without the knowledge that Bart has been pouring into my brain for all these years.
Connecting to the Meteobridge
When Steve got the new Ambient weather station, he took down the Davis, unplugged the base station along with its Meteobridge WiFi router, and he removed the Davis weather station from the Weather Underground online service so he could have a clean start with the new Ambient weather station. It was a dream to set up the new Ambient Weather Station, and after about a week, it was time to get to work on giving Diane the Davis with its Meteobridge.
We knew it would be tricky to get the Meteobridge online at Diane’s house if we had been able to go inside her house, but with all of us keeping our quarantines, it would have been an absolute nightmare to walk her through it remotely. To work with something THIS fiddly over a FaceTime call was not something we were looking forward to. We decided to do as much as we could at our house before handing it off to her. That was a good decision because it took us the better part of 3 days to get it working again!
And the Nightmare Begins
We plugged the Meteobridge into power and waited for the blinky lights to settle down. The Eero mesh router app announced that a new device had connected, it showed the name was Meteobridge and told us the IP was 192.168.10.34. To configure the device, we simply had to point a web browser at that IP.
We entered 192.168.10.34 into Safari and it responded with, “Can’t Connect to the Server”. I tried pinging it from the terminal and got no response. I sat there baffled for a bit and then I realized what was wrong. 192.168.4.X is our main network, and .10.X is the guest network and the Meteobridge was on .10.34. No problem, we’ll just switch over to the guest network. But we got the same error indicating no connection to the server.
That’s when I remembered that the whole purpose of using a guest network is to allow devices to connect to the Internet but NOT to have access to your internal network, which means they can’t talk to each other. I try to put all dodgy devices, especially IoT devices, on my guest network so they can’t do any damage if they get compromised. Windows PCs go on my guest network too.
Steve remembered that our previous router, the Netgear R8500, had a toggle where you could allow devices on the guest network to talk to each other, and then toggle it back to isolated devices. The Eero has no such toggle that I could find. I’m pretty sure I must have set up the Meteobridge originally using the Netgear and when we slid over to the Eero, the Meteobridge just came along for the ride without any fussing around with it.
The Meteobridge does have an Ethernet jack on it, so we tried hardwiring it into our network but the Eero app never showed it had connected over Ethernet. I never did figure out why that didn’t work.
Now picture how you’d tackle this problem. The device is on your network but you can’t talk to it at all. What would you do? All I could think of was to try to reset the Meteobridge.
Resetting the Meteobridge
The Meteobridge has a reset button on it, so I held it down for a while. No joy. Held it down for a longer while. No joy. Unplugged it, held it down for a while, plugged it in while holding it down, no joy. And by no joy, I mean it kept happily joining the guest network at .10.34. It was time to go to the googles for a solution.
It turns out there is a way to set the Meteobridge up without network access to it, but it’s not like anything I’ve ever seen before. Meteobridge is well-documented on their wiki at meteobridge.com/… In there I found the solution.

The fine folks who support Meteobridge have created an online simulator that looks just like the web interface to your own device. You can enter your network credentials into the simulator, and then download a configuration file. We were a bit trepidatious typing in our WiFi SSID and password to a random site on the Internet, but I figure that to use that information for harm, someone would have to figure out where I live and then drive to my house to get on my WiFi. We set the simulator up and downloaded the configuration file.
To update the little TP-Link router with the new Meteobridge configuration, you simply put the config file you’ve downloaded onto a thumb drive, plug that into the router, and boot it up. The router finds the file, updates its settings and you should be good to go.
When the Meteobridge booted up with the config file from the thumb drive, we squealed with delight when the Eero app told us a new device called Meteobridge had joined with a 192.168.4.X IP, which meant it was on the NON-Guest network. We typed the new shiny IP into a browser and boom, we were in! We might have danced a little at the pure joy of it.
What Fresh New Hell is This?
At this point, I figured my work was done, and Steve could take it from here. He was the one who had successfully gotten both kids’ weather stations and his own new one onto Weather Underground and Ambient Weather, so I didn’t think I would be needed. In retrospect, it was pretty adorable of me to think this nightmare was over. We were just now descending into the 7th Circle of Hell.
Weather Underground
To connect a weather station to Weather Underground, you navigate to wunderground.com and enter the location of the device. There’s a button you’re to push which is supposed to open a new web page that will reveal a Station ID and a key it has assigned to you. You then enter this Station ID and key into the Meteobridge interface. Once Weather Underground and the Meteobridge know about each other, the Meteobridge should start pumping data up to Weather Underground.
But on that day, after entering the info about the location of the weather station into Weather Underground, clicking the button triggered an error that simply said, “sorry, something went wrong”. Without this button working, we can’t get a Station ID and key which means we can’t get the weather station onto Weather Underground.
Steve and I tried probably 12 ways to make this work, changing browsers, emptying cache, typing in the address for the device, using a map to drop a pin for the location, but all methods just returned “sorry”.
Remember near the beginning of this saga I said that Bart pouring information into my head for more than a decade came in handy? The first time I used things I learned from Bart was earlier when I tried to ping a device that was on a different network, which gave me a clue to the problem. The second time I used something I learned from Bart was when I was faced with this “sorry” error.
In Programming By Stealth, we often interact with our web apps through what’s called the browser console. It’s a little area that pops down at the bottom of a web page. This is where real error messages get printed, not human-friendly ones like, “sorry”.
I popped open the console by holding down command-option-c, and there were two errors. One said 400 and the other 404. Error 400 indicates that the server cannot or will not process the request due to something that is perceived to be a client error. That wasn’t too much help, but Error 404 means that the server cannot find the requested resource.
My suspicion from this was that the service that should generate our station ID and key had actually gone down. It was time to abandon THAT whole path because there is nothing you can do from the client-side to fix a 404 error.
Ambient Weather
Luckily, Weather Underground isn’t the only game in town to which you can send your weather data. Another option is Ambient Weather, the makers of our newer weather station. This interface is even simpler to set up.
At ambientweather.com/… you start by selecting Add a Device. You are then asked to enter the location, and a few other facts about it, and create a name. Then you enter the MAC address of the network interface card of your weather station, in our case, the Meteobridge. The MAC address was nicely printed on the outside of the box, but it was also available in the Meteobridge interface.
Once we’ve told the Ambient Weather service to expect weather data from the MAC address and our physical location, we need to tell the Meteobridge to send it to Ambient. Back in the Meteobridge web interface, on the Services tab, we tell it to send Ambient weather and the Meteobridge makes us enter the MAC address again, even though it knows its own MAC address. We click save…
…and we get an error.
I’m sorry Dave, I can’t do that
Interpreting the error is the third time that Bart’s decade of knowledge dumping comes in handy. I look at the error and it says something about SSL and gives an error number. I looked the error up in the googles and learn that the error is saying that I am trying to make an insecure connection to a secure service. In other words, the Meteobridge software is ending an HTTP request when the Ambient Weather site is expecting an HTTPS request. We don’t have a way of telling the Meteobridge to use HTTPS when contacting Ambient.
After some poking around, Steve pointed out something curious in the License tab of the Meteobridge interface. There is a warning which says that our two-year license had expired, and hadn’t been renewed since 2018. To be honest, we never realized that there was a license to be renewed because it had always worked.
Back in 2016, secure websites were not widely used yet, but in 2021, they sure are. Perhaps if the license was renewed, we’d get a new version of the Meteobridge software that supports SSL. Right next to the expired license notification it had a Soviet-era-looking PayPal logo, so we gave it a push.
I’m sure you’ll be shocked to learn that we got an error. I forget exactly what the error was but we surmised that it was telling us this PayPal link was no longer functioning.

Back to the Meteobridge wiki we went to see if there was a way to pay that wasn’t from 2016 and found a link to where you could pay for a license renewal through a completely different service. Before pushing the button, I scrolled to the bottom of the web page to see the date it had been updated. I thought it might be an indication of whether paying for the Meteobridge license might be yield a modern version of the app. I was delighted to see that the wiki page had been modified in January of 2021.
We paid the $25 for a 2-year license and as soon we loaded the new license key into the Meteobridge, we saw the physical device start its blinking boot-up sequence. When it settled down, we went back to the web page for the Meteobridge and were delighted to see a drammatically changed view into the device.
It was the same kind of tabbed interface, and it clearly wasn’t rendering well with giant empty gaps in the view, but that actually sorted itself out over the next day. We could see from screenshots I’d saved before the upgrade that our software revision went from 2.7 in 2016 to 5.1 in 2021.
We excitedly flipped to the Services tab, and the Ambient Weather section no longer reported an SSL error. We went to ambientweather.com/… and were delighted to see that weather data was streaming into the website from Diane’s future weather station. I think we both cried a little bit that we finally succeeded after three days.
The Handoff
The next day, Steve scheduled to hand the weather station to Diane. Before the handoff, Steve went back into the Services tab on the Meteobridge software to verify that Ambient Weather was still working, and not only was it functioning, Weather Underground was now working! Our suspicion (based on knowledge learned from Bart on how to read website errors) was correct. The web service required to give us the Station ID and key had gone down right when we needed it and now it was back up.
The last, and very scary step, was to change the WiFi SSID and password to Diane’s network and hit Save. As soon as we did this, there would be no turning back. We would not be able to make any changes to the device because it would no longer know how to connect to our network. We entered her WiFi info and hit save, and then rebooted the device.
When the Meteobridge boots up, one of the LEDs blinks slowly, then blinks quickly, and then goes solid. But that’s not what happened – it continued to blink quickly and never went solid.
We debated at length what to do. We saw two options:
- Start over by downloading the configuration file from the simulator and going through every step again
- Act on blind faith that it actually was working and hand it off to Diane and hope for the best.
My personal vote was for option 2, even though in my heart I figured nothing had gone right so far, why would it work now? I convinced Steve that we might as well try the path of least work first.
We gave it to Diane, she brought it home, plugged it in, it joined her Eero network immediately telling her the IP it had received. She navigated to the IP in a browser and …
It worked perfectly. She could see her “new to her” weather station reporting data on Weather Underground and Ambient Weather.
Bottom Line
I’m kind of glad Steve never gave you a review of the setup of his original weather station because I think this story of discovery was a lot more entertaining. We enjoyed ourselves, even through the emotional ups and downs. I enjoyed it because I got to put to work the tools Bart has been teaching me for all these years. Steve enjoyed it because it actually worked in the end. Diane enjoyed it because she got a weather station like the rest of the cool kids!
Thanks for sharing your experience. Moving around a head-less system without display and keyboard between different WiFis is always a pain. We try to make it somehow as easy as possible. However, your report tells me that we should even take more care on this.
Boris – Thanks for your response. I’m not sure there’s anything you could have done about this since it was my isolated network that made the device impossible to talk to. And if we’d realized earlier that there was a license associated with the software, that too would have sped things up!