When macOS Big Sur broke cover, we got a first look at the Control Centre as imagined for the Mac. While it’s cousin, the new Notification Centre, has been much maligned, I feel like Control Centre flies under the radar. Maybe that’s because everyone is just getting on and using it, but I wonder whether some people don’t realise just how much lies within.
 Represented by an icon that looks like two iOS-style switches, it sits second from the right in your menu bar, next to the clock. On clicking the icon you will see a collection of sub-panels and single controls. Let’s take a look.
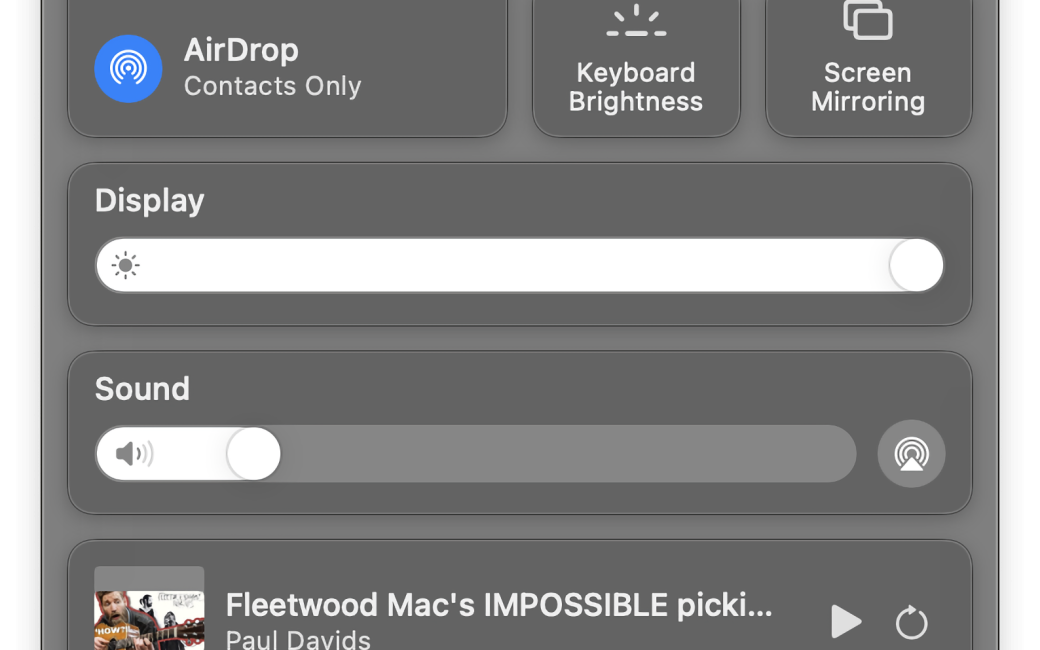
Top left is a sub-panel with three entries. At first glance these appear to allow you to turn on or off Wi-fi, Bluetooth, and AirDrop, but there is more to it than just a few switches.
The Wi-Fi entry shows the name of the network you are connected to, if any. If you click on the circular icon you can turn it on or off. But hover over the text and a small disclosure arrow appears. Clicking anywhere on the row that’s not on the icon opens a more detailed Wi-Fi- panel.
There is now a dedicated switch at the top to turn it on or off, but also a list of available networks, split into three sections. The top section shows Personal Hotspot devices, the next section displays known networks, and the third, collapsed by default, shows any other networks the Mac can see. You can join any of these networks simply by clicking on the name. Finally, at the bottom of the panel is a link to Network Preferences.
Moving back to the main Control Centre pane can be done by clicking on the title. The next entry is Bluetooth. There is no extra information shown but, again, clicking on the entry gives you a more detailed view. We have the dedicated on/off switch at the top, then a list all of your connected and known-but-disconnected devices. If supported by the device, each connected one shows you its battery level. Clicking on a device connects or disconnects it based on the current state. Finally, there is a link to Bluetooth Preferences at the bottom.
Below Bluetooth is AirDrop. This shows you if it is turned on, and if so, whether it is set to Contacts Only or Everyone. Clicking on the row only gives you the option to turn it off or on and to select one of those two modes if on.
Next to that first sub-panel, at the top right of Control Centre, is the Focus control that shows the current Focus Mode. Clicking anywhere on this control shows you a detail panel where you can set Do Not Disturb permanently, for one hour, or “until this evening”. Below those options you can pick from any of your defined Focus Modes. At the bottom is a link to Focus Preferences.
Below the Focus control is the Keyboard Brightness control. This does not display any information, but clicking it pops open a slider where you can set the brightness, and there is a link to Keyboard Preferences.
Next to Keyboard Brightness is Screen Mirroring. This will either be grey like the other controls, if you are not currently extending or mirroring to another device, or highlighted in white and blue if you are. You’ve probably guessed that clicking the control gives you more. If it’s not active, you see a list of devices to connect with, such as iPads and Apple TVs. Click on one of these to connect. If it’s in use, the device you are connected to has additional options to set how it is being used — either as an extension of your display area, or mirroring one of your monitors. There is also an option to hide or display the sidebar that this mode offers, and finally, a link to Display Preferences.
Moving down the main Control Centre we get the first of the wide controls — Display. This contains only a slider to set the brightness of your primary display; that’s the one that has the menu bar. If you have an iPad or another Mac nearby, there will be a little screen icon to the right of the bar. If this is highlighted in blue, then that device is connected using Universal Control, meaning it’s not acting as a display for your Mac, but your Mac’s keyboard and mouse or trackpad can be used to control it. Clicking it when highlighted like this will disconnect that device. If you click above the slider, further options are presented. If you have multiple displays that support macOS’s controls, which includes any built-in screens on laptops and iMacs, plus external screens such as an Apple Studio Display, or Pro Display XDR, then you will see sliders for all of them. Any Universal Control devices appear here and can be clicked to connect or disconnect. There are also buttons at the bottom for Dark Mode, Night Shift, and True Tone, plus another link to Display Preferences.
Finally, there is a third level to the Display control. On supported displays, such as Studio Display or Pro Display XDR, click on the name of the display to see a list of reference modes that you can pick from, to set the monitor’s colour profile.
Below the Display control is the Sound control, also full width. This contains a slider to set the volume of the current System Output device, and an AirPlay button. Click anywhere not on the slider to open a panel that lists all of your local sound devices, plus any available AirPlay targets. Click any of these to select it for System Output. There is also a link to Sound Preferences.
The next control may not appear. It’s called Now Playing. It has a thumbnail for the application currently playing audio, such as a YouTube thumbnail from Safari or album art from Apple Music. Next to that is a title and artist, and on the far right a play/pause and next track button for Music, or play/pause and skip back button for Safari. If you click on the thumbnail, it will take you to the app it represents. Clicking on either of the two buttons will take the indicated action, and clicking on the title takes you to a detail panel, which shows a very small “now playing” pane with the same elements plus a progress/scrubber bar and both directions of skip.
 That is all of the panels and controls that will be present by default, but there are a few more you can turn on in System Preferences, in the Dock & Menu Bar section. In the sidebar of this section, under the heading “Other Modules” you can choose to include Accessibility Shortcuts, Battery, and Fast User Switching.
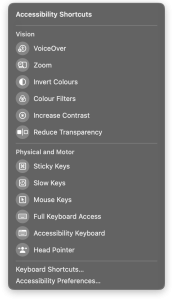
Accessibility Shortcuts adds a control that gives access to a long list of Vision and Physical and Motor shortcuts such as Voice Over, Increase Contrast, Sticky Keys, and Head Pointer.
Battery adds a battery control that shows whether your laptop battery is charging and the current capacity. Clicking on it reveals “Apps Using Significant Energy” and a link to Battery Preferences.
Fast User Switching shows the avatars of users defined on the Mac, with an indication of which are logged in. Clicking on an avatar will perform a fast user switch to that user, and there is also a link to go back to the Login screen, and one to Users & Groups Preferences.
Looking forward to the new macOS Ventura, coming later in 2022, there will be at least one new control for the new Stage Manager feature.
There is very little customisation available in Control Panel on macOS, other than the three ‘extra’ controls you can turn on if desired, however the set of functions available ‘out of the box’ are comprehensive and, I think, all useful. The idea for this story came from discovering that I can set the reference mode for my new Apple Studio Display without having to go into the System Preferences Display section, which has become more complex in recent macOS releases. Now, I am only ever three clicks away from choosing the display mode for editing my photos or general computing tasks.
Allister, I have a Mac Studio and display with a magic Keyboard with Touch ID ( and a Magic Mouse). My control panel does not have a keyboard brightness capability. I know magic keyboard with brightness capability is available with iPad and MacBooks. Do you know if/why/how to make my keyboard light up?