Last week I announced that I was going to do yet another nuke and pave because I was exhausted from all the weird problems I inherited from Migration Assistant. I am happy to tell you that I started the process on Monday, and by Tuesday evening I was about 90% complete. Even though it went swimmingly, I have many thoughts about the process.

Backing Up to a Sparse Bundle on Synology is Always Hard
Before doing a nuke and pave, one backup is mandatory, and having two backups is just common sense because after the pave, you’d have no backup at all otherwise. I use Carbon Copy Cloner to back up my full system and data to an SSD, and I have offsite backups with Backblaze. But if I’m going to blow away my internal drive, I need to have a replicant of that backup drive. Invariably I’ll have forgotten something that I can only get to by booting to the external SSD and just the act of booting from it can change its contents. Think of it like forensic evidence – before you start touching it you need to work off of a copy.
My strategy for the last few years is to make a sparse bundle disk image on my Synology and then back the SSD up to that sparse bundle. Every year it’s an adventure trying to remember how to do that exactly. It requires some incantations in Disk Utility on the Mac, then moving the sparse bundle from the Mac to the Synology, and then putting the data inside the sparse bundle on the Synology.
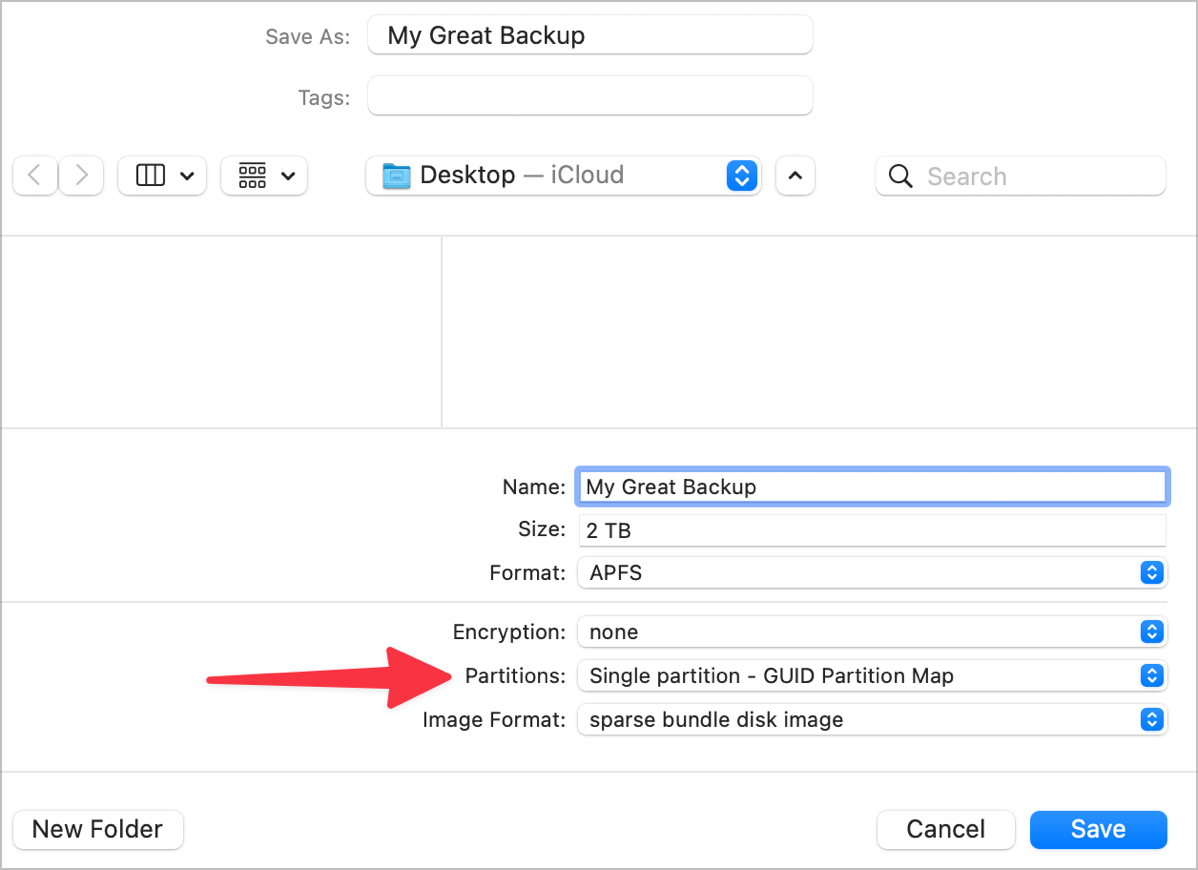
I have trouble remembering this process, so I pinged Steven Goetz and asked him how I’ve done it in the past. He’s good for that kind of question. I then remembered that I had documented it in Keep It from reinventedsoftware.com. The process I’d documented after creation of the disk image was to just hand copy over the files from my backup SSD to the disk image. I ran this by Steven and he said, and I’m quoting here, “That’s how I was going to suggest you do it.”
I tried to just copy over the pieces I really needed to preserve, like hidden files and my user Library where all those weird settings live. Then I got more aggressive in moving other files and since I was succeeding, I got bold and tried to copy over my Photos library. Things went downhill quickly and I never got a full backup completed. I started this process at 9:32 AM on Monday, and at 4:16 PM I gave up on having a complete duplicate of my SSD. I spent 7 hours on and off fighting with this method.
I told Steven I was finally giving up and he said, and again I quote him, “You are finding out why I never use Finder to backup my Mac. I would have just aimed Carbon Copy Cloner at the sparse bundle.”
I told him I thought he was a terrible person and that I didn’t love him anymore. While I’m still annoyed at him for not saying this at the beginning of the day, I’ll come back to the topic at the end of this article.
The Paving was Delightful
I have to say that the paving part was actually delightful. My mind map wasn’t very stale since I had done this just 10 months ago. I’ve also been honing this mind map for ages now and it gets more complete and easier to follow every time I go through it. App developers have also come a long way towards improving how to move the settings you create in the apps.
To review, on the right side of the mind map are all of the apps I need to install, categorized as Mission Critical, High Priority, and Low Priority. On the left side, I list all of the tasks I need to perform using those same three categories. Most of them are associated with apps, but there are also operating system tweaks and things like moving hidden files such as ssh keys and gitignore files.
At this point in the story I need to step back and address the fact that Bart is positively apoplectic listening to this and yelling, “I taught you how to use Chezmoi to manage dot files like ssh keys and gitignore files!!!”
He’s absolutely correct. We had many lessons in Programming By Stealth on this very subject and it would have made my life easier and more predictable if I applied what I learned in those lessons. Because I don’t often switch computers, the overhead of setting it up and remembering how I set it up and remembering how to use it when I needed it was greater than the effort of simply showing hidden files with command-shift-. and then command-dragging all of the dot files to a folder in Dropbox.
I went into it with my eyes open and I’m sure for those of you who use many computers or who move computers often Chezmoi is a much better choice. Back to my story now.
As a recent improvement to my process, I created a Dropbox folder called “nuke and pave” in which I put copies of any settings files I’ll need on the other side after the nuke and pave. So for example, in Audio Hijack I need to export all of my sessions and then import to the clean system, so I made a sub folder called Audio Hijack and dropped them in there. By putting them in Dropbox I know as soon as I install Dropbox I’ll have access to them in Finder. I also made a folder for my hidden files.
Back on the left side where I document all of the tasks associated with the different applications, I document that I have to remember things like exporting Audio Hijack sessions before I nuke.
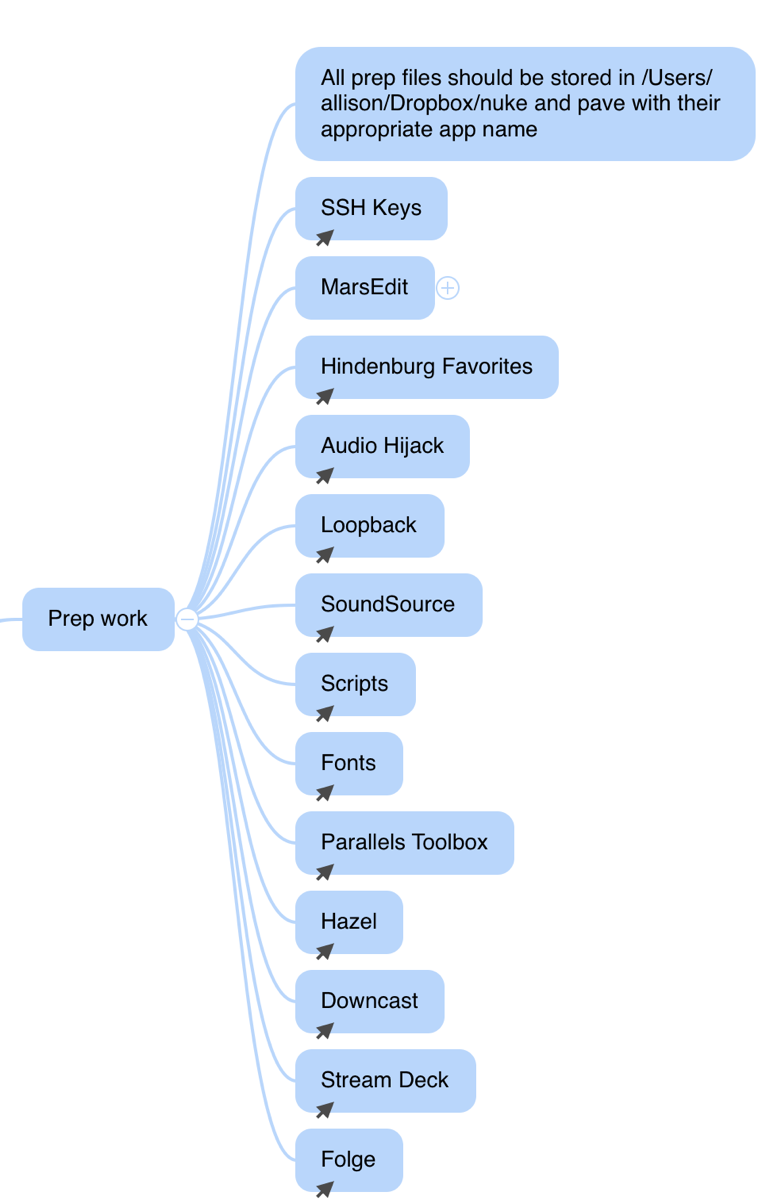
While I do my best to review the left side before nuking and I color-code these preparatory steps that have to happen, I always end up missing a few. This often means booting from my backup drive and then rebooting back into the paved system. This is time-consuming and annoying and also slightly dangerous because as I mentioned you don’t want to touch that last pristine backup unless you have to.
This year I decided I needed to improve the preparation process. I didn’t want to mess with the instructions for each app over on the task side of the mind map, but I thought it would be an improvement if I had one consolidated area for preparation before nuking. iThoughts to the rescue because it has the concept of linking between nodes.
I created a top-level node on the right side called Prep Work. Inside that node, I put each of the names of the apps that required prep work. I then created a link from the detailed steps on the left to the app node under Prep Work. That makes the Prep Work node very simple and easy to follow while the actual prep work is often quite messy with lots of operations required.
iCloud Drive
Before the nuking, I had Documents and Desktop synced to iCloud Drive, storing originals locally since I have plenty of space. When the paving happened, iCloud Drive was turned on and I made sure Documents and Desktop were checked, and my Photos were unchecked. I wanted to separate the slog that is downloading my Photos from everything else.
What I didn’t notice, and surprised me, was that Documents and Desktop were set to optimize storage, not full-sized as I expected. The way I figured out this was happening was kind of interesting.
As I was working away installing and configuring apps, I noticed that I was getting slow behavior from the operating system. For example, Command-Tab to an app would take 2 seconds to actually switch. Double-clicking a file in the Finder would take a couple of seconds to react. I knew I hadn’t yet crufted up my system, so I opened up Activity Monitor to see what was slowing things down.
I found a process at the top of the list called fileproviderd that was chewing up more than one full CPU. I looked it up and discovered it’s the daemon that manages optimized storage for iCloud Drive. Once I turned off Optimize Mac Storage, my files began to flow in as originals and fileproviderd stopped slowing my system down.
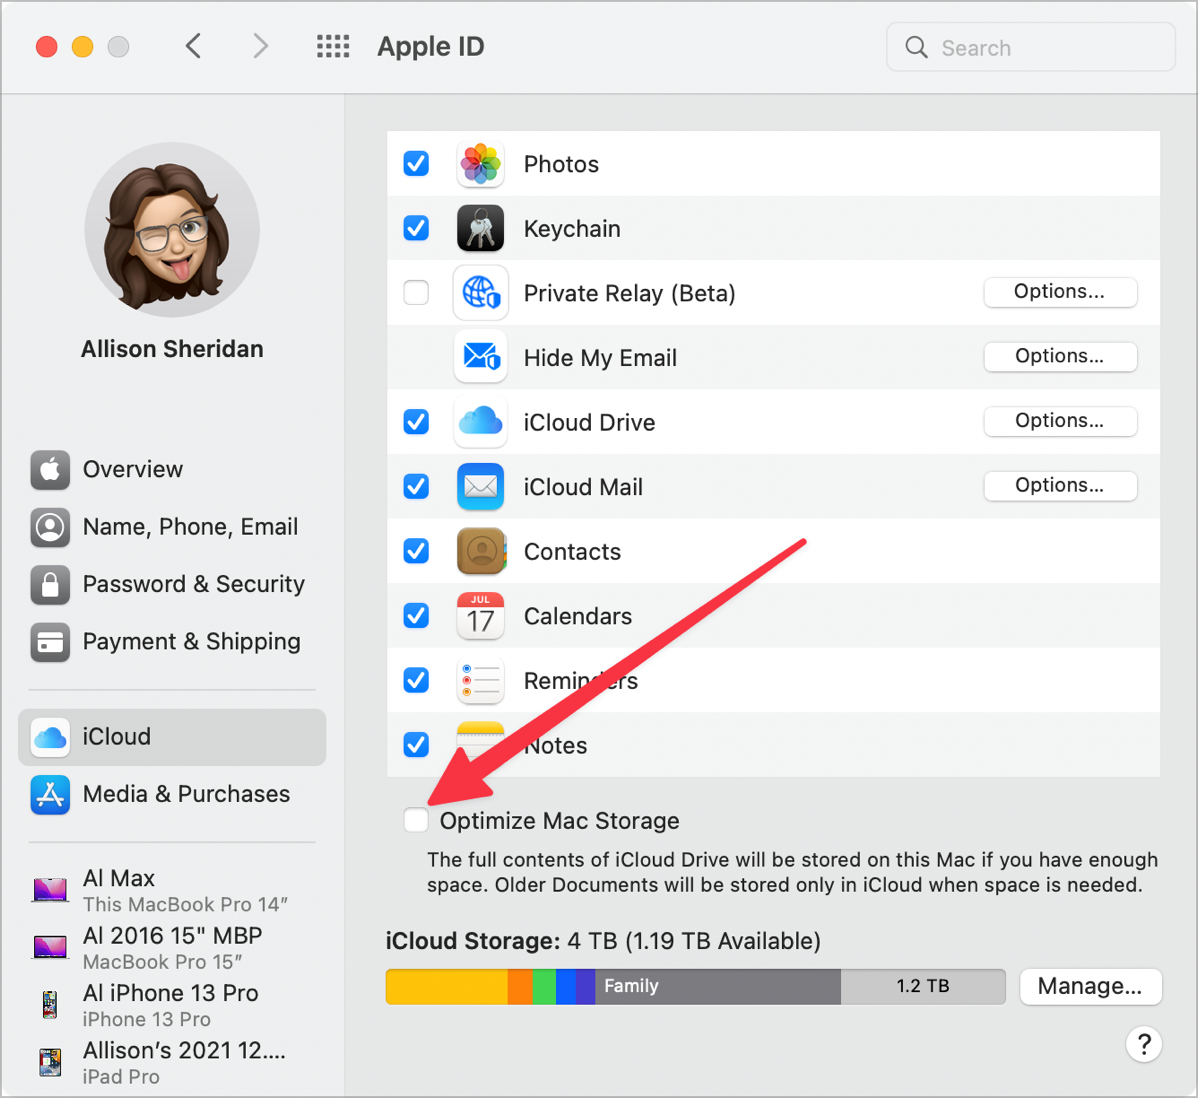
It was non-obvious where to find the setting to control whether iCloud Drive used optimized files. In iCloud System Preferences under your Apple ID, you see the pretty little graphic list in the upper right with checkboxes for each of the services you want to sync. Inside iCloud Drive the checkbox for Desktop and Documents was selected but there was no option for optimization.
I went back to the main page and found a little checkbox under the graphic list that said Optimize Mac Storage and it was checked. It makes some sense in this location but since Photos optimized storage is in a completely different place I didn’t think to look there at first. I’m kind of surprised that it did this as I’d never seen it checked before after a nuke. Yet another thing to add to my mind map!
Dropbox Notifications from UpDraft
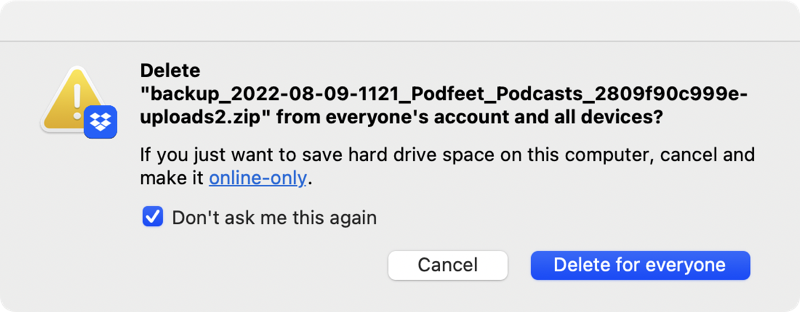
I would like to issue an official apology to Migration Assistant for being unjustly accused last week. I mentioned that I was getting these really annoying Dropbox notifications every time the WordPress plugin UpDraft from my website tried to delete an old backup in Dropbox. I said I had no idea how to fix it.
After the nuke and pave, the same thing happened. As I thought about it, it didn’t really make sense that UpDraft was deleting things on my drive. I was reinstalling my Hazel scripts when I found the one that I had created telling Hazel to delete old backups from Dropbox. Not only that, the solution to the pesky Dropbox notification was to simply click a checkbox that said “Don’t ask me this again.” I apologize to Migration Assistant for this misrepresentation of guilt. But only on this ONE item.
Steve Couldn’t See My Files
Ok, maybe I have to apologize for a second thing I blamed on Migration Assistant. Remember one problem was that Steve could not see inside my Desktop and Documents folder when connecting to my machine over the network? The same behavior was there after the nuke and pave. The problem was that pesky Optimize Mac Storage option. As soon as I unchecked that box, Steve was again able to see inside the folders.
My Favorite Apps
As I installed my apps from scratch, I started realizing how some apps are better than others in making our lives easier on installation and configuration. I came up with several different ways to describe my favorites lists. I’m not going to call out the more annoying apps by name, but just describe why they’re annoying.
The first criteria for favorites is how does the app’s installer work?
- Mac App Store is the clear winner. Easy, all in one place, click, and move to the next one.
- Apps whose download is the app itself, requiring no installer.
- Apps whose download is a DMG disk image. Usually, you only have to double-click to mount the disk image, and inside is a big arrow demonstrating how you just need to drag the app onto an Applications icon. One extra step but still pretty easy.
- Apps that use a .pkg installer. I dislike these because after double-clicking to launch they make you agree to a bunch of steps that are identical to every app so it’s just a big waste of time. They include the terms and conditions but there are not many of us who read them so it’s again a useless step for most.
- Apps that make us reboot after installation
- Some apps trigger a warning on the General tab of Security & Privacy. It’s not a big deal to go there, unlock and check the box to allow the installation, but I don’t actually understand what’s different about those apps to make them require this. The other problem is that pretty often the app will tell me to go look there but it simply doesn’t show up so there’s no way to agree. It’s aggravating.
- Apps that make me lower my security level by rebooting into Recovery, selecting Reduced Security and checking the box to “Allow user management of kernel extensions from identified developers”. One of my favorite and most useful apps requires this change to security. I know why the app requires this step and it’s not really a kernel extension but it’s still a pain and I don’t like having lowered security levels. The second app that requires it has not been updated to Apple’s new way of doing things and the company is just too lazy or understaffed or complacent to fix it.
Another way of judging how much I like apps is how they deal with their licensing. Let’s do another list:
- Mac App Store – again the clear winner because there literally is no license key to be stored and retrieved. Some apps with in-app purchases force you to push a Restore Purchases button which is a little annoying. It’s fine and easy when it works, but I’ve got an app that does absolutely nothing when I push that button. I think I have an in-app purchase, but to be honest I don’t know how to track down whether I bought it or not. I would think the app would either say, “purchases restored” or “you didn’t pay me you deadbeat”. Some feedback would be swell.
- Apps that have a simple license key you copy from your password manager and paste it in. The good ones have an obvious button to give it your license key and the best ones give you confetti or say “thank you” in audio.
- Apps that do let you copy/paste your license key from your password manager, but in a passive-aggressive move hide where you’re supposed to do that. They often give you a “buy” button that’s obvious but obscure the enter license option.
- Many apps now require approval of certain privileges in Security and Privacy. I don’t blame them because if a screenshot app is going to capture your screen, it makes sense that you should be the one to give them permission to do so. If a video conferencing app wants to be able to turn on your camera, it should ask politely first. Some apps make this approval easier than others:
- The very best have cute little animations to show you how to give permission. One actually shows you a fish, and you get to drag the fish onto a graphic and it enables the privileges. I have no idea why it’s a fish, but it’s fun!
- The next best simply put the language in the text, such as “Open System Preferences / Security & Privacy / Privacy Tab / Screen Recording
- One of my apps just said, “Enable privileges in Security & Privacy.” There were zero clues about which privileges it required. I have enough experience to know what it needed, but it could have made finding the right Accessibility preference a lot easier for me.
- Some apps make you uninstall or unlicense first on the computer before you nuke. That one has caught me out many times; requiring more process steps under Prep Work in my Mind Map.
I use a lot of apps that need to be tailored to my needs. I mentioned earlier that Audio Hijack has sessions you create for different audio routing scenarios. For example, I have one for recording Chit Chat that lets me record me and the other person on separate tracks and I have a completely different session for the Live show when I’m only routing audio and not using Audio Hijack to record.
In Hazel, I have a lot of different scripts that run depending on which folder she’s watching and what I want to do with the files she’s found. In Transmit, my preferred FTP client, I have settings for each of the different servers I need to access. In Under My Roof I have all of the data for my home including receipts and photos of my belongings for insurance purposes. These are just a few examples of the things you have to make sure you preserve from the nuke to the pave.
I made another ordered list of how much I like the different approaches apps have for helping you preserve settings and data.
- Apps that sync settings through the cloud (iCloud, Dropbox, etc)
- Apps that have an export/import tool for settings
- Apps whose developers send you the double-secret hidden Library file that may or may not work if you copy it across but they wish you the best of luck.
- Apps that make you take screenshots of every page of settings to reproduce
I’m happy to say that most of the apps now have very reliable methods of syncing data, so I don’t do nearly as much faffing about as I used to but there are still enough that it makes it really important to do that prep work.
I want to add one more honorable mention category to this list and I have to call out the app by name. Folge is the app I use for creating tutorial guides with screenshots and annotations. When viewing the list of guides you’ve created, the developer Oleksii very clearly included a Backup and Restore button right next to the green Create Guide button. When I reviewed Folge for the NosillaCast, I even told you all about it so I knew it was there. You can’t miss it.

But I missed it before nuking. See why I needed to add the Prep Work node to my mind map?
I was really hoping to avoid booting into my backup to go push that button, so I wrote to Oleksii and asked him whether the guides I’d created were maybe buried in my user Library folder somewhere so I could just drag them from the backup instead of booting into it. He got back to me really quickly and told me that indeed, I could just drag the files from the old Library to the new one. It worked perfectly. The reason he gets extra points is because of what he wrote after the instructions:
“May I ask you one thing? How would you ideally expect Folge to behave in such a backup-story like yours?”
Isn’t that lovely? He is in constant search for how he can improve his tool.
The last method of judging apps only has one entry in it, and it’s how fast does the download happen. Out of the 84 apps I downloaded, 83 of them either downloaded before I had a chance to check on them, or they were hugely capable apps that made sense they’d take a minute to download. The 84th downloaded inexplicably slowly and when I checked Activity Monitor to see my network speeds, it was downloading at 750KB/sec! I said I wasn’t going to call out apps but this one is so mainstream I feel it will be interesting. That slow download was Firefox.
But What About Your Photos, Allison?
I’m sure most of you have been waiting through all of this to find out what happened with my Photos download. I decided to wait till I had my system up and working well with most apps installed and configured before unleashing my photos onto the system.
I toyed with the idea of using Migration Assistant to move just my Photos (Pat Dengler was pretty sure I could do that), but I flinched. I turned on iCloud Photo Library, set it to Download Originals, and let it go to town.
With this method, Apple gives you optimized images first, so you get access to your images much more quickly. If the thumbnail is there you can always open it and Photos will download that one image ahead of the others. As I’ve mentioned before, the full download took more than 3 days the last time I went through this process. I was shocked when less than 2 days after I started the download this time, it was completely finished. I have no idea how soon it actually finished because I never thought 90,760 photos and 2567 videos would come down that quickly. So I wasn’t watching it.
Last Word on that Backup
I still wasn’t happy with the half-baked backup I ended up with on my Synology, so I decided to try Steven Goetz’s recommendation to have Carbon Copy Cloner simply make a backup from the SSD over to the sparse bundle on the Synology.
It wasn’t a quick process, but it was predictable and successful. Carbon Copy Cloner backed up 2,620,623 files for a total of 1.4TB of data from my SSD to my Synology over gigabit Ethernet in 32 hours and 39 minutes and 51 seconds.
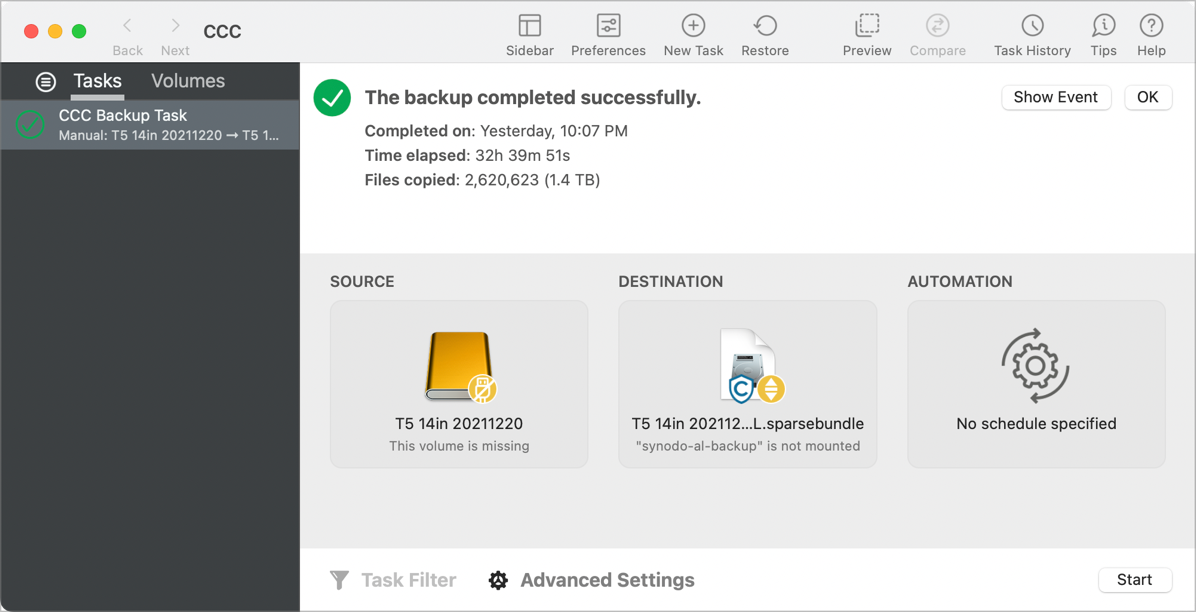
This time I added a new entry to my Mind Map suggesting that 2 days before I want to nuke and pave, I should start backing up my backup drive to the NAS.
Bottom Line
The bottom line is that the time and energy I put into doing the nuke and pave this time was about 1/8 the time and energy I put into trying to diagnose the Spotlight problems alone which were never even successful. That doesn’t even count how much time I wasted chasing down all of the other janky behavior. I don’t think I’ll ever try Migration Assistant again.
Here’s one last fun datapoint. I had 168 apps installed before the nuke and pave, not counting the 30 preinstalled Apple apps or any of the Apple Utilities. After the nuke and pave, that count has dropped to 84. I think that’s really remarkable. 50% of the apps I had installed in just 10 months didn’t even make my low priority list! I know I load a lot of stuff on my Mac, but even if you’re a more normal person, I suspect you could cut your app count by a lot if you did a nuke and pave now and then.

