Last week Steve and I went to visit his parents who live about four hours away. His parents are fantastic about always staying up to date on their apps and doing all security patches on their own because, you know, “stay patched so you stay secure.” But when it comes to major macOS upgrades, we like to be there to do it for them.
We had actually forgotten that we hadn’t yet given them macOS Ventura, so when I glanced at Steve’s father Ken’s computer and noticed the classic macOS Monterey background, I realized we had some work to do. I plopped down in his chair, went to software update and it said he was up to date.
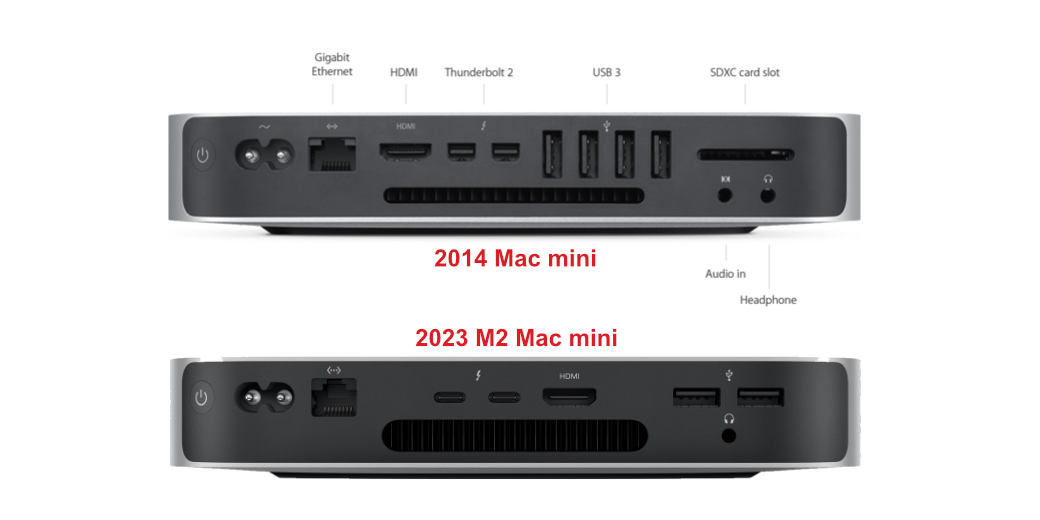
Ken and Merlee have had their Mac minis for a while so I figured maybe they were not eligible to get macOS Ventura. I looked up their model in MacTracker and discovered their Macs were from 2014. It is a testament to Apple that these nine-year-old Macs were still happily humming along on a fully supported operating system.
However, these Mac minis have 5400RPM spinning hard drives that have been spinning for nine long years. At this point, you have to ask yourself, “Do you feel lucky?”
If we lived around the corner where we could race over and help if one of their Macs died, we would have let them keep spinning, but since we’re four hours away we can’t jump in the car and make that kind of trip easily.
We explained the situation to his parents and suggested that we probably needed to buy them new computers. To our delight, both of them immediately said, “Ok, let’s do it”. They have a great appreciation for the fact that the two of us have skills that others around them do not. Their trust in our advice and those skills makes things a lot easier than if we had to sell them on the idea.
A lot of people share computers, and while technically they could have if one had failed, I don’t think there would have been peace and harmony in their home until we could get up there to help.
What to Buy
I figured that they didn’t need anything top-of-the-line so I started by looking for M1 Mac minis in the refurb store at Apple. I quickly determined that we couldn’t get anything on refurb same-day, and same-day was the only way this would work since we were leaving on the following day. We literally had just a few hours to figure out what to buy, buy the equipment, and set up these computers.
We looked at their current storage usage on their existing Macs, and Merlee was using around 100GB while Ken was using only 50GB. That was great news because it meant we could buy them stock M2 Mac minis with 256GB SSDs, and 8GB of RAM. This model was available for pickup at an Apple Store just 10 minutes from their house. I know Bart is shaking his fist at Apple for still not having ANY Apple Stores in all of Ireland, so I do appreciate that we have so many.

Steve had an idea for an improvement for his dad. Ken has neuropathy which has destroyed all sensation in his fingers. Coupling that with a slight tremor, typing is an arduous process for him. Because he cares deeply about security, his login password for his Mac, and his login for his 1Password account are both very long and very secure. With his trouble typing, it’s a very long process for Ken to enter these passwords. He doesn’t complain about it, but Steve wanted to make it easier for him.
Steve told Ken that for a Father’s Day present, he’d buy him a Touch ID keyboard. Ken’s current keyboard was a nine-year-old full-sized keyboard, so we spent some time with him testing to see if he used the 9-key pad for numbers, or maybe the delete key, and he did not. That told us we could go with the smaller, slightly less expensive Touch ID keyboard from Apple.

Our shopping list so far was 2 Mac minis and the Touch ID keyboard.
The new Mac minis have 2 Thunderbolt/USB-C ports and 2 USB-A ports, plus an HDMI port. While Ken could have used the Touch ID keyboard wirelessly, we knew it would drive him bananas if he had to suddenly charge it. So rather than having him worry about charging a battery, we decided to make this an always-charging wired keyboard. We bought a 2m USB-C to Lightning cable that would reach all the way under the desk and into his keyboard tray to be permanently plugged in.
I didn’t think about it ahead of time, but the Touch ID keyboard does come with a nice braided USB-C to Lightning cable, but it wouldn’t have been long enough. We harvested that little cable to take home.
What About Those Displays and Devices?
I’m sure some of you are sitting there grinning waiting to hear me talk about how many dongles we had to buy to make their systems functional. You’ll grin even more when I tell you that their displays were from around 2008! We were going to be connecting 2023 Macs to 15-year-old displays.
Ken’s display was connected over DisplayPort, using Mini DisplayPort on the Mac mini and full-sized DisplayPort on the display. I started hunting on Apple’s website for a solution, like maybe an adapter with male HDMI on one end and female Mini DisplayPort on the other but that wasn’t an option.
Fairly quickly I abandoned Apple altogether as there was a Best Buy around the corner with a much better catalog of available cables.
Further investigation, accomplished by taking photos upside down from under the Dell displays revealed that both of their displays also had VGA and DVI connectors. For $7.03 apiece at Best Buy we were able to buy HDMI to DVI cables for them.


Whew. That was a big hurdle that took probably 45 minutes to unscramble.
Merlee’s setup for USB on her old Mac was pretty straightforward. In the back of her Mac mini using the four USB-A ports were:
- Printer
- Time Machine Backup drive
- Logitech c920 Webcam
- Keyboard
In addition, she had a Logitech mouse transmitter dongle plugged into the USB-A port on the side of her full-sized keyboard. Unlike Ken, Merlee is a heavy user of the number keypad on her keyboard because she was an accountant for her career. She doesn’t have any problems typing quickly and accurately, and she never got Touch ID to work on her iPad because her fingers are unusually dry, so we decided to let her keyboard stay. That meant we could keep the mouse transmitter plugged into the keyboard as well.
That meant that for Merlee, we only needed two USB-C to USB-A dongles and she was all set.
Let’s go back to Ken’s Mac though, where things got a little bit more complicated. Like Merlee, he had a printer, webcam, and his keyboard plugged in via USB-A, but unlike Merlee he has a wired USB mouse and no backup drive.
Before you jump all over Ken for not backing up, he has his own process. He has a thumb drive that he keeps in a very secure place and he plugs it in at regular intervals and does a manual backup. Remember that he’s only using 50GB of disk space total – including the operating system.
His process has been to plug the thumb drive into the USB-A port on the side of his full-sized Apple keyboard, and then he simply drags the two folders he backs up onto the thumb drive icon and says yes when it asks to replace the files. It works for him and he’s especially rigorous so I know it’s a good process.
But remember that we’re going to be removing his full-sized keyboard and replacing it with the modern Touch ID keyboard which does not have a USB-A port on the side. That means we will be one port short.
At Best Buy we found a 4-Port USB-C hub for $32 that we could pick up that day. This would give us more than enough USB-A ports for his needs.
But one thing we weren’t willing to put him through was having to reach around and over his display to the back of his Mac mini to stick his thumb drive into the 4-port USB hub. You can imagine how challenging that would be.
In our photo taken under and around the display, we discovered that his display also has 2 USB-A Ports underneath and two on the side. We figured that the ones underneath must be so that you can plug the display into the computer and then use the ones on the side for data transfer.
This meant we needed one more cable and an unusual one at that. We needed a male-to-male USB-A cable to allow the display to act as a USB hub for Ken. “Luckily”, Best Buy had one available for pickup for the exorbitant price of $33.
At this point, we had our bill of materials finally figured out (or so we thought), so Merlee and I had a little play date at the Apple Store while Steve went to Best Buy for the cables.

Breaktime
When we got back from our shopping spree, it was time for Ken to participate in a Wii Bowling tournament, so obviously we dropped everything to go watch this highly competitive sport. In all seriousness, it was super fun to watch and Ken’s team is really good!

Data Transfer
After our sports break, Steve and I got to work. We took very different approaches to setting up the new Macs.
I was able to pretty easily pop in the new Mac and connect the dongles and all of her peripherals. As soon as the Mac mini booted up, it wanted to do an OS upgrade which was pretty annoying but I figured it was best to just let it finish.
Since Merlee had a Time Machine backup, and she doesn’t have much cruft at all, I figured the fastest, easiest, and most complete way to get her system just the way she liked it was to use Migration Assistant to set up her new Mac. While it was easy and complete, fast would not be how I would describe it.
After close to two hours it was still fixin’ to make a a plan to start moving the data. It was still saying, “Preparing to transfer user documents…”

I sent a screenshot to the Podfeet Slack asking if this was normal. While I waited for a response, I called Pat Dengler to find out if it was normal too but she wasn’t available. Finally I decided enough was enough and I was going to start over and do it by hand. I marched back into Merlee’s den, and it had finally started to transfer the data.
It told me it would take 40 hours, which was nice. After a while, it said 9, then 6, and then 2. In the end, it took over 4 hours to transfer less than 100GB of data from her vintage backup drive to her snazzy new Mac. I could probably have typed in all the files faster than that.
While I was cooling my heels impatiently waiting for Merlee’s Time Machine backup to migrate, Steve simply booted up Ken’s new Mac, let it do the software update, and then dragged Ken’s files to the desktop. I think his entire process was around 20 minutes.
We plugged in all of the dongles, including the USB-C hub, and his printer, camera, and new keyboard. Steve spent some time teaching him to use Touch ID and learned something interesting. The Touch ID sensor is on the far upper right of the keyboard, but with his limited hand control, it was nearly impossible for him to hold his hand properly to touch the sensor without hitting a bunch of other keys at the same time.
Finally, Ken suggested they try his left hand (since he is left-handed) and he found he was able to rest his wrist on the table and activate Touch ID nearly 50% of the time. But he reported back the day after we returned home that he’d found the sweet spot of holding his forefinger flat and now it’s working well.
I hope I’m as patient and forward-thinking as he is to learn new things when I’m in my 80s.
After that it was time to get his backup thumb drive working with the new Mac. As you may recall an hour ago when I started this story, he used to plug it into the USB port on his keyboard, but the new one doesn’t have a USB port. Our plan was to use the display as a USB hub.
We plugged the stupid-expensive male-to-male USB cable from the Mac to the display and then plugged his thumb drive into the side of the display. It didn’t work. There are two USB ports on the side and two underneath, and we tried all of the combinations and it still didn’t work. We changed USB ports on the Mac too, ensuring it wasn’t going through a dongle, but it was no good.
This project was certainly flexing every cable and connector muscle of our brains. We then got the idea that if we could buy a USB-A to female USB-A cable, we could hang it out from under his display for easy access to plug in the thumb drive. Apple didn’t have one for sale, and the one at Best Buy would take a few days, but Target had a 6’ USB extension cable for $11. Sold!

Steve was on his way over to Target when I realized something. Ken’s original keyboard had been connected by a USB extension cable before we unplugged it! In other words, we already had a USB-A male to female cable. I called Steve right away and he suggest I test it before he turned around and came back.
For the life of us, neither Ken nor I could get the thumb drive into the female USB connector on that extension. Finally I peered inside the female USB connector and noticed that it was keyed – meaning that it had a dent into the rectangle that was stopping a normal USB-A connector from going into it. I pulled out the old keyboard, and sure enough, its USB-A connector had a slot in the top which allowed it to slide in. I have a very vague memory of having seen a cable like this but it was a very long time ago.
Steve came back with the new extension cable and Ken’s thumb drive fit right in. While it’s something for him to get used to, I think it will be easier for him to lift up the cable off the desk to connect the thumb drive than it was to look into the side of a keyboard.
After I got home from the trip, I was studying the photo of the underside of Ken’s display and I noticed something. In addition to the two USB-A ports, I realized there was also a USB-B port, like the kind you see on printers. I haven’t been able to prove out this theory, but I bet if we’d plugged a USB-B Device cable into the display from the Mac, all four of those USB-A ports would have worked. I may just throw a device cable into my bag at Christmas to answer that question.
Software
The software story was a lot easier than the hardware story, but Microsoft went out of its way to make it hard for us.
Ken and Merlee, like many of us, finally gave in to the subscription model for Microsoft 365, which meant it was the one app that didn’t migrate even for Merlee. We had to download the installer on each Mac from scratch and log into their account.
By default, Microsoft insists on installing every single application and service they’ve ever invented. Ken and Merlee have never used PowerPoint (which makes me very happy), don’t want Outlook, don’t know what OneNote is, and they do not want anything ever in the cloud (except iCloud Photos of course), so they don’t want OneDrive. They want Word and Excel and that’s it.
I have done a few thousand more software installs than Steve so when I was installing Word and Excel for Merlee, I knew to stop on the Installation step of the installer and select Customize to eliminate all of the other apps. Steve didn’t catch it so we had a bit of cleanup to do to delete those other apps Ken didn’t need.
After the installation, Steve had his dad exercise Excel the way he does every day to make sure things were working properly.
A bit later when we were trying to get Ken’s thumb drive working, he tried to interrupt us to ask a question about Excel. We impatiently told him we were busy working on the thumb drive and made him wait. Finally we let him tell us what was wrong, and it turned out to be a way more important problem than the thumb drive.
He said that he had created a file in Excel and it was called Book1, but it didn’t show up in his folder of Excel files. I figured we just needed to change the default save location and that’s when I realized Microsoft had pulled a fast one on us.
When you install Office from scratch, it defaults to saving your files in OneDrive … even if you don’t install OneDrive. This is the last thing Ken and Merlee want!
It was surprisingly difficult to figure out where and how to change it back to saving on the Mac. Unless I just missed it, there doesn’t appear to be a setting or preference to change the behavior. I finally figured out that if you open a file and attempt to save it, you’ll see under the name field that it says “Place:” and a dropdown that says “OneDrive – Personal”.
Confusingly, there’s also a button that says On My Mac, which might make you think it was going to save on your Mac. But that’s actually a button that changes it to saving on your Mac. If you click it, the entire dialog box changes to a standard macOS Save As dialog box, but now it has a button to save to OneDrive.

Here’s the fun part – we had to do it both in Word and Excel to direct both of them away from saving in OneDrive. With a little more sleuthing we were able to figure out how to move the few files that had already gotten saved to OneDrive back to their Macs.
Gee, Microsoft, maybe you could ask people before making the assumption of where they want to save their files???
Why Not New Displays Too?
We were finally finished with the great emergency Mac mini upgrades of 2023. When I described to Pat Dengler the challenges of cabling the new Macs to the ancient displays, she asked a simple question – why didn’t we upgrade their displays at the same time?
If we’d had more time to think it out and more time to spend deciding on what monitors would be right for them, we probably would have. Replacing their 22” displays wouldn’t have been very expensive but it was just one more layer of complexity to add to what was already an incredibly stressful day.
We planted the seed with Merlee that she might really find value in a newer, higher-resolution display and she seemed open to the discussion for next time. Ken wasn’t as excited about the idea, and I think it’s because his display is a bit newer and the text is crisper than hers.
Bottom Line
The bottom line is that we were amazed that we could pull this off in such a short amount of time. In 5.5 hours we went from deciding to buy new computers to nearly complete installations with all data and applications transferred. That’s pretty miraculous.
We were gratified when Merlee exclaimed about how incredibly fast the new Mac is, “I just touch something and it opens instantly!” And also gratified when the day after we got back Ken sent a note telling us that his success rate with Touch ID had gone way up when he figured out to make sure he laid his fingertip flat on the sensor.
Personally, I appreciate their faith in us. Ken and Merlee both often say that they don’t know how other elderly people who don’t have kids with our knowledge level even use a computer.

One more thing…
We brought the elderly Mac minis home with us to clean up and sell back to Apple. They’ll give us $165 each for them, which was more than I expected. A few days after we got back, Ken called Steve asking for some help getting his browser to look like it did before with the right home page. I thought it might be helpful if I brought Ken’s Mac up so we could take a look at what he was hoping to see.
Luckily we have a 27″ Apple Cinema Display that has mini DisplayPort on it, so it was a breeze to plug this old machine in at our house.
Remember that the first reason we wanted to upgrade the Mac minis was that they couldn’t run the current operating system (so they would soon be two behind). The bigger reason was because they had 5400 RPM spinning hard drives and I figured 9 years of that spinning was long enough.
When I booted up Ken’s machine at our house, for some reason I double-checked the system configuration, only to discover under the Storage tab that his Mac had a 1TB SSD. Seriously!
Remember I said that I looked at Mac Tracker when I saw the age of the Macs, not System Information? Mac Tracker isn’t wrong, but it says the late 2014 Mac mini storage is “500 GB or 1 TB (5400-rpm) hard drive”. I stopped reading right there. The rest of that line says, “configurable to 256, 512 GB or 1 TB flash storage.”
I can’t believe it. It’s wonderful that Merlee really appreciates how fast the new machines are, and it’s wonderful that Ken has Touch ID on his keyboard to help him enter his complex passwords, and it’s wonderful that they’re running the very latest operating system…but I never would have done the upgrade in such a rush as we did that day if I realized they had SSDs.
It feels good to know we pulled this upgrade off in such a short amount of time, but holy canole was it hard!
I (hope) you thoroughly documented everything and every setup that you modified, and diagrammed what cables we plugged into what ports and where (knowing you you have a nice chart with all this)….AT least you were not dealing with any failures.
You might even look into a color laser printer for them (to save on ink).
Barry Porter
Allison — I enjoyed reading this… it’s typical of many scenarios I have faced as certified Apple Consultant. Why don’t you take the test and get certified just for funsies?
Ha! That’s a fun idea, Dave. My understanding is you have to take classes and read a book though, don’t you?
Barry – I’ve thought about a laser printer and with as much as Ken prints it would be economically ideal, but I hate to change anything that’s working. Even though that’s exactly what we just did!
Allison — When you pass the exam you earn the Apple Certified Support Professional certification. Here’s the link to the Exam Preparation Guide:
https://training.apple.com/content/dam/appletraining/us/en/2023/documents/Apple%20Device%20Support%20Exam%20Prep%20Guide.pdf
Although it’s cool to be an Apple Certified Support Professional, I don’t recommend joining the Apple Consultants Network… that requires a heavy membership fee, business liability insurance, background checks, and additional certifications. I dropped my membership in the ACN because these requirements didn’t help my business helping home users and small businesses.
Let me know if you decide to do it.
I’m not sure it would do for me, Dave. I don’t intend on working as tech support — I just do this for fun. It would be fun to take the test with no prep…just to see what I know.
You can do that, Allison… and you might surprise yourself with how much you already know! You don’t have to work as tech support… it’s fun just to have the creds. (And you can put it on your website/business cards).