Back in 2009, Steve and I hosted a party for the NosillaCastaways during Macworld at a local bar. It was a great success, and everyone had a great time. The following year, we did it again but something awful happened. Someone who publishes a list of parties during Macworld included our party and we had tons of crashers show up. Steve and I funded this party with our own pocketbooks so this was a real bummer.

In 2011, we wanted to do it again, but we needed a way to control who showed up. We deployed one human tactic and one tech tool to make the party a success. Barry Fulk (well-known as the host of the Midwest Mac BBQ), Paul Shadwell, and Julie Kuehl volunteered to be bouncers for the event. It was awesome – Barry wore a tuxedo, Paul wore an all-black suit, and Julie dressed up in her Harley biker gear complete with a leather jacket and a bandana.
The tech angle was Connor Jackson’s idea. He suggested I use a Google Form so people could register to attend. That would give the bouncers a checklist to ensure no miscreants showed up to spoil the party. I had never heard of Google Forms before but it turned out to be the perfect solution.
While it’s been 12 years since I first discovered Google Forms, I just realized that I’ve never talked about it on the show beyond a passing mention. I’d like to rectify that and teach you what Google Forms can do and how to make them yourself. They’re really nifty, really easy, and free.
What Can You Do with Google Forms?
The basic idea of Google Forms is that you create a series of questions and decide how you want them answered, and then you send out the form and automatically collect the data. That sounds really dry and boring, doesn’t it? How about a couple of examples to tickle your interest instead?
Let’s say you’re planning a big family reunion. You want to accommodate as many of the family members as possible, so you might want to create a form that asks for people to vote on which dates would be best for them. You might want to include where the event should occur, narrowing down the available options by a vote. Maybe once you find a date and location, you’d want to create another Google Form to get people to sign up to bring potato salad, beer, or cake. Perhaps you’d include a section on when people will be flying in and out so you’d know when to expect them.
Maybe you’ve got an event that’s a lot simpler, like a birthday party and you just want RSVPs. A quick Google Form is all you need.
If you teach a course or make a presentation, perhaps you’d want to use a Google Form as a method to get feedback on how the audience perceived the information you delivered.
Maybe you’re working on a project and you’d like to get feedback. I used a Google Form to ask people what they liked best about the design of Podfeet.com and what they wish was different about the site. I used some of that feedback to figure out how to redesign it into its current form.
During COVID, Steve cooked his usual giant Thanksgiving dinner even though we couldn’t have our normal large family gathering. We decided to drive care packages to each of our friends on Thanksgiving day. Now I didn’t want to bring sweet potatoes to someone if they hated them, or dark meat when they preferred light meat, so I created a Google Form with all of the options listed and let them decide what they wanted delivered. Our friends found it a delightful bit of entertainment to fill out and have goodies delivered to their doors.

Google Forms provide a great deal of flexibility in what kind of information you can collect and even has ways to protect the privacy of the participants so you don’t gather more information than you need.
Settings for Forms
Google Forms are available from drive.google.com under the “New” button (which will open a new blank form), or you can start at docs.google.com/forms which will show you more options. Across the top, you’ll see the Template gallery. This is a great place to peruse how to create different types of forms can be created. You can study a job application, an assessment, an event registration, and a form to find a time for a group to do something together.
Let’s start with a blank form and learn how to use Google Forms.
As soon as you start a form, you’ll see three tabs at the top:
- Questions
- Responses
- Settings
I’ll start kind of backward by walking through the settings first because they’ll change what options are available to you when you start creating your questions.

Within Settings, you can make the form a quiz, which allows you to assign point values, set answers, and provide feedback. If you don’t want to do a quiz, don’t toggle this setting on.
Next, you have a lot of control over how you deal with responses. By default, Google Forms don’t collect email addresses. I applaud Google for making this the default because collecting peoples’ email addresses means you’re responsible for protecting them. In the case of the NosillaCastaways party, I did collect addresses because I wanted to be able to notify the attendees if something went awry with the party, such as a venue change. You can toggle on the ability to collect email addresses here, or you can do it later in the creation of your form.
In Google Forms Settings, you can automatically send participants a copy of their completed form. If Cousin Billy has committed to making that potato salad for the family reunion, you sure want him to have a copy of that commitment, right?
Let’s say Cousin Billy remembers that he doesn’t actually know how to make potato salad but he’d like to make his world-famous quiche. In Settings for Google Forms, you can allow participants to go back and edit their responses.
If you’d like to limit users to one response, there’s a toggle for that in Settings, but it warns you that this will require the participants to sign into Google so their participation can be tracked. Again I think it’s quite polite of Google to have that turned off by default.
The next section of Settings allows you to control how the form and responses are presented to your participants. I really appreciate it when I start a survey if they show me a progress bar. Sure I’ll bail earlier if I realize after 5 minutes that I’m only 10% through, but that should be my choice I think. Google Forms lets you show a progress bar to be courteous to your participants.
If your form is a quiz, you might want to shuffle the order of the questions. You can choose whether to show the respondents the results from other respondents. That’s another thing I really like in a survey — I need to know how much people agree with me!
Finally, you can change whether by default questions are required to be answered. This is a default as I said, so you can always toggle required on and off question-by-question.
Let’s make a form already!

Now that we have our settings just the way we want them, let’s make a form already. Let’s start with an example. Let’s say we want to take a survey of the NosillaCastaways to find out how well they like the show. We’ll start by adding a title and we can also write a little form description.
Under the form description, you’ll see a set of formatting options you can use within the description including the typical bold/italics/underline, numbered and bulleted lists, along with the option to create links, and finally to remove all formatting.
A new Google Form will insert a new, untitled question. To the right, you’ll see it’s defaulted to multiple choice and a radio button that says Option 1 has been auto-created.

Before we write our first question, let’s explore the options for the answers.
We can allow two different free-form text fields: short answer or paragraph.
In addition to the multiple-choice radio button option that was the default for our new form, you can also choose checkboxes or a dropdown. Multiple-choice radio buttons and dropdowns only allow one answer, while checkboxes allow more than one answer to a question.
Let’s say your form is for collecting bug reports. People might need to upload screenshots of a problematic area in your app. Google Forms allows file uploads for this purpose. They warn you that respondents will be required to sign into Google if file upload questions are added to a form because their files will be uploaded to their own Google Drive folders.
The next three ways to present possible options for answers are linear scale, multiple choice grid, and checkbox grid. Linear scale is pretty self-explanatory — respondents will get a little slider where they can drag along a scale. You can set the minimum to 0 or 1, and a maximum of 10.
I didn’t really understand the checkbox grid until I looked at the template to find a time. It shows Monday through Friday down the left column, and then four columns across the top for Morning, Midday, Afternoon, and Evening, and then little checkboxes for the intersections. By that I mean you can check a box for Tuesday in the Morning, any time of the day on Wednesday, and evening on Friday.
Just like the dropdowns work, if you change that same find-a-time template to be a multiple choice grid, the respondents would only be able to choose one time to meet up instead of all of the times they’d be available. There’s certainly a use for the different types of options so it’s good to understand which ones allow which kinds of responses.
The last two types of responses are date and time. I assumed these options would be useful for choosing a time to meet up like the previous example, but it’s to define a specific date or time. You could use this to ask someone for their birthday, or the date they’re submitting a form. I thought it might be useful for quizzes, like, “When did Columbus land at Plymouth Rock?” but you can’t just answer 1492, you have to give the month and day too. By the way, when I was a very young child I got that question on a quiz and I didn’t know the answer. I looked at a neighbor’s paper and wrote down the answer. Before I turned it in, I erased it because I knew it was wrong to cheat like that. I’m no saint but my parents raised me not to cheat.
Now that we understand all of the ways we can have questions answered, can we finally start writing our NosillaCastaways survey?
Let’s make the first question, “How did you find the Podfeet Podcasts?” The obvious type of response should probably be a paragraph so people could explain in detail how they found the shows. At the bottom right I can set the toggle on whether to make this question required. Some people might not remember how they found the show so I’ll make it optional.
To the right of the question field, there’s an image icon. For reasons I can’t explain, they’ve made it so you can embed an image into any question, either by uploading, linking to an online image, or even using your webcam. Once it’s inserted into the question, you can change the alignment, change out the image, remove it, or add a caption.
At this point, we probably want to see how this will look to the respondents to our survey. Google Forms changes the location and even the names of some icons depending on how wide your window is in your browser. On a narrow window, there’s a 3-dot icon in the upper right with a lot of options, one of which is Preview. If you have your window wide enough though, you’ll see an eyeball icon that allows you to preview your form.
To add additional questions to the form, look around for a plus icon. If your window is narrow, it will be in a group of icons across the bottom, but if you’ve got a wider window they’ll be in a column on the right
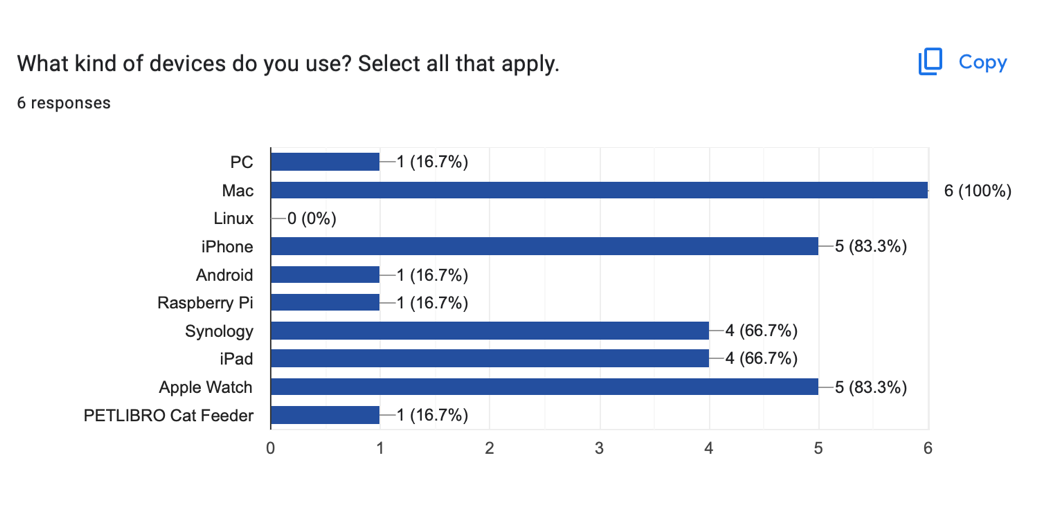
For my next question on my amazing survey, I’ll ask them what kinds of devices they use. This question would be ideal for checkboxes so they could check all that apply. As soon as you choose checkboxes, you’ll see Option 1 next to a checkbox. You can enter the first response option and then manually click to add an option, or just hit the enter key and it will add options as you type. They also allow you to add an option called “Other” where they can enter a free-form answer. I chose to let them choose from PC, Mac, Linux, iPhone, Android, Raspberry Pi, Synology, iPad, and Apple Watch.
Let’s get to the meat of the survey and ask them to know how well they like the NosillaCast. How about a linear scale response to the question? In addition to defining the numerical scale, we can also assign values to the two endpoints. That’s important so people know whether 1 is best or 10. I think we’ll label the value 1 to mean “Truly love it” and 5 will say, “It’s the best show ever”.
At any time while creating your questionnaire, survey, quiz, or party invitation, if you hover over a question, you’ll see a light grey icon with a grid of 3×2 dots. This is a handle that allows you to drag the questions up and down to rearrange them.
Let’s ask them how often they listen to the different shows. I’ll use a checkbox grid for this one. For the rows I’ll put in NosillaCast, Chit Chat Across the Pond Lite, and Programming By Stealth, and then for the columns I’ll put “never miss an episode”, “most of the time, “dip in and out”, “not my cup of tea”, and for snarky people like NASA_nut, we’ll make the last option “never heard of it”. When I was writing up those options, I realized I needed them in a different order. Just like the questions, the response options within a question can be rearranged using the same kind of grab handle with the six dots.

After all this work, I think our respondents deserve a reward. Back on that elusive menu of icons where we found the plus button, there’s an option to simply embed a video from YouTube. I thought it might be nice if those participating in my little survey got to watch a beautiful short video Steve created a few years ago – a compilation of the total eclipse we saw in Chile. It’s very moving and well done.
After giving the YouTube URL, the embedded video will have a 3-dot bubble on it, which allows you to left, center, or right align the content, change the video to a different one, or remove the video altogether. In case you’re wondering, you can’t embed any other video formats. I tried Vimeo, and a video I put on my own website recently of my cat responding to the dropping of the food by the new automated cat feeder, and Google Forms didn’t accept either one.
This video is really a very separate part of the form, so let’s use that elusive menu that moves between the right side and bottom of the view and choose the last icon that looks like two tiny rectangles. That lets us add a section to our form to separate the two distinct pieces. If you’ve got a long-form, separating them into sections has a bonus feature that you can collapse sections so it’s easier to work on your form.
Formatting Your Masterpiece
If you’re happy with the default color scheme Google gave you, you’re pretty close to done, but if you’d like to customize the look a bit more, take a look at the painter’s palette icon in the top menu bar. Not only can you change the text styles for the header, questions, and text, but you can also choose the overall color, and add a Header image.
If you select to add a header image, you get a plethora of very cool-looking banner images under the Themes section with topic areas like Work and School, Illustrations, Birthdays, Wedding, Travel, and more.
You can also upload your own banner image or choose from your already-uploaded Google Photos. I uploaded a banner image I have of the four Podfeet Podcast logos. When the logo came up, Google Forms automatically changed the theme colors to complement the images. I thought that was pretty cool. Before the banner image, the form was lavender, but it must have picked up the grey from the Taming the Terminal logo because the form changed to a more professional dark grey border and light grey background. Interestingly, it had a color palette that complemented the four logos so I chose a nice blue instead of grey.

Distributing Your Google Form
Let’s say we’re done with the survey for now and we want to test it out. We don’t want to send out the raw URL to create the form, rather we want to send out a form people can actually fill out and submit.
If your window is narrow, you’ll see a paper airplane icon that lets you send out your form. If you embiggen your window, there’s a big purple “Send” button that does the same thing.
You’ll get three different ways to send the form to your intended respondents. The first option is to send via Email. If you were sending out birthday party invitations, or asking your relatives to help you pick a date for a family reunion, this might be a practical method since you’ll have a specific set of recipients. You’ll still see that “collect email addresses” is set to “do not collect”, but I think that just means that you won’t collect the email addresses. It wasn’t clear to me whether Google might collect the addresses.
The second method to send the form is to use a link. You can simply copy the giant long docs.google.com/forms URL with a lot of glop in it, or they offer to give you a shortened URL. It’s still a bit gloppy, but it’s to forms.gle and it is a bit shorter.

Finally, if you manage your own website, you can get an embed code ready to plop into a web page as an iframe. That’s how I did the NosillaCastaways party invite all those years ago with a double-secret private URL that only listeners of the show would know.
Responses
After you send out your Google Form, you’ll actually be able to see the responses roll in. Remember when we started on this journey I said at the top of the form you’ll see Questions, Responses, and Settings. Even without selecting the Responses tab, it will have a number next to it showing you how many people have responded to your survey.
When you open the Responses tab, you’ll see three additional tabs: Summary, Question, and Individual.
On the summary tab, you’ll see the data presented differently depending on how you allowed the participants to respond. For example, if you gave them a freeform text field, you’ll see the text-based responses. If you gave them a multiple-choice/checkbox, then the responses will show a horizontal bar graph for each answer and what percentage of the participants selected each of the options. Likewise, you’ll see a vertical bar graph if you gave them a linear scale like 1-5.
Here’s something really fun. Next to the non-text-based response sections, like the bar graphs, you’ll see a copy button that lets you copy the graphic itself. This can be a great way to embed the results into a final report. It’s an odd copy though, it doesn’t really show in the clipboard or even in my clipboard manager so it’s hard to extract. I’m not sure how (or why) they made it so hard to use.

After the Summary tab, we can look at the Questions tab, which focuses on each question, one at a time. Text-based responses will be listed and it will tell you how many people wrote the same thing. Probably not too valuable with an open-text response question. A multiple-choice checkbox question will show you all of the different sets of options people chose, and if you have a large enough sample size that could end up repeating so you might see more than one response to a specific combination of answers. Likewise, linear scale responses could be very valuable to show you the frequency of each response.
The final tab under Responses is Individual, and it allows you to see how each respondent answered each of the questions. I could see this view being very helpful if you were giving out a quiz.
These three ways of viewing the data you received may meet your needs, but if you’ve got a giant survey you’re doing and want to do a lot more analysis, there’s also a link at the top to create a Google sheet for the responses. Once the sheet is created, the button will change to “view” and as more responses come in they automatically populate the sheet.
Quizzes
I want to make one last comment about quizzes. I didn’t quite understand how to make a quiz so I experimented using the quiz template they provide. Even after starting with a template, I had a lot of trouble figuring out how to get it to do things. It seemed like it was a bit buggy, getting stuck from time to time where I’d have to refresh the whole page to work with it. Sometimes the quiz would open with an answer already chosen, and I couldn’t figure out how to consistently give the quiz taker feedback. Maybe I was just doing something wrong, but none of the other templates or form options gave me a lick of trouble. I’d be curious whether any of you could get quizzes to work consistently.
Bottom Line
The bottom line is that Google Forms is a highly flexible tool to collect data whether it be a vast audience survey or to create a quiz for a class or to organize an event and get participant information. And it’s free! If you’d like to take my little survey and watch Steve’s eclipse video as a reward, there’s a link in the shownotes to the NosillaCastaways Survey.