Introduction
Every once in a while, I start working on a topic for the show and as I dig in, I realize it’s more complex than I first realized. More rational people would back away and move on to another subject, but if I don’t hit a roadblock, I keep digging in. And sometimes I descend into madness. This is one of those times. I recommend that you skip this entire subject rather than descend with me. If you continue, blame yourself.
A History Lesson
Way back in 2015, Apple introduced Live Photos. A photo taken in Live on the iPhone captures 1.5 seconds before and after the photo is taken. In software, the phone chooses what it considers the best key photo, but you can go into the editor in Photos and adjust the key photo to get that perfect moment in time. In my opinion, it’s the only way to take photos of children and pets.
The other feature of Live Photos is that you can use some fun effects like bounce and long exposure to create interesting images and videos.
A year later in 2016, Apple introduced Portrait Mode which allowed us to take shallow depth-of-field photos mimicking what we can do with a big-girl camera. Over the years, the quality of Portrait images has gotten better and better, and can create very compelling photos of people (and pets).
But if you chose to take a Portrait photo, it wasn’t a Live photo. You had to choose the cool shallow depth of field, or the ability to capture just the right frame. If you captured that perfect smile in a Portrait photo, that was awesome. If you missed it, the photo was useless.
The problem at this point in the story is that we had to choose between Live and Portrait photos. Before you took the shot, you had to decide if you wanted to be able to select the best photo in a Live photo, or risk it and try to get a fabulous portrait photo of a person or pet.
With the advent of the iPhone 15 models, and with iOS 17 and macOS Sonoma, Apple gave us almost the best of all worlds. If you take a photo of a person, dog, or cat (sorry bird and reptile people), even in Live, it can become a portrait photo. I know, it sounds too good to be true, right?
This very cool feature has some tricks to it. We’re going to go through:
- How to know you’re taking a Live Portrait photo
- Limitations on Live vs. Portrait in these photos
- How to edit the depth of field
- How to share these images so the recipient can also edit the depth of field (and thar be dragons!)
How to Know You’re Taking a Live Portrait Photo
I took two photos to demonstrate the first item on our list – how to know you’re taking a Live photo. The first photo I took was of my laptop, which no matter how much I love it, is not a person, dog, or cat. The second photo I took was of my cat Ada, named after the first computer programmer, Ada Lovelace.
In the upper right of the Camera app while taking each of these images, I made sure that the Live Photo indicator did not have a line through it. Down below, just above the shutter button, I made certain that I had selected a regular photo (not pano or portrait or any other option).
As I pointed my camera at the two different subjects, there was one subtle difference in the onscreen information. When pointed at my cat, the camera showed an “f” in a circle as an overlay on top of the image in the bottom left. When I looked at my laptop with the Camera app, there was no “f” showing. This “f” is the indicator to tell you that you’ll be able to change the depth of field on the photo you’re about to take.


If you don’t see the “f” when you point your iPhone 15 at a person, dog, or cat, you may have to toggle on this feature. It should be on by default, but if you don’t see it, open Settings, Camera, and then scroll down till you see Portraits in Photo Mode. The text below the toggle says:
Automatically capture depth information if a person, dog, or cat is prominent in the frame in Photo mode, so you can apply Portrait effects later.

In traditional photography with big-girl cameras, you have a dial that changes what’s called the f-stop. As the f-stop number gets smaller, the lens opens up more, which creates a shallower depth of field. Think about how it’s harder to focus driving at night – that’s because your pupils dilate super big and then you have a shallower depth of field.
Anyway, Apple have chosen the f-symbol to indicate that you’ll be able to change the effective f-stop inside the Photos app. What’s interesting here (beyond learning a wee bit about traditional photography) is that the iPhone 15 has been instructed to take a Live photo, but it’s going to let us change the depth of field.
After you take the photo in Live but not Portrait of a person, cat, or dog, the indicator in the upper left will have an “f” in a circle and the word Live next to it. The dropdown will be there to play around with effects like bounce and long exposure. But hold that thought.

When you edit the image, across the bottom along with the normal editing options, you’ll see both Portrait (with an “f” in a circle) and Live, side by side. If you select Live, you can drag the slider to choose a different key photo, but there’s something new on the slider. Above the initial key photo, there’s that little “f” in a circle again.

Remember when I started this story and I said “Apple gave us almost the best of all worlds”? There’s one limitation. The depth information is only on that initial key photo. If you didn’t capture what you wanted and need to change to a different key photo, then you can’t adjust the depth of field.
I didn’t want you to be confused if you start by changing the key photo and then change to Portrait to adjust the depth, and suddenly the photo changes back to the original key photo. But hey, you got a better photo because you took it in Live.
I look at it as the Live Photo is there just in case you missed the perfect moment, but you get all the benefits of Portrait mode if you did capture the perfect moment.
Still in the editor, when you select the Portrait option (again with the “f” on the button), you’ll see the word “Depth” on the left and a dial across the bottom but it says OFF. At this point, pretty much everything in your image should look in focus. But if you start to slide your finger along the dial, you’ll see little numbers popping up like f 16 down to f 1.4. We could go through why they’re numbered this way but that’s a whole “how cameras work” explanation, so let’s stick with what I said before: the smaller the number, the shallower the depth of field.
As you drag your finger, you’ll see the background of your photo go out of focus. If you drag all the way to f1.4, you might even see part of your subject go out of focus. A dog with a long nose might end up with their ears out of focus. You probably don’t want that, so drag it up until you see your subject in focus but distractions in the background are blurred out.

But that’s not all. You’ll see an orange square on the screen, showing you where the camera’s original focus point was. You can simply tap anywhere on the image to change what is in focus. In 2014 a company called Lytro came out with a specialized camera that allowed you to change what was in focus like this and now we have this capability in our pockets. If you’ve ever taken a photo of two people in front of some pretty scenery but the camera focused on that scenery and the photo was useless – now you’ll be able to fix it.
In the upper left next to yet another “f” in a circle, you’ll see a hexagon icon with two circles in it – looks like a metal nut on the end of a screw to me. Tap that icon and you’ll be taken into the studio lighting options. Perhaps you’re feeling a bit fancy, and you want to choose a fabulous stage lighting effect for your cat photo. When you’re in the lighting mode with the nut selected, the “f” icon changes to say the f-stop you’ve chosen, such as f 2.8. Not sure why you need that information while playing with lighting but it’s there for you if you need it.

If you do give studio lighting a play, be sure to go back and forth with the depth of field because it can dramatically change how your studio lighting effect looks. Also, if you apply studio lighting, this turns off Live. When you flip to the Live slider control, it will be greyed out. At the top, you’ll see the word Live in a box with a line through the Live icon, and tapping on that will make it Live again. It will also turn off any studio lighting effects you may have applied.
After you save your changes to the depth of field and/or the studio lighting effects, I think the onscreen information gets confusing. In the upper left, it will still say Live (even though it’s no longer live) and the “f” icon has a line running behind it. That would imply to me that this isn’t a Portrait image any longer and that it’s still Live, but it’s actually the opposite.
Under the chevron that drops down where you’re used to seeing loop, bounce, and long exposure, you now have Live, Live Off, Portrait, and Portrait Off. I played with these options for a bit and if anything I was more confused as I toggled them on and off, especially when I had studio lighting applied. I was going to try to explain it but I’m pretty sure it’s not acting exactly as they’d intended so let’s move on.

How to Share Live Portrait Photos So They Can Still be Edited
My interest in this entire topic came up because I had a problem to be solved. Pat Dengler joined our family at a brewery nearby. We used Pat’s new iPhone 15 Pro to take a family portrait (Pat IS family) and she had it set to regular Portrait mode when the photo was taken. That’s cool, but when we looked at the photos, we realized that the depth of field was too shallow and some of us (including Pat and me) were way out of focus.
Understandably, Pat didn’t want to be responsible for choosing the right photo from those we took to adjust the depth of field, so she said she’d just give them all to me and let me find the best one and then I could fix them.
It turned out to be much trickier to transfer editable depth photos than I ever would have imagined, and where the real madness began.
Shared Albums Don’t Work
We normally just create a Shared Album in Apple Photos for family events, but when Pat added these Portrait photos to our Shared Album, I couldn’t edit the depth of field. I knew Shared Albums weren’t full resolution but I didn’t realize they would lose some of the editing functionality. It was time to go on a quest to find a way to move these photos from her library to mine and let me do the depth-of-field editing.
It’s very mean of me to do it this way, but I’m going to start by telling you the methods that failed first, and then I’ll tell you what does work.
iMessage Doesn’t Work
The next most likely way to succeed at sharing a Photo with an Apple-centric person is to send the image via iMessage. If you drag an image from Photos into Messages, or use the Share icon at the top of the Photos app and share to Messages, the image loses the depth data when it arrives at the other end. That really surprised me. iMessage is usually my go-to when other methods fail.
iCloud Sharing
I tried iCloud sharing next but it also failed me. You have to log into iCloud.com to share files (no right-click to share), and then when you choose to share a photo it gives you the option to copy a link and send it to someone. When you send the link to someone, you can clearly see it’s a photo with depth information because it has the little “f” symbol, but the edit button is greyed out when they receive it. I guess that makes sense though – iCloud sharing is just letting someone view your photos, it’s not a collaboration method.
Export Unmodified Original
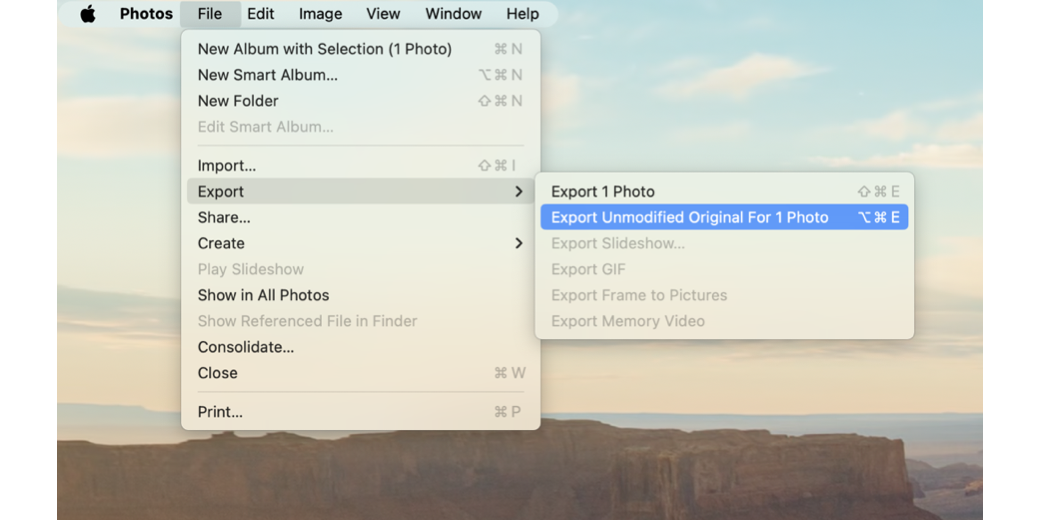
Then I got to thinking maybe we need to export the image first. If you do a simple export from Photos in macOS using File → Export → Export 1 Photo (⇧-⌘-E), you can set the export to be HEIC, JPG, PNG, or TIFF. But this isn’t the full, original photo format, even if you export to HEIC. To export the original in all its glory with its precious depth information, you need to select File → Export → Export Unmodified Original (⇧-⌥-E).

If you’re on iOS, select the share sheet icon in the bottom left (the little box with the up arrow on it). Then you’ll choose Unmodified Original. We’re going to come back to where to export the file in a bit, but that Unmodified Original part is super important.
The exported original will break into two files. If the photo was taken as a Live photo, you’ll get the original photo (either a JPG or an HEIC depending on how you took it), and an MOV file which is the little 2-3-second video taken for the Live photo.
If it wasn’t taken as a Live photo, you’ll still get two files, but it will be either a JPG or HEIC, and an AAE file. The AAE file contains any adjustments you may have made to the original photo so the changes could be reapplied if you ever wanted them back.
Ok, now we know how to export unmodified originals. I exported an unmodified original and dragged it into iMessage, and sadly, bringing that image into Photos on another user account did not allow me to edit the depth of field.
So iMessage is definitely out as a transfer mechanism if you want the recipient to be able to edit the depth of field, but this Unmodified Original method is crucial for what will work.
Photo Format Does Matter
I did finally find a couple of ways that you can transfer the file, but the format in which you took the original photo matters … I think.
I’m an engineer by training and in my DNA. I know how to do controlled experiments where you change just one thing at a time. That’s the only way to know for sure what affected the outcome of the experiment. But in all of my testing with Pat, and some with Jill, and later extensively with Sandy while I was even watching her screen, I’ve seen some methods not work and then start working for no apparent reason. I’m going to give you the best advice I can but don’t be surprised if at some point you get inconsistent results!
One of the things Pat and I discovered that we think caused janky results was that the format in which she took our family photo was a JPG, not HEIC. The “HE” in HEIC stands for high efficiency, but it’s also a newer format that allows more options. To increase your chances of success in transferring photos so they can have their depth edited, I suggest you ensure you’re using HEIC for your photos.
On the iPhone, in System Settings, scroll down and open Camera, select Formats, and under Camera Capture ensure that High Efficiency is selected. The other option is called Most Compatible, and that’s the option that creates a JPG. Pat had set her camera a while back to take JPGs because she had trouble sending photos to her Android friends. Keep that in mind if you choose to make the change to HEIC.


I know this feels like fixin’ to make a plan to maybe start doing something someday, but there’s one more thing that matters. The person receiving the image must be on iOS 17 or macOS Sonoma. That little fact reared its head when Steve was unable to edit the depth on a photo I’d sent to him and yet Sandy could see the depth slider on the same photo. I’d done tons of experiments using Steve’s MacBook Pro to test whether photos were editable and they worked, but when I sent him this one photo and he was on his Mac Studio, it didn’t work because it was still on macOS Ventura while his laptop was on macOS Sonoma.
Ok, I think we finally have enough caveats here to get us to finally be able to transfer the photos!
Apple Mail Does Work
The first way I found that allows you to successfully send a portrait photo to someone and have them be able to edit the depth information was to use Apple Mail. Dragging right from Photos into Mail had the same problem as iMessage, so I first exported an unmodified original as described earlier and dragged it from Finder into Mail. It works, but there’s one more thing you have to do.
You have probably noticed that in Apple Mail when you attach an image, there’s a little dropdown on the upper right that lets you change the size of the image you’re sending. You get to choose between small, medium, large, and actual size. But if you’ve dragged in an unmodified original, you get the option to choose Original Image. You must select this for the photo to be transported to its recipient without any data being stripped away.

Remember that the recipient must be on macOS Sonoma or on iOS 17 in order to make the edits to the portrait photo you’ve sent them.
Sharing Via Cloud Links
Dropbox
Sandy and I tested the idea of putting the unmodified originals into Dropbox and then sending her links to them. We had total success if I sent a link to a single image or if I compressed a group of them into a zip file. In all cases, she was able to modify the depth data. Dropbox with unmodified originals for the win.
iCloud
Earlier I said that sharing via iCloud.com didn’t work because it isn’t a collaboration tool, it’s all about just showing them a photo. But what about sharing from iCloud Drive? I exported an unmodified original to my iCloud Drive in the Finder so that it was a file, not part of Photos. I right-clicked on the file, and chose Share and selected iMessage. I sent a photo of our cat Grace to Sandy.
While opening the image in Photos looked like it worked, because the upper left clearly said “Portrait” and “f”, I didn’t get the depth slider when I went into Edit. I backed out of Edit and tapped on the word Portrait with the little “f” and saw something very curious. Under Portrait, it has two options: Portrait with a little “f” next to it, and Portrait Off with the “f” having a line through it. But get this, the Portrait Off option is selected! Why would the photo say it was Portrait but have Portrait off? But it gets even weirder. You cannot change the selection.

Sandy and I are in agreement that this must be a bug. Why let you send a Portrait photo, give you a dropdown to enable the Portrait photo, but disable the option?
Undaunted, I went back into the Share sheet on iOS, and there’s a button for Options before you export. You can set the format from automatic, to current or most compatible. We would want current to ensure we still had the HEIC on export. At the bottom, there’s a toggle that says All Photos Data, which is off by default every time you go to export a photo. Below the toggle, Apple explain:
Original quality files will include edit history and metadata like location, depth information, and captions. The recipient can view the current version and modify any edits.
That sounds like exactly what we want! Above the toggle, the heading says that this toggle affects Airdrop and iCloud links only. I set a photo to Current format, chose send as iCloud link, turned on All Photos Data, and texted the iCloud link to the image to Steve and believe it or not, it worked.

I found another method on iOS that worked with iCloud. If you export as original from Photos using the Share Sheet, you can email it as an attachment. When you start the email, tap in the blank area of the screen. You’ll first see Paste, Select, and Select All. Tap the chevron to the right. Now you’ll see Add Link, AutoFill, and Format. Tap the chevron to the right again. Now you’ll see Quote level and Insert Photo or Video.
Do not select Photo or Video! Instead, tap that darn right chevron one more time and you’ll see Attach File. Select that option and it will let you navigate to where you saved the file. When you select Send in the email you’ll be asked whether you want to send as full size and you need to say yes.

This one sounds a lot harder than it is (unless you fat-finger the chevron button which I did the first few times) but it gets the job done.
Google Drive
To be complete, I wanted to try another cloud filesharing option so I abused my friendship with Sandy by sending her a link to an unmodified original in Google Drive. I created the link by opening my Google Drive in Finder, and right-clicking on the file, and choosing Copy Link to Clipboard.
When she opened the link, she didn’t have permission so she had to request permission. This triggered an email to me that I had to open. Then I had to log into Google Drive on the web and give her editor permissions. As soon as I granted her permission, she was able to import the image to Photos and she was able to change the depth of field!
So while it was incredibly annoying compared to using a Dropbox link, technically you can use Google Drive to share an unmodified original Portrait photo that the other person can edit.
At this point, I told her I refused to install OneDrive to test that option because even I’m weary of this investigation!
Bottom Line
I explained at the beginning that I had descended into madness (and dragged Sandy with me) and now you understand what I meant. At least I warned you! Let me see if I can summarize my findings:
- To take a Live Portrait photo, you have to have one of the iPhones 15 running iOS 17
- I recommend setting your image format to High Efficiency (but I’ll confess that I did find scenarios where jPGs actually worked)
- For the person receiving your image to be able to change the depth of field, they must be on macOS Sonoma or on iOS 17 but they do not need an iPhone 15.
- To transfer the photo successfully so they can edit the depth of field your choices are:
- From macOS, Export an unmodified original and then you can:
- Save locally and attach to an email in Apple Mail but be sure to change the size to Original Image
- Save it to Dropbox, or if you want to make it harder, to Google Drive and send them a link. This may work in other non-iCloud services but I haven’t tested elsewhere
- On iOS you can:
- Use the Share Sheet and use Options to set the format to Current, Send as iCloud Link, and turn on All Photos Data. Then you can send the iCloud link through any service – text, email, etc.
- You can also Airdrop the photo if you toggle on All Photos data in Options first
- Export Unmodified Original using the Share Sheet from Photos and save to iCloud or another cloud service. Create an email and add the image as an attachment
- From macOS, Export an unmodified original and then you can:
I have a suspicion that much of what I’ve explained would work with “regular” Portrait photos but early on in the process I got overwhelmed with the option and focussed my efforts on just the new Live Portrait photos. I welcome you to try any or all of these methods and find out if they work for your “regular” Portrait photos.
As you can imagine, this has consumed my daily life for several days, taken up Pat’s time, Jill’s time, and especially Sandy’s time to do all of these experiments. I thank them all for their efforts, and now I’m going to go take a nap.
You might have coaxed me to upgrade from 12 to 15 for iPhone!
Will it matter which model of iPhone in the 15 series?
According to the very minimal mention of the feature in Apple’s support article, it’s “iPhone 15 models” so I interpret that as all of them.
https://support.apple.com/en-is/guide/iphone/iphd7d3a91a2/ios