The Problem to be Solved
When I was preparing my workshop for Macstock, I knew I’d be in a big room with the audience pretty spread out and far away. I was going to be teaching from my Tiny Mac Tips series, so it was going to be a live demo.
I started looking around for some apps to make the experience better for the audience.
Scroll to Zoom with Accessibility
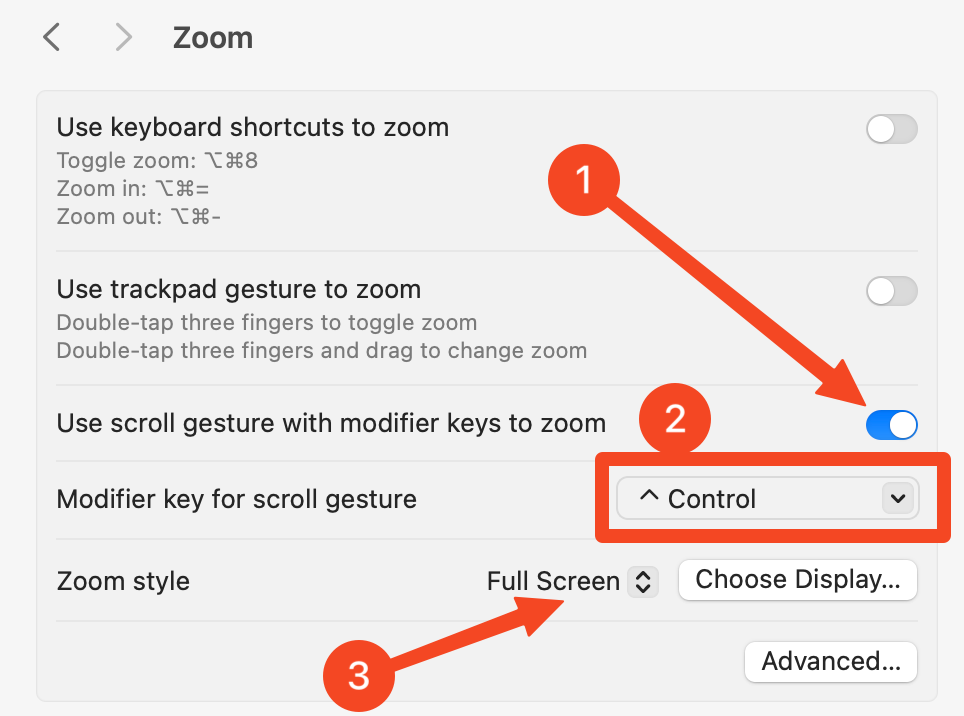
The first thing I knew I would use is the accessibility setting that allows you to scroll with your trackpad/mouse to zoom in and out on the screen. If you haven’t enabled that, no matter your age or visual acuity, I highly recommend it. To enable the feature, open System Settings → Accessibility → Zoom.
First, toggle on “Use scroll gesture with modifier keys to zoom”. The default modifier key is Control, but you can choose to change it if you like. The default Zoom style is Full Screen, but you can change that behavior too. Personally, I keep the modifier as Control, and I like Full Screen the best so I don’t change anything in here other than toggling it on. Play with the options and see which makes the most sense to you.

Once you have this scroll-to-zoom feature turned on, it’s handy for your own needs, like trying to see the ever-shrinking road names in Apple Maps, but it’s terrific when doing a presentation. During Macstock I probably used control-zoom 30 or 40 times to show people what I was doing on stage.
You do have to get it into your mindset to always picture yourself as sitting in the back row and trying to see. While you’re picturing yourself in that back row, remember to repeat the questions when people ask and they’re not on-mic!
Ok, so that control-zoom trick helps the audience, but I started wondering whether there were apps out there that would add even more enhancement to the user experience during my presentation.
Presentify to Annotate the Screen
I decided to start my search in Setapp and I found an app called Presentify by Ram Patra from presentifyapp.com/… The problem Presentify sets out to solve is to help you draw attention to something on screen while presenting using arrows, boxes, circles, and text.
Presentify is available for a one-time cost $7 in the Mac App Store and in Setapp. In the Mac App Store, you’ll see in-app purchases, but Ram added that simply as a tip jar if you keep using Presentify and want to throw Ram a bit more money. I like that approach, $7 for life and all versions is a great deal but obviously, a developer could use some more funding from time to time to keep the app in active development.
Presentify Tools
You can control Presentify’s functionality completely through keyboard shortcuts, or you can use the Presentify menu bar app. By default, if you toggle on Presentify, you’ll see a floating control strip at the top of your screen.

You’ll see five colors to choose from, along with icons for free-form drawing, arrowed lines, rectangles, ovals, and text. Pick a color, tap on an icon, and draw away on your screen. I’m not much for freeform scribbling, but I love me an obvious rectangle or a nice arrowed line to point at something. Never been a fan of ovals and circles because it’s always so hard to encompass the item you’re trying to highlight.
When you’re doing a presentation, it’s pretty rare that you would want to have an annotation stay up onscreen, so Presentify automatically has the annotations fade away after 2 seconds.
Next to the five colored icons, there’s a curious icon of two intertwined curvy arrows. This delightful option creates annotations that are gradients of random colors. You draw a rectangle and it goes from purple to pink to yellow. While I wear rainbow-patterned prescription glasses, I tend towards plain old red for my annotations. If it brings you joy though, Presentify has you covered.
The final control on this little control strip is an eraser. You can use that to quickly erase an annotation you’ve just put onscreen.
The floating control strip is visible to your audience. If that’s distracting to your intended audience, from the menu bar app (or with a keyboard shortcut) you can choose to annotate without controls. Once enabled, hit the F key for freeform, R key for a rectangle/square, C for circle/oval, A for arrow, or T for Text. Getting out of Text is a little harder because typing R would type an R instead of invoking the rectangle tool. I couldn’t find an easy way to get out of it other than escape twice or control-A which disables Presentify. I feel like there should be a way but I just haven’t found it.
Probably the most useful option in Presentify is called Interactive mode. In this mode, you can toggle back and forth between interacting with your applications and annotating the screen.
First, you enable interactive mode from the menu. You’ll see a brief popup telling you to hold down the fn (function) key to enable interactive mode. Then from the menu, enable Presentify with or without the onscreen control strip.
Now let’s say I’m flipping slides in Keynote using my keyboard but I want to draw an arrow. I simply hold down the fn key and type the letter A and I can draw a sweet arrow to point to something in my presentation. I can let go of the fn key and I’m back to interacting with my Mac.
It’s often useful to have your cursor highlighted in some way so the distant audience doesn’t have to strain to try to find the tiny pointer. Presentify has you covered there too. With the highlight cursor option, your cursor is surrounded by a big pink hollow ring. You can’t miss it.
Shortcuts
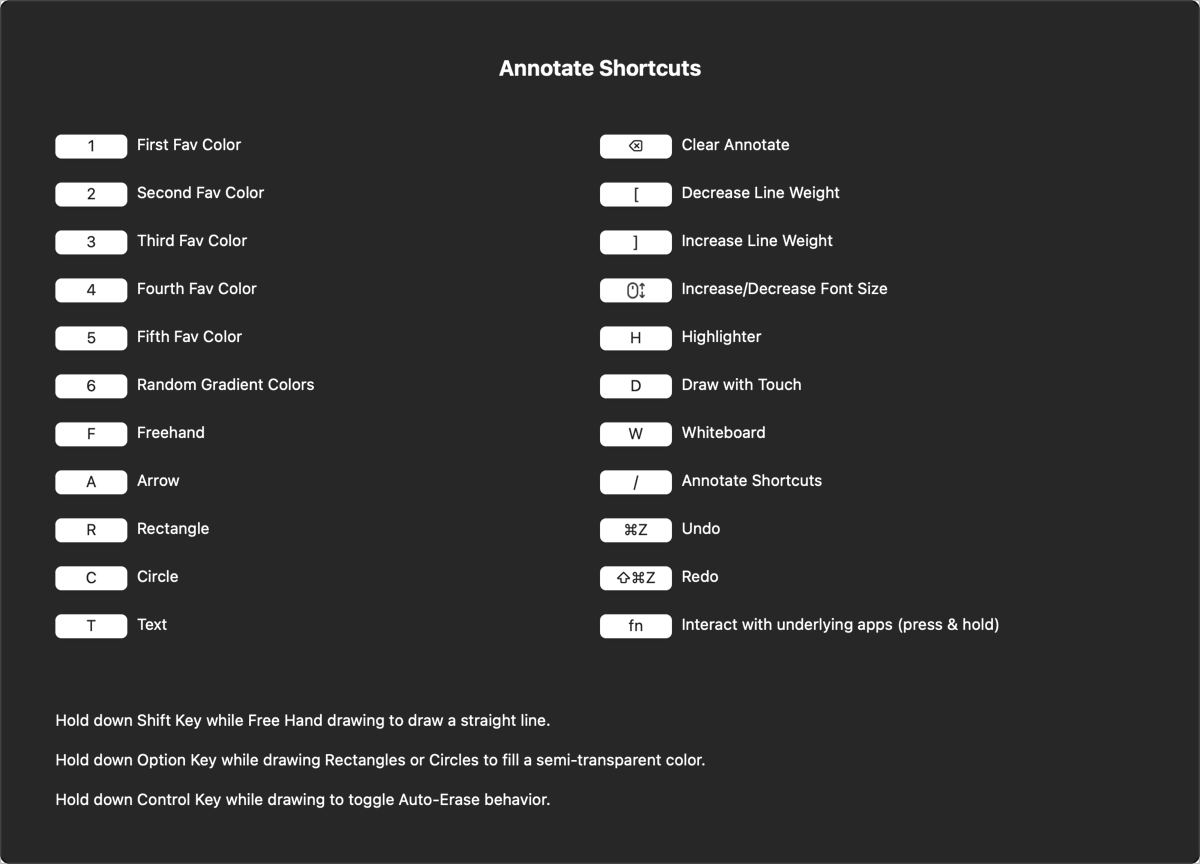
I figured out the keyboard shortcuts for the different tools just by experimenting, but then I discovered that if you have Presentify enabled to annotate, you get another option in the menu bar to view all annotate shortcuts. And boy howdy are there a lot of them.

You can select the color by number if you can remember 5 numbers. You can increase or decrease the line weight with the right/left square brackets. That one is easy to remember because it’s standard in a lot of image applications like Apple Photos, Affinity Photo, and Photoshop. There’s a highlighter you’re supposed to be able to invoke with H which works well in regular annotate mode but if you’re in interactive mode, macOS takes over and shows you your desktop with function-H.
Likewise, after you enter some text onscreen with Presentify, you can simply scroll on your mouse or trackpad and the text will shrink or embiggen.
I discovered in the Annotate Shortcuts menu that you can invoke a Whiteboard mode that covers your screen (with the exception of the menu bar) with a grey rectangle for you to draw on. I’m not sure that’s super useful with only a trackpad or mouse to draw but maybe there are some uses.
There are three tiny tips at the bottom of the annotate shortcuts screen. As is true in many annotation tools, you can hold down the shift key to draw a straight line with the freeform line tool. If you hold down the option key while you’re drawing a rectangle or circle, it will fill with a semi-transparent circle. Finally, if you hold down the Control key while you’re drawing, you can toggle the auto-erase behavior. In general, I think it’s a good thing that the annotations fade away after a few seconds, but sometimes you want one to stay, so it’s cool you can hold down the Control key to get it to stick around.
Settings (Preferences)
You’d think I was done describing a $7 app by now, wouldn’t you? I’m close, but the settings for Presentify give you even more control. On the general tab, you can start Presentify at login, and you can also have your cursor highlighted with that big pink ring when the application launches. Maybe you have a giant screen or multiple screens and you’re always losing your cursor – this could be really handy.
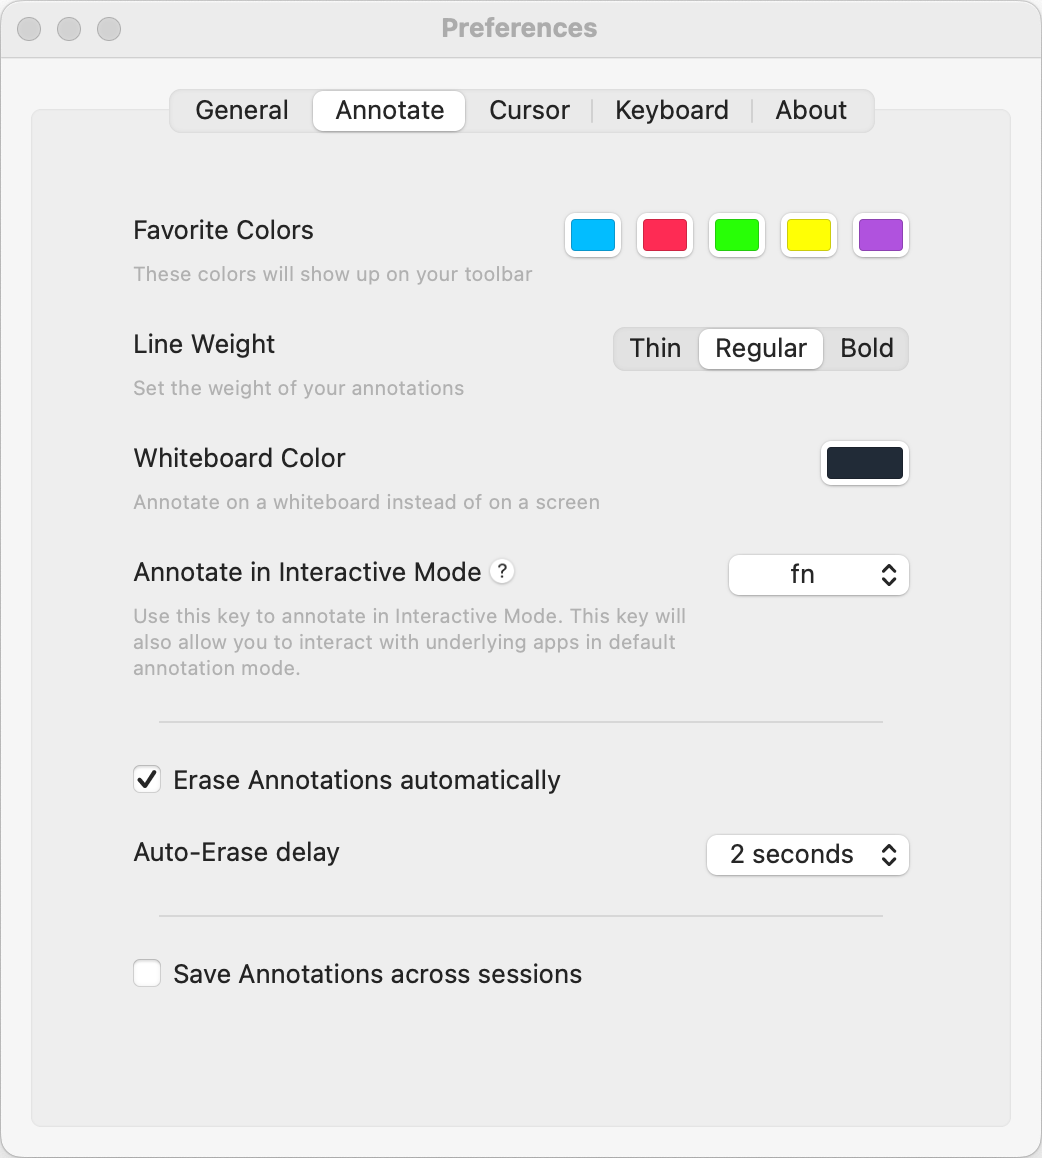
On the annotate tab in Presentify, you can change the five color choices for annotation, or as Ram refers to them, “favorite colors”. Tap each one and you get the standard Apple color picker to change the color.

You can change the default line weight too. Let’s say you’re always using the left bracket to shrink the line width on your arrows – you could just change it from Bold or Regular to Thin.
Remember the fn key invokes interactive mode? If you have never figured out what the caps lock key is for on your keyboard you can use that instead of the fn key.
Screen annotations with Presentify vaporize in 2 seconds, but you can change that to anywhere from 0-10 seconds, and even disable auto-erasure of annotations. That explains why there’s a manual eraser in the set of tools.
Our cursor highlight has some options too. If you don’t favor pink, you can change the color. You can change it from large to small so the little ring is tighter in. You can make the border of the ring dashed instead of solid, and you can change the opacity of the ring. By default it’s 75% opaque but you can set it from 0 to 100%
We talked about the keyboard shortcuts, and in settings you can change the three main shortcuts – toggling annotations, toggling whether you see the annotation controls, and toggling the visibility of the highlight cursor.
Bottom Line
The bottom line is that if you want to maybe keep your audience awake a little bit longer by adding annotations to your screen during live demos or canned presentations, I think Presentify for the grand some of $7 might be just what you need. Again you can find it in the Mac App Store or it’s included in your Setapp subscription.


This software is great. Can it be used with the Magic Trackpad? I love carrying the Magic Trackpad around the room while giving presentations.
I don’t see why not?
It means it works with the Trackpad. That way, I don’t have to sit in one spot to give a lecture – it’s truly fantastic!