Astrophotography by Stealth, from looking up at the night sky, to hanging a picture on the wall that takes your breath away.
Part three: Time to go bigger or go home.
Hello and welcome back, I’m Brian Hoffman, and in our last episode, I had gotten to the limits of my Right Ascension (RA) tracker-based R8 camera. I wanted longer exposures, I needed to take multiple pictures I could “stack”, and I needed to learn how to edit my pictures with something more than Preview.
I knew I needed a stronger tripod, a tracker that could do both RA and Declination (DEC), a telescope, a guide camera, the main camera, and a control system to drive it all. I decided I would go with a simpler system, which would do a lot of the work for me and allow me to level up once again.
Oh, but the budget. This was not going to be cheap. Think of it like any other expensive hobby. However, there are cheaper options that can get you into the hobby for less, like buying used equipment or an all-in-one setup.
If you look at a new low-cost refractor telescope, you are in the $500-900 range, and it is easy to set up and get started quickly. If you want a little more capability, $1000-1500 gets you a better refractor telescope.
Then there are the “All-in-one” telescopes, which are now available. They can get your foot in the door for around $400-550. They have limited ability, but with patience, you can capture some outstanding pictures. Did I mention you will have the opportunity to learn some patience?
Further, these astrophotography setups are not as robust as other scopes, so you will need to take care of them, or you could be looking at broken equipment that is not repairable. Think plastic parts.
If you go with a reflector setup, you will get a bigger scope for the same money, but setting one up takes more patience, and they are less handy to travel with. Think, more sensitive to movement and change, but they gather a lot more light for the same money. It’s a trade-off.
Stepping up to $2000 or more gets you a better scope, which will continue to be useful for a longer time and will yield better pictures. The choices you make early on your quest matter. Plan your budget wisely.
Wanting my setup to last longer and give me years of excitement and entertainment, I went for a best value setup and spent a little more.
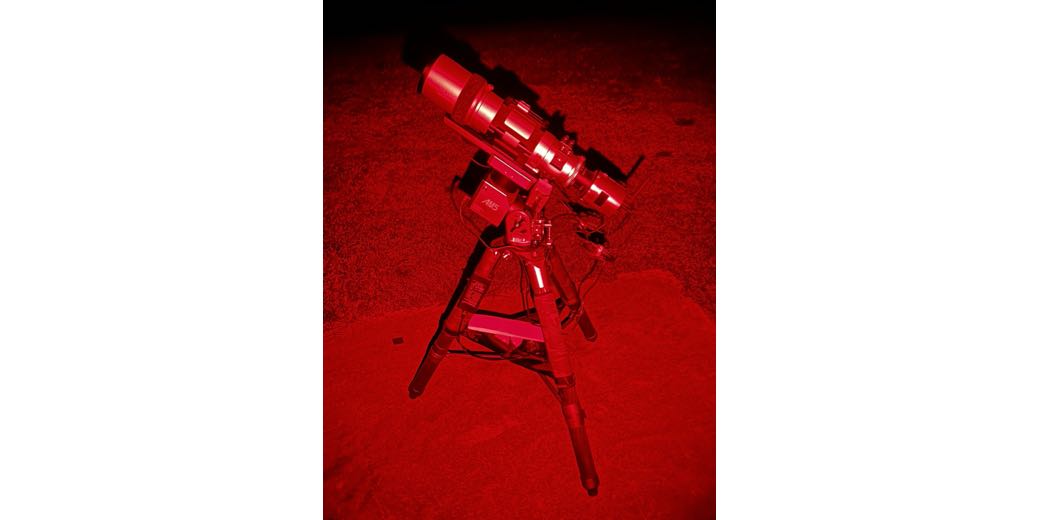
ZWO is a brand of astrophotography equipment. It is a bit of a walled garden if you use their equipment, but it does afford an easy entry and great results. I decided to use their camera, control system, and strain wave tracking mount.
The mount I chose was the AM5n with its tripod. On the street, it costs around $2200. I could have used its little brother, the AM3, but I have other possible plans down the road, and the AM5 will be necessary for that setup because it can handle more equipment weight.
The camera I chose was the ASI 2600 MC air. It combines the main camera in APS-C, a guide camera to direct the mount, and the computer system to drive it all. Best of all, the camera had a cooled sensor, which meant I could take longer exposures and gather more light without blowing out the picture. This was one of the limitations I needed to overcome with my current camera.
While this is not the cheapest way to go, again, to me it was the best value as it was a single unit that did three things well. I had an integrated main camera, the guide camera, and the brains. So now I needed a telescope.
The telescope most people start with has a 50-70mm aperture. They can be purchased for $600 to $1500. I wanted more light. Further, some of the cheaper scopes did not have excellent lenses, which required more post-processing to correct those errors.
I went with an Askar 85mm refracting telescope for its clarity and ease of use. I was not disappointed. It costs $2300. It was worth it. My pictures straight out of the camera are far better than the ones for smaller telescopes, and I will be able to use it far longer before I need a better, larger-sized telescope for things I wish to photograph.
I started to learn the system and take pictures of, you guessed it, Andromeda and Orion. I was instantly amazed at the clarity and the ability to select a target. I did some prep work and started taking pictures, it became that easy.

One thing I knew I could use to focus my camera was a Bathinov mask. It’s a slotted cap that fits over the opening of the telescope and sends light through the lens at three different angles.
When the camera is in focus, the light source (a star) shows you six evenly spaced “rays” of light extending from the middle of the star. It’s a quick way to ensure focus manually.

Learning the software for the new camera setup only took a few YouTube lessons. I was shooting pictures of the things I wanted to capture the first night. I knew I wanted to capture hours of light, yes, hours of light to create the image I wanted to hang on the wall. I was getting close and I knew it. I was motivated. I was at the next level. But I still had not picked my editing software.
One thing I learned early was cable management. Mine was as good as it gets. No matter where the telescope was pointed, all my cables remained properly placed and had the correct slack. It’s a simple thing, but if your cables catch, you could be done for that session, or worse, damage your equipment.
I was comfortable setting up my telescope and taking pictures. After a while, I would set it up, do the polar alignment, check focus, pick out an object, and start taking pictures.
I would tell the camera how many pictures to take and how long each should be. I was comfortable enough to then go inside for part of the time I was capturing images. I was on a roll.
The only thing left to automate was focusing the telescope. Yep, there is tech for that as well. An AEF or Automatic Electronic Focuser works with the main camera and the control system to properly focus the telescope anytime you want.
By this point, I had very good pictures, but I still wanted to reduce my errors even more. I then learned about another tripod, and it called my name.
The only problem was that it was only available in Japan, and they weren’t making it anymore. I got really lucky just after Christmas ’24 when a friend let me know there was one for sale and it was New In Box, but it was in Japan.
As it turns out, I have a friend who lives in Japan, I asked him for a little help bidding on it. We won! Now I just needed to go to Japan and pick it up. No problem, I had a trip there the next month.
I was able to pick up my tripod and bring it back to Texas with a little coordination. The tripod was so good that it allowed me to further reduce my tracking error by half. It was worth it.

I was in heaven, or at least I was staring at it and loving every minute. My pictures were awesome. After taking hours and hours of pictures of 15 different targets, I knew what I had to do, but my laptop was really old and was in desperate need of replacement.
I was at another inflection point. Do I just bite the bullet and get a new MacBook Pro? After all, mine was a ’19 model and it was starting to show its age. M3 or M4? Do I look at the MacBook Air?
I reached out to Allison. I knew she was a big photo buff, and she has an ever-so-slight Apple bias, so who better to ask? Turns out Allison had written an article about the MB airs and the MB pros. Our discussions led me to the store to pick them both up. The Airs were missing a lot of ports, but it was way lighter.
I decided to go with the MB Air, then even better news came. Apple was about to release the M4 version of the MB Air. I patiently waited two more weeks, all the while taking more pictures. I had hours and hours of pictures by now. I was finally ready to learn how to edit!
Truth be told, I knew a while back, PixinSight was going to be the software I was going to use to edit my astrophotography pictures. All of the people I was learning from used it, and the results they shared were spectacular.
The learning curve was going to be steep. I took the first step and stacked, you guess it, my 108 five-minute Andromeda pictures and my 132 five-minute Orion pictures. I was one step away from being able to hang them on the wall.

Teaser: Well, I’m finally ready to start editing pictures using high-level software. I had this season’s pictures of 15 different objects, I had a new computer, and the software to do the work.
Now I just needed to sit at my desk and learn how to process each of them. I was excited. How long was it going to take for me to gain mastery of the next level and be ready to print a wall hanging worthy picture or two?
In the next episode, we will all find out.