How Windows Changed in iPadOS & macOS 26
I recently wrote an article entitled Exploring Markdown Export from Notes. As I often do, I included lots of screenshots in the article to illustrate what I was describing. But there were some problems with several of my screenshots, and they were caused by changes in macOS and iPadOS 26 with windowing.
The first of the changes is that windows now have even rounder corners than before, which can cause some unfortunate side effects depending on how you take the screenshot. The second change is that often one or more edges of a window will have no border whatsoever when captured as a screenshot.
Before I get into my discovery on this topic, let’s start with a perfect example of the problems encountered because of these design changes by Apple. In the Markdown article, I used a screenshot of an Apple Notes window on iPadOS, showing everything I’d written in preparation to export to Markdown.
The ugliest part of the screenshot is that in the right top and bottom corners, the screenshot shows a black arced wedge where the rounded Notes window has been squared off. The left top corner isn’t there at all, as it blends white into the white webpage. The right side of the window is white too, so you can’t see where the screenshot ends and the white background begins. It’s also of note that the left side sort of comes and goes. As you go down the side, sometimes there’s a grey shadow, and sometimes it’s pure white. Overall, the whole thing is a real good look.

The screenshot in the Markdown article was taken on my iPad. There are three methods to take full-screen screenshots on iPadOS. If you have a Magic Keyboard, you can hold down Command-Shift-4 to take a screenshot. You can also take a screenshot by holding down the power button and either the up or down volume button. Finally, if you have an Apple Pencil, you can drag on the screen from the bottom left corner diagonally towards the upper right, and it will take a screenshot.
We’ve now captured the entire screen, but we want only the one floating window with its lovely rounded corners. Interestingly, when the screenshot comes up and offers drag handles to resize, those drag handles have rounded corners. You would hope that would mean when cropped, the resulting image would still have those rounded corners.

Sadly, as you drag the round handles to magically snap to the edges of the window you want to capture, they stop being rounded and become sharp corners. If they stayed rounded, then we would get a nice, rounded rectangle screenshot, but instead, we get colored wedges on the corners.

The resulting screenshot is distractingly ugly.

While the disappearing edges seem to be more of a problem when capturing iPadOS windows, the ugly wedge corners were happening for me with macOS screenshots as well.
Nerd Community on Mastodon to the Rescue
When I got frustrated with this problem, I posted a question to Mastodon asking the collective what we’re going to do about these terrible wedge corners (not even addressing the disappearing edges yet). We focused on macOS screenshots, but I’ll circle back to a solution for both when I get to the end of the story.
I got help from a whole lot of people, but I’m going to focus on the contributions of just two. The first is Ken Case, CEO of Omni Group, and an all-around terrific guy. I also got help from Dr. Drang, who has been a writer/scripter in the fabric of the Apple nerd community for a long time. Before explaining their ideas, let me talk about how I normally take screenshots on the Mac.
macOS Screenshots with Multiple Tools
I use a couple of different screenshot utilities. My primary tool of choice is Shottr from shottr.cc and CleanShot X is from cleanshot.com/…, (and available through Setapp) is a second favorite. I tend towards Shottr because I prefer its annotation tools, but I still use CleanShot X regularly. From time to time, I’ll even use Apple’s built-in screenshot utility, Screenshot.app, available in Applications/Utilities.
If I take a windowed screenshot with Shottr on macOS, I get the dreaded wedge corners. Ken Case said he had a screenshot process that wasn’t giving him the wedge corners and that was using the built-in Screenshot.app. He explained his process, and it starts with using the keystrokes for the built-in tool. Let’s review those right quick so his explanation will make sense. Open System Settings → Keyboard, and look for the keyboard shortcuts button. You’ll get a list of Apple features that have keyboard shortcuts, one of which is Screenshots.

The keystroke Ken uses is Control-Shift-Command-4, which lets you capture an area to the Clipboard instead of making a file on your desktop. After initiating this keystroke, you get crosshairs to select a region, but if you use the space bar, you can hover over a window until it turns blue and shows a little camera icon, and then simply click the window.
If you haven’t changed the system defaults, this process will give you a screenshot with a drop shadow. Ken adds one more trick to this sequence to change that. Instead of clicking on the selected window, he option-clicks the window, which captures it without adding a drop shadow.
As usual, I’ve made this sound a lot more complicated than it is in practice.
The story might have stopped there, but the good news is that I didn’t follow his instructions properly in my initial testing. I read as far as where he said he used the built-in screenshot tool and then started my experiments. I launched Screenshot.app and used the floating tool palette instead.

If you use the button to “Capture Selected Window”, hover over a window and option-click to eliminate the drop shadow, you’ll get a floating thumbnail in the bottom right of the screen. So far, what I was doing was essentially the same as Ken’s instructions without using a keystroke. But then I wandered off his instructions.
I clicked on the floating thumbnail, which brought the screenshot up in Quick Look. I clicked on the share icon and selected Copy. You can also Command-C from Quick Look to put it in the Clipboard. Or you can right-click on the floating thumbnail and choose Save to Clipboard. All three do the same thing.

Now here’s the crazy thing. Pasting that screenshot into a document shows the ugly corner wedges!

Before rereading Ken’s carefully written instructions, I confirmed that my screenshot tool of choice, Shottr, also creates the black wedges when I copy a window. CleanShot X, on the other hand, does not get the black wedges; it copies with lovely rounded corners.

Dan Moren joined in the fun on Mastodon with a good question. He asked whether maybe one of these is a PNG and one is a JPEG. PNGs support transparency (allowing for the square corners to disappear), while JPEG does not. His question made sense, but since these are in my clipboard, how do I know their file types without saving (which might change their file types)?
Dr. Drang described a really nerdy way to find out. He suggested I open Script Editor (another app buried in Applications/Utilities) and run the AppleScript command “Get Clipboard Info”. I ran the commands on the two ways to capture the image (one that gets wedgies and one that does not), and the one with transparent corners returned as the first result, “class PNG”. The one that got the wedgies returned “TIFF picture”. TIFFs don’t support transparency either, so this is a clue, but it doesn’t tell us why.

Around this time, Dr. Drang posted a link to an article he wrote on his blog “And Now It’s All This” about how he automated taking screenshots using Python. You can read it at leancrew.com/…. His Python script takes a screenshot using the command-line tool screencapture and gives it rounded corners (even if the screenshot was squared off), and then puts it on a nice, narrow, colored border. In his post, he not only gives us the source code, but he also walks through it to explain every step.
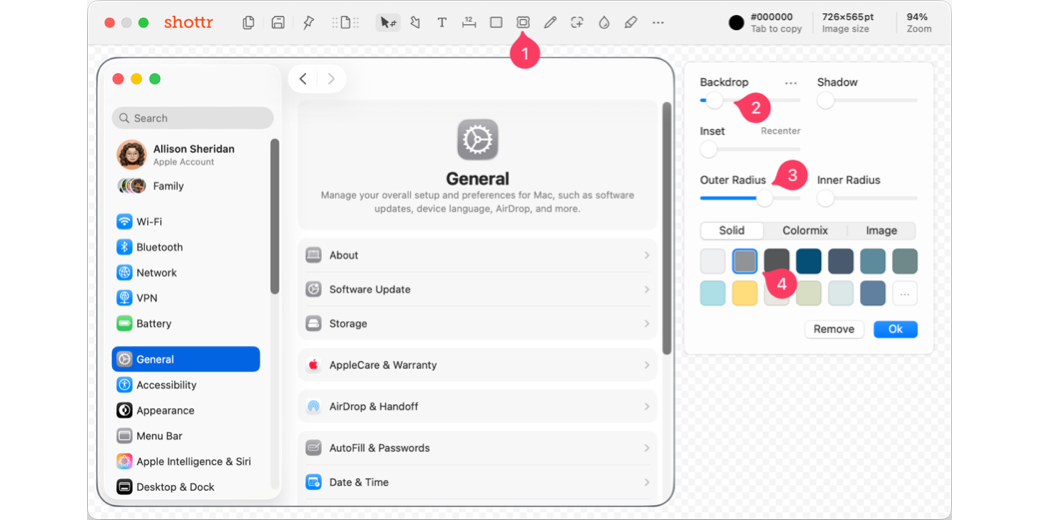
Rounded Border (Backdrop) with Shottr
This inspired me to find another way to solve the corner wedgie problem and the other problem we’ve been neglecting: the disappearing edges of windows in screenshots. First, I penned a gentle email to Max, the developer of Shottr, and so far, he hasn’t been able to reproduce the problem. We’re holding out hope that the problem can be traced back to some setting I’ve fiddled with on my Mac. I do fiddle a bit!
In the meantime, though, Shottr has a tool in the paid version called Backdrop. It’s a nice way to add a beautiful background for an image, or you can create a boring single-color backdrop. The important feature is that you can change the size of the backdrop to be very thin, to the point that it looks more like a border than a backdrop.
It also has an outer radius slider, which carves off the corners of any rectangular window and gives them a gentle arc. I dragged the slider until the radius pretty much matched the radius of the new OS 26 windows. Finally, I chose a grey color for the backdrop.

I don’t use backdrops regularly, so every time I come back to Shottr to add a backdrop, all of these settings are maintained. I only have to hit the backdrop button (or hit the letter K), and I’ve got a border on my image.
Rounded Border with Retrobatch Pro + Keyboard Maestro
But then Dr. Drang suggested I could probably add the border with a tool called Retrobatch. Allister Jenks introduced us to Retrobatch in 2019, and I wrote a post about how I use it to manipulate images in 2023. It’s an app written by Gus Mueller of Flying Meat fame. You may know him from his app Acorn. Retrobatch (and its big sister Retrobatch Pro) is an app that lets you drag and drop little nodes onto a canvas to do various operations on images.
Retrobatch has a border node where you can specify a border thickness and corner radius. I tried a few different strategies to build a workflow, such as having it read a file from the Finder and write back to the same folder in Finder. I had it tack on the word “-border” so I didn’t write over the original. But then I realized that when I’m going to use this, I really don’t want to create a bunch of files. I want to capture a screenshot to the clipboard and then be able to paste it or save it with the border already applied.
I ended up with a very simple workflow in Retrobatch. I started with a Clipboard node and set its action to “Read from Clipboard”. Next, I put in the Add Border node. I set the color to a medium grey and the width to 2px. When it came time to add a corner radius to the border, I got a little bit stuck. How big is the radius of the new OS windows?
I could have taken a screenshot of a window and measured it using a graphics tool, but instead, I asked ChatGPT to tell me what radius Apple defines for macOS 26 windows in their developer documentation.
ChatGPT says it doesn’t appear to be defined by Apple anywhere. I verified this by asking my friend Steve Harris, Reinvented Software developer of Keep It and Feeder. He confirmed that Apple has not defined the radius. He measured it for me in Affinity Photo and also gave me more information than I expected. He explained that if a window has a toolbar, the radius is large, and he measured it at 50px for 2x screens. But he said that if there is no toolbar on a window, the radius shrinks, and he measured that radius at 30px at 2x. He invited me to see the difference by toggling on and off the toolbar in Finder windows (View → Hide Toolbar). Sure enough, the radius shrinks if you hide the toolbar.
Around the same time as Steve was responding, ChatGPT told me the big radius was 52px, which is pretty close to what Steve measured. ChatGPT went on to explain that in Retrobatch’s Add Border node, I would have to add the 2px border value, so I should set 54px as the Corner Radius value.
The third and final node was as simple as the first; another Clipboard node with its Action set to “Write to Clipboard”.

Again, I’ve made this sound complicated in my attempt to be clear. I have 3 nodes: Read from Clipboard, Add Border, Write to Clipboard.
I could have stopped here. I could have captured a screenshot to the Clipboard, double-clicked on the little Retrobatch workflow app I created, and then pasted the screenshot with its new rounded border. I wanted a wee bit more automation, so I created a tiny Keyboard Maestro Macro that simply runs my Retrobatch app with a keystroke.

Now I can capture a screenshot to the Clipboard, hit my keyboard shortcut, and then paste, and I’ve got my fancy screenshot with a nice grey rounded border. Wedgies are gone because the rounded border carves them off, and those white windows no longer disappear into my white webpages.

As it turns out, this process doesn’t require a window with the exact (or inexact) radius I’ve specified. I can take an area screenshot, which has square corners, and apply my rounded border to it, and it will match the style of a windowed screenshot. If I take a screenshot of a window without a toolbar, it will change the 30px radius to 52px.
This means I can take screenshots of my iPad, crop in on a window, AirDrop it to my Mac, and then run my little Retrobatch app against it, and I will get the same rounded rectangles with a nice border. Losing the wedgies on iPadOS screenshots makes me unreasonably happy.
Bottom Line
The bottom line is that while I do like the new roundy windows in iPadOS and macOS 26, capturing their windows and making nice screenshots is more challenging than it used to be. Researching the issues was great fun, especially with the help of folks like Ken Case and Dr. Drang. I also want to give a shoutout to some other folks who chimed in to help: Ben Etherington, Wayne Dixon, Calum, and Simon C Hulse. I have a nice little automation now to clean up my screenshots, but I have a feeling I might even dive deeper.
Did you know there’s a command-line version of the screenshot app you can use from the Terminal? If you can do it on the Terminal, it means you can write a script for it. If we can write a script, that means we could put a script to take the screenshot into Keyboard Maestro right before it calls the Retrobatch workflow. It could initiate the screenshot, let me choose the window, and then copy a nice, rounded border version of the screenshot all in one keystroke.
Ooh … I wonder if the open source library Imagemagick could do the rounded border, making the whole thing a script …
Hi Allison,
A small correction, besides Retrobatch Gus Mueller made Acorn, not Pixelmator.
Acorn is my graphics editor of choice. I use it also for screenshots, to draw arrows, resize images etc.
Frank – thank you SOOO much for the correction! I even opened the Flying Meat website to look it up before typing that but those 3 nanoseconds between operations were long enough for me to forget. I’ll correct it in next week’s show too.
No problem. I really like Adam being on the show, great addition. Thanks.
BTW I saw that in the fourth beta of iOS 26.1 they added a toggle to switch off transparency. I only reduced transparency on my iPad, I like it on my iPhone. My main (Intel) Mac is stuck on Sequoia, so I don’t have it there.