 I’ve been playing around with computer graphics since before you could reasonably display a photo on a computer screen. I’ve grown my knowledge of how to work with graphics as the technology itself has grown and, as a result of this, there aren’t many graphical tasks I don’t at least have some idea of how to tackle. It also means I have a lot of tools in my graphics toolbox.
I just had a look at the Applications folder on my Mac and over 10% of the applications — 17 of them — are what I would classify as graphics applications. That doesn’t include a few command line tools I have installed. In my repertoire I have everything from simple image browsers to full-featured professional editors like Affinity Photo and Affinity Designer. I have a tool for every job. But that doesn’t mean there aren’t better tools for some jobs — better ways of solving some problems.
I decided recently that I had a problem which needed to be solved more effectively. Most of the photos I publish online these days start off as 30 megabyte RAW files. For a long time, my process was to import these into Adobe Lightroom for keywording, selection, processing, and publishing. Yes, I had my entire workflow built into a single tool — that’s what a professional photo management application can do.
But I decided I no longer wanted to use Adobe Lightroom. Cost was a significant factor, but its “Adobeness,” the threat of price increases, and a “reinvention” of the software as Lightroom CC — a cloud-focused, cut-down experience that l expect will become to Lightroom Classic what Apple Photos became to Aperture — also combined to make me throw in the towel on Adobe.
Fortunately, at about the right time, Skylum Software launched Luminar 3 which promised to be a Lightroom competitor. I say promised… there’s still a significant chunk of that promise to be delivered. Luminar’s photo library management is, let’s say, nascent. But I have fallen in love with the processing engine which allows me to get better results, quicker, than with Lightroom. I’ve reviewed Luminar 3 over on the Essential Apple blog.
Luminar’s immaturity leaves me with a few gaps and the one I am going to (finally) talk about now is the penultimate step of my process — getting a processed photo ready to upload to Flickr. In Luminar, I have a giant, 14 bit RAW file up to 6000 pixels wide that looks beautiful. On Flickr I want a 3200 pixel wide JPEG that has my standard watermarks on it. I also want to put the finished image into my Apple Photos library at a smaller size optimised for a retina iPad screen. And sometimes I want a much smaller version, which needs a slightly larger watermark, that I can put on social media platforms. I can absolutely do all of that in Affinity Photo, but doing it consistently and repeatedly is a chore. The last batch I processed included over 200 images. This is a job for automation.
Enter Retrobatch, from Flying Meat. The company with the crazy name may be familiar to you as publishers of the Acorn graphics application. Retrobatch is a batch image processing tool — its job is to take a bunch of images as input, do stuff to them, and output something… usually new image files. The application window is quite similar to Rogue Amoeba’s Audio Hijack, in that you place nodes on a canvas, then join them up to create a workflow. A simple use case might include the nodes “Read images,” “Scale,” and “Write images.” To read images Retrobatch can use a named folder, ask at run time, or you can even save the workflow as a droplet and just drop your images on the icon whenever you need to. The scale node lets you define fixed dimensions or a longest or shortest side dimension either in pixels or a percentage of the original. The Write images node lets you pick a destination folder, file naming rule, image type (e.g. JPEG) and a few other options.
However, the real power of Retrobatch is the huge choice of nodes you have to put between the read and write nodes. There are 53 of these in the basic version of the software and 23 more in the pro version. Some of the basic ones include scaling, colour correction, borders, watermarks — both text and graphics — metadata changes, trim, drop shadow, and blur. Some of the additional pro nodes include PDF maker, change bit depth, run script, and classify images. That last one uses machine learning to analyse the content of your images, including the ability to add your own CoreML models.
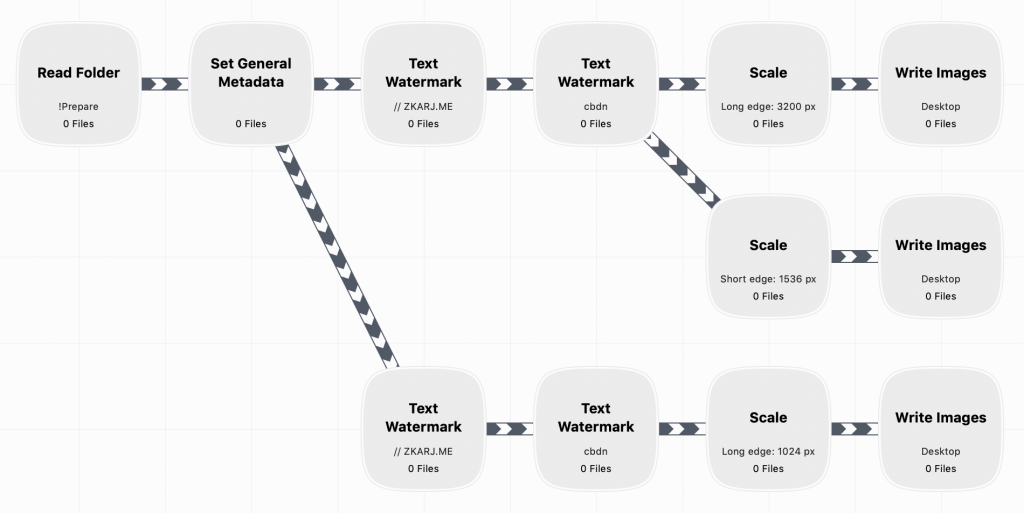
I’ve included here a picture of my main workflow. You will see after the initial Read Folder node, there is a Set General Metadata node. This adds my Creative Commons license to the Copyright metadata field. Then the workflow splits in two. The bottom branch places large text watermarks (my web branding and the Creative Commons license symbols), scales to a long side of 1024 pixels and writes out a JPEG image with a “blog” suffix. The upper branch adds the same watermarks but proportionally smaller, then splits again to create a JPEG sized at 3200 pixels on the long side, suffixed with “flickr”, and another JPEG sized at 1536 pixels on the long side suffixed with “photos”.
When I am processing a whole bunch of photos in Luminar, I simply export them all at full size into a staging folder, then launch his workflow. I can then immediately upload all the Flickr-optimised versions to Flickr. I also have a slight variation on this workflow saved as a droplet on my desktop. The only difference is it outputs to the desktop. This means I can drag and drop one or many images onto the icon and very quickly get the optimised versions right there on my desktop without needing to actually launch the Retrobatch application and load the workflow.
My workflow barely scratches the surface of what Retrobatch can do. In addition to the extra nodes like AppleScript and PDF and Photoshop file tools, the pro version also has a Javascript capability which adds incredible power to the tool, enabling you to create and distribute your own nodes.
Retrobatch isn’t for everyone, but if you find you sometimes need to do the same basic manipulations to a bunch of images, and especially — like me — if you have a process like this that you repeatedly use, then give Retrobatch a look.
You can get Retrobatch directly from FlyingMeat.com for USD$29.99 for the standard version or USD$49.99 for the pro version. There’s a page on the website which explains the differences between the versions.
[…] but I can’t remember who. Someone suggested adding the border with a tool called Retrobatch. Allister Jenks introduced us to Retrobatch in 2019, and I wrote a post about how I use it to manipulate images in 2023. It’s an app written by Gus […]