When I explained my journey trying to get AirPods to work for me and how the AirPods Pro 3 finally stay in my ears, I bemoaned one thing. The Beats Fit Pro came in a lovely Stone Purple (think lavender), but the AirPods Pro 3 only came in white. White is fine but it’s boring.
The other odd thing is that my AirPods Pro 3 case is already showing scratches. While the earbuds themselves have hit the ground many times, I’ve never dropped the case. Seems like it just scratches, setting it on tables and counters, which is disappointing.
As I thought about this over the last month or so, I thought maybe I could get a skin for them to make the AirPods purple. While little cases are easy to find, skins were far less prevalent. I didn’t want anything that made it thicker or heavier, so I kept hunting. Then I came across a well-known name I’d forgotten about: Slickwraps.
They sell something called AirPods Pro 3 Retro Color Series Skins that come in a variety of colors, including purple! I was looking for a simple, one-color skin, but the Slickwraps playfully have a six colors Apple logo.
But that’s not all, the product also includes skins for the AirPods themselves.

Learning how to apply Slickwraps is crucial to success, and annoyingly, the installation video for a particular product is very difficult to find. On the Retro Skins page for AirPods Pro 3, the only link was to their Instagram Reels page. From there, I could scroll through and find the AirPods Pro 3, but it turned out to be just a flashy video of how cool it would look if you succeeded at applying the skin.

I hunted around some more (why is this so hard?) and found a page called “Install Videos” with some text advice on how to apply dry and wet skins. I hadn’t a clue which I was buying, but below the text, there is a giant grid of installation videos for different products. I couldn’t find the AirPods Pro 3 Retro Skins specifically, but they did have one on the AirPods Pro 2, so I figured that was close enough.
After watching the video, I knew immediately that I’d need Pat Dengler’s help to apply them. I paid the $19 and set up a play date with Pat for their arrival.
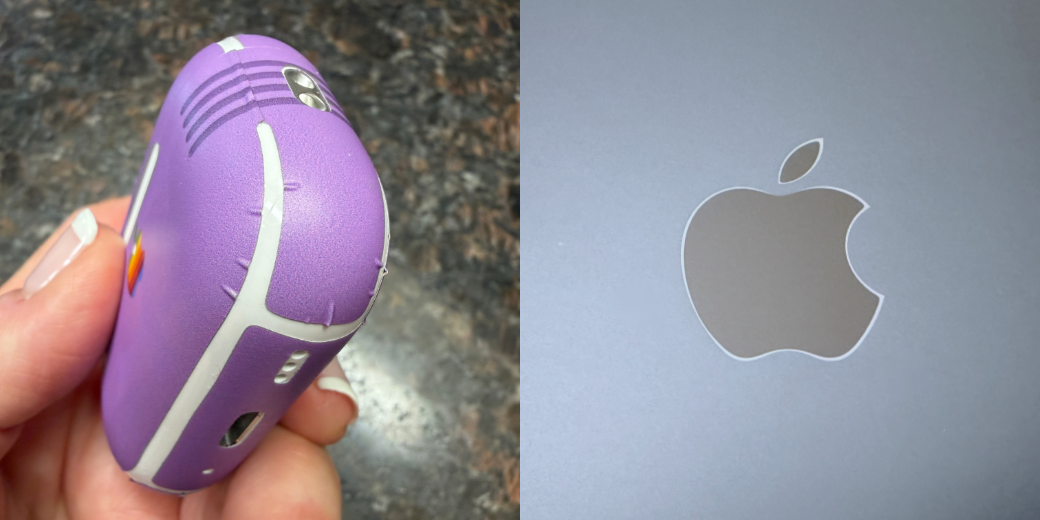
I’m going to skip to the punchline here: applying a flat sticker to a rounded object is nearly impossible to do well. The first 3.5 minutes of the video showed someone applying and reapplying and reapplying the skin. Every edge alignment (like for the hinge), every little hole (like for the light to shine through), and every corner piece was laid down several times. The corners were the worst, though, because you need to use a hair dryer to make the flat piece malleable enough to wrap around that round corner.

When Pat and I did it, we did not succeed in 3.5 minutes. In fact, we didn’t succeed in 45 minutes. Technically, my case is now purple with a retro six colors Apple logo, but it looks like a 6-year-old applied the skin. None of the edges aligns well at all. There are overlaps in some areas, gaps that are too big in others, and wrinkles everywhere.
One of the challenges of applying Slickwraps with a hair dryer is that not only does the heat make them malleable, but they actually stretch. So it’s possible to get overlap on opposite sides because you’ve stretched it to be too big.

After working it together, we took turns pushing the wrinkles out with a fingernail and credit cards like they suggested, but the end condition was no better than when we started.
The Slickwrap skin I bought also comes with wraps for the AirPods themselves, but after the disaster that was applying them to the case, Pat and I gave a hard no to the thought of trying to apply skins to the almost spherical earbuds.
If you look at my case from far enough away, it looks kind of cute.
But in the hand, you can feel every single edge of the wrap. Even where it’s aligned properly, there are gaps where you can feel the scratchy edge. I find it really annoying.
Bottom line is that I definitely would not recommend trying to apply Slickwraps skins to curved objects like AirPods, unless you’re far more meticulous and patient than I am, and you don’t care if it feels scratchy when it’s done.
But don’t give up on Slickwraps altogether, because I bought a second product from them and it worked out great!
Naked Series Skin for MacBook Air
When I bought the M2 MacBook Air, I didn’t worry about all the reports that the midnight blue model was a fingerprint magnet. I’m blessed with very dry fingers, so I don’t get many smudges on things like an iPhone screen. I assumed it wouldn’t be a problem. I couldn’t have been more wrong. The newer models of the MacBook Air have an improved surface, and supposedly, they show fingerprints less, which validates the problem with the M2.
When I was perusing the Slickwraps site for the skin for AirPods Pro 3, I came across what they call their “Naked Series Skins”. These are skins that don’t change the color or add graphics or any of that silliness. The one I chose was the Ultra Matte (Wet Application) Naked Series Skin.
My MacBook Air looked terrible pretty much all of the time. Not only would it get covered in fingerprints, but even when I tried to clean it, it showed every single smear from the microfiber cloth. I put a picture in the article showing it smeary right after cleaning. You can also see that I had an adorable rainbow “a11y” sticker on it, too, that showed my support for LGBTQ folks as well as accessibility, all in one sticker. I got it from the Silktide folks during an interview at CSUN.

I had to give up my sticker in order to apply the Naked Series Skin. It didn’t come off particularly well, and even with Goo Be Gone, it left a sort of shadow on the laptop cover that bummed me out.

The process of applying the wet Naked Series skins was massively easier than applying the skin to the AirPods Pro case. It makes sense that it was easier since it’s a large, flat surface. You can buy these skins to cover the area around the keyboard on the inside and even the bottom, and I imagine those would be a lot more challenging. I only cared about the fingerprint side, so it made life easy.
Steve is pretty good at this kind of work, so he took charge. The wet application skins come with a flat little squirt bottle filled with soapy water. You squirt this soapy water all over the top of the laptop, peel the skin off of its backing, squirt the sticky side all over with soapy water, and then lay it down on the wet surface of the laptop.
As you can imagine, with all this soapy water, it slides all over the place. What was surprising was how easy it was for one person to hold two corners in place while the other person used a credit card wrapped in a glasses cleaner cloth to wipe out the bubbles. In short order, the bubbles were gone, except for one pesky one around the Apple logo. We worked and worked on that bubble, and all we could seem to do was move it around the logo.
I should mention that they sell a version with a cutout for the logo, but my logo had some fine scratches on it, so I wanted it skinned as well.
The final step is to let it dry for 6-8 hours. We decided to put something slightly heavy on the logo in the hope of convincing the bubble to dissipate.
After 8 hours, we took a look and we were delighted to see the results. That one tiny bubble around the Apple logo changed into a rim bubble all around the logo. You see, the logo is a very slight and smooth bump above the top surface, so the skin pulls away around the edge, but it does it uniformly.
Picture a black matte Apple logo that’s glowing white all around it, including around the stem of the Apple. It’s unexpectedly gorgeous.
But enough about how cool the logo looks. My MacBook Air now has this lovely matte finish that hardly collects any fingerprints. After about a week of use (including a trip to see the grandkids), I noticed a few minor smudges on one side when I looked at it under bright lights, but a quick swipe with a wet towel, and it dried to a perfect sheen.
If you look closely, you can still see the shadow from the sticker I removed, but it’s not as noticeable as it was before applying the Naked Skin. Not only does it look beautiful, but it feels fantastic. I find myself sliding my hands around on it because it feels so good.
I mentioned on the AirPods Pro skin that I could feel the edges of the skin, and it was annoying. On the MacBook Air, I can definitely feel the edges on the edges, but it’s not a natural place to move your hands all the time, so I don’t really notice it in regular use.
The MacBook Air 13.6″ (2022 M2) Naked Series Skins normally cost $23, but they’re on sale right now for $20. Like I said, I bought the wet ultra matte version, but you can also get a wet gloss version, or matte dry and semi-gloss, both in the dry version.
Bottom Line
The bottom line is, I would really think hard before trying to do a wrap on any non-flat surface. Consider how patient you are, how much time you have, and how much you really care about changing the look. Maybe just get a cute case instead. Or if it’s AirPods Pro, consider getting the Beats Fit Pro in a cute color instead.
But if you have a laptop, especially one of the fingerprint magnet MacBook Airs, I can highly recommend getting the Naked Skin from Slickwraps. I can’t speak to how the MacBook Air Naked skin will wear over time, but for now, I’m deliriously happy.