Learning the MV7+ Like an Instrument
In the last segment, I stripped my recording chain down until there was nowhere left to hide, removing all the links in the chain that were there to fix my audio and that immediately exposed something uncomfortable: If I wasn’t going to fix things later, then everything had to be right at capture.
And that meant microphone technique was no longer a vague performance skill or a “talent thing”. It was processing. Just earlier in the chain.
Mic technique is processing
When people talk about “processing”, they usually mean plugins: EQ, compression, de-essing, noise reduction, that sort of thing. But all of those are reactive. They’re responses to a sound that already exists, whereas mic technique has a huge effect on tone and is proactive. It determines what sound exists in the first place.
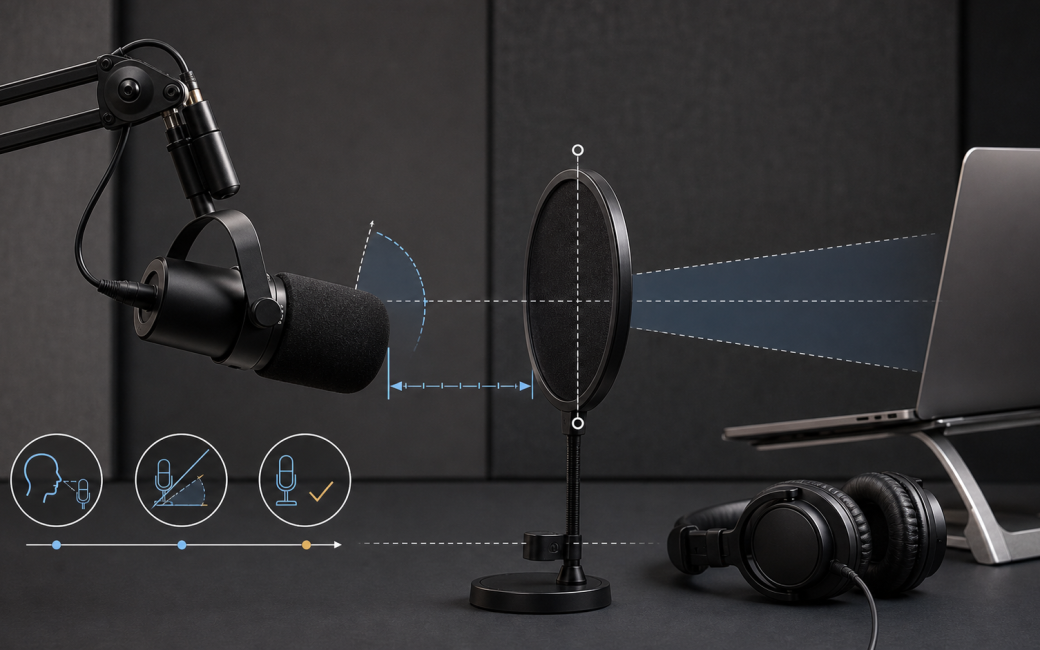
One thing I did not know until recently was that if you change your distance, angle, or height relative to the mic, you haven’t just changed loudness—you’ve changed spectral balance, sharpness of consonants, proximity effect, and how the room interacts with your voice.
That’s EQ, that’s level, that’s tone-shaping — just without a GUI.
Once I knew and actually accepted that, it became obvious that I couldn’t keep treating mic position as something casual or intuitive. If it was doing real work, it needed to be repeatable.
Consistency before taste
Before I could even think about “good tone”, I needed the same tone every time. Not roughly, not “close enough”, but actually the same. This is because without consistency, you don’t know whether you’re hearing a meaningful change or just random variation. And I feel that’s where most mic technique advice falls apart, because it tells you what sounds good, but not how to reliably get back there tomorrow.
Making consistency boring and reliable
I realised I needed physical constraints—not memory, not judgement—so I built a setup where position wasn’t something I decided each session. It was something the room enforced. Here’s what that looks like:
- I sit up straight-backed on a firm piano stool, so my height is fixed.
- The mic is mounted so it doesn’t move between sessions.
- The pop filter is mounted and used as a distance gauge.
And that means my mouth always ends up in the same place relative to the mic capsule.
Once that’s in place, consistency becomes boring, and boring is exactly what you want because now, if something sounds different, it actually is different — not just a side effect of drift.
Why I can’t do the “performance mic dance”
Now I’ve mastered boring, you might be wondering what happens to the audio, the art, the performance. You’ll sometimes see voice actors moving around the mic: leaning in for intimacy, pulling back for loud lines, angling off for emphasis. That’s a real skill. But it’s also a performance in its own right.
It also doesn’t work with my hardware, so let’s take a little diversion about that. In fairly simplistic terms, but hopefully I won’t say anything actually incorrect here.
There are, broadly speaking, two kinds of microphones. The property we are interested in here is their directionality, so there are directional microphones, cardioid is the term you might hear, and there are non-directional or omnidirectional microphones.
Because of road noise, air conditioners, creaking floorboards, I need a directional microphone for recording. That’s non-negotiable, really, for any bedroom-recording setup. These directional microphones not only pick up sound mostly from in front of them, they also pick up sound mostly from near them. In other words, the distance between your mouth and the microphone has a huge proximity effect, and that means physical acting where you expressively move around like Andy Serkis or Benedict Cumberbatch would have your voice swooping and soaring all over the shop.
No, that is not going to work. My microphone, my wonderful microphone, demands that I keep my head locked in place in front of it. One day I’ll learn how to make micro-adjustments to improve acting, but that is pro-level acting.
Does that make my audiobooks dull? Of course not, though I’m bound to say that, aren’t I? But acting for audio does not need to come from the body, it can come from the face and mouth, the control of volume, and the expression in the phrases. I think you’d be hard-pressed to prove that my head was rigidly held in place when I record.
So, back to the main thread, I’ve conquered boring, and that means I have repeatability, and repeatability is what lets me capture close to the target every time. If I need different tone, I’d rather choose it deliberately and lock it in than try to perform it live every sentence.
The three levers that actually matter
Once consistency was solved, something clicked.
If mic position shapes tone—and I can now hold position stable—then I can change tone on purpose. Not endlessly. Not randomly. Just by adjusting three things: Distance, Angle, Height
That’s it.
Everything else is secondary once the room and noise are good enough. At this point, though, I wasn’t trying to pick a sound yet; I just wanted to understand what each lever actually did, without guessing.
Running controlled tone experiments
I treated this like calibration, not creativity and I recorded longer samples while changing only one variable at a time:
- very close to further away, in sensible steps
- then off-axis at a few angles
- then small vertical shifts
One thing that surprised me when I actually did these tests was that my original “standard” distance wasn’t giving me the best tone after all. When I moved in closer, the sound got warmer and more intimate in a way I really liked.
That did mean changing the setup — the flat pop screen started getting in the way — so I dropped it and relied on the mic’s own foam and careful angling instead. That was a good reminder that the right distance isn’t a rule, it’s something you have to discover by listening.
It also meant I had to adjust to measuring my mouth’s distance to the microphone’s foam shield instead, but that was easy enough: I brought the pop filter back into play, but instead of talking through it, the frame is set to touch my chin if I get too close.
Having settled on angle, height, and approximate distance, I then recorded a longer section with more subtle changes in distance, and listened back later, on different days, sometimes in different contexts. Because what sounds “nice” in the moment isn’t always what survives fatigue.
What mattered was intelligibility over time, consonant clarity, and how tiring the sound felt after long listening.
By the end of that process, I had something far more valuable than a “good sound”.
I had a baseline.
A position I could return to, every time, knowing exactly what I’d get.
Where this leaves us
At this point, I wasn’t chasing tone anymore.
- I had consistency.
- I had a reference.
- I had three levers I understood.
And that changed the question completely. I was no longer asking “how do I avoid bad sound?”, I was asking “which sound do I actually want?”. And that, is what the next segment is about.
If you want to know more, come and ask me over in the Slack community at podfeet.com/slack, where I and all the other lovely NosillaCastaways enjoy friendly, positive online conversations. Feel free to message me, Eddie Tonkoi, if you have any thoughts, questions, or techniques you’re using. It would be nice to share ideas.
You can also find our work at jerntonkoi.com, where you’ll find Jern’s character-driven queer love stories, the audiobooks I produce for them, and bonus material for our subscribers.
I’ll be back soon to talk through some more of my workflow but, for now, happy recording, and happy reading.