

Important info, before you read on…
I wrote this article over a month prior to publication. After finishing the writing, and recording for the podcast, Google announced the Google Earth Pro desktop application was being sunsetted!
You can still download the application until June 2027, so I decided to publish anyway. Just know that while it will continue to work beyond then, it is an Intel binary application. This will work on Apple Silicon Macs running macOS 27 Golden Gate, using Apple’s Rosetta 2 compatibility layer, but it will not work on macOS 28 and later.
You almost certainly know about Google Maps. Did you know there is a related tool called Google Earth?
Maybe you did, but if not, it’s a more project-focused version of Google’s mapping tools. You can access it in a browser, at earth.google.com where you can build your own maps with all sorts of capabilities like custom shapes, lines, markers, and more.
Did you also know that there is a desktop app called Google Earth Pro? I’ve known this for years, but I kept forgetting about it. Don’t worry about the Pro in the name, you can use it completely for free. There are advanced features you can pay to use. You can download the app directly from Google.
The one thing that keeps me coming back to Google Earth Pro is my AvGeekery. Let’s take a little detour in that direction by way of explanation.
The term AvGeek is short for Aviation Geek. According to Google Gemini, it originated as a niche, affectionate term for passionate aviation enthusiasts, gaining popularity via online forums in the early 2010s before becoming a mainstream hashtag for plane spotting and industry fans.
I’ve been an AvGeek since long before the term was coined. I pay for a Gold subscription to FlightRadar24 where I watch all sorts of aircraft flying all over the globe, though mostly in my local area. It’s a great tool for aviation photographers, like me, to know what’s nearby and what scheduled flights are expected.
OK, let’s start turning this detour around. There’s another thing about me… I am a passionate personal historian. I love all sorts of history, but I am quite fanatical about tracking down facts and stories about my early life, and about the lives of my immediate family. This all started after my father passed away in 2017 when we started to hear stories about him that we hadn’t heard before. I’ve since sat down with my Mum and an audio recorder between us, to be sure I get all her stories while she is still with us.
Right, we’re almost out of the detour. Just a little further. Part of my personal history includes what’s happening now, and in recent memory. There’s no sense leaving it to my children to have to chase down all my stories later on when I can tell the stories myself. Some of those recent memories concern travel. Travel on aeroplanes.
Do you see where this fits together yet? Perhaps in general, but let’s dig in to the point of this rambling tale.
After I have taken flights outside of New Zealand, I go to the history section of FlightRadar24, afforded me by my subscription, and I download a replay of the flight. This takes the form of a KML file. KML stands for Keyhole Markup Language and is an open standard for sharing geospatial data. One of the most well-known users of KML files is… Google Earth.
OK, we landed! (Yes, that pun was intentional.)
Once I have downloaded a KML file for each flight, all I have is a file full of coordinates and timestamps. It’s not very exciting. However, loading it into Google Earth Pro allows me to visualise the flightpath.
Before I go on, let me wake some of you up. This doesn’t have to stop at flight data. Maybe you like hiking or cycling, and you track your progress with a simple app like GPX Tracker or the popular AllTrails. What better way to impress people with your hill-climbing abilities than by showing the trail on a 3D map. Yes, Google Earth is natively in 3D.
Although Google Earth primarily works with KML files, it can import GPX files, too. You just have to tell it how to do the conversion — a step I will leave for the listener to experiment with.
Let’s look at what’s involved in visualising a KML file.
When you open Google Earth Pro, it will show you the entire globe and then spin it, so your current location is in the centre, assuming you allow it location permission.
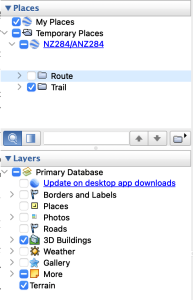
From the menu bar, select File then Open. Navigate to the KML file and choose it. You will see the route plotted on the globe, and the globe will spin to make most of it visible. It looks pretty ugly at this stage but we can fix that.
Notice in the left sidebar, under “Places” then “Temporary Places” there is now an entry representing the file. If there is a title in the KML file, it will appear here. There is also a disclosure indicator. Click that to expand the tree one level.
At this level, you will see two entries: Route and Trail. Click the checkbox next to Route to uncheck it. This will immediately improve the display. The grey you saw at the start was the potentially thousands of waypoints of the route. Turning those off lets us see the underlying trail.
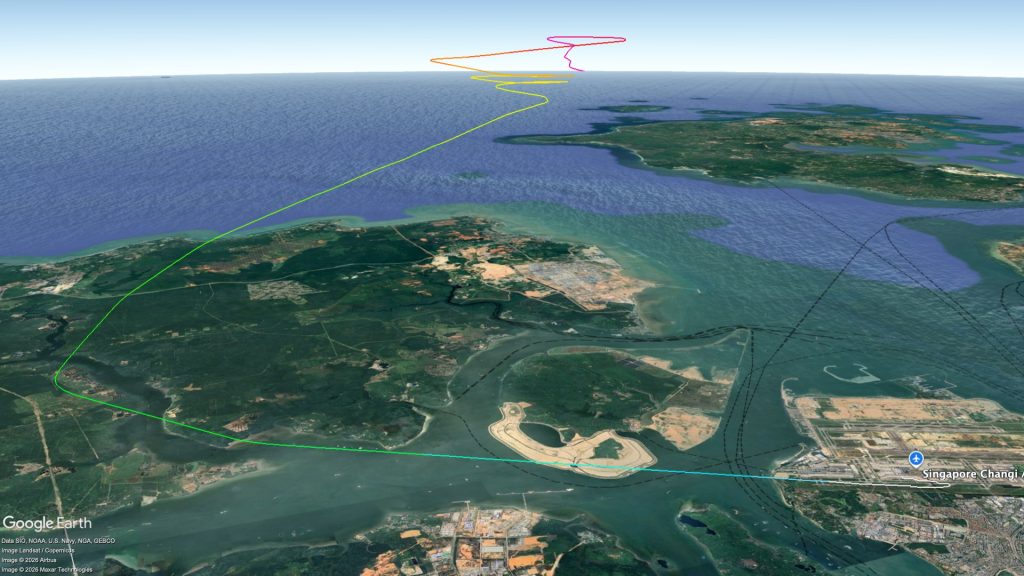
In the case of a FlightRadar24 trail, the colour represents the aircraft altitude, the same as you see in the app.
Now it’s time to become artistic director. Either using the controls in the top right of the view, or by using trackpad or mouse gestures. I won’t explain all of these, so experiment to see how they work. Be sure to work with position, zoom, viewing direction and elevation to get the view you want. It can take a bit of experimentation to get what you want as all the variables interact.
One quick tip: you can fairly accurately move the viewpoint forward, back, left, and right using the arrow keys on the keyboard, too. I find this to be a useful last action of fine-tuning.
Now you can capture a screenshot of your viewpoint, but don’t use the OS tool or even your favourite application. Above the view is a toolbar. The third-to-last icon here is titled “Save image”. Click that.
A context toolbar appears below the main toolbar with a handful of settings. One of these is a Map Options dropdown. On this, you can turn off various overlaid features and choose the style of the landscape; full colour, muted colour, or monochrome. Your track will always appear in colour, so this choice can help make it stand out.
Next to the Map Options, you can pick the dimensions of the image. It defaults to the current size of the window, but you can select from various standard sizes. Do note that selecting a size that is a different aspect ratio to the window will crop the view so you might need to cancel out (use the x in the context toolbar) to adjust. You can adjust with the mouse while in this mode, but I found it jumpy. The arrow keys still work well, though.
Finally, click the Save Image button. You will be shown a standard macOS file save window where you can choose the location and file name, and also choose between JPEG or PNG format.
Here’s an image that shows our arrival into Singapore in 2025. It’s a fairly low-angled view so you can see the flight path pop up over the distant horizon before the final curved approach to land.
In a follow-up article, I’ll show you how to go to the next level when visualising a trail. Beyond 3D… to 4D!