
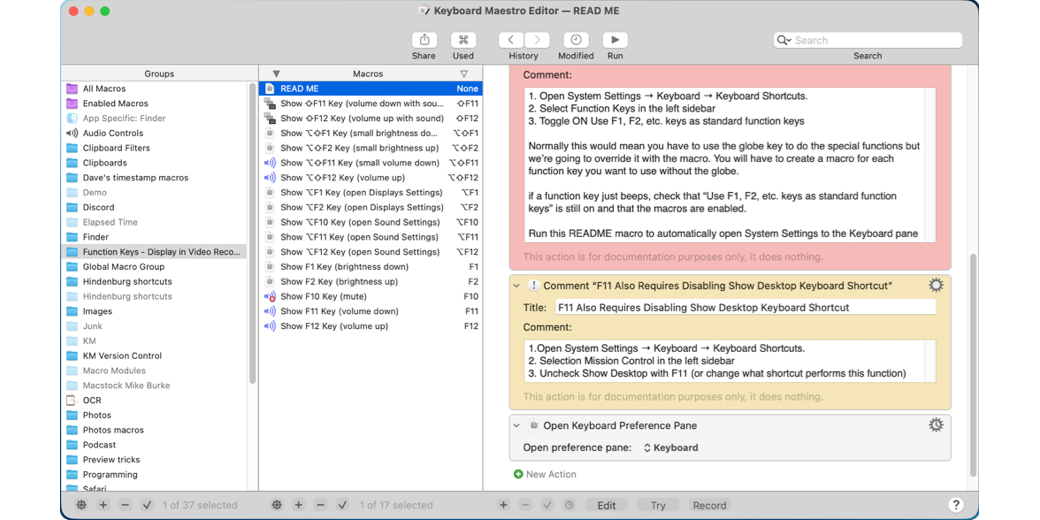
One of the most powerful tools that I take for granted on my Mac is Keyboard Maestro. I have a lot of cool little animations running that I sometimes forget aren’t part of the operating system. I wouldn’t call myself a power user of the tool compared to some other folks, but I know my way around it well enough. This week I solved a peculiar problem that had been bugging me for years by using Keyboard Maestro.
The Problem to be Solved
In my article about Cleanshot 5.0 this week, I explained that, like ScreenFlow, it can record keystrokes and display them in the video recording. This is an important feature that helps your audience follow along with what you’re demonstrating.
If you don’t create screencasts, but you do demos to live audiences, you can use a tool like Keyscreen or KeyCastr to display your keystrokes onscreen to help the audience follow along. But if you’re recording the screen, there’s a problem.
Both ScreenFlow and CleanShot allow you to choose to display either all keystrokes or just modifier keys, such as Command, Control, and Option, in combination with regular keys. For example, if you hold down Option-Control-V to paste without formatting, it shows the keys ⌥⌃V (capital V).
Overall, this is a dandy feature. But there’s one set of keys that the screencasting tools I’ve tested can’t seem to capture, and that’s the function keys. You might be wondering why I would care to show these particular keys.
In a recent ScreenCastsONLINE tutorial, I was teaching a bunch of my Tiny Mac Tips, and one of them was how, if you hold down Option-F1 or F2 (the brightness keys), you can jump directly into System Settings to Displays settings. No faffing about launching System Settings, finding Displays, and then selecting it. That’s built-in functionality that really speeds up getting to the right place in the labyrinth that is System Settings.
You can also hold down Option and any one of the three volume keys (F110, F11, or F12) to jump right to Sound settings in System Settings.
I was on a roll with modifier keys added to function keys, so I also wanted to demonstrate how you can make teeny adjustments to brightness and volume if you add Option-Shift to the respective function keys.
If the function keys didn’t show in my videos, the tutorial would be much harder to follow. It would even look wrong as I said “Hold down Option F1” and all the audience could see was the Option key.
I simply had to find a good, permanent solution to this problem, and the awesome Keyboard Maestro was the perfect tool for the job.
While the final solution may look intimidating, it’s only because the steps need to be replicated for each function key you want to capture. The individual macros are quite simple.
Setup for Macros
At a high level, we’re going to disable the normal way that the function keys operate, and then we’re going to put the functionality back with Keyboard Maestro. This requires some setup.
By default, the function keys aren’t really acting as function keys. For example, if you tap the F1 and F2 keys, you’ll see the brightness go down and up. But if you hold down the 🌐︎fn key, then F1-F12 act like function keys. Ok, with me so far? Function keys don’t act as function keys by default.
For this trick to work, we have to swap that behavior. It will make sense in a minute … I think.
- Open System Settings → Keyboard → Keyboard Shortcuts.
- Select Function Keys in the left sidebar
- Toggle ON Use F1, F2, etc. keys as standard function keys
Under this toggle, it explains: “When this option is selected, press and hold the 🌐︎ key to use the special features printed on each key.” The special features are things like brightness and volume.
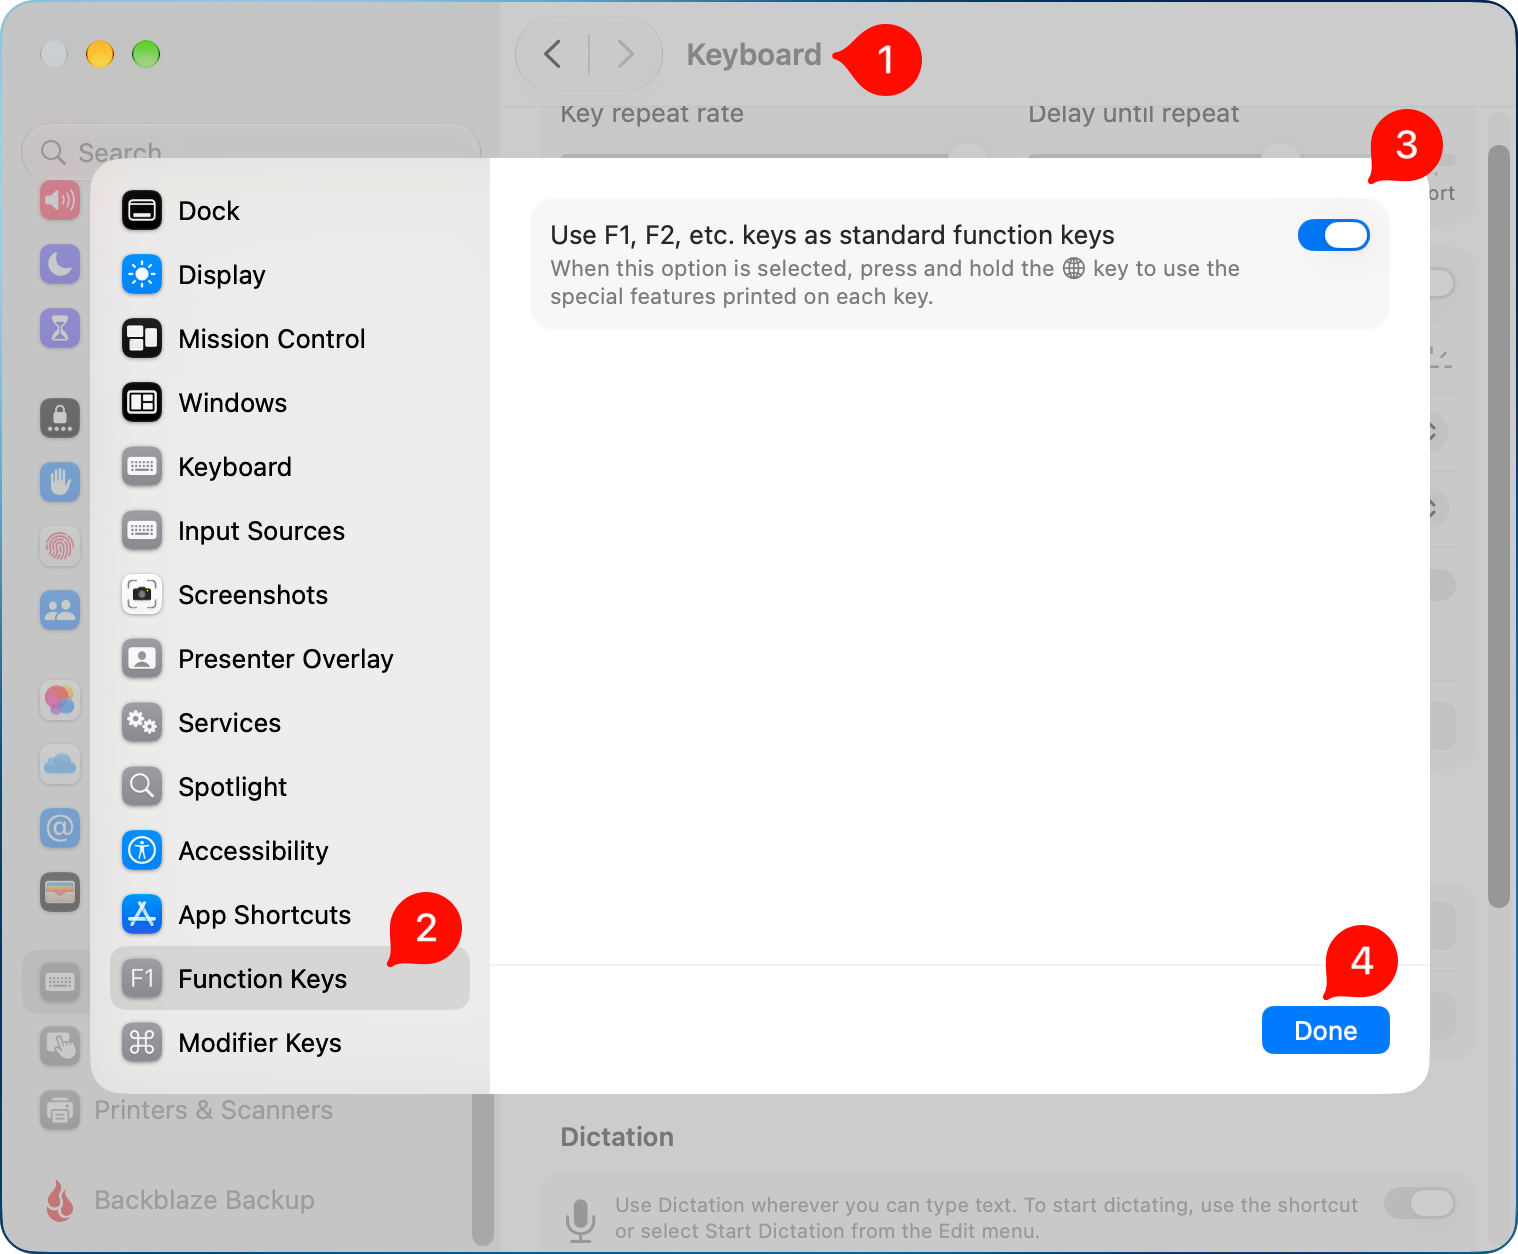
If you have nothing assigned to a function key, tapping it now will just boop at you. But holding down 🌐︎fn with a function key will execute the special feature on that key. For example, 🌐︎fn+F2 will increase the brightness of the display. This may be the way you’d like your function keys to behave anyway, and if so, you’re welcome for this embedded Tiny Mac Tip. You should stop right here.
For the rest of us, we’re going to do something that sounds nutty. We’re going to use Keyboard Maestro macros to bring back the original functionality. When we’re done, we won’t have to use 🌐︎fn to use the F-keys to do things like control brightness and volume. Ok, even to me this sounds kind of batty, but let’s soldier on.
Quick Keyboard Maestro Primer
Keyboard Maestro is an incredibly capable tool, and I’m not going to do a full tutorial on it, but a quick primer will be helpful.
The Keyboard Maestro interface has three columns. The left column is for Groups. You can group your macros by app, but you can group them any way you like. Grouping by app is cool because you can have the macros only function within that specific app. For example, I wrote a macro that only exists when I’m editing the podcast in Hindenburg.
The second column is a list of the macros you have in the selected group. At the bottom of this second column, there’s a plus button to create a new macro within the group.
With a macro selected, the third column is where you build, view, and test the macro. At the bottom of the third column is a plus button (amongst other things), and this button pops up all of the available actions you can add to your macro.
That’s it for the primer. See? That wasn’t so bad!
Building our Function Key Macros
Now let’s walk through how to create our first macro to return the default functionality to one of our function keys, which will allow ScreenFlow and CleanShot to display those keys.
In our left column, we can tap the plus button at the bottom to create a group I’ll call Demo. Since these macros will be used while demonstrating any application, we’ll leave the defaults for the new group to be available everything everywhere all at once.
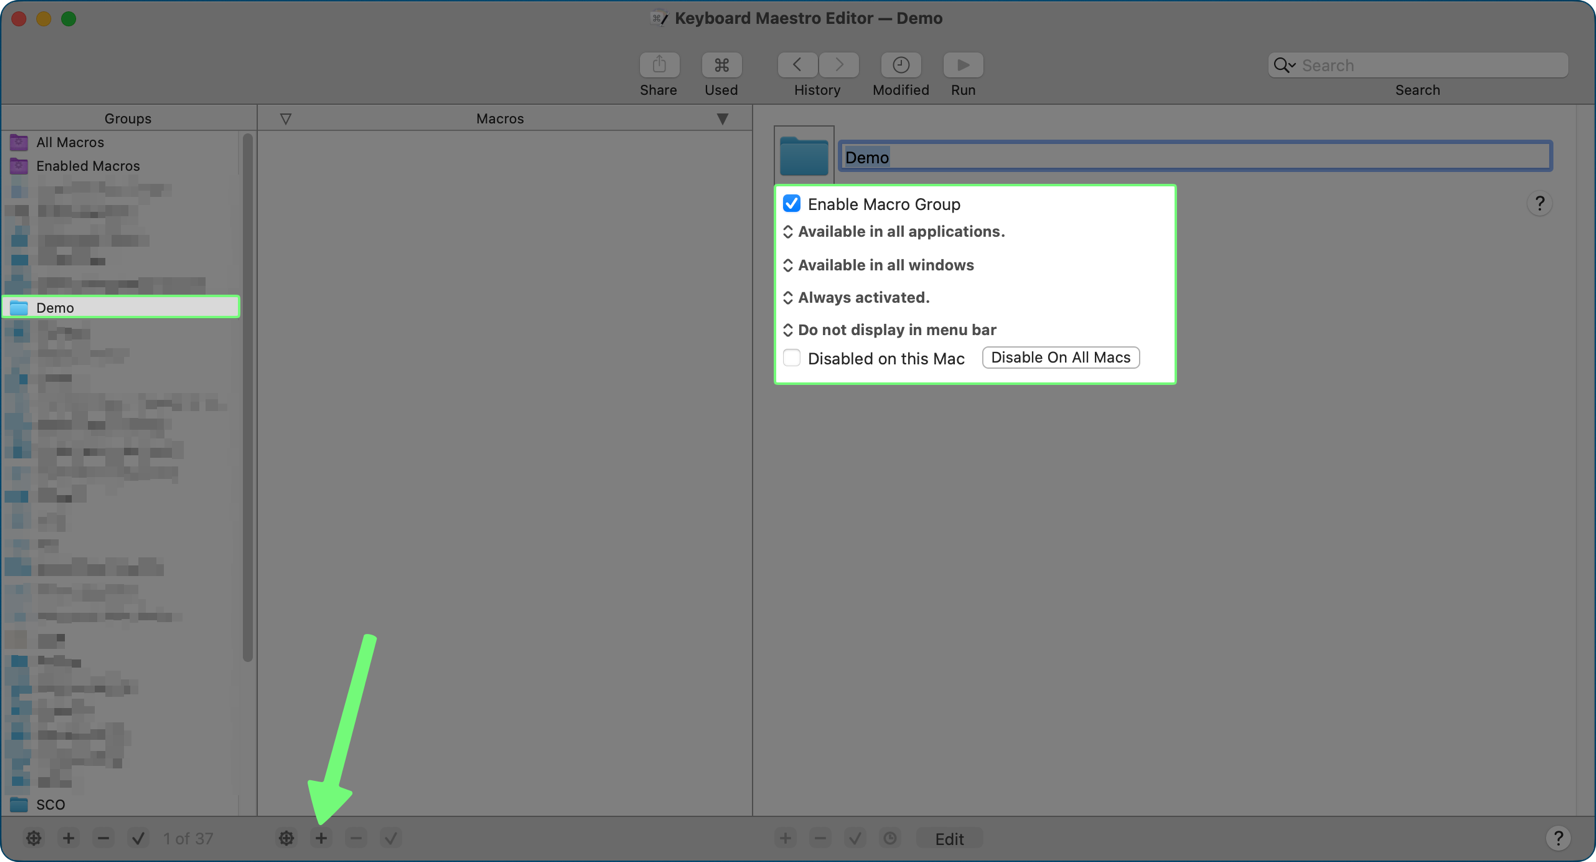
Next, we select the plus button in the second column to create a new macro. Creating one macro to put the functionality back on the function keys is quite easy. To solve my problem, I created 16 different macros, but their form is very similar. I created the first one, duplicated it, made a few minor tweaks, and then moved on to the next one.
The first macro I added was to return normal functionality to the F1 key, which should be to turn the brightness down. When invited to give the macro a memorable name — I chose “Show F1 Key (brightness down)”. I’m clever that way.
The fun part is in the right pane. Below the macro’s name is a checkbox that says “Triggered by any of the following:” and you’re invited to add a trigger with a green plus box.
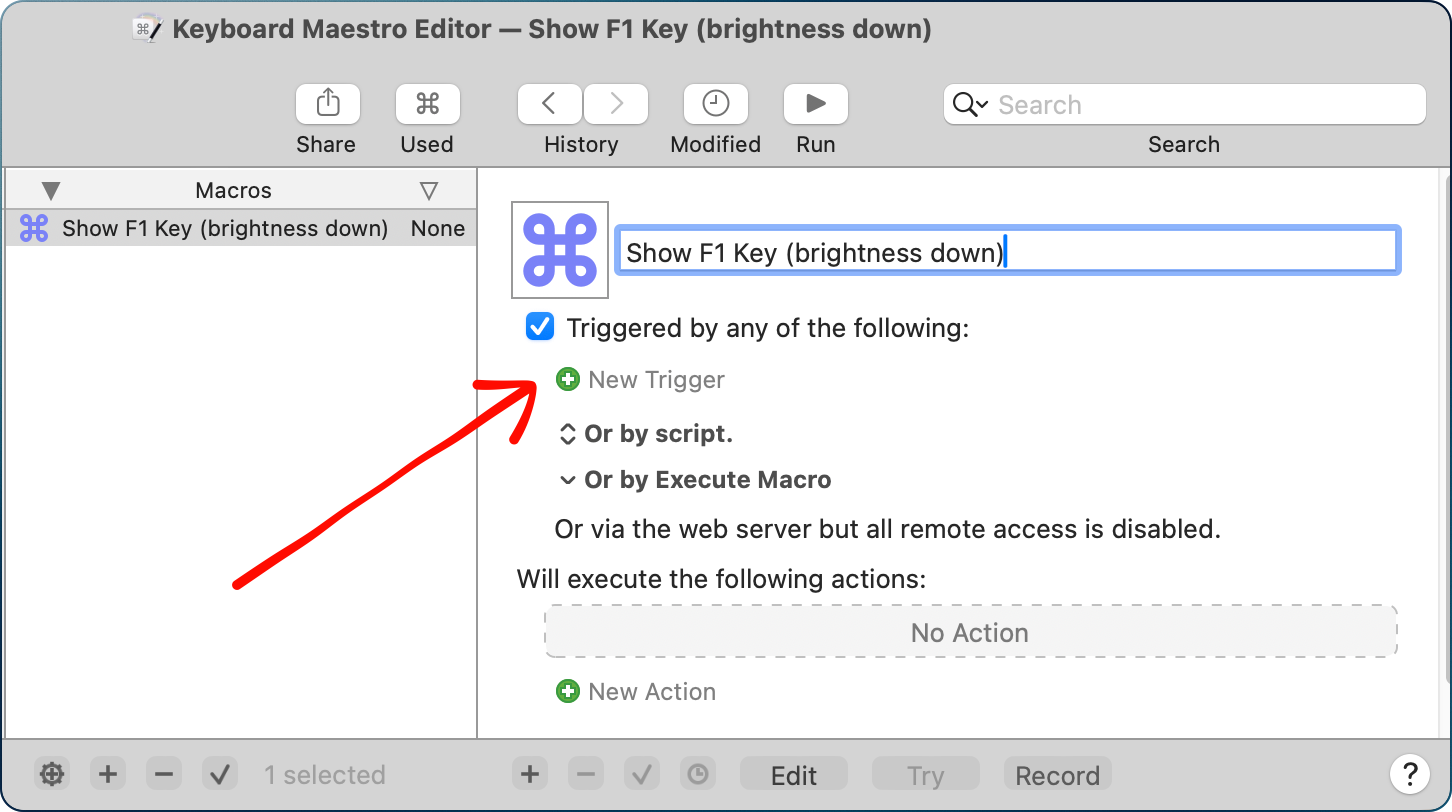
When you tap the green plus, you’ll see an alarming number of options, but don’t panic. The first option is hotkey, and that’s what we want. We want to trigger this macro when the F1 key is pressed. Now you get the familiar field to type the hotkey.
Ok, cool. We’re almost done. We have a macro and Keyboard Maestro knows how to trigger it, but it doesn’t yet know what action to take. At the bottom of the right pane is a plus button, which will pop up a list of the gazillion actions you can choose to add. Again, don’t panic!
At the top of the ginormous list is a search field. We want F1 (without the 🌐︎ key) to trigger a brightness change as it did before. Searching for “brightness” returns a list of four options: decrease and increase brightness, but also small decrease and increase. For this macro, we can simply select Decrease Screen Brightness and drag it down into the action field, and our macro is done.
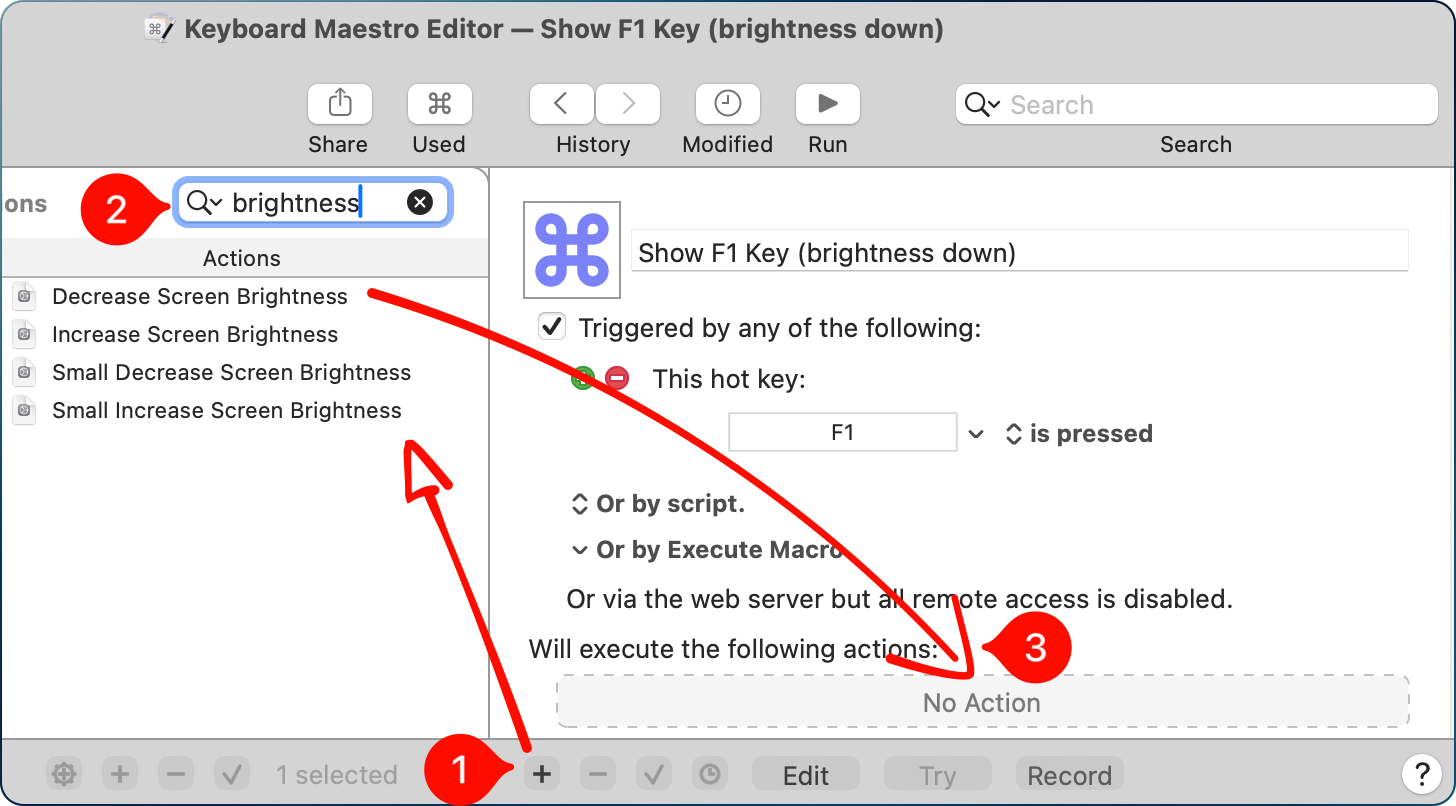
That sounded like a lot, but we really only did three things after creating the group:
- Added a new macro and named it
- Added a hotkey trigger
- Told it the action we wanted for the hotkey
With those three simple steps, now a tap of F1 brings the brightness down just like nature intended. More importantly, and for reasons I can’t explain, now when you do a screen recording, your software will see the F1 key being pressed.
Once I had F1 working properly, I only needed 15 more macros for my tutorial. And why so many, you might wonder? I needed to show how brightness up and down worked by themselves by tapping F1 and F2, but the big excitement was adding the Option key to both of them to bring up Displays in System Settings. I had to duplicate my macro to add ones for Option-F1 and Option-F2 as the triggers.
Likewise, I wanted to demo holding down Option and any of the three volume function keys: mute, volume down, and volume up.
You can see how the number of macros I had to create was multiplying. 5 function keys providing their normal functionality, and then the same five with the Option key held down. We’re at 10 already.
But then I decided to teach another trick. If you hold down Shift and Option with volume up/down and brightness up/down, you get tiny incremental changes instead of the bigger default changes. I know, it’s for the true control freaks amongst us, but it’s fun. So that gave me 4 more.
The final trick was to show the audience how to have the volume keys play a little “boop” sound to let you know how loud or quiet your changes were making the volume. That used to be the normal behavior, but Apple took it away from us in Yosemite 10.10.
If you hold the Shift key down with volume up or down, you get it back! That gave me the last two macros, bringing the grand total to 16.
Proof of Success
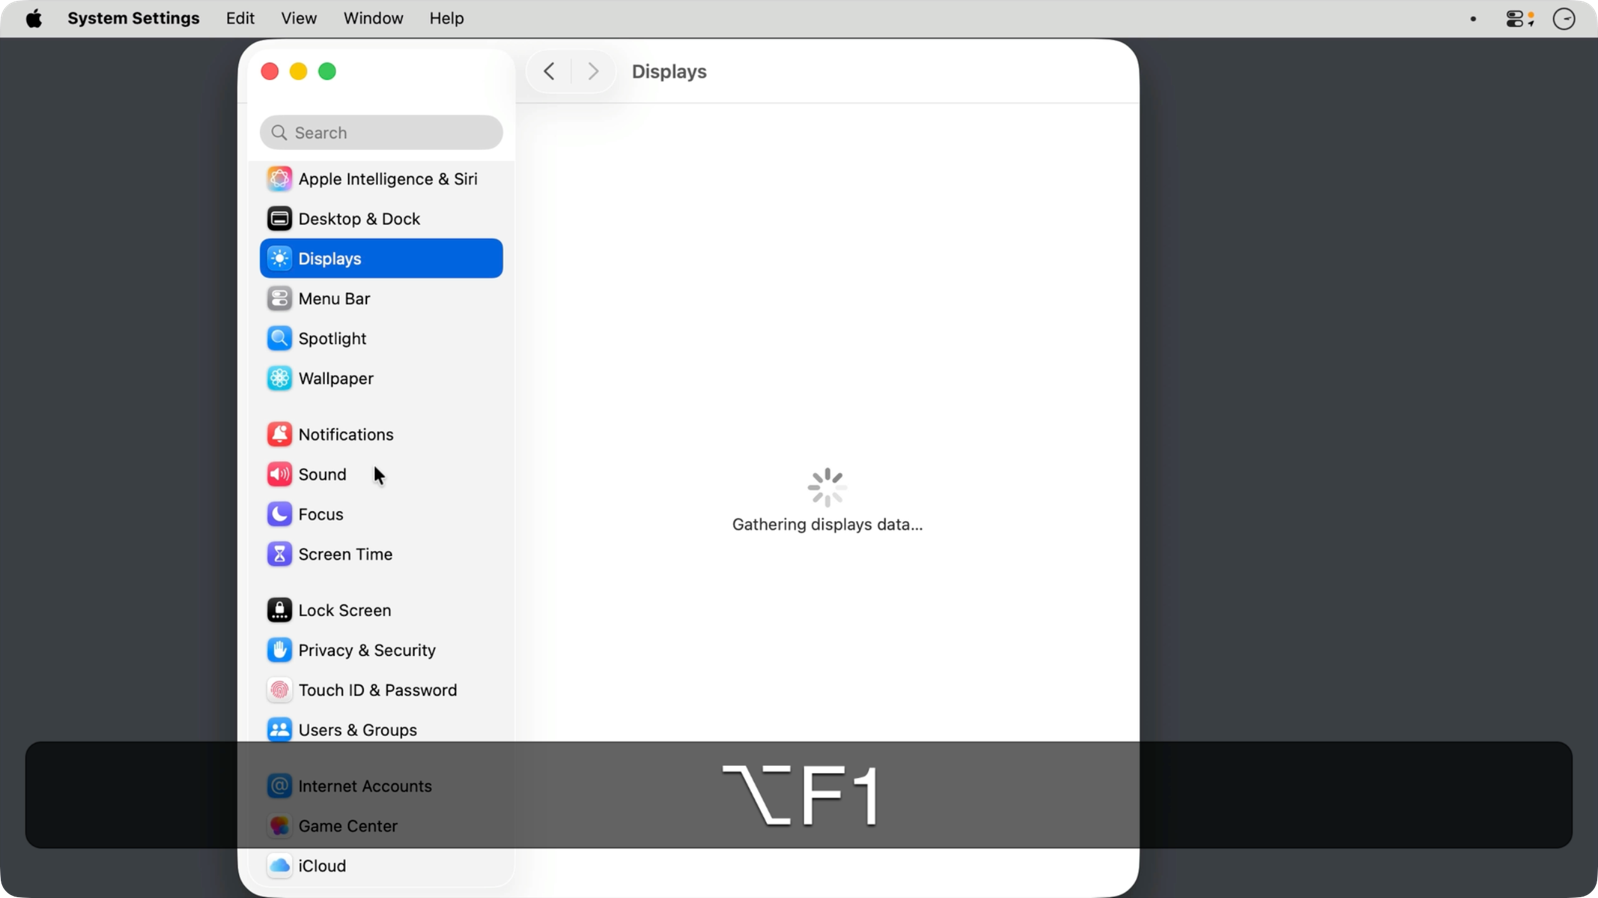
The real proof of success was when I recorded my tutorial video with ScreenFlow, added a video action to show modifier keys, and I could see my function keys. I put a screenshot from the final video into the show notes to prove it.
I’m quite skilled at coming up with nifty automations like this but I often forget how I did these things. I worried that if I succeeded in remembering that I’d created these macros, it would be really helpful if I left myself some breadcrumbs about how to enable all of this. In particular, I needed to remind myself that I’d have to toggle the way the function keys work.
I wrote a “macro” called README that’s actually just a couple of comment boxes to remind me of how it works and what toggles to flip.
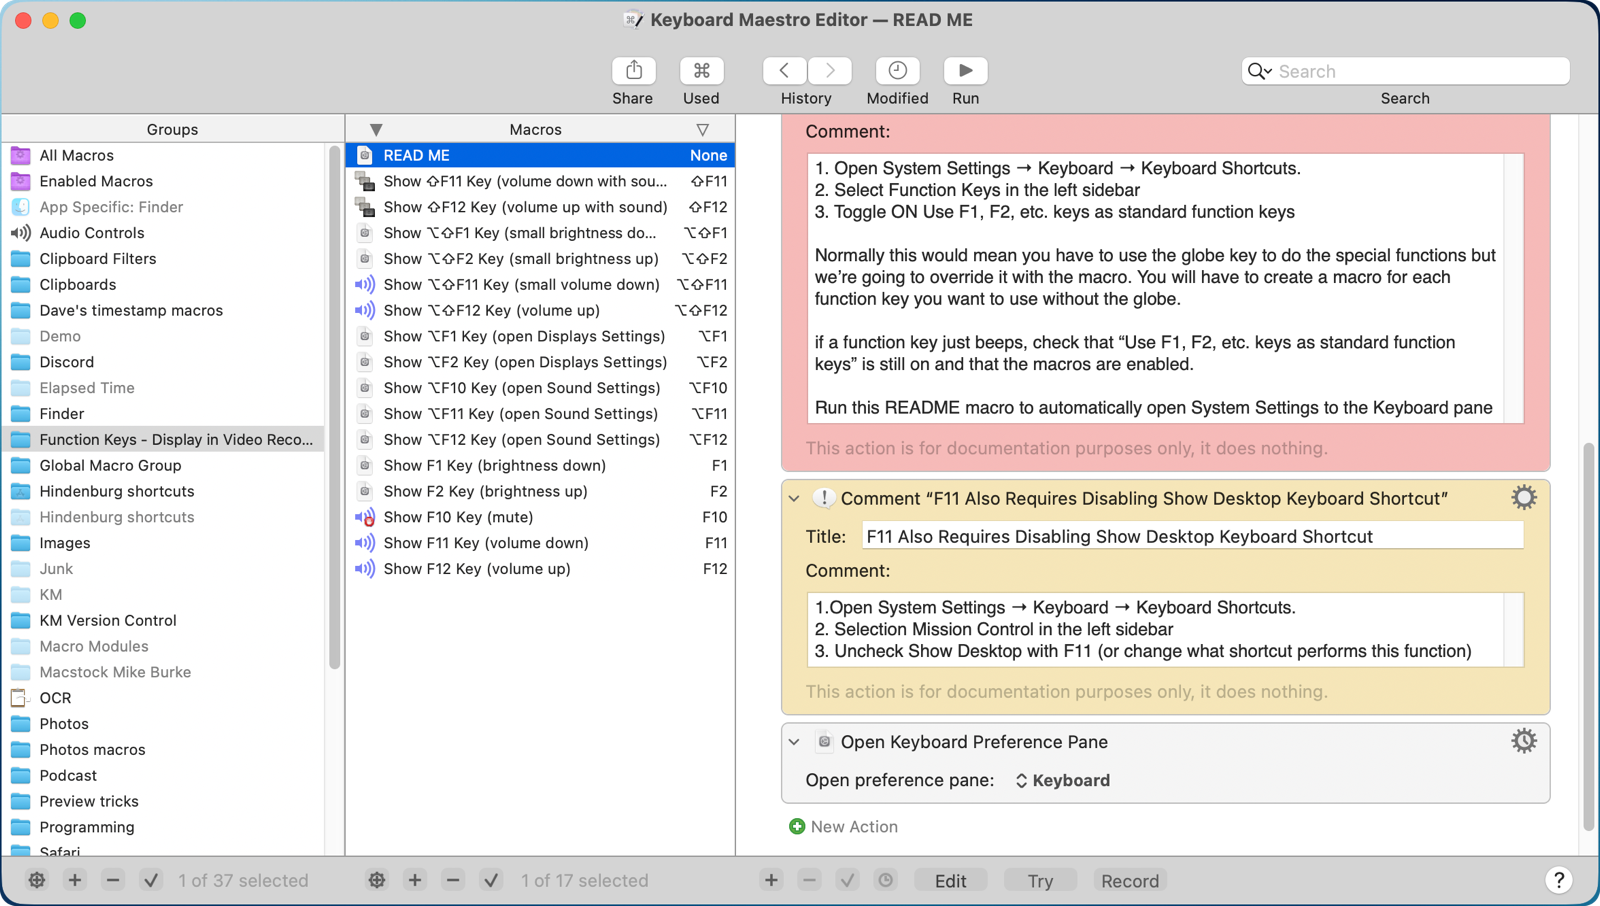
After I got all of this working as designed, I found a problem. The F11 key wouldn’t work to mute the audio. It turns out that F11 is assigned to Show Desktop. In order to use F11 with these macros, you have to go back into Keyboard Shortcuts and, under Mission Control, uncheck the box to Show Desktop for F11. You can bet I added that to my README macro!
If I ever need to show the function keys for the remaining 7 function keys, I’ll have some work to do, but for now I’ll take a rest.
Bottom Line
The bottom line is that this is a pretty narrow need, but I was so proud of my solution I felt compelled to share. I also now have an article I can reference in six months when I can’t figure out how I did this or why I did each step.
If you want my macros, I’ve put a link in the shownotes where you can download a zip file of the entire group. When you import the macros, make sure you have your settings to disable any imported macros, and then carefully review what I’ve given you. Macros are little executables that can change things on your system, so they are VERY DANGEROUS. Mine aren’t, of course, but practice good hygiene even with a trusted source.
One final bit of advice. When you’re not actively screencasting while needing to see the function keys, you might want to disable the entire group and toggle the function keys back to their original behavior in System Settings.
One More Thing
One more thing. Somehow apps like KeyScreen and KeyCastr, which display typed characters onscreen, can show function keys without any of this falderal! Maybe I should get their developers together with those from ScreenFlow and CleanShot?