Astrophotography by Stealth, from looking up at the night sky, to hanging a picture on the wall which takes your breath away.
- Astrophotography by Stealth Part One — by Brian Hoffman
- Astrophotography by Stealth Part Two — by Brian Hoffman
- Astrophotography by Stealth Part Three — by Brian Hoffman
Hello and welcome back. I’m Brian Hoffman and if you have been following along, you know I was to the point where I had just started the editing process with more than Preview.
I had stacked my Andromeda and Orion pictures with great success. Now it was time to level up and learn how to edit my stacked pictures so I could finally hang one or two on the wall with a bit of pride and wonder.

Part four: edit or bust?
If you have been following along with my progress and figured out it has been a few years of effort to get me to this point, you are right. Now in less than two months, I am starting to learn how to edit my pictures.
I know I’ll be a N00B for a very long time. I also have a very large bucket of respect for those who have mastered these skills.
As you know, I had stacked my Andromeda and Orion light frames. I sent them to Amos for his critique. He was very happy with my progress. That was all I needed to motivate me. I got back to work in the time I had available.
I travel for a living, so I needed to download all the tools and additional files I would need to use PixinSight on the road. After 47GB of file downloads and several free add-ons, I was ready to stack the rest of the pictures and begin my astrophotography editing journey.
I stacked all the pictures I had over the next several days. I had around 75 hours worth of pictures, maybe more, not including the ones from my R8. I also learned about dark frames, flat frames, and bias frames. I had none of those. How much better would my pictures be with them? I was going to find out. I got to work taking those frames to enhance my work.
Light frames are what you would think of as a picture. Dark frames are used to tell software like PixinSight what your sensor “sees” when there is no light. Flat frames are pictures your sensor “sees” when you shine white light at your sensor. Bias frames are a bit more technical; they tell your software about sensitivity and, of course, biases.

Some of the stacks were rally nice, others needed more data before I was going to have the basis for editing a great picture. As you know, astrophotography teaches us patience. Some of my objects only filled two percent of the sensors area. I would need a lot more data to produce stacks I could work with. This endeavor could take years to produce the pictures I wanted.
In astrophotography, distance is measured in light-years, not miles, and angles in degrees, arc-minute and arc-seconds. An object which is closer will be seen as larger, and fills more arc-minutes than a same sized object much further away.
When you start talking about millions of light-years away, even the largest items in the universe, like galaxies, get relatively small. Astrophotography takes you to a whole other level of understanding size, distances and time.
Before I started editing my photos, I looked at what was rejected by PixinSight. It was amazing how much stuff flies through the frame during each shot. This picture contains the rejections for my M104 stack. It contains satellite trails and at least one aircraft passing by.

I was now ready to take the stacks and start editing. The easy way to edit my stacks was to watch a video and mimic what they do. Brian see, Brian do. This will take you to the next step, but would I understand the what’s and why’s? Well the answer is sort of for now. My learning curve has been steep. While I do understand what is going on, I am still unsure what step will produce the desired output, so I am both watching and using trial and error. I suspect I will soon learn the process steps for the output I want, but for now, I am the student and I am soldiering on.
Of course, editing Andromeda was first. I had stacked the pictures I had taken and now I needed to learn the editing steps needed to get to the results I was looking for, all without turning my picture into something it wasn’t, which was my biggest fear.
The first thing you need to know is stretching. Stretching is nothing more than enhancing the light levels to something we can see and appreciate. I think of it like “If I traveled much closer to the object, what would I see.” I would be able to see more light. That to me is stretching.
The next thing you have to do, if you are using a color sensor, is correct for the different photo receptors in your camera. The Red, Blue and Green receptors can all see green. So your total green has to be reduced or you will just have a green screen with some details embedded.

After you correct the color values, you are going to process the new picture. You are going to reduce the blur and noise, you are going to correct the colors of the object, then you are going to enhance some of the items in the picture to better represent what you saw.
This part is no different from processing any picture. You need a little enhancement here, or a little reduction there, no problem. In the end, you get a picture you can be proud of, and maybe just maybe, hang on the wall. But your learning won’t stop there. You see, the software and the equipment is always getting better. If you really want the best picture you can take, it will take a lifetime of effort. But for now, here is where I am in the journey.

In the future, I will be able to make my pictures even better. However, it all comes with a cost. I can buy a monochrome camera with a full frame sensor which will capture more precise light and using a filter wheel, I can bring the colors back to the picture. Monochrome cameras have every pixel setup to capture the light which hits it. It is a yes or no question. However in an RGB color camera, only one in three pixels are setup for each color. Monochrome cameras will give you more optical resolution, and with more time, the color returns.
Stacked sensors are another technology which will revolutionize astrophotography. These sensors have all three color sensors stacked layer upon layer so as a photon hits the sensor, each color can be processed giving you higher resolution and color all at once. Filters are another technology which helps select the light you are trying to capture. In light polluted cities, filter are a must. If you have a dark sky location to capture from, filters become a choice.
Other techniques like Dithering and Drizzling are way beyond the scope of this post and to be completely honest, I do not completely understand them and while I do Dither between each shot, I don’t see much benefit so far, but I bet I will in the future, for now, I have the data.
As I use PixinSight, I am starting to understand why other add-on software is available. There is so much you can do to enhance your data and increase your resolution simply by using software. I expect as I get better, I too will pay to use these enhancements.
One thing you can do to enhance you pictures is go to a higher altitude dark sky location to capture your light frames. I like being in a dark sky location above 6000 feet where a large portion of the atmosphere is below you and the light you collect will have less light pollution to work against.
Dark skies locations are available all around the world. Going to one of these places on the new moon is likely to have you finding others who are trying to capture their own wall hanging picture which takes their breath away.
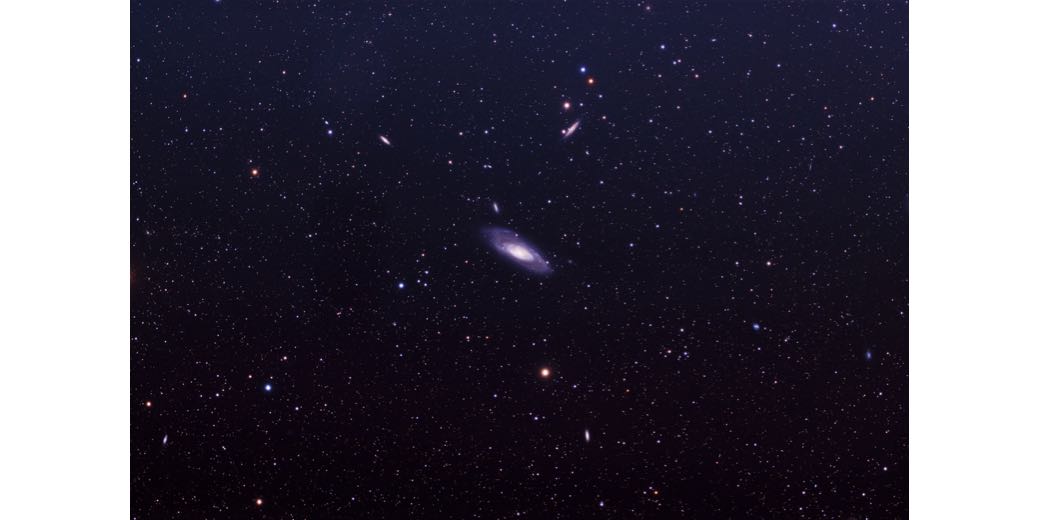
Here is one last picture I will leave you with for now. This is a stack of 178 pictures of M106 and in the vein of where’s Waldo, I will ask how many galaxies can you find in this picture. Taking a casual look you can easily find six or seven galaxies. If you take your time and enlarge the picture and take a good look, how many galaxies can you find? Add your guess to the comments. Hint, I found way more than I expected.

One of the reasons I am able to capture so many galaxies in this picture is because of where in the night sky M106 can be found. Looking up at the big dipper where the ladle would pour out, M106 is located right there. What this means is there is less Milky Way dust to look through to see M106 and its “neighbors.”
Outro: One other thing I need to let you guys in on is I have an older eight inch 2000mm reflecting telescope which may be adaptable to astrophotography. I would capture way more light in every shot. But that project is for another day, however I know my first target when it is ready to capture light.
What I do know is I will be learning more about Astrophotography by stealth to gain the needed skills to take that wall-hangable picture which takes my breath away.
Finally, here is a bonus picture from our vacation to Bryce Canyon a few weeks ago. It is not fully edited, but it does accurately represent the night sky as I saw it and it shows some of the flaws an uncooled camera will capture. The contrast to the cool sensor is amazing.

It has been my distinct pleasure to chronicle my adventures into the early days of my photography rebirth. While I have not sought any one skill, as the need arose, learning occurred and I can now say I am on my way on a journey with will last the rest of my life.
I hope to stop by again when invited so I can share some of the successes and frustrations as I continue to level up and seek that next wall-hangable picture which will take your breath away.
All,
I guess I should let you all know I found 143 galaxies before I lost count. Man is this picture fun too look through.
Brian
Wow – that’s crazy. What an amazing image you captured!