Over the decades that I’ve been writing and talking about the Mac, I’ve covered multiple applications that are designed to help you recoup disk space. It’s so easy to accumulate files that you really don’t need to keep, and many apps these days create large files in hidden directories that you might not even know about. If you have limited storage, perhaps on a laptop, maybe you need help finding big files you don’t need to sync locally from your cloud storage provider.
In the past, I’ve done reviews of these specific apps to help you gain back disk space, but today I’d like to talk about why you might want to run several of them one after another.
I recently installed four of these disk scanning apps and ran them all on my 13″ MacBook Air. Running these four apps sequentially helped me find a lot of space I could recover with no adverse impact. Because their interfaces are so very different, each app found different things I could eliminate. I’m going to walk through the apps and give you an overview of how they represent your data and describe why I found each app useful in its own way. I truly believe that if I only used one of these apps to scan for unnecessary files, I wouldn’t regain nearly as much space.
The four apps I ran were:
- A relatively new entrant into this space: Disk Graph from desairem.com/… which costs $5.74 direct from the developer, or $5 in the Mac App Store
- Space Lens from MacPaw as part of Clean My Mac Plus at macpaw.com/…. Clean My Mac Plus is a subscription service for $65/year if you pay annually, but it’s also available inside Setapp (which is also from MacPaw). Note that Space Lens is not part of Clean My Mac Basic.
- An oldie but a goodie (and recently updated): GrandPerspective, free from grandperspectiv.sourceforge.net. You can also get GrandPerspective in the Mac App Store for $3.
- OmniDiskSweeper, which is free from the Omni Group at www.omnigroup.com/…
If you’re a fan of Daisy Disk, please don’t take its omission from this list as any slight on the tool. From what I can see, it’s quite delightful, but I had to draw the line on how many tools to install to make my point. I’m still tempted to buy it when I’m done working on this article. It’s only $10 from daisydiskapp.com/… and it looks pretty nifty.
One word on accessibility. None of the graphical apps seem to be accessible, but the final app I’ll be talking about will be able to meet the needs of our VoiceOver user friends. I’ll explain more when we get to it. Big correction/addition since this was posted – Disk Graph and now OmniDiskSweeper are both accessible with VoiceOver!
Disk Graph
I started my disk-scanning adventure with Disk Graph, mostly because it was the new shiny app I’d just purchased.
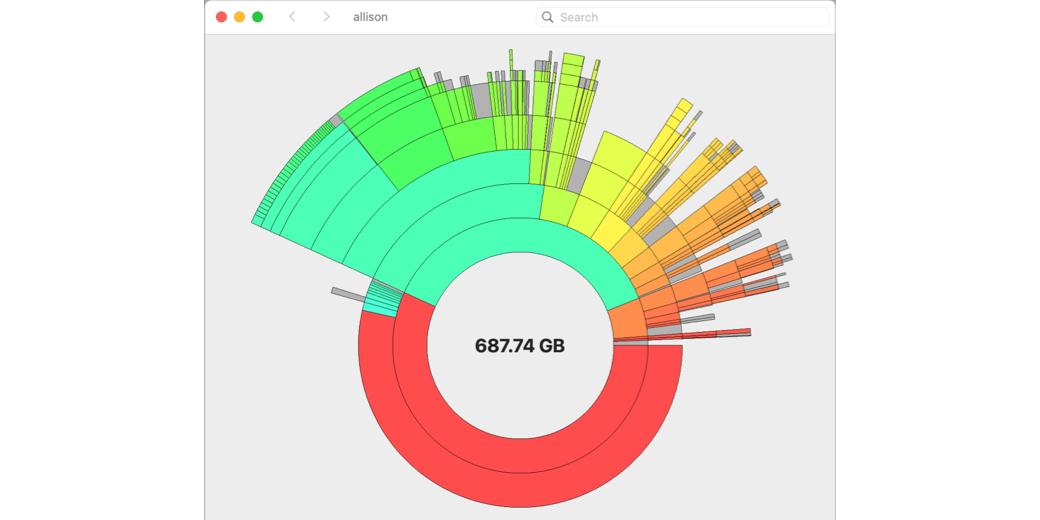
When you first launch Disk Graph, it invites you to select a folder level of your disk to scan. I decided to have it scan just my user directory. At first, the interface seems overly simplistic, showing a simple blue circle on a white background with a counter showing how many files had been scanned so far.

In a minute or two, it had scanned well over a million files and then produced a very interesting-looking circular pie chart representing all of my data. In the center, it said the total amount of data in my home directory — 690GB. Moving out from the center are concentric arcs representing types and locations of data.
More than half of the first interior circle for me is a red arc, and if I hover over that segment, it tells me it’s my Pictures directory, which is 390GB. When you go from the first level to the next concentric arcs, you’re drilling down into that directory. So my second arc going out is nearly all red, and that’s my Photos Library. But part of the arc is a series of small teal-colored arcs that don’t take up nearly as much of the arc.
Hovering over each one showed them to be folders of pictures from my two kids’ weddings. These are huge directories, and I know I should go through and just pull out the images I want, but I have never gotten around to doing that. Using Disk Graph, I discovered that not only do I have a 3.5GB folder from Lindsay’s wedding, but I also have a 3.5GB Zip file of the same folder. In the first few minutes, looking at the data in this crazy circular view, I found 3.5GB to recover.

But that’s not all. Steve has been working on scanning in all of the photos from our physical photo albums, and they’re in a folder called Photo-Albums-Scanned. This folder is inside Dropbox. My task in the scanning project is to put them into Photos, while retaining this Dropbox folder. With Disk Graph, I clicked on the concentric arcs for the scanned photos directory, and it opened that folder up into a new view, allowing me to see more granularity.
As I poked at this folder inside Dropbox, guess what I found? Another copy of my kids’ wedding albums! And yes, a second copy of the zip file of Lindsay’s wedding too. Grand total of unnecessary files in Dropbox (and synced to this Mac) is another 13.4GB! Add that to the 3.4GB in the first Pictures folder, and the total savings by Disk Graph in the first 10 minutes is 16.8GB.

Not all discoveries help you regain disk space. Using Disk Graph I found yet another Photos Library called Syndication.photoslibrary, which was taking up 23GB of space.

This Syndication library was buried in my User Library/Photos/Libraries, which isn’t normally visible in the Finder, and I had no clue what it was. I decided to ask Perplexity AI, and it explained that it’s where “Shared with You” images and videos are managed. Any photos or videos you’ve ever been texted via Messages will be in here. I backed away very slowly to make sure I didn’t break anything.
I’ve been describing Disk Graph’s pie chart view, but you can switch it to Tree Map view. This view shows your files as differently sized boxes depending on disk space used, and they look kind of like a printed circuit board with some grey squares surrounded by (in some cases) wee tiny little boxes around them. To be honest, this view in Disk Graph sort of breaks my brain a little bit and doesn’t help me to see where I may have wasted space.

MORE BREAKING NEWS!
I have another addendum about Disk Graph after chatting with developer Nick. He pointed me the Layout option under the View menu, which is available when Tree View is selected. Under Layout, you can choose between several different ways the little blocks are laid out. The default, which is what broke my brain a little, is Snake / Spiral. I changed it to Stack, and it resembled the way GrandPerspective displays it, which makes more sense to me. You can also choose just Snake, which goes left to right by size, or Spiral, which spirals in by size. It’s great that Nick gives us all these options.
While he was helping me understand, he also explained that the grey boxes that mystified me and looked like printed circuits. He said these grey boxes represent a collection of files that, individually, are too small to display.
END MORE BREAKING NEWS
Whether you favor the Pie Chart or Tree View, you can change the color coding to mean different things. One bit of information that’s useful when deleting items is whether you’ve accessed them recently. With View by Date Modified or Date Created, you get a heat map where Red is the most recently modified, then yellow, green, and finally blue, which identifies your oldest stuff. That nearly 4GB zip file of Lindsay’s wedding is the only blue item I have, showing it hasn’t been modified since 2015! Pretty sure I don’t need TWO copies of that.

When you do find a file you’re sure you don’t need, if you right-click on the segment representing it, one of the options is “Move to bin”, also known as the trash or deleted items. When you execute a move to bin, the concentric arcs do this cool animation to move the segment to the trash. I found a 400MB recording from The Mac Mommy (Melissa Davis) from 4 years ago buried in Dropbox that I definitely didn’t need any longer. I put the animation of removing it into the shownotes for your entertainment.
BREAKING NEWS!
After I posted this article, I got a lovely letter back from Disk Graph developer Nick Kick. Amongst many other topics, he pointed me to a menu option I hadn’t noticed under View, that says Show List. With Show List checked, above the graph view (Tree or Pie), you get a column view list of your folders showing their size. As you drill down into the graphical portion, the list view updates to show the details of your new selection.
This gives Disk Graph the best of both worlds, and Nick took the care to ensure that the list view is accessible to VoiceOver. I am very happy to stand corrected when I originally said none of the graphical apps were accessible.

END BREAKING NEWS!
I stopped hunting for disk space using Disk Graph because I wanted to give the other applications a chance to shine. Total space regained by Disk Graph = 17GB.
| Size | Tool |
|---|---|
| 17GB | Disk Graph |
| 17GB | Running Total |
CleanMyMac Space Lens
Next up is Clean My Mac. I definitely wouldn’t get a Clean My Mac subscription just for Space Lens, but since I have a Setapp subscription already, it makes sense to see what it would find if I put it through its paces.
Space Lens is accessed from within Clean My Mac with all of the fancy undulating animations they favor over at MacPaw. Like Disk Graph, you get to choose the folder level to start with.

Space Lens completed the scan of my home directory much more quickly than Disk Graph. I didn’t time it, but I’d say at least twice as fast. Upon completion, Space Lens shows a list view on the left of the top 8 directories sorted by size, with a chevron to show other items. It is of note that among my top 8 directories were several hidden directories (those starting with a dot). .Trash is kind of obvious, but I can see .ollama weighing in at 2GB. Ollama is a Large Language Model I downloaded eight months ago to test running AI locally on the Mac.
You may remember NosillaCastaway Steve Mattan joining me on a special tidbit episode of Programming By Stealth where he taught us how to run these LLMs locally. In any case, I quickly learned that 16GB of RAM on this MacBook Air didn’t give a great experience, so I definitely don’t need to keep the LLM Ollama on disk. The strength of Space Lens is that it revealed this 2GB model in a hidden directory, so it’s very unlikely that I would have discovered it on my own.

To the right of the list view are the same 8 folders in bubbles by size. The view is very pretty with a gradient purple for each bubble. We already know my Pictures directory (even with optimized images) is quite large, but my user-level Library is close behind at 335GB. A single tap on any of the bubbles opens the selected folder and shows a new set of bubbles by size. Most of the bubbles show their size under the title of the folder, but oddly, some don’t.
My biggest bloat contribution in my Library is Messages. Remember that Syndication Photos library I found with Disk Graph? Well, here it is again. Remember that if you sync your Messages via iCloud, that ever-growing directory is getting synced to all of your devices.

I drilled down into Messages a few levels, and once you get into Attachments, you can’t drill down any farther. The items in here are pretty obfuscated, so you really wouldn’t want to clean things up this way.

A better way is to open Settings on your Phone, then go into General > iPhone Storage, wait for it to draw the graphs, and you’ll likely see under Recommendations to Review Large Attachments. I just checked, and I’ve got a 1.21GB video of Pilot Pete teaching the audience at Macstock how to fold your own toga out of a bed sheet. It’s not that this isn’t priceless content, but I took the video, so it means it’s also in my Photos library for posterity! Definitely something I want to delete.
After you’ve drilled down into the bubbles, Space Lens gives you bread crumbs at the top of the screen so you can bounce right back to the high-level view and start a new drilling exploration.
While Space Lens is definitely the prettiest of the apps I tested, I didn’t find myself exploring nearly as much with it as I did the other applications. However, I do want to give an honorable mention to another Tool in Clean My Mac under the Smart Care button. Among other utilities, it looks for what it considers “junk”.

On my Mac, it identified 85GB worth of junk candidates. I was doubtful that I really had that much junk, but it was clearly worth investigating.

Drilling into Junk takes you to the Cleanup Manager, with sections for System Junk, Mail Attachments, and Trash Bins. I have Xcode installed on my Mac, specifically to use the simulators to see how my web apps look on different screens. Smart Care identified that these simulators take up more than 43GB of space. I only need to run these simulators very occasionally, and I could easily go fetch them again at any time.
But a more compelling storage item Smart Care found, and I didn’t see identified with the other disk scanning apps, was an iOS Device Backup from when I upgraded my friend Lupe’s iPhone 14 to a 16. I can, with a click of a button, regain 34GB of storage just by deleting that unnecessary backup.

The other big contributor to what Smart Care considers junk was cache files, but I find deleting caches to be a fool’s errand. Cache files are normally deleted automatically when not needed, and if you delete them yourself, they grow back on their own.
I didn’t spend much time with Mail Attachments (because the problem is similar to cleaning Messages from outside of the app). Likewise, Trash Bins didn’t seem too interesting since you can just empty them on your own.
Our running total is now:
| Size | Tool |
|---|---|
| 17GB | Disk Graph |
| 34GB | Clean My Mac |
| 51GB | Running Total |
GrandPerspective
I’ve been writing and talking about our next tool, GrandPerspective, since 2007 in Episode #97 of the NosillaCast. That’s 963 episodes ago! It’s so long ago that in the same episode, I asked the audience whether anyone knew of a cross-platform podcatching app. iTunes had podcasting by then, but they hadn’t yet come out with a Windows client. Now that’s way back.
Anyway, GrandPerspective displays your files in a grid of boxes, rather like the Tree view in Disk Graph, but it’s a much more intuitive interface for me. After telling it to scan my home directory, I was rewarded with a very pretty graphic of gradient-filled boxes, representing file size with the sizes of the boxes. Nearly 2/3 of the window is one giant file, which, to no one’s surprise, is the package file for my Photos Library.

Ignoring that behemoth, my eye was drawn to a large red square. Upon selection, across the bottom, I could see the location in my directory of a file called “whisper-best.bin” inside a Rogue Amoeba models directory. On the far right of the bottom, it showed me the file was 2.88GB. As we discovered using Space Lens, Large Language Models like this take up a lot of space. In the toolbar at the top, one of the icons is “Reveal”, which will open the enclosing directory of the file in Finder. I’m not sure I’ll get rid of that model, but it was interesting to see where it was and how big it was.
With that giant box for Photos dominating the screen, it’s hard to see other large files. But GrandPerspective has a tool to fix that problem. With any one of the other files selected, using the Zoom button in the menu bar zooms in on that entire section so it fills the window and ignores the entire Photos directory. Zooming back out brings all of the boxes back.
One of the more obvious areas for disk reclamation was a region of shiny rust-colored boxes that together take up a trunkload of space. When I selected one of the boxes, I could see it was a ScreenFlow file from my most recent ScreenCastsONLINE project, taking up around 3GB of space. If I go to the menu bar and select View → Selection Focus → Move Selection Up (or use ⌘-left bracket), then the entire directory in which that file resides becomes selected. That directory of ScreenFlow files takes up 40GB. That’s not terribly surprising to me, and I’ll explain why.
When working in ScreenFlow, you simply cannot have the file contained in any cloud service. As the software isn’t the most stable app around, and these videos are so very hard to make, I create a copy of the local file over on Dropbox every time I make a substantial amount of progress. As a result, the Dropbox folder for my latest video has 50 copies of the file, with the smallest starting at 75MB and the last copy being over 3GB.
Now the real question is, why on earth is this Dropbox folder for my ScreenCastsONLINE videos synced to my MacBook Air when I literally never work on ScreenFlow on this Mac? ScreenFlow isn’t even licensed for this Mac! I’ll be cleaning that folder out as soon as I get the hat tip that everything is dandy with my video, but in the meantime, I’m going to stop syncing that folder to this Mac.

Under the Window menu, there’s an option to turn on the Control Panel. I have no idea why they put it there or called it that. It would much more properly be called an Info window and be put under File. It has three tabs: Info, Display, and Focus.
- Info gives you the top level showing your drive size, and how much has been scanned.
- The Display tab has three interesting options
- Show lets you choose between the default of Packages & Files, or you can show just Files, or Packages and Folders.
- By default, you can color the boxes by folder, but you can change it to creation date, file extension, or type, and a handful of other methods
- Palette lets you change the color palette of the displayed boxes, and you can choose from a good dozen different color sets, so you’re sure to find something to delight you.

At the bottom of the poorly named Control Panel, you can mask the results of the scan to eliminate cloud files, hard links, or those with no version control. Masking changes the display to replace any files or folders that meet that criteria to be replaced with a big black box. I masked my scan to show no cloud files, and the resulting graphic was very interesting. Basically, it demonstrated that only a very tiny fraction of the files on this Mac are not in a cloud service.

Ok, I gotta quit playing around with the tool and see what else I can find. Once I told Control Panel to show me everything again, I found a 2GB MAMP zip file from 2020. MAMP is an application that lets you build a web server right on your Mac. While a very useful tool, I definitely don’t need that file anymore because it’s so far out of date.
GrandPerspective helped me find even more AI models, including several downloaded for MacWhisper transcription software. I decided to go manage those in the app, but I ended up downloading even more interesting models! I’m not going to count that against GrandPerspective though.

GrandPerspective was the third app I ran to scan my disk, so while it also found some of the same silliness as the other apps (like Lindsay’s wedding photos being replicated), and I already knew about the Dropbox files for ScreenCastsONLINE, GrandPerspective is only going to get credit for the 2GB MAMP file.
Our running total is now:
| Size | Tool |
|---|---|
| 17GB | Disk Graph |
| 34GB | Clean My Mac |
| 2GB | GrandPerspective |
| 53GB | Running Total |
OmniDiskSweeper
OmniDiskSweeper takes a very different approach from the other tools. It is completely text-based, which has certain advantages. It starts building a column view of your folders almost immediately, while sorting the sizes of the contents in those columns as you watch. The non-graphical interface helps me to find even more items to clean up.
One advantage of a text-based interface is that it can be accessible with VoiceOver. Unfortunately, as of this writing, OmniDiskSweeper is only almost accessible, and the part it’s missing is kind of important. While it reads out the directories just fine, it doesn’t read out the size. I had a feeling it wouldn’t be all that hard to fix, and I happen to “know a guy” at Omni Group. I sent him a note about the issue, and he wrote back almost immediately that he was working on an update for Tahoe and that he’d fix this accessibility problem at the same time. How cool is that?
EVEN MORE BREAKING NEWS
By the time I woke up the day after this was published, Omni Group CEO Ken Case had a test build of OmniDiskSweeper that’s accessible via VoiceOver and ready for us to test. He posted about it on Mastodon. How great is that?
END EVEN MORE BREAKING NEWS
Unlike the other applications I’ve covered, OmniDiskSweeper doesn’t let you choose which directory to scan; it scans the entire drive.
Once it finishes scanning your drive, you can start perusing the column view window for candidates to delete. The first column on the left is the top level of your drive, with the found directories sorted in order of size, with the size showing to the left of the directory name. For example, my top directory is Users, and it told me it was around 200GB.
This first column also includes all hidden directories. If you’re a nerd, you’ll recognize directories like private, usr, opt, bin, sbin, and more. Definitely don’t go poking around in those directories if you don’t know what you’re doing!
When I drilled down into Users, and then allison, unlike the other apps, my Pictures folder wasn’t the largest directory. It looks like OmniDiskSweeper doesn’t drill into Package files. That’s just fine since I would manage those in Photos or PowerPhotos anyway. Since OmniDiskSweeper isn’t swamped by my gigantic Photos directory, my attention was drawn to my user-level Library.
The biggest directory in there was Containers, and in there, I found the largest consumer of space was my clipboard manager, Copy ‘Em. It was hogging up over 8GB of space.

I knew why Copy ‘Em was taking up so much storage. In Settings for the app, you can choose to have auto-deletion of unstarred items, and in there, you can define how many recent unstarred items to keep. I had set mine to 1000. That’s definitely overkill for how I use my clipboard manager. I am also a big ol’ screenshot taker, which explains why the app was taking up so much space.

Using OmniDiskSweeper, I poked around in my Documents folder. I have a folder in there where I keep files related to debugging software and other things. Remember all the “quality time” I spent with Apple trying to figure out why my M1 MacBook Pro’s battery was draining when it was asleep? In this debugging folder, OmniDiskSweeper found I had 4GB of files related to that work. In particular, it revealed a 3GB sysdiagnose file and another 1GB of DMG files for Copy ‘Em and Backblaze (which Apple was convinced were causing the problems).

OmniDiskSweeper also identified 1.3 GB worth of files from when I was fighting a Spotlight indexing problem back in 2022! As much as I love to hold a grudge, even I don’t think these 5GB of files need to stick around.
Let’s tally up OmniDiskSweeper’s success: 5GB of troubleshooting files with Apple, plus let’s say 6 of the 8GB from Copy ‘Em, and we’re up to 11GB saved. And remember, OmniDiskSweeper came in for cleanup duty after three other disk scanning apps had already been through to sweep things up.
Final Tally
I mentioned my ScreenCastsONLINE video files in Dropbox while talking about GrandPerspective, but to be honest, they were pretty visible in most of the apps. It only occurred to me because of this disk sweeping exercise to not sync that folder, so I’m going to add it to our total without giving a particular tool the credit.
Our final tally is:
| Size | Tool |
|---|---|
| 17GB | Disk Graph |
| 34GB | Clean My Mac |
| 2GB | GrandPerspective |
| 11GB | OmniDiskSweeper |
| 46GB | SCO videos in Dropbox |
| 110GB | Total Saved |
The bottom line of what I’m trying to demonstrate is that even spending around 15 minutes with each tool, I saved a massive amount of disk space on my laptop. The fact that each app presents the information to you in a different way is why I recommend running more than one of these apps to sweep your drives. If I really spent some significant time working with these apps, I’m sure I could find a lot more to clean up.