Paypal button on Podfeet, more on the NosillaCast forums, Bookmarks Synchronizer 3 Firefox Extension from addons.mozilla.org/firefox/1989, and Foxmarks Bookmark Synchronizer at addons.mozilla.org/firefox/2410, more ways to do screen snapshots on OSX, Flip4Mac upgrade from flip4mac.com/wmv.htm to create Windows Media files for distribution and free flip4mac as Quicktime components, tutorial on installing a drive in an external enclosure, network speed test from dslreports.com/speedtest and Speakeasy from speakeasy.net/speedtest, tutorial on how to get back the keyboard viewer in OSX, expansive tutorial on how to put YouTube video on your iPod in Windows using the Greasemonkey extension from addons.mozilla.org/firefox/748 and the user script “Download YouTube Video” from userscripts.org and finally MediaCoder from mediacoderhq.com/download.htm.
Subscribe to the Podcast –> 
Listen to the Podcast once – 42 min 33 sec
I had a great day yesterday, my son ran in this HUGE cross country race – there were TWENTY THOUSAND runners! Think about it, they each ran the 3 mile course, so between them they circled the GLOBE three times!!! It was an amazing thing to see, the races took off every seven minutes, so sometimes the fastest runner from one race would actually lap the slowest runner from the previous race. they had people to tell you how to park, how to get in the front gate (runners show your uniforms, friends buy a ticket), people to direct you to the race site, people to line up the racers in a holding pen, people to line up the runners in columns at the starting line, people to announce the races, people to fire the gun, people to let you cross the path at specific times so you didn’t get trampled, people to sell you t-shirts, people to print race results, people to handle medical emergencies, people to usher the runners across the finish line and into the chute so they stay in order to have their time recorded…I think there were another 20,000 people just to ORGANIZE this event. It was really an amazing thing to see – they even had “the globotron” – a massive 25 foot across monitor that in blazing sunlight was a perfect way to watch the races. Anyway, time for tech!
Site changes
You may have noticed on the website that I’m trying some new things – and I’m sure you’ve noticed that I’m kind of kludging things up along the way. I never promised I was a programmer, and that’s obvious in what I’m causing in WordPress – I don’t know how to make there not be the green color behind things I stick in the sidebar. Anyway, my objectives are met until I find someone willing to help me figure out what I’m doing wrong. Maybe listener Ryan will help me out, he’s really good at this stuff. Anyway, this week I added a Paypal donation button. I know, you’ve all been DYING for that to be up there, just wishing that there was a way you could give me a little bit of pocket change to keep the show going. I don’t spend a ton of money on the show, but there are monthly Vizaweb fees and Libsyn fees to consider, and i wouldn’t mind making enough to offset those costs. If you don’t mind going over and making a Paypal donation, that would be terrific.
Forums
the forums are starting to take off – lots of people looking and a fair number of you posting too. I’m still getting the hang of how to set this up – QA director Steve noticed that he was unable to post in the “Allison’s Wisdom” category (not sure why he thought he should be allowed to, but just to keep him happy I figured out how to open it up.) that was fun though, the discovery of how to do things is what I live for in tech, so I dug around in the administrators panel and found out I can control all kinds of cool things in there! head on over to https://podfeet.com/forums (or just click on the forums link on the right) and get involved!
Bookmarks synchroniser
Research assistant Bart sent in a nice tip this week. He says, “I have another problem-solving FF extension for you and your listeners. This time the problem is synchronizing your bookmarks between multiple computers. Anyone who has more than one computer they regularly use has probably wished they could always have access to all their bookmarks. The Bookmarks Synchronizer 3 FF extension lets you do just that. You can get it from addons.mozilla.org/firefox/1989. The only slight down-side with this one is that you need access to a server to get this to work. The server needs to support either FTP or be a webDAV enabled web server. However, one good thing is that the iDisk you get with a .Mac account is in fact a WebDAV enabled web server so .Mac users can also play along. As always full details including screen-shots and special directions for .Mac users can be found on my blog: bartbusschots.ie/blog.”
I know this is a big problem for a lot of people, and this tool could be a big help. I did a search on Firefox Extensions for “bookmark sync” and I found a lot of extensions out there to do this. there’s one with a very similar name called Foxmarks Bookmark Synchronizer at addons.mozilla.org/firefox/2410 and I mention that one because they have a place on the web for you to put your bookmarks called my.foxcloud.com so you don’t need a .mac account.
personally I have a different problem. I’m virtually never on a different computer because i carry my laptop EVERYWHERE with me (I even took it to a cross country meet yesterday!) My problem is that I toggle back and forth between Safari and Firefox all day long and I need the bookmarks to sync between the two applications. If anyone knows how to pull that off, I would really like to know how! thanks for the tip Bart, keep up the good work!
Listener Ryan on many things
Listener Ryan wrote in with a bunch of interesting comments on the podcast. I’ve done a few episodes where I talked about screen capture programs, like my current favorite, the widget Screenshot Plus. Ryan writes:
For screenshots, there is a built in function in OSX that lets you take screenshots using a simple keyboard shortcut, it pretty much covers everything that the Screen Shot Plus widget can do, take a selection or full screen and save it as a file to the desktop (as a .png file, which you can convert to any one of several other formats using Preview.app) or copy it to the clipboard. Not sure if it’s too much easier than using the widget, but if you want to know more about the shortcuts you can go into System Preferences > Keyboard and Mouse > Keyboard Shortcuts and it should be the first item in the list.
This is a great suggestion Ryan, here’s why I’ve never talked about it. People look at me like I have 2 heads when I say “oh, it’s easy, just hit command-shift-option-4, then hold down the space bar till it turns into a camera and click the mouse!” For some reason that sounds complicated to some people! If you do it a lot, it’s really not that bad, but I figured a widget would be easier for most people to use. It also bugs me that Apple changed the screen capture from making a jpeg to making a png file. I know it’s the new cool thing like Apple always has to do, but when I send those images to PC people, they can’t see them! that was one of the reasons I started using SnapZPro after Apple switched it to .png – you can set it to save to desktop or clipboard, and supports a ton of formats – gif, jpeg, png, etc. SZP is $70 – but it’s not worth it just for that. I bought it because I can use it to record movies for tutorials, so it’s worth it to me for that extra capability.
I do find that I’m using ScreenShot Plus really often now for simple screen shots, toggling it between saving to the desktop and saving to the clip board depending on my need. When i want to put a pic in the shownotes, I need to save to the desktop, but to imbed in an email the the clipboard meets the need. i do have one really odd problem, or maybe some would consider it a weapon. I use Apple’s iChat for access to my friends on AIM and iChat. It turns out that with me on iChat and the other person is on AIM either on a PC or a Mac, if I paste in a screen shot – it kills their AIM session! it’s 100% reliable – try it, irritate your friends! It doesn’t work iChat to iChat though – the picture actually just goes through. Has anyone else seen this happen or know if there’s a workaround? It’s been doing this for over a year now, would kind of be nice to have a fix to this!
Ryan had another comment in reference to my problem with not being able to play copy protected Windows Media files (from Elton John) on my Mac. the way I got around it was to play it on Windows Media Player inside Windows on Parallels on my Mac, and then on the OSX side I recorded the sound from the sound card using Wiretap Pro, which gave me a high quality mp3 file that I could play on my iPod and in iTunes. Ryan says:
I’m not sure if it would work, but you might have been able to play the Elton John download in Quicktime if you have Flip4Mac WMV installed. It’s a free product that Microsoft started supporting after they discontinued support for WMP on the Mac earlier this year (or end of last year, I don’t remember exactly), but it basically allows you to play anything that is in a Windows Media format in Quicktime. While the actual application (flip4mac.com/wmv.htm ) isn’t free, Microsoft (probably through some partnership/agreement with the software developers) offers a free version from their site (free flip4mac).
Well Ryan, I’ve tried a couple of times to make this thing work, but I could never get it to do anything. You got my curiosity up though on why I was unable to do it, so I decided to try once again – and if I succeeded i could write about my success, and if I failed I could whine about it! No loss either way for me I figure. First I double checked that I had WMP 9, then I went to the link you sent me, and clicked the “download your free copy here” link. I read there the explanation of why flip4mac charges for the software but if you sneak through the Microsoft link it’s free. Turns out the paid for version is considered an upgrade, and it allows you to import Windows Media files for editing and to create Windows Media files for distribution. sounds like the difference between Quicktime and Quicktime Pro. Anywho, time to download the free option, which they call Windows Media Components for Quicktime. this software was last updated in late July of this year, so maybe it works better than it used to, AND its Universal so it should run well on the Intel based Mac. I am optimitistic!
I spoke too soon – got an error that says some components may be incompatible with flip4mac (wait, wasn’t I trying to install that? it’s incompatible with itself??? it said something about Popwire import and export, and said I had to remove those things. Hmmm…maybe that’s what I installed before. For those of you on Windows, you know that all you have to do is go to the add/remove programs controls, find the app and tell it to go away. On the Mac it’s easier, and also in a way harder. there usually are no installer programs, and there’s definitely not a global add/remove programs thing. I have to hunt it down by name. Luckily we do have the fast search called Spotlight, so I searched for this popwire stuff, found the components down in the system-wide library, along with the preference file also in the system library! that’s a very odd place for this kind of software to be – usually software component that are well behaved live in the user level library, not at the system library. that keeps your system pure so if you’re having problems you can create a new account and have a clean system to work with. Well, it’s in the trash now! Started the installer again.
Installer went quickly, and took me to the Applications folder with both WMP 9 and Flip4Mac in it, along with a TWENTY FOUR PAGE manual! You’ve got to be kidding me! all I want to do is play windows media files and I’ve got to read 24 pages? that is so not going to happen. I’ll read the first page, maybe. Ok, I didn’t read any of it. I double clicked on WMP 9. It opened quicktime, with some sort of file ready to play. i clicked play, and that’s when things got really weird! It blinked away (the application) and then it opened Safari with one of those phobos.apple.com links that takes you to the music store, which of course meant it launched the iTunes store, and then went back to Quicktime while it showed a slide show of the hot picks in the music store with an ad for the new iPod! what the heck? At no time was I ever in WMP!
I decided I should go try and find some wmv files to open to see if this thing was working. I downloaded the roast Stephen Colbert did at the White House Correspondents dinner (if you haven’t seen that, head over to Youtube to find it, really funny, except the fact that the press did NOT think he was funny as he roasted all of them.) I double clicked the wmv file, and it happily opened up in the free VLC software I use! Ok, so instead I right clicked on the file, and did an open with – and I had several interesting options. I had Windows Media Player with the Microsoft logo, and also WMV Player, with the green Flip4Mac icon. I tried WMV player, and it played perfectly…in Quicktime! I’m starting to figure this out – when they called this “Windows Media Components for Quicktime” they evidently did some mods to QT to make it play WMV files, not some mods to WMP!
I had to make sure that I was getting content that i would otherwise not be able to play, so I tried opening the Colbert episode on Windows Media Player, but unfortunately it worked fine in WMP! Hmmm…gotta hunt down something that requires version 10. and then I spent about an hour looking for a .wmv file that I could be SURE wouldn’t play on quicktime before adding Flip4Mac, and i couldn’t find one! I did find a video file that I couldn’t play, but I wasn’t sure what that was, it just said I needed a codec. Can someone send me a link to a file they know didn’t play under WMP 9, but does play under WMP 10? it sounds easy to find, but I sure couldn’t find it!
In any case, thanks for all the great suggestions, Ryan, appreciate the ideas!
External disk drives
I think I’ve found a new hobby for myself – that’s putting disks into external enclosures. this is a great idea when you take a drive out of a computer because it’s too small, instead of throwing it in a drawer, pop it into an enclosure and you’ve got an instant backup drive. For some reason I’ve been doing a lot of this lately, and I thought it might make a good bit for the podcast under the title of “things you thought were hard but how come everyone else seems to know how to do it?”
this week’s effort was for my friend Nancy. She has an external firewire enclosure that has a failed drive in it. It took a while to figure out that it was the drive and not the enclosure (we’ve been struggling to work with it for about a year now on and off! Once i figure out it was the drive, I told her I’d find her an inexpensive and yet huge disk drive to put in it so she’d have a nice backup drive. Her old one was only around 60GB I think, which is pretty useless of a size these days.
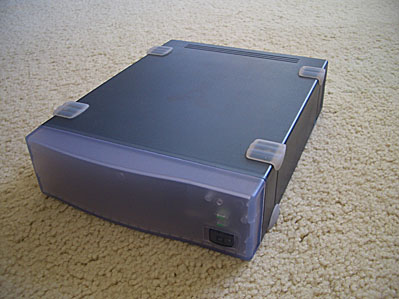
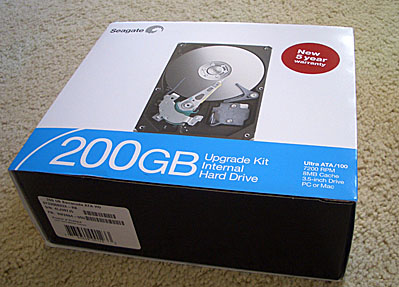
Luckily disk drives are just getting bigger and cheaper all the time, so since we didn’t have a strict timeline, I had the luxury of watching the ads for a good price, and today I was rewarded when i found a 200GB drive for only $50 at CompUSA! What you have to look for in this case is an INTERNAL drive (not intuitive, but external means it already has a case or enclosure around it). The other thing to watch for is the difference in the connectors on these things – there’s ATA (which is the older style and is very very common and what I actually needed in this situation), and Serial ATA or SATA. If you’re working with a really new enclosure it could be SATA, but it’s probably ATA. Be sure to check though!
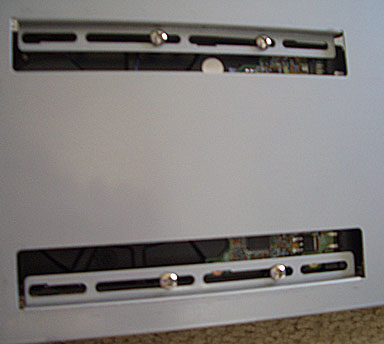
Open up the external drive case now. I was lucky today, the case had just a couple of screws to open it up, you may or may not be so lucky. Once I got the lid off, I had the drive visible in front of me.
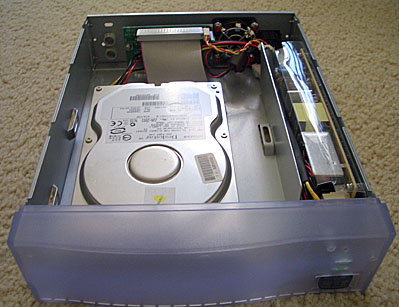
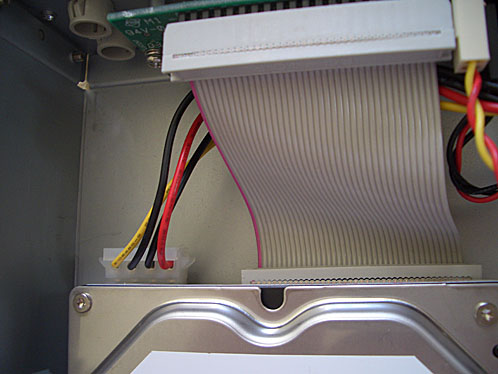
There are only two connectors on the drives. One is for power – it’s a white connector with four wires coming out of it. this one is a BEAR to remove. No matter what you think, you won’t break this one pulling it off, you’ll tear up your fingers maybe, and possibly scrape your knuckles when you finally get it loose and your hand flings across the top of the enclosure. Once you’ve gotten a bandaid for your knuckles, the flat ribbon cable is way easier to disconnect. just kind of wiggle it gently until it pulls free.
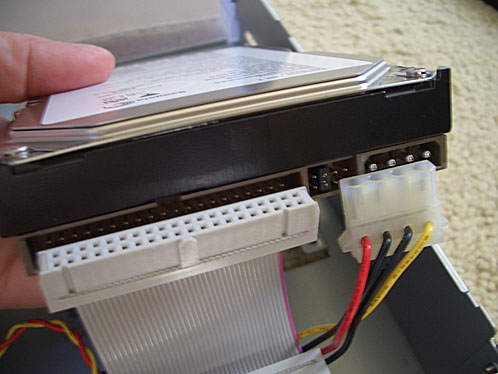
I always start the hard way looking for how to get the drive out of the case, look for four screws, maybe into the bottom of the drive, sometimes into the sides, and now you can remove the drive from the case.
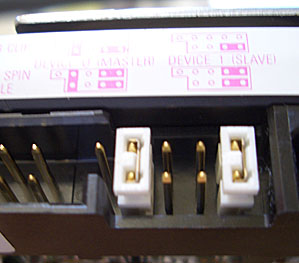
I made a big mistake on the next step, which will allow me to be a better instructor. Have you ever heard of jumpers? They’re these microscoipic little pieces of plastic with wires imbedded in them and two holes in them that you place over two connector pins to close a circuit between the two pins. I’m not an electrical engineer, so that’s the best I can come up with for an explanation. you can put these little jumper blocks across different pairs. the drives have 4 pairs of pins for a total of 8. the old drive had two of the jumper blocks, connecting the first and last pairs. the new drive had one block, connecting the second pair. In my infinite brilliance, I assumed that the enclosure probably wanted the jumper blocks set the way they were on the old drive, so I changed the new drive to match the old drive.
plug the two connectors back in, screw the drive into place, put the lid back on, and I’m ready to fire it up. I plugged in power and the firewire cable to my Mac, and flipped the switch, and that’s when I remembered how the Macs and PCs have different format drives, so the drive came up saying it was unreadable. No worries, I launched Apple’s disk utility (inside Applications/Utilities) and told it to erase and format the drive to the Apple extended format. And that’s when I realized I had a big problem – it only had 35GB on it! What the heck? I messed around a bit in disk utility, played with the number of partitions (it was set to 1), and finally I opened the case back up to read the info on the drive to see if maybe they snuck a smaller drive into the box (would explain that great price, wouldn’t it?)
Strangely it said 200GB on it. Hmmm…and that’s when I remembered the jumper blocks. I pulled them off and put the one back the way the new drive had it originally, put the lid back on, fired it back up, and shazam, it had the disk size I expected! Now wasn’t that more instructive since I screwed up? I should warn you that when you fire up one of these disks you will never get the number of GB it says on the box. there’s this long boring story about the fact that there are 1024 bytes in a kilobyte, not 1000, and how there’s overhead that takes up some space, you have to tip the waiter, and when you’re all done you get about 185GB out of a 200GB drive. At least it’s better than the 35GB I had when I started, eh? Well, another fine job finished in record time, and I’ll have you know that I did virtually all of this while gossiping on the phone with my friend Melanie! Ok, the screwup was while I was on the phone and I fixed when I hung up the phone, but I’m SURE that had nothing to do with it!
Better speed test
A while ago I told you about a better network speed test, but I just went back and looked for it and realized that I never put up the url for it, so I’m going to tell you about it again. Part of this is selfish, one of the great things about the shownotes is that I now have my entire knowledge base in a searchable database. I no longer have to stretch the grey matter to remember a tool or a website I like, it’s right at my fingertips at all times! Anyway, for years I’ve been using dslreports to measure my network speed at home, which you can see at dslreports.com/speedtest. It has a nice little java app that tests your upload and download speed, and then shows you a graph of how you compare to other users from the same area and same network provider, which is kind of cool.
My new favorite though is Speakeasy from speakeasy.net/speedtest. the thing that makes this one more fun is that they give you a visual feedback graphic while it’s measuring that is like a tachometer on a car. It revs up and up and up and goes down some and then back up as it gets the results. I know, it’s silly, but I find myself going, [make car revving noise here] as I’m watching it and it makes me happy! they do a second smaller one for the upload speed too so you get to do it again. Try it yourself, I bet you find yourself doing the car revving imitation too.
Character Palette in OSX
Back in the good old days on the Mac, you used to be able to go up to the menu bar and pull down to something I think was called Keyboard Layout. This was a great little tool – it would show you a keyboard and what characters would be made as you changed to shift, option, command, control, and any combination of all of those. For example, if you want to put an accent aigue (that’s French for that accent that goes up and to the right on words like Rene), you could go up to the keyboard layout and hold down the option key and you’d see that right where the E used to be was the accent you wanted. you could either just click that accent when you saw it in KL, or you could get out of KL and then hold down an option-e.
Apple made life just a tad bit tricker a few years ago and buried this lovely little tool way down in some obscure menus. I’ll try and explain where they put it and how to use it now, and as always there’s great screenshots in the shownotes:
First open System Preferences, click on International. Yes, they keyboard layout is under International! Why the heck didn’t you think to look there right off the bat??? Sheesh. Anyway, here we are in the International system preferences, now click on the Input Menu tab, and then click the box next to Character Palette and the Keyboard Viewer. (I’m actually going to give you a two for one here.) If you pushed the right buttons, you should see an American flag in your menu bar at the very top of your screen.

those of you from countries other than the US will be wondering why we get our flag here – I think if you have special characters for your own language, you would pick one of the other keyboard layouts within the International tab. It would be interesting to know that if you default language was Korean would the Hangul keyboard input method be the default and you’d get the Korean flag instead of the US flag? I’ll leave that one as an exercise for the student!
now if you click on the American flag (which will stay there so you never have to remember how to do this again), pull down to Keyboard Viewer first and you’ll see a keyboard with the font shown at the bottom:
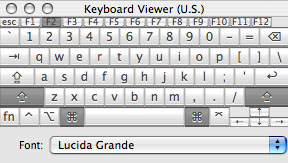
if you hold down the modifier keys like option and shift, you’ll see the symbols change. I put a picture in the shownotes to show what it looks like with the option key held down. Look where the “e” key used to be, and instead you’ll see the key has turned orange and has an accent in it. I should mention that those accent keys are a little tricky – to get it on top of the e, you type option-e, and then hit e again. when you hit the option-e you won’t be able to see anything, it’s not until you hit the e again that the accent shows up.
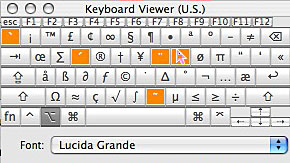
by the way, I challenge you to create a screen shot like I did of the keyboard viewer with the option key held down, with any of the other screen shot programs or Apple’s built in capability. The problem is that I have to be holding down the option key for the keyboard viewer to look like I want it to, but to trigger the built-in screen shot tool I have to let go of the option key. that even goes for the widget Screen shot Plus, except it has a TIMED full screen shot. so you engage the widgets, click on time full screen, then go back to the keyboard viewer and hold down the option key. After a few seconds you’ll hear a boop, boop, boop, and then the sound of a camera clicking. The widget will come back up and allow you to save it to the desktop, or take another shot if you prefer.
anyway, back to keyboard viewer. You know how in some menus on the Mac there will be a shortcut shown, but you can’t actually figure out what optional key’s they’re saying to hold down? Like which one is shift and which one is option? That’s another good reason to use keyboard viewer – hold down the option key and it shows the key being held down with that goofy symbol!
Some characters are still not available, like what if you want a nice looking arrow in the middle of your text like the one I put in the shownotes? You could use some goofy font like Wingdings to do it, but what if the person you send it to doesn’t have that font? they won’t know what you’re talking about! Well, that’s where the two for one special comes in – we also selected to have the character palette showing in our International menu pick.
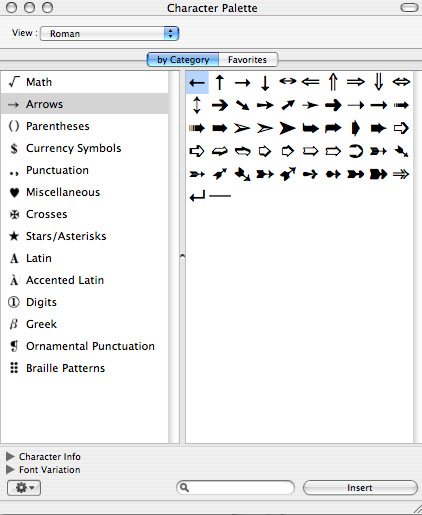
now you have access to tons of cool symbols – math, arrows, parentheses (fancy ones), currency symbols, miscellaneous which contains useful things like umbrellas and snowmen like the ones in the shownotes: . there’s crosses, stars, Latin (and accented latin for the real nerd), digits which are numbers with circles around them of different formats along with some lovely fractions (which I personally would have filed under MATH, but that’s just me). We wind up the list with Greek, ornamental punctuation and even Braille patterns. All you have to do to put one of these symbols in your text is to double click the one you like. That concludes our little tour through the International palette today.
watch Youtube on your iPod
this is actually a remake of a previous story – a few weeks back I went through a description of how to put YouTube videos onto your iPod that I printed word for word from a Wired Magazine in their August 2006 issue, and while I dutifully tested the Mac instructions, I didn’t actually test the Windows instructions. Listener David DID try to do it on the Windows side, and he got stuck, so I decided to go through it myself and see what was wrong. turns out the instructions were less than complete, and one of the free products was not really worth the trouble. Here are the instructions with full screen shots in the shownotes to walk you through the whole process. Can’t miss the opportunity to explain how much more complicated the windows process is than the Mac process though! Ok, I’m done with that.
The idea is that youre going to find a video you like in YouTube, download it to your computer, and then convert it to the iPod video format.
1. Launch Firefox. Add the Greasemonkey extension to Firefox. To do this, go to the Tools Menu, pull down to Extensions.
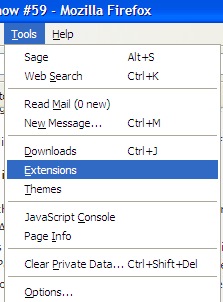
You’ll see a list of the extensions you already have installed, if you have none the list will be empty, but either way you’ll see a link at the bottom that says “get more extensions”.

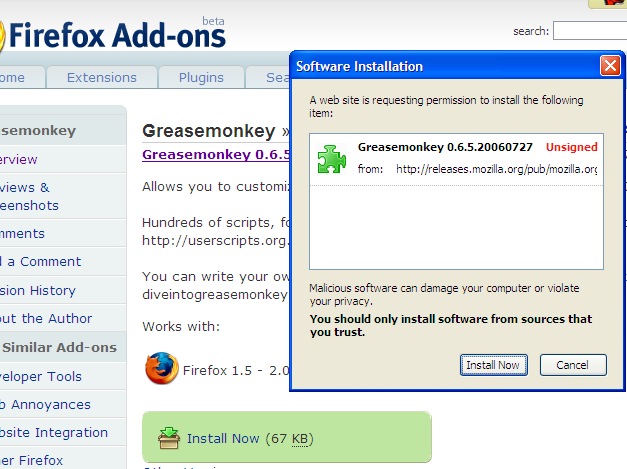
This will take you to the Firefox extensions web page, so do a search on Greasemonkey (don’t you just love that name?) When you find it (addons.mozilla.org/firefox/748), click on the big green button that says “Install Now”. YOu’ll get a notice saying that a web site is requesting permission to install the extensions – as soon as the “Install Now” button is available to you (they make you wait to be sure you’re paying attention), click it to install Greaasemonkey into Firefox.
Firefox will tell you that you have to restart for the extension to actually stick, so restart it now. When you relaunch Firefox, you should see a little grinning monkey in the bottom right if you’d done everything correctly.
That was fun, but we’re only a third there guys. Stay with me.
2. Go to userscripts.org, type in the search window “Download YouTube Video”. this website has a really interesting search mechanism, it actually searches as you type! I’ve put the direct link in the shownotes to the script we’re looking for: userscripts.org/scripts/show/3982 anywho, Once you’re at the link for the YouTub script, click on Install This script in the blue box on the upper right.
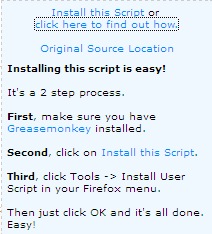
Some junky looking code will get all over the screen, ignore it and click on the Install button in the upper right. A window should pop up saying that the script installed successfully.
Ok, you’re 2/3rds there guys, we’ve installed Greasemonkey and the script, you only have to do all that once, from here on, this is all you have to do next time!
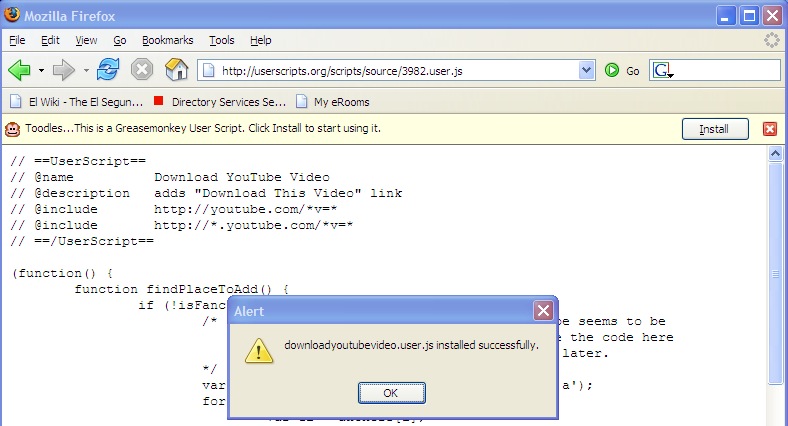
3. Go to YouTube and bring up a movie, say by searching on “dinosaur burns”, one of MY movies. All that work we did before added one tiny little thing to YouTube – now you should see a Download Video option beneath the screen. It’s not real obvious, it’s a blue link that looks like it was always there under “flag as inappropriate”.

When you click download this video, a window will open asking you to save to disk.
Click it to save the file to your disk. the original instructions from Wired said that the file name will be some random set of numbers and letters followed by the .flv extension, but on my desktop it was just called get_video and didn’t even show me the .flv extension. So, whatever it calls it, note it’s location and go to step 4.
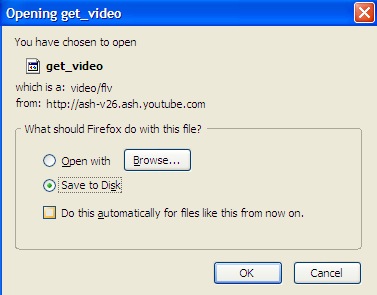
4. The next step is to download a freeware application that will convert the .flv file over to something iTunes can play, in this case it’s an m4v file. The instructions from Wired said to install and launch the free Super video converter from erightsoft.com, but that sight is just a big ‘ol pile of spam! It was ads upon ads, and all links including download buttons took you to more ads! My friend David DID find the Super software, but I never did find it. Instead i found an open source application called MediaCoder from mediacoderhq.com/download.htm. No tricks here, download and install.
when I ran the installer, it as a wizard that gives you options on how advanced of an interface you want – I flinched and picked “normal”.
I’m not sure I completely follow how MediaCoder knew what I wanted, but here’s what I did and it worked. I first clicked the big button for add file. It didn’t quickly find the flv file “get_video”, but I navigated to it and it put it in the window on Mediacoder. Next I clicked on Devices, curious to see what was in there. One of the choices was Media Player, when i selected that it showed me an iPod with my movie already in it! (I chose this really cute video of a small kitten falling asleep. shut UP, it was cute!)
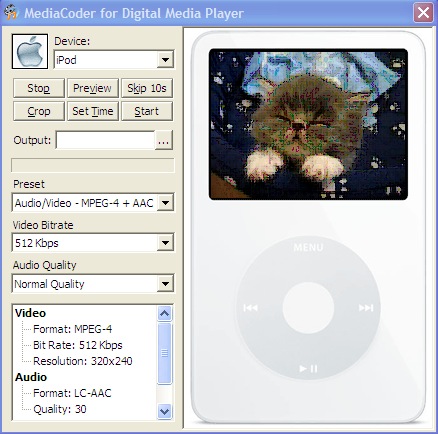
That step might have been the one that told MediaCoder what format to use! finally, I selected the Action menu, and pulled down to Start Encoding. voila – you have your m4p file. open it in iTunes and sync your iPod and you’re done! Be sure to let me know if you give this a try and it works or more importantly doesn’t work
Looks like we’re just about out of time and topics, be sure to head over to the forums and make some comments, suggestions, get into a flame war – have some fun! It’s really taking off so I’m excited to read all the information. As always drop me a line at [email protected] or leave me a voicemail at [email protected]. Thanks for listening, and stay subscribed.
Great blog here! Also your site loads up fast! What host are you using? Can I get your affiliate link to your host? I wish my website loaded up as quickly as yours lol
[…] second menu bar trick is something I talked about way back on show #66 in 2006. They’ve moved it since then so I don’t think it will count as repetition! The problem […]