Move urls between browsers, Podcasting explained at gruntmedia.com, Pop the NosillaCast at popcurrent.com, vote on podcastalley.com, HDA Bob bests Allison on video format extensions, how to change the format of built-in screenshots on OSX, plug for NosillaCast on Barts Blog at bartbusschots.ie/blog, AppDelete from reggie.ashworth.googlepages.com/appdelete kills AppZapper, Apple Dashboard Widgets without the need for OSX from widgetop.com, Yahoo! widgets from widgets.yahoo.com (otherwise known as Konfabulator), more on Crossover Beta, Recipe software reviews – Yum! is available from nixanz.com, and Measuring Cup from shallotpatch.com.
Subscribe to the Podcast –> 
Listen to the Podcast once – 38 min 43 sec
drag tabs between browsers
Listener Bruce sent in a really cool little tip he found on macosxhints.com. Have you ever had a browser open to a url and wished you had opened it in another browser? Maybe this doesn’t happen to you, but I use Safari as my default browser and it doesn’t always work well with certain kinds of sites – like wiki’s for some reason seem to need Firefox – you won’t see all the little formatting icons in Safari. Anyway, if this does happen to you, the tip from Bruce will come in handy. here’s the tip:
“If you ever have a page open in one browser and want to open it in another browser, simply drag the URL (grabbing the favicon to the left of the URL is the easiest way) to an open spot in the tab bar (the tab bar needs to be visible to do this). If you want to overwrite another tab’s page, drag it onto that tab. (You can also use this to duplicate tabs in the same browser.) Dragging into Camino’s toolbar is the same as Safari. Shiira always makes a new tab, no matter where you drag the URL. Firefox, Opera, and OmniWeb both behave the same as Safari and Camino. “
This is SO COOL! I have been moving tabs all over the place between my browsers just to see how it works! Someone added yet another hint, “kirkmc adds: You can also simply drag the URL (whether from the favicon, the actual URL in the Address Bar, or any link) to a browser window to open the page. This is especially practical for web designers who need to view pages in different browsers.” Thanks Bruce, this will come in VERY handy – if I remember to use it!
podgrunt to explain podcasting
If you’re listening to the NosillaCast right now by clicking the “listen now” link and always wished you knew what the heck this whole podcasting thing actually is and how it works, or if you’re reading this text online at podfeet.com and wondered the same thing, or if you are a sophisticated podcast listener, but you have trouble articulating to your friends what podcasting is and how it works, you’ll enjoy this next link. there’s a guy named Craig Syverson who has a site called Grunt Media, and he’s made a terrific little online video that explains how podcasting works. I really recommend you check it out at gruntmedia.com. He did a class at the Podcast Academy and he’s got a real flair for interesting ways to tell a story in graphics. I’m very impressed with this video and plan to use it when I’m having trouble explaining Podcasting to people. If you find this useful let me know, especially if you’ve been on the sidelines trying to “get” what this is all about.
Popcurrent
I’ve been fooling around with different Podcasting things, and I ran across Popcurrent. It’s a podcast listing site that allows you to Pop or Flop a podcast. In other words you can give me a free plug! I put a link in the shownotes so you can jump over to popcurrent and pop me if you like – or flop me if you don’t!

vote on podcast alley
While you’re at it, head on over to podcastalley.com and vote for the NosillaCast there too! I haven’t bugged you guys about that in ages, not sure it makes a big difference in the scheme of things but it’s fun to look at once in a while!
hda bob on m4p vs. mp4
Again I have to admit on air that my mechanic taught me something about computers. HDA Bob is my mechanic of 28 years, and he’s a geek, and proud of it. the other day I referred to a video file as an m4p file. He sent me an instant message to tell me that it’s mp4, not m4p. We went back and forth like that for quite a while, so I finally went over to wikipedia to look it up so I could prove him wrong. Not to learn, just to prove him wrong!
I found an article on MPEG-4 and there’s a section on file extensions. Much to my chagrin, it says “MP4 files with audio and video generally use the .mp4 and .m4v extensions”. But I look on my disk, and I can clearly see files that say .m4p on them! what gives? and then I found the footnote that says “The common, but non-standard use of the extensions .m4a and .m4v is due to the popularity of Apple Computer’s iPod and the iTunes Store.” Can you believe that? Maybe someone at apple just had a little typo one day and they messed up and never admitted it? Now I’ll never know how to talk and say this right! Maybe I’ll just say “audio file” and “video file” and not try to explain it? Sheesh. and of course there’s no living with Bob now.
Change the format of built in screenshots
Over the past few weeks we’ve talked a lot about the different methods available on the Mac to create screen snapshots. We went through a shareware app called iClip, a dashboard widget called Screenshot Plus, and finally listener Ryan’s suggestion to use the built in screen snapshot utility. I explained that I used to use the screen snapshot utility in OSX back when it made jpegs automatically (command-shift-4 was my favorite), but that with more recent versions of OSX they changed it so that it creates .png files instead. Unfortunately many Windows users can’t see .png files, and while Ryan taught me that Preview could convert file formats for me (I did not know that!), I still felt like that was an extra step.
Luckily listenr Tim wrote in with a perfect solution! It turns out there’s a setting in the com.apple.screencapture setting that can be changed with a simple command in the Terminal. He sent in four different options, to change the default file type to pdf, png, jpg, or tif. For example, to change it to jpg – you type “defaults write com.apple.screencapture type jpg”. He cautions that you have to log out and log back in for this change to take place, but once it’s done I think it’s taken care of until you fancy a new file format! Tim points out that you can swap in jpeg instead of jpg depending on your personal preferences for file extensions. The same is true of using tiff instead of tif. I didn’t realize you could change those extensions without wrecking anything, that’s good to know too.
defaults write com.apple.screencapture type pdf
defaults write com.apple.screencapture type png
defaults write com.apple.screencapture type jpg
defaults write com.apple.screencapture type tif
Thanks Tim – this is an outstanding tip – I took a screen snapshot before using your command and it was a .png file. I ran the command to change the default to jpg, logged out and back in and did a new screen shot and it was a jpg! This makes me so happy!!! Since you sent this to me I’ve used it regularly to communicate with Windows users and I’ve had no trouble.
Bart’s Blog
Research Assistant Bart just keeps on giving – on his blog he put together the list of the 5 tech podcasts he listens to and why he likes them. The NosillaCast made the top 5 which is very flattering. In his description of why he likes the NosillaCast, he really captured what I’m trying to do here which was great. I hope you’ll go on over to his site and check out the other great podcasts he recommends, clearly he’s got very discriminating tastes if he likes the Nosillacast, right? check it out at bartbusschots.ie/blog and scroll down to “Tech Podcasts I’d Actually Recommend”. thanks so much Bart, it was wonderful to read!
In creating a blog on WordPress, which is what Podfeet.com actually is, they give you a thing called “blogroll”. I could never figure out what that was for, but I just figured it out. it’s where the blogger puts links to other blogs he or she likes. Well, my first blogroll is Bart’s Blog! so now you don’t have to hunt around, you can get to his wisdom straight from podfeet.com down on the right side. I also added a category in the forums where you can talk about your favorite podcasts.
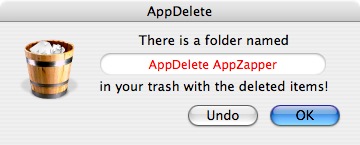
AppDelete
Listener Ryan heard our discussion of how we get rid of applications on the Mac, since there’s no Add/Remove programs feature. Many folks like AppZapper, and I simply do a search on all the file names that include the name of the application. Here’s the idea from Ryan:
there’s a new freeware app that’s started to make the rounds that’s pretty useful for when you want to actually delete an application on OS X. It’s from reggie.ashworth.googlepages.com/appdelete. I haven’t tested it myself because I already have an application that does just this (AppZapper, which is shareware), but from what I’ve heard around and see from the product page it works pretty well.
Sounds like something worth trying, Ryan, and since it has that ever important feature of “free”, I decided to give it a whirl. For normal humans, it might be hard to decide which of your precious applications to delete, but in my case I’ve got so much slop on my machine it should be pretty easy to find something I don’t actually need! I took a look at my Applications folder, and I found that I have 129 Applications! Do you think that’s excessive?
As you may recall, the reason I don’t use AppZapper is that in my one test of it, it failed to get all of the associated files (which I tested by doing a Spotlight search for the app name after I ran AZ). I’ll do the same thing with AppDelete – if it succeeds on the first one, then I’ll test some more later, but if it messes up on the first one, it’s outta here!
The ReadMe for AppDelete says that it’s a droplet application which means to run the app you just drag the application or folder containing the application you want to delete onto the AppDelete icon. they suggest you keep the icon in your dock so it’s easy to find to drop applications on it. Once you do drag an app on AD, it searches for items associated with the app you chose, and it places them in folders that show the path they were deleted from and moved inside of a folder in the trash named AppDelete and the name of the app you deleted. that sounds complicated, but I can see what they’re trying to do here. Once you’ve trashed something, if you screwed up you can reconstruct where everything used to be. there’s even an Undo feature in AD which is amazing! You can only undelete while AD is still open from deleting the app, not at a later date. If you do close AD and later on decide you want to resurrect the app that’s still in the trash, you can use the Logs to do that.
They sure give you a lot of protection against your own stupidity here, don’t they? The best part of installing AD was that I now have 130 applications! I dutifully put AD in the dock as I was instructed, and now to pick an application. I came up with the perfect irony – I found that I still had AppZapper in my applications folder – I’ll delete one deleting application with another deleting application.
First I used spotlight to find of the places appzapper was listed in my entire disk. I found the app itself of course, a folder called AppZapper in my Library/Application Support folder, and also a .plist file in my user Preferences folder. When I dragged AppZapper onto the AppDelete icon in my dock (which wasn’t easy by the way, the dock kept politely opening up space for it to be ADDED to the dock instead of letting me drop it on top of AppDelete. When I did succeed, AppDelete launched and asked me if I was sure I wanted to delete it.

When I said ok, the same screen now gave me the option of saying undo, and showed me the name of the folder I would find in the trash if i wanted to make sure it was good to go. I then took a look in my trash, and found 3 items in the folder called AppDelete AppZapper: the application itself, the Application Support folder, and the Preferences folder, both with just the files pertaining to AppZapper.
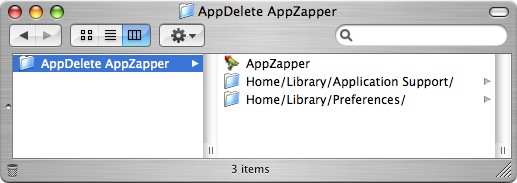
When I went back to Spotlight to search for AppZapper, all traces of it were now gone. On it’s first test, AppDelete did everything flawlessly, gave me lots of good information along the way about where it found stuff and what it was trashing, and behaved exactly as I would hope it would. I hate to admit it, but this is actually EASIER than the way I WAS doing it with Spotlight, so I’ll definitely keep this hot little piece of freeware on my disk. In fact, I think I’ll go hunting for more applications to delete! I bet I’ve got some extra browsers lying around…
Apple DashBoard Widgets without the need for Mac OS X
Research Department Niraj came across a very odd little application/website. Many people are enamored with Apple’s Dashboard Widgets, which are little applets that run when you push one of the f-keys, giving you a calendars, a dictionary, a calculator, weather, flight information, webcams, iTunes info, just about anything you could imagine. I don’t happen to use a lot of them, probably about 3 or 4 that I use consistently but some people are nuts about them. Windows Vista has widgets, but they call them gadgets, but don’t think they copied the idea from Apple, because that would imply Apple came up with it themselves. Apple actually got the idea from a tool called Konfabulator (spelled with a K) which was bought by Yahoo a while ago and renamed Yahoo! Widgets. They were the original, and even better YW is cross platform – runs on both Mac and Windows.
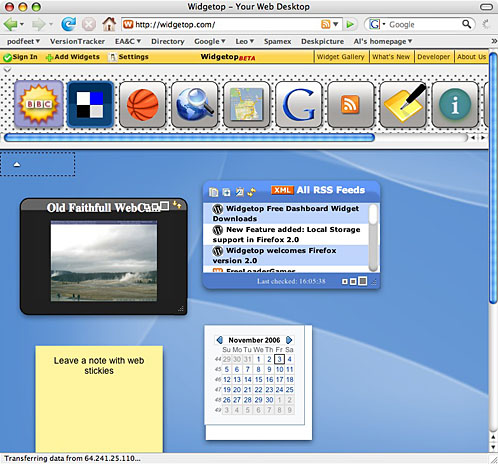 anyway, Niraj’s odd app/website is called widgetop from widgetop.com. This site allows you to view widgets in a web browser instead of floating them on your screen. I have no idea why you’d want to do this. The site only runs in Firefox 1.5 or higher, so I launched Firefox 2.0 and gave it a try. The site comes up with some widgets already on screen, so it takes a while to first launch. the main widget is a tutorial of about 6 steps that walks you through how to move widgets around – hover over them and a frame comes up that you can grab to drag, close the widget, or minimize the widget on the virtual desktop of the browser window. I found that frequently I had to click on the widget first before hovering would bring up the frame. They also have a row of widgets across the top that you can add to your virtual desktop simply by clicking on them. Like Apple Widgets you can hover to see the little “i” in the bottom left that if clicked will show you the preferences for the widget, but it doesn’t work as cool as it does on OSX, there the widget magically flips over, but here it just blinks and you’re on the back side.
There’s a widget gallery where you can test out widgets on your virtual desktop or add them straight to your favorites. You can also modify the look of your desktop by changing the background color or adding a background image. I found the concept of widgetop novel and interesting, but not really all that useful. The work it’s trying to do in a web browser is just too much bandwidth drain, i found myself waiting frequently, like when I added the google maps widget and it had to paint the screen painfully and then repaint, and then I had to stretch the window to see the address bubble and that was even more painful. If you’re bored it might be fun to check out but beyond novelty I wouldn’t spend time on it.
I loaded Yahoo! Widgets ages ago, but not recently so I thought I’d take a look at it again since we’re on the subject. I went to
widgets.yahoo.com and hit the download button and installed the application. This is a good thing, because as you recall I’m down to only 129 applications with the tragic loss of AppZapper, so now thankfully I’m back up to 130. I’m feeling better now.
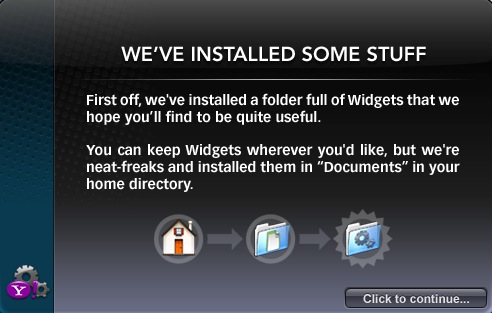
YW installed and then gave me a helpful window that said “we’ve installed some stuff” where it told me that it put some widgets in my Documents folder. This is a good message, I never would have thought to look there, because I never put anything in there.
that warning box had a “next” button on it, and suddenly widgets started popping up all over the screen, but luckily there was yet another warning box that said “whoa! see that? we just opened some widgets for you to experiment with!” I forgave them for ending a sentence in a preposition because I liked the way they did it. they also explained at this point that you can edit widget preferences by control-clicking on the widget. I wonder if on the windows install it says right click? anyway, they also explain that you can move the widgets by just dragging them around.
One of the things that makes yw better than apple dashboard widgets is that you can change how you view them onscreen. they can float on top of everything, hide under everything, float between windows (which is called normal) or be stuck to your desktop. I got to wondering what the difference between hide under everything and stuck to the desktop was, so i experimented. If you put it on the desktop, it pretty much just sits there and can’t be messed with – you can’t move it or play with the prefs. For a bit I was wondering how I mess with it at all, when I remembered from last time that a menu item was put at the top of the screen that shows a couple of gears, and that lets you pull down to view a particular widget, or access the prefs for any of the widgets. Had I clicked “click to continue” on the warning box before letting my ADD kick in and start playing with the widgets, I would have seen the gear menu explained. Oh well, wouldn’t be the Nosillacast if I were caught reading instructions, now would it?
they also added a hotkey – if you push the F8 key it brings all your widgets to the foreground and greys out all of your windows and desktop – they call it a heads up display. this is very similar to the way Apple’s Dashboard widgets work, except after you hit the key a second time they don’t disappear, they just go back to their regularly scheduled locations. You might be wondering whether there are enough widgets to consider YW – there are 1000s on their site, and they include instructions on how to roll your own. Check out Yahoo Widgets today!
Crossover Beta 2
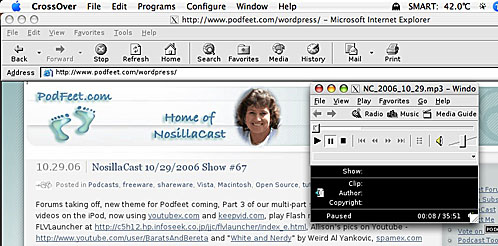 RA Bart inspired me with an article on his blog to give Crossover from Codeweavers another try. I had tried it a while back and it was pretty boogery, lots of stuff stopped working, but he seemed inspired so I figured I’d jump back in. I also heard from 2SmartChix.com on their Views from the Coop podcast that they interviewed jeremy White of Codeweavers, and that a new beta version was out there. I guess I shoudl remind everyone what the heck I’m talking about. Crossover is an application that allows you to run Windows applications on a Macintosh, without running Windows at all. for example, Microsoft stopped developing Internet Explorer at version 5 for the Mac, but with Crossover you can run IE 6 for Windows. Back on show #61 I did a full walkthrough of how to install apps under Crossover, so check that out if you want to hear and see how it’s done. I did include a screen snapshot on podfeet of IE6 running on my Mac with Windows Media Player (the Windows version) playing the Nosillacast if you’d like to check that out.
I tried loading more applications and it still seems to get weird. I tried to load Quicktime 7, and maybe this is actually Apple’s bad implementation, but it got all tangled up trying to install iTunes which I hadn’t asked for and hadn’t downloaded. It errored out of not installing iTunes and then went on to successfully install Quicktime. Like I said, probably Apple’s fault. The reason I wanted to install QT was so that I could see if I could play the Apple ads off of the website from within IE6. Unfortunately, even after I got QT installed, IE6 didn’t seem to know how to send the video to it. I think since each application is sort of an independent island floating in OSX-land, it has no idea the other apps are there. It may be that they would understand each other if they were in the same bottle – I still haven’t figured out what bottles are actually for! I tried installing QT into IE’s bottle to test my theory but the installation failed without even trying to run the QT installer. they give you a nice log file to look at when installs fail, but there’s nothing in there to give me a clue to why.
IE and QT both simply blinked away and quit at different times with no warning – not sure what irritated them. I even tried opening the Apple URL inside QT, and that caused my processors to go nuts, hitting 100% and turning the fans on and heating up my lap, so I quit Crossover and gave up. While this is clearly an interesting concept, it’s EXTREMELY far from prime time usage, and I wouldn’t recommend it to anyone but the pure enthusiast to see what the future could bring. Beta is overstating it’s capabilities!
Yum! Recipe Software from Margaret
Last week listener Dean wanted to know about good Recipe software for the Mac. Two listeners wrote in with ideas.
Listener Margaret writes, “About the recipe software, I did a search on Version Tracker and found this freeware, Yum! and downloaded it. I also downloaded some shareware, but I actually liked the freeware better. I’m not sure what your listener exactly wants, but check out the link. I’ve also included some screen shots using your widget. I like the widget much better than command shift 4 space bar.”
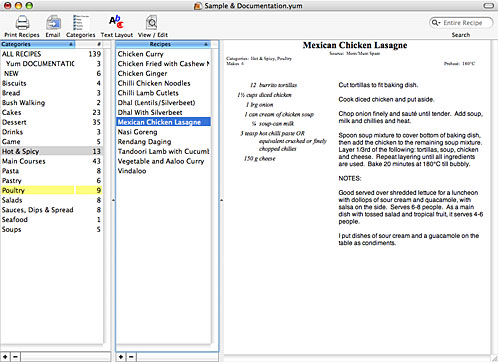
Yum! is available from nixanz.com. Margaret included some screen snapshots that I put up on podfeet.com showing where you add a recipe, and what it looks like when you’ve finished.
This is the screen where you add the recipe.
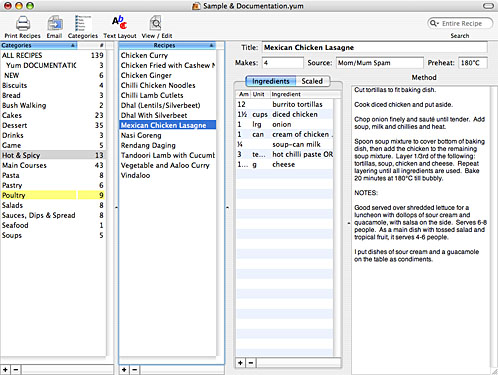
This is what the screen looks like when you have finished.
Margaret points out that you can also include photos on your recipe page. You can also import recipes off the internet.
I installed Yum! at Margaret’s suggestion, and at first I couldn’t find any recipes in Yum! (I was hoping it would come with them) so I whined to Margaret about that, and she pointed out that the documentation that I never read actually had the recipes in it! Oh sure, she’s going to be all full of herself about that now, isn’t she? It’s a good thing it came with recipe’s, otherwise I would have to populate it with the driving directions to Taco Bell, wouldn’t I?
You’ll be shocked to know that on rare occasions, like Thanksgiving, I actually cook. Not as much as my husband, but I try to keep up. he found a recipe a few years ago by Melinda Lee (a radio cooking show host in our area) for Cranberry Chutney. I think I even put a photo of our chutney on the website last year I was so excited about it! i decided to test drive Yum!’s interface by entering in Melinda’s chutney recipe. By the way, if you haven’t ever had chutney, this stuff is amazing. It’s got cranberries, sugar, cider vinegar, onions, garlic, cinammon, dates, currants, almonds and crystalized ginger. It’s the weirdest combination of spicy stuff like onions and garlic with sweet stuff like cider, cinammon and ginger.
anyway, back to the freeware review. I of course read no documentation before I started. I was faced with a 3 column view with categories in the left pane, a blank recipe title in the second pane. I clicked the plus sign at the bottom of the recipe pane (nice use of a standard convention there) and the third pane suddenly had lots of fields to fill in, like title, source, and how much the recipe makes (like 12 servings for example). I like that it has a place for source – cooking is such a collaborative sport – it’s really important to be able to say “grandma’s apple pie” or “Melinda Lee’s cranberry chutney”. It even has a spot to put the temperature to preheat the oven.
there’s a pane to start entering ingredients, with a column for amount, unit and ingredient name, again with the plus sign at the bottom. I have to have shortcut ways to do things, letting go of the keyboard and moving my hand to the mouse or trackpad feels SO inefficient, so I was happy to quickly discover that I could tab across to each filed and if i kept tabbing at the end of one ingredient it let me start the next one below it without hitting the plus key. When you’re done entering ingredients, there’s a blank area called Method which is where you type in the way to make your recipe. When you’re all done, there’s a toggle key called view/edit that lets you switch between editing the ingredients and method and seeing how the finished recipe will look. It’s really nice looking when it’s done, beautiful format.
One of the slickest features of Yum! is that you can type in a scale factor – let’s say your recipe makes 12 servings, but you have 18 guests. In the Makes field you put in 12, and then in the bottom right it says scaled serves and then a blank field where you can type in 18. Magically all of the ingredients scale by 18/12ths! I happen to be very good at math – calculus was a breeze for me, but when faced with multiplying by 18/12ths and the recipe says 1/3 teaspoon, I gotta get out my cipherin’ paper to work it through. this great application does all the heavy lifting for you!
They have the first pane for categories, so you could have desserts, main courses, meat, poultry, things like that. I couldn’t figure out for a bit how to get my recipe into a category i’d created (again with the plus sign at the bottom), but then as usual I sat back and thought – this is a Mac application, how would it work if it were made for Mac? I just dragged my recipe name onto the category name and boom – it’s listed in the category now! I tested to see if I could have one recipe in 2 categories and sure enough it supports that too. there’s even a search capability which will be really handy when I get both of the things I know how to make in here!
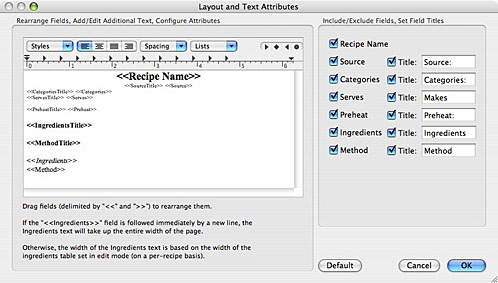
Another awesome feature is that there’s an Email button – if you have a recipe selected and hit the email button it launches your Mail application, titles it with “Yum! a recipe” followed by the name of your recipe. In the body of the email is a nicely formatted description of the entire thing including the source, categories, how much i tmakes, all the ingredients and the method to make it. They throw one line at the bottom as a plug for the software with their name and website. I thought I found one flaw – when I tested printing, it put the ingredients on the left side and the method on the right, which made the method this really narrow and very long column instead of having the full width. and then I found this menu called Layout and Text Attributes where you can organize each of the database fields, change the fonts and colors, and basically play around with rulers and all sorts of stuff. You can really customize it to anything you want.
I think Yum! is an outstanding application and I highly recommend it. Yum! is licensed with an interesting agreement – they call it UNDER-Ware. the basic premise is that your underware should be comfortable, so while there are certain things that must be followed, like you must not distribute the software without th elicense, or use is for commercial purposes, but you do get some options. You can treat it as shareware, or beerware (ship them some beer by ground transportation), or haggleware, make them an offer. I like a developer with an open mind. Thank you so much Margaret for recommending Yum! to us!
Measuring Cup Recipe Software from Ryan
Listener Ryan sent in a couple ideas for recipe software too. He wrote, “While I don’t use either of these two applications I have heard that they are very good for recipe management. For freeware I’d go with Measuring Cup from shallotpatch.com/), it’s a fair application, but the shareware app that I’ve heard of is much better and seems worth the mere $20. Connoisseur from thelittleappfactory.com is a very cool app and it has alot more features than Measuring Cup not to mention it’s a bit prettier.”
I downloaded and installed Measuring Cup first, figuring if I like the freeware I’d never go on to shareware! Measuring cup looks a lot like Yum!, there’s a category pane on the left, the recipes on the right pane. to add a recipe you click an icon in the toolbar that says new recipe. You can put in the name, how much it makes and units, calories (why would I want to know that for heavens sake?) and how long it takes to make. I like that it has the time, but it doesn’t have a field for attribution like Yum!
They’ve done a great job of imbedding the help into the application, as you create a new recipe it has the ingredients in an upper pane with the method below. they prepopulate the method table with this instruction “This table stores the preparation steps. To add a new step, hit the plus (+) button on the right. To delete, hit the minus (-) button or use command-delete as keyboard shortcut. These instructions work for any table that has similar scrollbar buttons.” It’s a great way of telling you how to work with the tool knowing you’re probably not going to read the instructions anyway! You can get rid of this instruction field with a quick click of the minus button, so it’s not in the way at all, and telling you how to add the next field is great. the method can be broken up into steps, unlike Yum! where it’s more of one big section like a traditional recipe. Step numbers seem helpful to me, I always seem to lose my place when I look at a complicated recipe!
Measuring Cup also has categories and you can drag recipes into multiple categories here too. One unique feature of Measuring Cup is that you can create sub-recipe’s, which is cool – like if you’re making something that also has a sauce that goes with it, or the frosting for a cake. very good idea. Measuring Cup also has a side pane that allows you to throw in some extra information, such as an alternate name, description, and you can even drag a picture into it. that’s really a cool feature.
Measuring Cup has an import function, so I tried exporting from Yum! to see what would happen. Yum! allows you to export to a text file or an XML file, but MC didn’t recognize either of those file types, so I’m not sure what it’s looking for – maybe a Measuring Cup recipe from one of your friends. I tried it the other way around – MC exported a file with an extension .rcplets which was kinda fun to say, but of no use to Yum! I’m afraid.
There aren’t a lot of options to format the printout, but it did print nicely with the quantities in bold so you could clearly see them separate from the ingredients. You can’t see it in the application formatted nicely like you can in Yum! but i’m not sure that’s a critical feature. It also doesn’t come prepopulated with any recipes. Overall though I think MC is a great product too, and just as easy to use as Yum! – I might have raved more had I tested it out first! this is pretty cool to get two freeware (or underware) products this quickly to help out listener Dean.
With all this talk of recipe’s I’m going to have to stop writing because I’m HUNGRY, but we’ve got another recipe review from listener Lynn so I’ll have to run that one next week. I had no idea that recipe software was this popular, maybe I’ll have to learn how to cook so I can play with all my applications!
That sounds like a good place to sign off so I can get some food! As always, feedback is more than welcome – shoot me an email at [email protected], or send me an audio comment or suggestion at [email protected]. And don’t forget to head over to the forums at podfeet.com/forums. thanks for listening, and stay subscribed.
Hi Allison,
I sent you a info about Recipe Manager but don’t see it mentioned. Did you not get my notes last week?
I see now you mentioned at the end that you would review it next week.
Thanks, ly
I ran out of time – now I can spend some real time on yours instead of giving it the bums rush that I had left! I really want to give it a fair shake. this is a very fun category – I loaded your s/w up last night!