New camera (Nikon D40), Errata in the forums, added Podzinger search to the website, HDA Bob’s Element Modification Movie, KIT for organizing your life from reinventedsoftware.com, Blender for 3D modeling from blender.org, freeware image viewer called Xee, from wakaba.c3.cx/s/apps, and a new beta shareware image editor called Chocoflop from chocoflop.com. NetNewsWire 3 pre beta review from newsgator.com by Bart Busschots, and FreeRuler for measuring things onscreen at pascal.com/software/freeruler.
Subscribe to the Podcast –> 
Listen to the Podcast Once (41 min 11 sec)
You know that song “I did a bad, bad thing”? I did a bad thing – I finally broke down and bought a digital SLR camera. I’ve been resisting the temptation for the last two years, but when the Nikon D40 came out at $600 US including a lens, I couldn’t help myself! I bought a Minolta X700 film SLR back in 1978, and I still have that camera. It took amazing pictures, beautiful quality, but when digital came out I had to jump. I’ve always remembered the clarity though of an SLR for getting those amazing shallow depth of field photos – like in portraits or taking macro shots of flowers.
Let me step back a sec and make sure you’re all with me here – SLR stands for Single Lens Reflex – what it really means is that when you look through the viewfinder, you’re actually looking through the aperture of the lens. When you push the trigger, a series of mirrors move out of the way and let the light through to the sensor in the camera (or the film in the 35 mm days). SLR cameras are also characterized by interchangeable lenses, so you can get a huge zoom lens, or a crazy wide angle lens, or even a fixed focal length lens that solves a particular problem.
So at this point you’re wondering why I said this was a bad, bad thing, right? sounds like a good thing, doesn’t it? Well, this Nikon D40 is awesome! It’s very light for this kind of camera, even though it’s way bulkier than the little point and shoot cameras. It takes fantastic photos, and one of the most excellent features is that it can take 2.5 frames per second! so I took it to my son’s track meet today, set it on the little running man icon (which means it set the shutter speed as fast as possible), and I pretty much held the trigger down for 5 hours straight! I’m serious, after I cleaned out the bad photos, I had 400 left! What the heck am I going to do with 400 photos? I can’t mail them to the mom’s of the kids, they could only stand maybe 5 of their own kid even! But I can’t throw them away either, they’re too good! and if you look at them really fast, they make a cool flip book effect!
I’m paralyzed now, I filled up 1.3GB of my disk and I have no idea what to do next. and it’s day 2 of owning the camera. I’m gonna need a bigger hard drive…
Errata
Well, I have been making so many silly little mistakes, I finally opened a forum called Errata – which dictionary.com describes as “a list of errors and their corrections inserted, usually on a separate page or slip of paper, in a book or other publication”. I hope they don’t mind if we extrapolate the term to include electronic errors and corrections? The nice thing about this forum is that it gives everyone a way to point out my mistakes so we don’t just have to depend on QA director Steve to carry that heavy load. this week’s installment of Errata is that after I described a site called nowonder.com, and I incorrectly gave Bart credit for this find rather than Leo who actually told me about it. Bart was gracious in pointing this out to me.
I was unjustly accused of making another mistake, and it’s kind of interesting how I proved my innocence. Leo wrote to me to tell me that he thought last week that I said, “check it out at songbird dot nest”….when I should have said “songbirdnest.com”. Unfortunately I don’t find myself fascinating enough to actually listen to my own podcast, so i noodled on how I could check to see if I really made that error. then I remembered the excellent service Podzinger from podzinger.com. Podzinger, through what appears to be either magic or some amazing algorithms matched with massive compute power, transcribes podcasts into searchable text! Let me explain how it worked in this case.

I went to Podzinger, and in the search field typed NosillaCast and then hit Zing it! This brought up the latest batch of episodes of the Podcast along with other Podcasts that mention my show. Now in the search window, there’s a pull down that allows you to change where to search for the phrase – one of the choices is NosillaCast at podfeet.com, along with the other shows listed. I pulled down to NosillaCast, typed in Songbird, and zinged again. Now Podzinger shows last week’s podcast, with two bullets with time stamps of when I said Songbird, first at 23:42 and then again at 26:00 along with a transcription of what I said. Here’s where it gets really good – i don’t have to open iTunes and move the slider to 23:42 to listen, I can simply click on the word Songbird inside that paragraph and a little flash player starts playing the show right there!
The good news is that I was able to vindicate myself – I really did say songbirdnest.com correctly. For once I didn’t mess up! Leo explained that he must have sneezed while I was saying the url, which is perfectly understandable. He suggested I institute a Podzinger search bar on Podfeet like they do on twit.tv. That sounded like I could kill a bunch of time not getting the Podcast written, so of course I went over to check it out! I created an account on Podzinger, and one of the options was to put a Podzinger search on your site. I added it to the sidebar, and now you can type songbird right on podfeet.com and do the search from right there! very cool. Let me know what you think of it! Great idea, Leo…or was it Bart????
HDABob.com
I’ve mentioned before what a geek Honda Bob is, but I really should focus on how cool it is that he actually comes to your house to fix your Honda or Acura. It’s amazing what he can do, all in the driveway! You might be wondering how the heck he can do that without all of the tools you’re accustomed to watching your dealer use…during those long long hours while you wait with the great unwashed, waiting what seems like an eternity for them to finish. For years Bob worked on our cars using a gigantic step van, but after it got rear ended, he bought himself a red Honda Element.
Now you might not think a Honda Element would make a good substitute for a mechanic’s shop but that’s because you haven’t seen what Bob has done to his car! Luckily for us, Bob created a movie where he explains all of the killer modifications he made to the Element to make it work for him. I think you’ll enjoy seeing this movie, check it out by going to hdabob.com, click on the Introduction link, then scroll down and click on the Red Element (or you can click on the link in the shownotes!) Element Modification Movie You can even see the old step van that he replaced.
Tim Verpoorten of the MacReviewCast.com asked me to do a review of Keep it Together, otherwise known as KIT. Here’s that review:
Keep it Together, or KIT
Hi Tim, Allison Sheridan of the NosillaCast Podcast hosted at podfeet.com. I was delighted to accept your request to review Keep it Together, otherwise known as KIT from reinventedsoftware.com because it’s actually a tool I use really often. Reinvented Software is also the home of the outstanding Podcast creation tool for the Mac called Feeder, which is what I use to do all of my Podcasts. The developer, Steve Harris, is incredibly responsive to requests and assistance, and in fact ages ago i wrote to Steve about how much I liked KIT and he said he wasn’t really developing it because it ended up on the back burner because of all his work on Feeder. He said that renewed interest (from people like me) got him going again, and he’s made tons of advances since then.
Ok, after all that teasing, what does KIT actually do? As the website says, KIT is like a magic scrapbook for everything you want to keep. Text, documents, images, movies, sounds, web pages and bookmarks can all be dragged to KIT for safe keeping, tagged, previewed, collected together in different ways and found instantly. Think of it as a great junk drawer, you know you want to keep all this info but it’s all different kinds of stuff, so this is one place where you can keep it all together.
KIT has a very clean Mac-like interface. It has a pane down the left side that is prepopulated with certain categories, like Library, last import (kind of like iPhoto), Notes, documents, Images, Sounds, Movies and Bookmarks. From there you can add groups (which look like folders) with a simple click of the plus sign at the bottom. One of the most powerful features of KIT is that you can put the same thing in multiple places. Let’s say you have a bookmark that you want to remember, but it’s important to your PhD thesis – you could put it in a folder called PhD, and also have it in the Bookmarks folder. It makes it so much easier to find, because whichever one you think you might have put it in, it will be there for you.
The body of KIT works kind of like Apple Mail – with those groups and categories down the left side, you click on one of them, and the top half populates with the items inside it, and the bottom half is sort of like a preview pane. there’s an info drawer that slides out of the right hand side showing a lot of info about the selected item – like for images it tells you the file name, format of the image, creation date, size and where the actual image is on your disk. You can add comments and tags here, which can be used for making smart groups. I’m a big fan of the smart groups concept, it makes it so much easier to find stuff if i can just define a search criteria and the stuff that matches it is always there. Speaking of search, KIT uses Spotlight to search.
KIT allows you to customize your toolbar, but the good stuff is pretty much already in the toolbar as it’s shipped to you. This is one of those tools that has a TON of cool features and capabilities that you can love even if you don’t use all of it. I liked doing this review because it reminded me of how much more it can do than I take advantage of! As always I measure a tool’s real value by whether I keep using it after I first find it, and KIT has been in my toolbox for over a year, and I keep using it, so it must be great, right? KIT is shareware at $25 US and you can download a free 15 day trial, so check it out at reinventedsoftware.com.
Blender
I should probably label this section – chicken. Listener Phil sent in a link to an amazingly powerful application called Blender. Blender is an Open Source tool for creating 3D models with shaded rendering. Here’s the part where chicken comes in – I haven’t the foggiest idea how to use a tool like this! Let me give you an idea – the website says things like “fast skeleton creation mode, interactive 3D paint for vertex weighting, and fast envelope based skinning” and has a really cool graphic next to it of a robotic hand with a creepy looking skin overlay. It talks about B-splines interpolated bones, and constraint stack for IK solver setup. I’ve always needed that, haven’t I?
I don’t mean to make fun of this application by any means, it’s just that it’s so far out of my league I can’t begin to give it a fair review! If any of these words have made sense to you, and you’ve wanted to get into 3D modeling but the tools were enormously expensive, you should head over to blender.org. the amazing thing is that Blender is available not just for Windows and Mac, but they have both a PPC version and an Intel version, there’s a download for Solaris, FreeBSD and Linux as well. the developers at blender.org have created an amazingly cool application, and have distributed it under the GNU Public license, so it’s free for you to download and develop further. I hope someone out there has a bent for this kind of thing and can make this tool create something fun for us to see here! they do have tutorials over at blender.org, so go check it out! thanks Phil for a very interesting tool – sorry I’m too chicken to really learn how to use it!
Xee
One of the things I’m most jealous about on Windows is the way it’s so easy to quickly view photos. On OSX we have Preview, which is pretty light, but still takes way longer to pop up a photo than on Windows. I’ve been running MilkyWay from lny.mine.nu ever since I reviewed it, and it’s fantastic at just popping up a quick image so I can see which one I’m looking for. I judge tools by how long I keep using them after the review, and MilkyWay has taken up permanent residence for me.
Bart just turned me onto a freeware application for the Mac called Xee, from wakaba.c3.cx/s/apps, which might be useful for image viewing too. I wrote to the developer asking him how to pronounce Xee, and he said, “I haven’t a clue! Part of the reason I picked it was because the ambiguity in pronounciation amused me. I should probably not be
allowed to name things at all.” Isn’t that wonderful? I have to think how that so would not work in the corporate culture, the freedom of enjoyment in the freeware and shareware community is just a joy to behold!
Anyway, back to the review of this unpronounceable software. The website bills Xee as a lightweight, fast and convenient image viewer and browser. It is designed to be a serious tool for image viewing and management, with a sleek and powerful interface. Because they use OpenGL to display and scroll images, Xee can do it much more smoothly than other viewers. this sounds like something that could solve my problem! Plus, it has the all important really cool looking icon. no clue what it is, it’s sort of a green futuristic, and yet somehow amphibian-like X with an eyeball on top.
![]() I downloaded and installed Xee and opened up a photo with it. Even though it was a 5MP photo, it popped right open quickly. I noticed the arrows in the toolbar, and clicked on the forward arrow, and it very quickly started flipping through the photos in the same folder. It worked great, just the kind of thing I was looking for. This is no one-trick pony though, it has a lot more up its sleeve. Command-F makes the picture full screen (or you can do it through a menu), and there are zoom buttons that work as expected. they included a button to make the picture fit the window which is something missing in many applications, so that was a nice bonus.
I downloaded and installed Xee and opened up a photo with it. Even though it was a 5MP photo, it popped right open quickly. I noticed the arrows in the toolbar, and clicked on the forward arrow, and it very quickly started flipping through the photos in the same folder. It worked great, just the kind of thing I was looking for. This is no one-trick pony though, it has a lot more up its sleeve. Command-F makes the picture full screen (or you can do it through a menu), and there are zoom buttons that work as expected. they included a button to make the picture fit the window which is something missing in many applications, so that was a nice bonus.
I read online where it said that it was supposed to be able to crop photos, but I didn’t see any menu for that. i looked in the customize toolbar menu, and there was a treasure trove of things I needed. Along with the crop button I was seeking, it also had buttons for delet file, copy file, move file, and rename. i really like the way those middle two functions work – when you hit copy or move file, it brings out a drawer with a button that says “choose a folder”. I clicked on that, chose my folder, and it moved the file. the next time i went to use move or copy, the drawer opened and now the folder I used before is in a list so all I had to do was double click it. Even better, it has command-1 next to it, so I figured out that on the NEXT photo i could just hit command-1 and the photo was automatically moved over to that folder.
At first I had some trouble with Xee and long file names – when I moved or renamed a file, it truncated them to 32 characters (including the .jpg). When I wrote to the developer, I also asked him about this, and he said he hadn’t experienced it. that seemed odd, so I asked Bart to see if he could replicate the problem, but it worked perfectly for him too. Odder still, so I tried it again myself, and now it’s not doing that! It must have been something hinky about the files I was messing with the first time, because now it works great. I’ve decided to blame it on neutrinos.
Xee will create a slide show for you, in random order, or in order, and you can set the time length for each slide. I didn’t find the controls intuitive for it though – I could see a play forward and reverse reel icons and another one that could have been play or maybe fast forward, but they stayed greyed out. Under the Browser menu I found slideshow and then a menu pick to run. Even while it was running those icons didn’t do a darn thing. I wish it would allow me to save the slideshow as a movie, but it’s not that sophisticated. Funny how demanding with get with Freeware, isn’t it?
the crop tool worked well (once I found it in the customize toolbar menu) but it didn’t have a way to crop to a specific aspect ratio which is something I commonly want (say, 4×6 for example). Even holding the shift key down didn’t make it square. I guess it’s ok for maybe messing around with graphics for the web or something. they talk on the website about lossless cropping and rotations which sounds cool but I wasn’t sure how to test that, I’m sure it’s true. Xee does give you a lot of information about your file while you’ve got it open – it tells you the resolution in pixel width and height, and some stuff that must mean color, it said YCbCr H2V1 which I’m sure I needed to know. It tells you the file size, and the creation date and time.
I used Xee a bunch this weekend to help me sort through the mountains of photos from the track meet, so I think I’ll keep it around. If it had an aspect ratio for cropping I’d use it even more!
Chocoflop
 Speaking of image editing, Leo sent me a link to a new beta shareware image editor called Chocoflop from chocoflop.com. Chocoflop got a quick vote from me when I opened it – and it came up in less than 2 seconds! I think Photoshop Elements (non-Universal binary) is around a full minute, so I dread having to open it. Even on a G5 it’s pretty annoying how long it takes to open up.
It opens with a fairly small tool palette on the left, a tool options thing on the right, and that’s it. As you click on the different tools, the tool options change to fit the tool. I find this a bit more intuitive than the method the Photoshop suite uses where it’s the tiny little header thing that holds all the options. I forget it’s up there, and it’s sometimes not obvious how many options are hiding in there. If you have an image open, the layers palette also shows up without you having to ask for it.
I found something else to like – I clicked on the zoom tool and zoomed in on a photo, and in the bottom left corner of the screen it showed me a thumbnail of my image showing me where I was zoomed in! i can’t tell you how many times I’ve gotten lost when I’m zoomed way in fixing an old photo, working the little details to make it perfect! This would be a great boon to that process! I’m also addicted to keystrokes to do repetitive tasks, and I was happy to find that command-0 brought the image back to fill the screen, and command-alt-0 made it 100% of it’s native resolution, two things I need all the time.
there’s a live rotate tool, but it works the opposite of every rotate tool i’ve ever used. if you click on the image and drag around the center in a clockwise rotation, the image rotates counterclockwise. All I can figure is that the developers must be left handed! I like the live scale tool – when you push on the screen you can scale the image in and out very easily. Lucky for me, command-z did the undo’s to fix how much I messed up my photo with that one! I found a tool called Magic Brush, but I had some trouble figuring out how exactly it worked. The reason i was confused was because the tool options palette seemed to be describing two different tools in the same window. The pull down at the top in the options was talking both about blending modes, color dodging and that sort of thing, while the second pull down was giving me options of blur, sharpen, and saturate/desaturate. That’s very confusing – having multiplying effects on the same tool! I also found that pretty much no matter what I set the upper setting to, it was the lower setting that was actually in charge. The magic brush scared me.
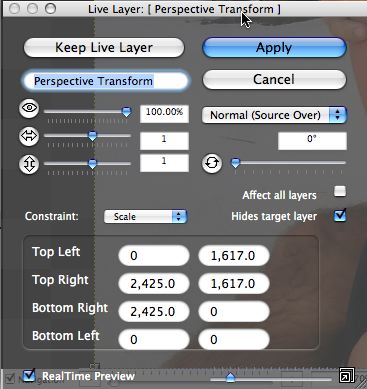 There are all the standard kind of tools like marquis’ for selecting, Paint brushes, and a text tool. When I clicked on the text tool, I also had to pull down to font, show fonts, and then this really pretty but confusing window glided into place on screen. It was transparent, and had buttons for apply, keep live layer, and cancel. I could also change something from 100% to other sizes, change the height and width from a value of one, rotate, scale, and set specific dimensions of whatever it was talking about. There was even an interesting slider in the bottom right. I have no idea what this was for. It wasn’t showing me fonts, that’s for darn sure!
I tried just typing some text when that scary but pretty window was up, but it insisted on showing me a message that said that Growl wanted to tell me something (to grab the handles) but that I didn’t have growl installed, and advised me to go get it. i’ve never understood what Growl actually IS, even though I’ve installed it before. In any case, it wanted me to grab the handles, but the handles to what? I had nothing on screen to grab! I closed this pretty window, and again hit the T for Text, and started typing on screen. This time an equally pretty window glided into place, and it showed me a nice text window where I could type whatever I wanted, sort of like a mini-text editor window. Then it typed it on screen in teeny tiny little letters. I tried that scaling vertical thing i mentioned, it didn’t do quite what I expected, so I hit command-Z to undo and I got a big scary (not pretty, non-gliding) error message, something about an invalid argument! I know my husband says sometimes my arguments are invalid, but I don’t want a program telling me that! i think it was a wee bug, actually. Hey, it’s beta software, right?
I couldn’t find an undo history list, which is something I depend on in PSE. That’s where they show you the last 20 or so of your actions, and you can skip right back by a bunch of steps. let’s say you’ve been blurring an area, you might push and lift your cursor 5 times, which is 5 undos but if you have the undo history you can jump back 5 to before you started that exercise. Wish Chocoflop had it, but near as I could tell it didn’t.
There are a ton of features to Chocoflop that I don’t know anything about, must be higher level image editing stuff I’ve never learned. Things like Lanzcos Scale Transform under Geometry Adjustment, never happened across a problem that solved just yet. Maybe soon though. Chocoflop does have what I need most, and that’s the ability to crop images easily and quickly to a defined aspect ratio. Even though I don’t print photos any more, I still seem to prefer my images at 4×6 inches. I have one pet peeve, and Chocoflop shares this flaw with Photoshop – there’s no keystroke to crop! once you select the regions, you have to go up to Image, and pull down to Crop to Selection. That makes me nuts! Why on earth would you put one of the most used functions buried in a pull down menu without a keystroke shortcut? argh!!!
One of my favorite tools is implemented in chocoflop – it’s the clone stamp tool. Here’s the problem it solves. You’ve got a photo of your dad and step mom that’s really lovely, but it turns out they just happened to be standing in front of a wall where there’s a picture of your mom on the wall, and it looks like she’s grimacing at them! Well, kind of ruins the whole picture, right? To get rid of the picture of mom, select the clone stamp tool, alt-click on the wall in an empty area, and then go up where mom’s picture is and just start rubbing the wall. The pattern where you first clicked will be replicated up where you’re rubbing and simple make her disappear. It’s great for removing blemishes on photos, a stain on a tie, or even in restoring old photos where there was a tear in the paper.
I didn’t find a bunch of standard tools, like the paint bucket (but there was a color picker and a gradient tool) or the ability to draw geometric shapes, like lines and rectangles. I thought I’d check out the help files at one point (when those options were scaring me), but there’s not much there. They take you to a wiki called wiki.chocoflop.com, which is a place anyone can help them document. I can get into that, but I think they need to include some pretty basic information first, and there’s virtually nothing there. Overall I think Chocoflop is a really promising start, and just for how fast it opens I might be willing to buy it.
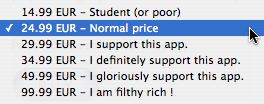 Chocoflop is in beta right now, but they do want you to buy it, which is a little bit odd. They have an entertaining pricing model – their normal price is 24.99 EUR, but if you’re a student (or poor) you can buy it for $14.99. You can pay more as well – if you support the app, you pay $29.99, if you definitely support it, it’s 34.99, if you gloriously support it, it goes up to 49.99, and if you’re filthy rich you can pay 99.99 EUR! I thought was pretty entertaining. btw, 24.99 EUR is around $33 US. By the way, they make you do a math problem to be able to save if you haven’t paid for your license, which is a fun way to annoy people into paying their fees! It didn’t happen at first, but started up after a while. In any case, if you want a fast, capable, shareware image editor, I can recommend Chocoflop at chocoflop.com.
Netnewswire
Bart sent in a review of NetNewsWire 3 pre beta for us today. He knows I don’t read much, so he figured I wouldn’t test it out myself since it’s an RSS reader! Let’s have a listen.
INSERT NETNEWSWIRE REVIEW FROM BART
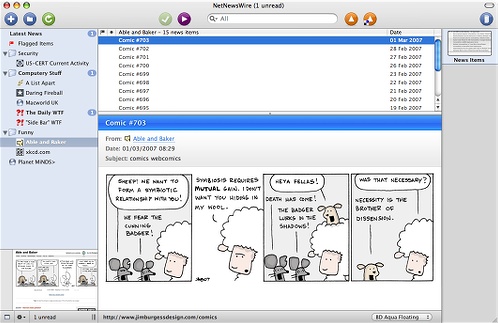
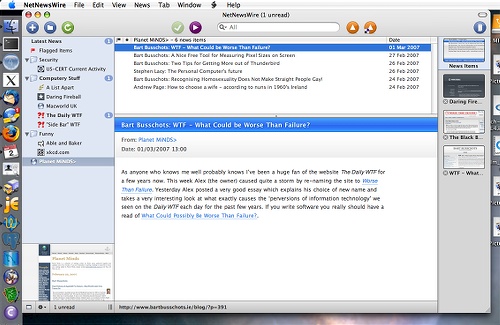
Thanks Bart for a great review! I was kind enough to insert the images in the shownotes as requested. If you’re looking for a powerful RSS aggregator and reader, you can find NetNewsWire in scary beta form over at newsgator.com. You can even try out their free online RSS aggregator there too.
FreeRuler

Have you ever had something on screen that you wish you could measure – in inches (or real dimensions like centimeters) or even a way to count the number of pixels in an image? I’ve held up a ruler to the screen when I had this need, but it really doesn’t work all that well. Listener Bart sent over a link to a sweet little freeware Mac application that solves this problem. It’s called Free Ruler from pascal.com/software/freeruler but ironically Free Ruler is not written in Pascal, but rather in REALbasic!
Free Ruler provides both a horizontal and vertical ruler which can be used independently or simultaneously. You can measure in pixels, inches, picas, or centimeters. When the rulers are up on screen and you move your mouse around, the rulers show you your relative position by moving along a little flag with a number in it (they call them interactive tick marks).
these little rulers are great fun to play with – you can lengthen and shorten them just by grabbing them at the ends, you can drag them around on the screen easily, and changing the dimensions for measurement is as easy as click on the units to cycle through the choices. When you first bring up Free Ruler, it gives you one horizontal and one vertical ruler, touching at their corners in the upper left side of the screen. When you drag one, the other goes along. there’s a little lock on the end of each one, and if you click on it, it unlocks the ruler so you can move it about freely without that other ruler tagging along.
If you forget how to change all these parameters, the menu for Free Ruler gives you the same choices. there’s even a bunch of nice keyboard shortcuts, like if you want to change the measurement to pixels, just hit the p-key to change it. with Free Rulers as the front most application, your cursor will turn into cross hairs, which turns out to be very useful. Let’s say you want to measure the exact distance across an image – set the ruler on one edge, then move your cursor to the other end (easy to see what you’re doing because of the crosshairs) and then you can use command-c to copy the dimension you just measured.
I can see how Free Ruler will be able to help with the Podcast – it would be so nice to be able to measure the size of a screen snapshot before I post it to Podfeet – I always have to open them in Photoshop Elements first and ask it how big the image is. this is a much more elegant solution. Check out Free Ruler from pascal.com, and if you really like it, throw the developer a donation!
Well I had fun with these tools, I hope you enjoyed them as well. Until we talk again, keep those great emails coming to [email protected], or send in audio files to [email protected]. And don’t forget the forums at podfeet.com/forums_bbpress, there’s a lot more great discussion going on in there now that it’s clean! thanks for listening, and stay subscribed.
Allison:
You changed something and now I can’t download an mp3 version unless I go to iTunes. Previously, I could right click on “listen now” and download the mp3 version. Given my dislike of iTunes on Windows I hope you can revert to the previous version…
thanks…
Bill – It was actually still there, but evidently not obvious enough. The other comment i got from Maurice was that Flash was hammering the person’s cpu (I think I’ve mentioned that a few times), so in the interest of your sanity and Maurice’s cpu cycles, the experiment is now over, and the Flash is gone. Bart will be happier too – he thinks Flash is evil!
Allison