Four mistakes last week, issues with Camino on Podfeet, adios to Flash players on Podfeet, OSX Summarize function, hdabob.com/WhatIsThatLeak.htm to learn about leaks. Google Part 14: Google X at theplaceforitall.com/googlex, and Elliot Back’s blog, and Google Mobile at mobile.google.com. Galerie from myriad-online.com, Bobo Galerie, Democracy from getdemocracy.com, Chocoflop again from chocoflop.com/, InstantShot! from projects.digitalwaters.net.
Subscribe to the Podcast –> 
Listen to the Podcast Once (42 min 09 sec)
So, did you notice that Podfeet.com was DOWN on Sunday afternoon? Wasn’t that lovely? I gotta tell you, I sure enjoyed it. I switched from Vizaweb over to GoDaddy because I got sick and tired of my site disappearing, and now it’s started to happen at goDaddy! sheesh. I called them, and unlike vizaweb, they actually answered the phone, and it was a system wide issue. I decided to let the guy off the hook right away, I feel that if it’s a system wide issue, my whining won’t have any effect on what they do, because they’re already pulling out all the stops. I think whining is useful when it’s just MY site that’s affected because it’s possible they’re not showing enough attention to the problem. It was toast for about 6 hours, but it appears to be back up with snappy performance again.
Errata
I’m proud to announce that I have four mistakes from last week. The first is probably the funniest – I mispelled Errata on the forum by that name and no one noticed! I thought something looked funny about it. The second I received in an email from HDA Bob:
“Allison, I just got to listening to your podcast tonight and there was an error. First of all I didn’t replace the big van with the Element. I still have the big van. Second, the 1991 Accord Station Wagon was rear-ended and totaled. That was why I got the new Element.”
I did remind him that the step van DID get rear ended too (he had a bad run of that!) but of course he’s right about the most recent rear end accident.
Listener Maurice posted in the Errata forums that Leo was right after all. Here’s what Maurice had to say: “Well, in fact Allison did say songbird.nest about 33.25 minutes into the podcast! It is the SECOND time the URL is mentioned.” I just can’t win, can I? I thought Podzinger vindicated me!
The final thing I’m surprised no one else pointed out to me – I FORGOT to do any Google Products reviews! After 13 straight weeks, maybe I decided I was done or something? completely slipped my mind. I’m telling you, growing old is a drag!
Listener Feedback
I got an email from listener Maurice, who had several interesting comments. For one thing, he told me that my site renders oddly in Camino. He says “sometimes I get nothing more than a white window with nothing in it, and the next time it will load correctly; no idea why that is.” I tested Camino to see what was happening, and it appears to be that the speed of Camino maybe be affecting the way it displays. When I ran Camino on a bunch of different sites, it was much slower than Firefox or Safari, and as a result, I saw much more of the behind the scenes work that the browser does to render the page. Podfeet is a black background with a white rectangle painted on it. When I go to Podfeet in Camino, I see the whole page turn black, then the top half of the white rectangle gets painted, but it takes a wee bit longer for the second half to paint white. I think this is what Maurice is seeing.
He also noted that when he’s on podfeet.com, his cpu goes nuts now – and he suspected the new flash players I put in place of the quicktime links I used to have. I had used a cool plugin to do this, but I decided to kill the experiment. I never got a complaint on the quicktime files, so I think I was doing exactly what I complain about – I went looking for a solution to a non-problem. Listener Bill also sent in a comment about it too – he said
“Allison: You changed something and now I can’t download an mp3 version unless I go to iTunes. Previously, I could right click on “listen now” and download the mp3 version. Given my dislike of iTunes on Windows I hope you can revert to the previous version…”
the good news is that I learned how to set it up as flash, and that I tanked it when it became annoying!
Chocoflop redux
Last week I reviewed a very promising image editing application still in beta, called Chocoflop. I wrote to the developer Santiago to tell him I was reviewing the tool – and I think I scared him! He wrote back that he didn’t think it was ready for a review considering how buggy and primitive it is right now! heck, it’s already better than most delivered products from the big companies! I did have one issue that was intriguing – I noticed that Chocoflop shifts the color of the image away from red. I took a screen snapshot of the same photo open in 3 applications at the same time so I could show the color issues. Santiago asked that I send him the picture so he can work on the issue, which i thought was cool. He also said he found my review eye opening and gave him some ideas for changes. It really feels good to have an impact in that way, especially since it’s already such a cool application. I can’t wait to see how this software evolves over time. I’ll be sure to let you know how it progresses.
Mac OSX Summarize Service
I’ve been using OSX since before it was released, and yet this week my buddy Ron told me about something I never knew it could do. You know the Services menu that lives under the name of every application? Like if you’re running Firefox, you look down under the name Firefox, and there’s the Services menu. When we all first got OSX we were all excited, testing out every feature, but wandering down to the Services menu never reaped any benefits. it seemed for a while that Grab would be good – a way to grab screen snapshots, but there’s SO many other easier ways to get screen shot that it didn’t even pan out.
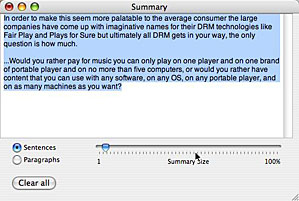 There’s one good thing in that menu, not sure when they snuck it in there, but it’s called summarize. Picture this, you’re over at Bart’s Blog, and he’s written this wonderful article about Digital Rights Management (http://www.bartbusschots.ie/blog/?p=393), but you realize that you have to jet off to work and won’t have time to read the whole thing. What if you could get a quick summary, and even tailor the summary to as long as your attention span? that’s exactly what the Summarize function does. First select the text you want summarized, and then go to Services/summarize and a nice little window pops up with a summary of what you selected. If it’s still too long to pay attention, there’s a slider at the bottom where you can shorten or lengthen the summary.
You can even choose whether to see sentences or paragraphs – another way to tune how much information you end up having to digest. Each time you do a summary, and keep the summary window open, it adds the new text after a separator so you can collect a bunch of information together, and you can save it as a file for later reading. This is a very interesting tool, and from what I could tell comparing Bart’s blog to the summary at different levels, it really does a decent job of picking out the sentences that get to the point of the article. Hope you find it useful too!
HDA Bob
And now, a word from our sponsor. As I’ve mentioned before, HDA Bob dedicates his website to educating us. One of the most important sections on his site is “What is that leak?!?!?!” at hdabob.com/WhatIsThatLeak.htm. Bob says, “when you see a spot from where the car was parked overnight, you wonder…What is it? Well, aside from the ugly stain in your garage, you could be letting our engine run out of oil or coolant, or at the worst, brake fluid. You don’t need to be a CSI agent to figure out what it is. But you might need to take a close-up look at the leak or the undercarriage of your vehicle or even feel the suspected substance. After identifying what the leak is, the next step is stopping it. Sometimes the leak is hard to identify. maybe this will help:” From there he goes through and explains what each of the different sources could be, and how dangerous they are. From brake fluid to fuel, to coolant, power steering fluid – the list goes on and on.
He does a great job of telling you what it will feel like and smell like, and whether you should instantly get it fixed or whether maybe you can take your time with the problem. In some cases he shows pictures of what it looks like so you really can get a good idea of what you’re dealing with. I learned a lot looking at this, and I’ll be sure to check out this site next time I find a scary looking puddle under my car! check it out at hdabob.com
Google Part 14
I still can’t believe I forgot to do a Google products review last week! You’d think I’d have felt empty and unfulfilled, wouldn’t you?
Google X
This week I found something that is sort of Google, but not really Google. I know that sounds confusing, but hopefully this will become more clear. As we’ve been going through all the Google products, one thing that frustrates me is that to get to many of the cool tools, I have to drill down through the menus in Google. Like to get to the Google Labs, I have to go to Google, then to More and then to Labs, and THEN i can see the good stuff. I know, I could have a big pile of Google related bookmarks (which I do) but what if it could be easier?
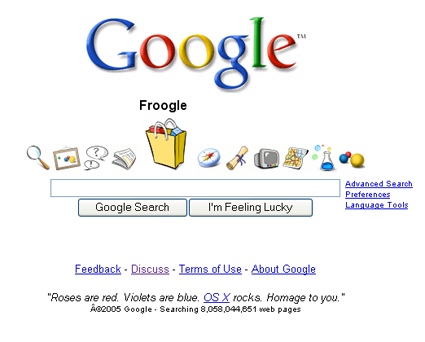
Enter Google X, written by Chikai Ohazama of Google, some time in 2005. Google X works like regular Google, but you also get a Mac OSX-like dock of Google tools in which to search. Above the normal search field you’ll see a magnifying glass for regular search, a picture frame to search images, some cartoon speech bubbles for Google groups, a newspaper for News, a shopping bag for Froogle, a compass for Google Local, a diploma for Scholoar, a tv for Google Video, a map for duh…Google Maps, a chemistry flask to get to the Labs, and three globby looking colored balls that get you to More Google products. Each of these icons gets bigger as you hover over it, just like in the Apple dock. In case one is confused about the genesis of this look, at the bottom it says “Roses are red. Violets are blue. OS X rocks. Homage to you.”
Now I started by saying it’s Google, but not really Google. This site was developed by this guy from Google, but it was pulled from Google. I’m not sure I understand this though, because then someone mirrored it so you can still use it. Googlex is at theplaceforitall.com/googlex, and it’s fully functional. I put a link in the shownotes to Elliot Back’s blog where there’s a letter from the developer explaining how he developed it and how fun he thinks it is that it’s still in use, pretty interesting. In any case, whether it’s real Google or not, live Google or archived Google, it’s a useful site to get to the Google tools more quickly than ever! Oh, and just to confuse you more, there’s also Googlex2, which looks EXACTLY like googlex, except the animation of the dock-like icons is really jerky. No need to put the link to THAT one in the notes!
Google Mobile
I’m starting to think that this testing out new applications thing is a real sickness. I know, you’re thinking “she’s just figuring this out???” I was driving home on Friday and I stopped at a stoplight and downloaded and installed a bunch of applications on my Blackberry! These apps are so cool – I have Google search, Google Maps, Gmail, Google News and Google SMS on my Blackberry now! I had Google Maps before, even with the satellite image option, but now they have added real time traffic to it! I used it on Saturday to see a nice red line representing the traffic I was stopped in, not sure why that was comforting but it made me happy. I’ve enjoyed Google News on the Mac for reading tech news of course, so having it on the mobile will be fun for long road trips. I don’t have any buddies on Google SMS, so that one won’t be too useful. By the way, Google Mobile isn’t just for Blackberries, but I couldn’t find a list of devices it works on, so if this sounds like what you “need” on your mobile phone, just go over to mobile.google.com and see if it installs.
Galerie
I’ve done a couple of reviews here on tools that help you create web galleries, and they’re great fun. jAlbum is hard to beat for usability, flexibility, and price (it’s free). Even though i’ve got a great solution in jAlbum, I couldn’t resist testing out a free Universal Mac application called Galerie (spell) from myriad-online.com, because it generates media gallery web pages from iPhoto, GraphicConverter, iView MediaPro, Extensis Portfolio 7 or from any set of pictures and/or QuickTime media files. Tight integration into these tools could make this really useful, I use all of those tools except Extensis.
When you first download Galerie, it gives you two things – the application itself, and also the folder of Galerie templates. The readme says to put it anywhere you want, but when you launch Galerie you need to tell it where you put the templates. Makes sense I guess, but that extra flexibility in placement seemed unecessary to me, why not just put it somewhere for me?
Galerie’s interface is very very intuitive, I was able to jump in and start playing right off the bat without reading a darn thing. The main screen has most of what you’d want – you name the main page (which is frequently a buried option in tools like this), then define the max size of the thumbnails and the number of rows and columns, and give the max size in pixels of the big images. You can toggle on the title, date or comment for the thumbnails and separately for the pictures themselves. The title is the title of the photo, so if you don’t title your photos this will be kind of goofy, like DCSN605 and stuff like that.
The templates are available in a drop down, or in the Window menu you can see thumbnails of how each of them look. That Window menu is chock full of fun stuff, you can see a preview of how the images will look in the web gallery when you’re done, and advance through each picture to see if you’ll like it before you generate all the html to make it work. I almost forgot to tell you how to actually tell Galerie what pictures you want to use! This is the only part of Galerie that’s not REALLY intuitive – there’s a little image in the very top of the main screen that’s a picture of a baby. it has a 0 to the right of it, and a big clear button next to it. You drag images (either from your disk, or from an application like iPhoto or iView) onto the little image of the baby. The number changes to represent the number of images you’ve chosen. I suppose my statement about being unintuitive is mitigated by the fact that it actually says “you can also drag and drop files or folders onto the icon” right next to the picture of the baby!
I tested dragging images from disk, from iPhoto and from iView and all three worked the same. I’m kind of confused about this integration they mentioned – I told it to use iView, but I’m not sure what it accomplished. There’s not suddenly a Galerie option in iView, and dragging from iView is the same as dragging from iPhoto. I suppose I COULD read the help file, but you know I won’t do that, so just quit your dreaming, ok?
I’ve been teasing long enough, time to hit the Generate Gallery at the bottom of the main window. Galerie automatically creates the html just like you would expect. I put up a silly little one of a dog of a friend of ours (his name is Bobo) so you can see how it looks. There’s a link in the shownotes to Bobo. 
Galerie also lets you set up a field to enable visitor feedback on a web page, so I tested it, and it set up a nice little comment box, but with the proliferation of spam on comments I decided to forgo that on my Bobo page!
Galerie lets you publish from within it to your server, which is pretty standard. I don’t tend to use that feature because I’m so comfortable with Transmit as my ftp client – don’t have to re-enter server names and all that nonsense.
After you’ve created your web gallery, you can edit it without having to run the whole thing all over again. You can remove images, add more images, and edit comments. It was much quicker to edit the gallery than to start over when I tested it. This feature is pretty advanced beyond some of the other web gallery options I’ve used, like the one in iView or jAlbum. In this option, if you click on choose images to add, it launches your image viewer (iPhoto, iView, whatever you picked originally) so maybe that’s what that option of defining your image viewer is for.
I’ll definitely be keeping Gallerie around to make web galleries, it’s easy to use, creates beautiful pages, and best of all, it’s free from myriad-online.com.
Democracy
I discovered a new video podcast catching client this week that might be a good substitution for iTunes. It’s called Democracy from getdemocracy.com. I don’t have a lot of issues with iTunes, it works quite well for me most of the time, but I like to keep my eye on what new ideas people come up with – solving problems I didn’t know I had. Democracy is a cross platform tool with versions for Mac OSX, Windows and Linux, and it’s free. Democracy plays an awful lot of formats – Quicktime, WMV, MPEG, AVI, XVID and more. It allows you to subscribe to any video RSS feed, podcast, or video blog. One of the powers of this over iTunes might be the built-in Channel guide, but we’ll have to give that a try before we claim that as a victory.
Democracy allows you to download and save videos from YouTube, Google Video, Yahoo Video, and other sites, which is really cool. One of the things that caught my eye with Democracy is that they support high def and full screen videos. They also support BitTorrent which means you could download more content more quickly and efficiently than through more traditional means. I’ll have to test that out too.
When i first downloaded Democracy, it couldn’t seem to find any of the pre-loaded feeds, which was annoying and I almost dropped it right away, but it turns out I had proxies on and Democracy does not support proxies at this time. Once I got that figured out, it was a whole lot more fun! The interface to Democracy is very bold and attractive, mixes in both the standard apple grey windowing with bright green and blue banners. When it first comes up, there are 5 icons in the upper left – Channel guide, Video Search, My Collection, New Videos and Downloading. below that in the left pane, they have pre-populated it with 3 folders – News and Tech, Entertainment, and High-Def. Below that they give you an example playlist.
Each of the folders opens up to show 3 or 4 podcasts they’ve chosen to get you started. Click on any one of these, and the right hand pane shows you a list of episodes available for download. They do a good job in this window of showing you information about each episode, allowing you to change to column widths to read more or less about the episode. The date is clearly shown along with how big the file is. Remember I mentioned the bright blue and green banners – green means you’ve downloaded it and it’s available for viewing, blue means it’s available for download but you don’t actually have it yet.
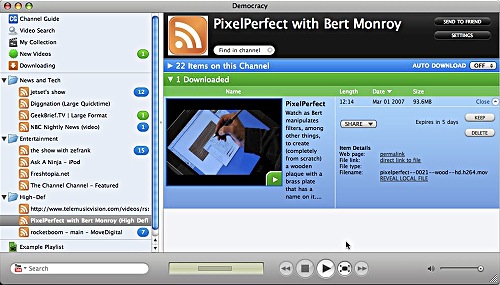
I downloaded an episode of PixelPerfect with Bert Monroy, which is hosted at revision3.com/pixelperfect. The way to find where an episode came from is to click the little details arrow on an episode, and the description expands to include a direct link to the file. In this expanded view or the normal view, you can see a bright green arrow to play the episode. When you hit play, it opens in the Democracy player, but the real fun is when you hit the full screen window. It animates to grow to the size of your screen – VERY pleasing video effect. I know it’s just eye candy but I expanded and collapsed it about 5 times because it made me happy!
This Pixelperfect video was in high-definition and it looked fantastic! It was a demo of how to create a wooden plaque with a brass name plate on it in Photoshop, very cool! when the episode is playing, you get some options to keep, delete or star the video. I wasn’t sure what the star meant, so I clicked it, and it launched my browser and tried to get me to create a user account at videobomb.com, which evidently is a site that allows you to “bomb” a video through the Democracy Player. This has to be the worst naming convention they could come up with, evidently “bomb” is a good thing. In the US, there’s two uses of the term, if you say a movie bombed, that means it did very badly. Then again if you say “it was the bomb”, that meant it was really good. I thought this site was going to be to pan a video or say it was lame, but it’s actually supposed to be like digging it. One thing that bothered me a lot when i looked at videobomb was that well over half of the videos it had on the front page were sex related. not exactly what I was looking for, so I think I’ll stay away from that star thing.
You can also click a share button on a video and email it to a friend, post it to del.icio.us, digg or reddit. Emailing wasn’t clear how it worked – I was wondering if it actually sent the video itself or a link to download it, I sure hope it’s the latter since these files are HUGE! The 12 minute video on making wood in photoshop was 98MB.
down in the bottom left, there’s a search field where you can find videos on YouTube, Google Video and a bunch of other sites. I did a search in YouTube for a video we posted recently of my son Kyle winning 4×400 relay race in track (I’ll put a link in the shownotes to Kyle’s race as I’m SURE you’ll want to go see it!) and it found it immediately and I was able to download it and watch it inside Democracy.
I should mention one drawback to Democracy over iTunes – it doesn’t remember where you were if you stop playing a video. I was halfway thorugh watching the wood creation in Photoshop when my husband asked me a question. I hit stop and when I hit play again the darn thing started over! Just to be sure the podcaster had remembered to check the box that says “remember playback position”, I subscribed to the same podcast in iTunes and it handled this perfectly – remembered where I was. I sure hope they fix that in a future release, it’s release 0.9.5.1 right now so maybe it’s coming in the final 1.0 release.
Next I took a look at the channel guide – it said there are 1000 channels to choose from. A very iTunes-ish view opened up (and took almost as long as the itunes store to open). It has channels by category, new channels, today’s most popoular, and a search field. Of course I clicked on technology in the categories, (you didn’t think I’d click on sports or politics, did you?) The screen only changed one little section to show 4 tech podcasts, which was lame, but there was a button to see more technology, and when I hit that I got 16 on the page and an option to look at 16 more pages. They really need to add more filtering here, there are thousands of tech podcasts, you have to be able to filter down to the category you’re interested to make the information valuable to the user.
I should mention that when Democracy first opens it offers to bring in all of the movies you have on your computer, or just the ones in your Movies folder. these movies, and the ones you download all become part of My Collections. Think of it as your Library in iTunes or iPhoto terminology. Creating playlists is identical to iTunes, so I won’t go into detail. A big difference with Democracy is that your videos are not represented just by their name, but a big image of the beginning of the movie. Oddly the display size of the movie is direclty related to the video size of the movie – the high def and Youtube videos I downloaded were 230 pixels wide, while a video I downloaded from my digital camera was only 100 pixels wide, and an episode of Geek Brief TV I downloaded was just as small. In any case, it’s really nice to see the videos this way because you can easily distinguish them.
Syncing with your iPod is obviously not available with Democracy, so that’s a downside, but I tend to watch a lot more video on my laptop than I do on my iPod. I like Democracy, the interface is beautiful and intuitive, the downloads are fast and painless, and I give it a definite thumbs up. If they add the ability to return to where you stopped listening, it will be perfect!
As a quick aside, I wanted to re-mention a couple of tools I’ve reviewed recently because they came in very handy during the writeup of the Democracy review. When I realized I wanted to describe the different sizes of the videos, all i did was pop up FreeRulers from pascal.com/software/freeruler to measure them on screen. SO EASy, compared to what i would have done before Bart turned me onto this tool – I probably would have done a screen snapshot of the video image, opened it in Photoshop Elements, and pulled down to Image–>Image Size–>Resize Image, and then read them off the screen. Instead, I popped open FreeRulers using Quicksilver with a keystroke, slid them over to the image and read it off the screen. So sweet! The other tool I used was the very beta Chocoflop from chocoflop.com/. I wanted to resize an image for the show notes that was too big (I had measured it with FreeRulers to see that it was too big for the site), and I opened it in Photoshop Elements. while I was waiting for Photoshop Elements to OPEN, I was able to launch Chocoflop, resize the image and save it….all before PSE even opened the image! I’m in love with Chocoflop, can’t wait till he gets the color part fixed so I can use it with my photographs. For now it’s perfect for screen shots I need to manipulate!
InstantShot!
My new favorite Podcast is Mac Break Weekly with Leo LaPorte, Alex Lindsay, Merlin Mann, Scott Bourne, John Foster, and Andy Ihnatk. the two funniest people on there together are Merlin Mann and Alex Lindsay. these guys sort of talk about some Mac stuff, but mostly they go down rat holes. they went down rat holes so often the actually had a rathole song – maybe it was more of a single chord. ANYWAY, every once in a while they make it out of the rat holes and talk about some actual Mac stuff. they each do a software pick of the week, and this week Scott Bourne told about a great freeware Mac menu bar app called InstantShot! from projects.digitalwaters.net.
The problem this application solves is finding yet an even quicker, more flexible way to take screen snapshots. I don’t know if this is a big deal for you, but I am ALWAYS taking screen snapshots. I do a ton of them for the Podcast shownotes to show you menus or screens that are interesting in a tool, but I also use them to explain things in emails or instant messaging sessions. this is a real example of a picture is worth a thousand years! If you write any kind of documentation, it’s so much more powerful if you can have screen snapshots in it so people can really see what you’re talking about and follow along on their own application. One thing i also love to do is take screen snapshots of Windows applications, which works for me with a Mac screenshot utility because I run Windows in Parallels so it’s actually running inside Mac OSX.
Enough about why we need these tools, the real question is aren’t there enough ways to do this already? Apple has built into OSX some nice screen snapshot tools, but they require you to remember some pretty bizarre keystrokes. While I seem to be able to remember them like some kind of idiot savant because I can’t even remember my best friend’s name, not everyone is so lucky. For some reason command-shift-option-4 and spacebar to capture a window is just second nature to me. I also use SnapZPro from ambrosiasw.com which is great for also capturing video of the screen, but it’s pretty expensive at nearly $70. And it’s great because I get to use command-shift-option-3 and double click to get a window shot! Again, probably not for everyone.
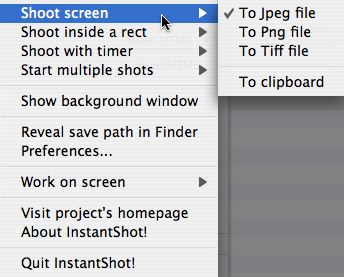 So how about a freeware app that gives you lots of flexibility without having to memorize any commands? That might be the ticket, so that’s why Scott recommends InstantShot! He said his Aunt Faye uses it, and she’s 88 years old, so that’s his test for an easy application. I downloaded and installed InstantShot! and it launched in the menu bar with a little scissors icon. the menu for InstantShot! dedicates the first four spots to the main things you want to do with it. You have shoot screen, which records the entire screen, and shoot rectangle, which defaults to the window you have in front. It tells you this by putting an orange border around the window, and that orange border moves to any window you hover over.
Before I go any further, I want to wander to the preferences because that’s what really made me happy with InstantShot!. In the General tab you can set the path for saving, which is really sweet – most of these things just glop it all onto your desktop. When i’m writing the ‘cast, I’d really like them to go to this week’s episode folder, so this makes it easy to change each week. easier than moving each file I create. In this tab you can also set the prefix for the name if you want one (they suggest “ishot-“) and you can even have it imbed the time or date or both by puttin gin :d or :t in the prefix field. Very nice. You can also set the jpeg quality in this tab.
Have you ever done a screen shot only to realize something really goofy was in the background that got cropped into the image? InstantShot! takes care of that too. In the pulldown menu you’ll see “show background window”, and this sets the whole background to a single color. You choose the color for the background in the general tab of the preferneces, and you can have it hide either just the wallpaper if that’s distracting, or even hide the whole desktop if you’ve got icons cluttering it up. My desktop is kind of a mess, so hiding the whole thing is the option I like.
The advanced tab has a bunch more great options to set – my favorites was to confirm filename for each capture because I like to name the pics as I’m creating them, so I don’t have to do that later. I also liked the choice to constrain the images width and height to a specific number of pixels. My website can accomodate up to 500 pixels wide before the images start to hang over the edge, so I set the constraint to 500 pixels and ran some tests, and sure enough it scaled down the images for me without any distortion. this means i won’t need to check with FreeRulers and then open in Chocoflop to resize if they’re too big while waiting for PSE to come up!
I should mention that InstantShot! supports multiple shots and timed shots. I’m not sure multiple shots is something I’ll need so much, but the idea is that you set it to take a full screen snapshot every 5 seconds (or whatever interval you prefer) and then I guess you mess around on your desktop and then wait for it to take the next shot. I don’t think this is something that solves a problem for me, but perhaps you’ve got a use for it. Let me know if you do, I’d be curious why this would be useful. InstantShot! also supports timed images, with a default of 5 seconds after you ask for it, it takes a shot of your entire screen. I’ve definitely needed that before, when there’s something tricky you need to set up before you can take the shot. You can do a rectangle shot too with this option.
the last tab is for Hotkeys, so if you’re an idiot savant on the hot key thing, you can set it up to shoot the whole screen, shoot inside a rectangle, and a whole slew of other things using hot keys. for normal people, you can simply pull down on the menu bar app icon and select shoot screen, shoot inside a rectangle, shoot with timer, or start multiple shots. If you want to change the format of your snapshots, you can do it right there, pull to the right on any of those four options and you can change it from the default jpeg format to png, tiff, or even send it to the clipboard which is often handy if you’re just going to paste it into an email or an instruction manual, why keep a copy of the screen shot on your disk?
If you forget where your screen shots are going, you can see “reveal save path in finder” in the menu too, very handy for those of us with no memory for THAT kind of thing. Another problem with most screen shot applications is that I have a bad habit of leaving my cursor on the screen where I take the picture. While sometimes you do want to be pointing at something, most of the time I don’t want that, and the default for InstantShot! is that the cursor’s image is not included even if you leave it right smack dab in the middle of the area being snapped. In the Advanced tab of the preferences you can choose to add the cursor’s image, so you have that flexibility. On the System tab you choose to have InstantShot! start at login, which I clicked right away because this kind of app is something I use all day long, I’ll want it already up when I get started! I give InstantShot! from projects.digitalwaters.net a 100% approval rating, I’ll definitely be using this tool all the time.
Time to wind up this Daylight Savings Time episode of the Nosillacast, i sure hope you learned something today, or at least heard a mistake so you can go post it over on the forums at podfeet.com/forums_bbpress! Shoot me an email if you have any questions or comments at [email protected], or better yet a voice recording at [email protected]. Nice talking to you today, thanks for listening, and stay subscribed.